2018 MERCEDES-BENZ GLS SUV lights
[x] Cancel search: lightsPage 216 of 398
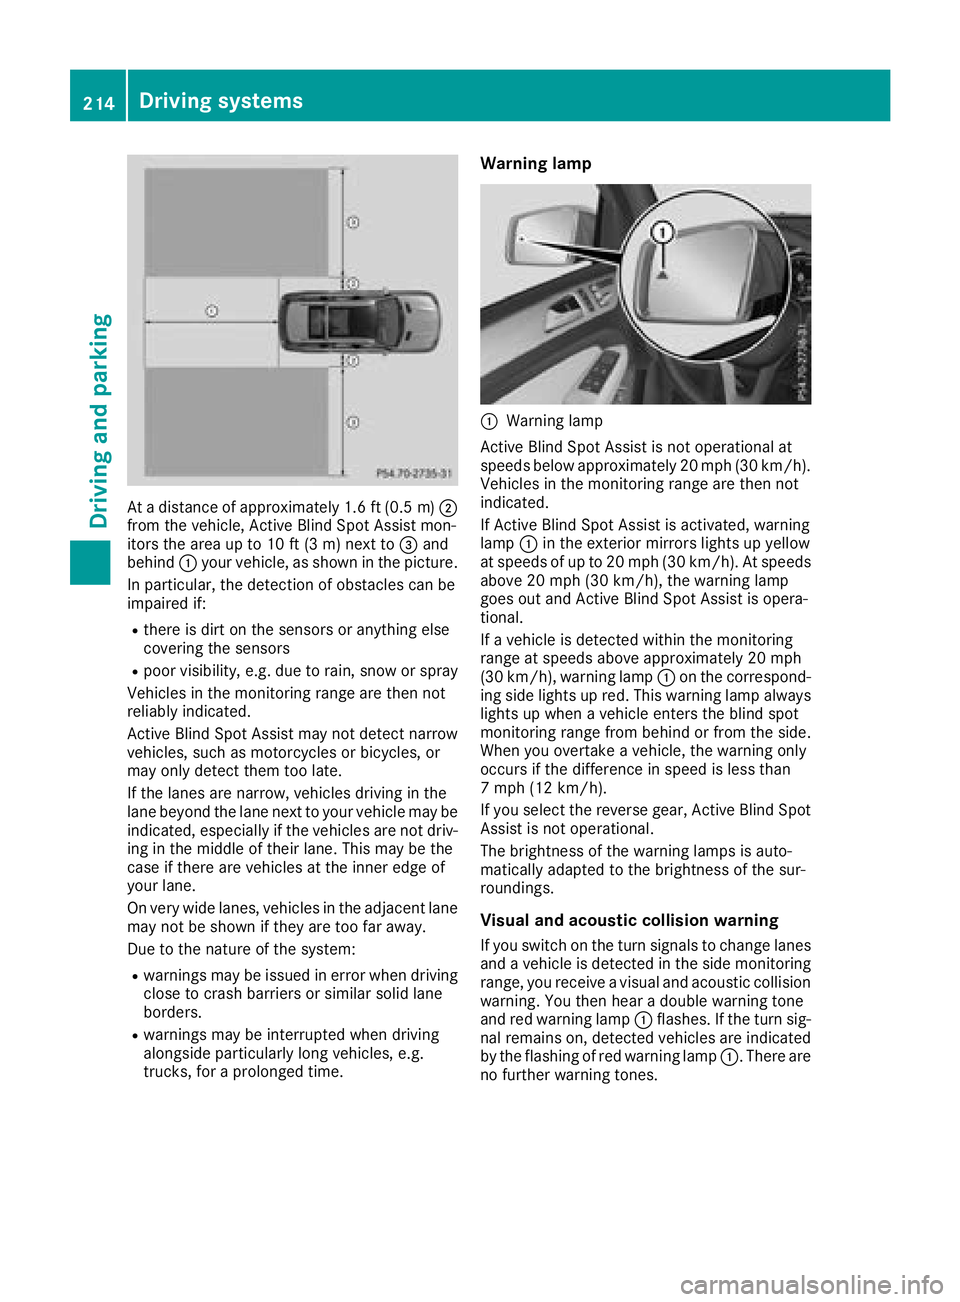
At a distance of approximately 1.6 ft (0.5m);
from the vehicle, Active Blind Spot Assist mon-
itors the area up to 10 ft (3 m) next to =and
behind :your vehicle, as shown in the picture.
In particular, the detection of obstacles can be
impaired if:
Rthere is dirt on the sensors or anything else
covering the sensors
Rpoor visibility, e.g. due to rain, snow or spray
Vehicles in the monitoring range are then not
reliably indicated.
Active Blind Spot Assist may not detect narrow
vehicles, such as motorcycles or bicycles, or
may only detect them too late.
If the lanes are narrow, vehicles driving in the
lane beyond the lane next to your vehicle may be
indicated, especially if the vehicles are not driv- ing in the middle of their lane. This may be the
case if there are vehicles at the inner edge of
your lane.
On very wide lanes, vehicles in the adjacent lane
may not be shown if they are too far away.
Due to the nature of the system:
Rwarnings may be issued in error when driving
close to crash barriers or similar solid lane
borders.
Rwarnings may be interrupted when driving
alongside particularly long vehicles, e.g.
trucks, for a prolonged time.
Warning lamp
:Warning lamp
Active Blind Spot Assist is not operational at
speeds below approximately 20 mph (30 km/h).
Vehicles in the monitoring range are then not
indicated.
If Active Blind Spot Assist is activated, warning
lamp :in the exterior mirrors lights up yellow
at speeds of up to 20 mph (30 km/h). At speeds
above 20 mph (30 km/h), the warning lamp
goes out and Active Blind Spot Assist is opera-
tional.
If a vehicle is detected within the monitoring
range at speeds above approximately 20 mph
(30 km/h), warning lamp :on the correspond-
ing side lights up red. This warning lamp always
lights up when a vehicle enters the blind spot
monitoring range from behind or from the side.
When you overtake a vehicle, the warning only
occurs if the difference in speed is less than
7 mph (12 km/h).
If you select the reverse gear, Active Blind Spot
Assist is not operational.
The brightness of the warning lamps is auto-
matically adapted to the brightness of the sur-
roundings.
Visual and acoustic collision warning
If you switch on the turn signals to change lanes
and a vehicle is detected in the side monitoring
range, you receive a visual and acoustic collision
warning. You then hear a double warning tone
and red warning lamp :flashes. If the turn sig-
nal remains on, detected vehicles are indicated
by the flashing of red warning lamp :. There are
no further warning tones.
214Driving systems
Driving and parking
Page 217 of 398
Course-correcting brake application
If Active Blind Spot Assist detects a risk of a lat-
eral collision in the monitoring range, a course-
correcting brake application is carried out. This
is meant to assist you in avoiding a collision.
GWARNING
A course-correcting brake application cannot always prevent a collision. There is a risk of an
accident.
Always steer, brake or accelerate yourself,
especially if Active Blind Spot Assist warns
you or makes a course-correcting brake appli-
cation. Always maintain a safe distance at the
sides.
If a course-correcting brake application occurs,
red warning lamp :flashes in the exterior mir-
ror and a double warning tone sounds. In addi-
tion, a display underlining the danger of a side
collision appears in the multifunction display.
In very rare cases, the system may make an
inappropriate brake application. A course-cor-
recting brake application may be interrupted at
any time by countersteering slightly or acceler-
ating.
The course-correcting brake application is avail-
able in the speed range between 20 mph
(30 km/h) and 120 mph (200km/ h).
Either no braking application, or a course-cor-
recting brake application adapted to the driving situation occurs if:
Rthere are vehicles or obstacles, e.g. crash
barriers, located on both sides of your vehicle.
Ra vehicle approaches you too closely at the
side.
Ryou have adopted a sporty driving style with
high cornering speeds.
Ryou clearly brake or accelerate.
Ra driving safety system intervenes, e.g. ESP®
or PRE-SAFE®Brake.
RESP®is switched off.
Rthe offroad program is activated (vehicles
without the Offroad Engineering package).
Rthe Offroad or Offroad Plus drive program is
activated (vehicles with the Off-Road Engi-
neering package).
Rthe LOW RANGE offroad gear is activated
(vehicles with the Offroad Engineering pack-
age).
Ra loss of tire pressure or a defective tire is
detected.
Switching on Active Blind Spot Assist
XMake sure that Active Blind Spot Assist
(Ypage 242) is activated in the on-board
computer.
XTurn the SmartKey to position 2in the igni-
tion lock.
Warning lamps :in the exterior mirrors light
up red for approximately 1.5 seconds and
then turn yellow.
Towing a trailer
When you attach a trailer, make sure you have
correctly established the electrical connection.
This can be accomplished by checking the trailer
lighting. Active Blind Spot Assist is then deacti-
vated. The indicator lamp lights up yellow in the
exterior mirrors and the Active Blind Spot
Asst. Not Available When Towing aTrailer See Operator's Manualmessage
appears in the multifunction display.
Active Lane Keeping Assist
General notes
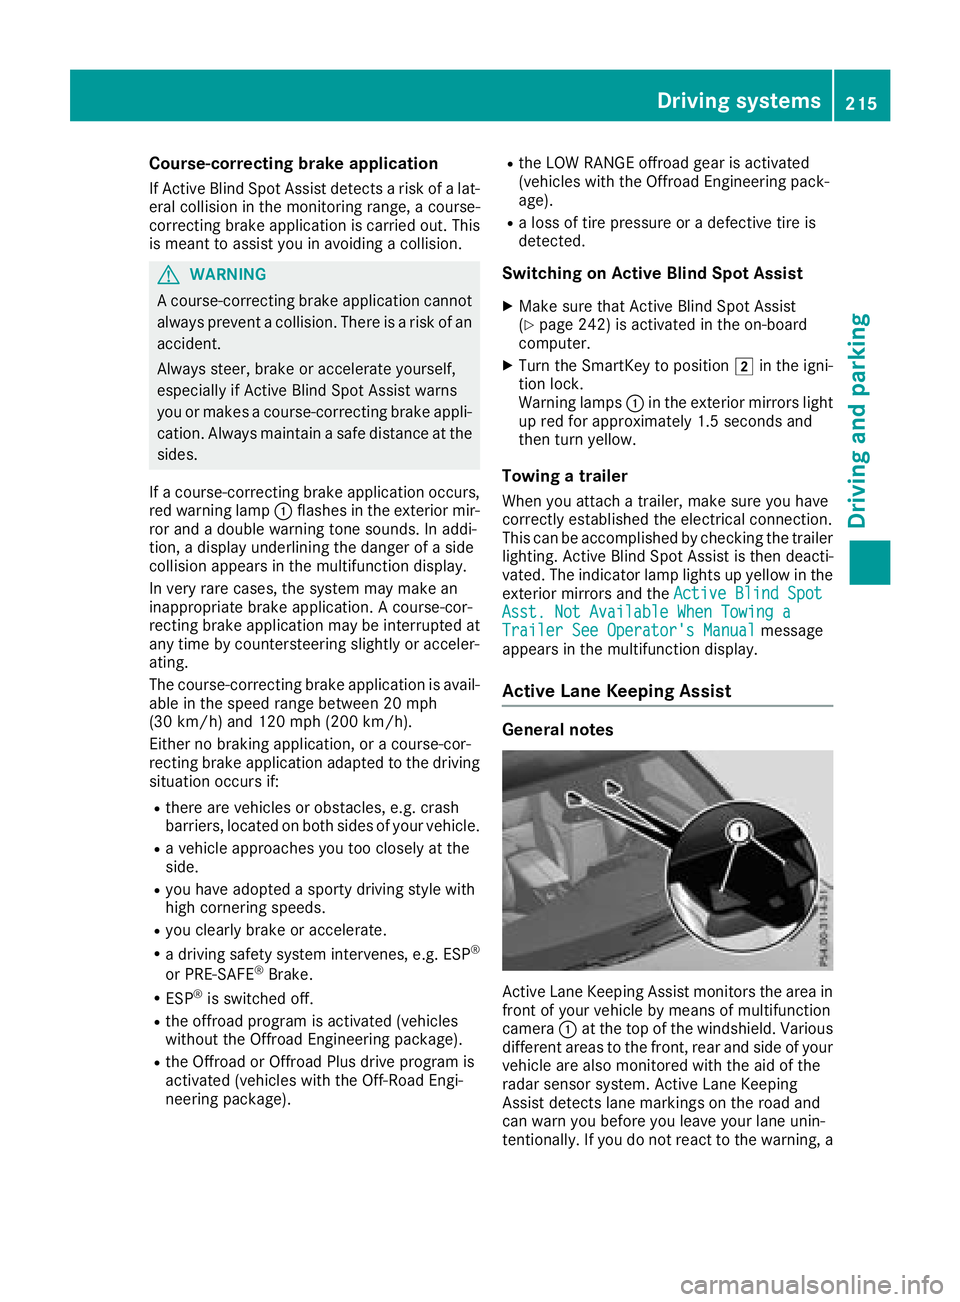
Active Lane Keeping Assist monitors the area in
front of your vehicle by means of multifunction
camera :at the top of the windshield. Various
different areas to the front, rear and side of your
vehicle are also monitored with the aid of the
radar sensor system. Active Lane Keeping
Assist detects lane markings on the road and
can warn you before you leave your lane unin-
tentionally. If you do not react to the warning, a
Driving system s215
Driving an d parking
Z
Page 221 of 398

Activating DSR
XPress button:.
Indicato rlamp ;lights up.
The à DSRsymbol appear sin th emulti-
function display.
You can only activat eDS Rwhen driving at
speeds below 25 mph (40 km/h).
If th ecurren tvehicl espee dis to ohigh ,th eÃ
DS Rsymbol appear sin th emultifunction display
wit hth eMax .speed 25 mph
message (Can -
ada: 40 km/ h).
If you have activated DS Rand you chang eth e
driv eprogram ,DS Ris deactivated. If you switch
between th eoffroad and offroad plus driv epro -
grams, DS Rremains activated.
Deactivating DSR
XPress butto n:.
Indicato rlamp ;goes out .
The à DSRsymbol appear sin th emulti-
function display wit hth eOff
message .
On vehicles wit hth e Off road Engineering pack-
age, if you select adifferent driv eprogram ,DS R
is also deactivated. If you switch between th e
Off road programs, DS Rremains activated.
DS Rswitches off automatically if you driv e
faste rthan 28 mph (Canada: 45 km/h). The
à DSRsymbol appear sin th emultifunction
display wit hth eOff
message .The status indi-
cator in th emultifunction display goes out .You
also hear awarning . Onvehicles wit hth e Off-
road Engineering package, if you select adiffer-
en tonroad/offroad program ,DS Ris also deac -
tivated.
Changing the set speed
XTo increase or reduce th eset speed in
1 mp hincrement s(Canada: 1km/h
increments): briefly press th ecruise control
leve rup : for ahigher set spee dor down ;
for alower set speed.
The set spee dappear sin th emultifunction
display wit hth eà DSRsymbol.
When DS Ris activated, you can chang eth eset
spee dto avalue between 1mph and 11 mph
(Canada: between 2km/h and 18 km/h).
iThe DS Rset spee dis always changed in
1 mph increments (Canada: 1km/h incre-
ments). This is regardless of whether you
press th ecruise control leve rto or beyon dth e
pressur epoint.
Off-road program (vehicles without the
Off-Road Engineering package)
General notes
Selec tth eOff roa dprogram for easil ynegotia-
ble off-road terrain, e.g. dirt tracks, gravel or
sandy surfaces. The engine's torque is restric-
te dto alimited degree and th edriv ewheels can
spin .The spinnin gwheels produce acuttin g
effect for bette rtraction .ABS, ES P
®and 4ETS
program sespecially adapted to off-road driving
are activated. Agentle accelerato rpedal curve
is also selected, i.e .th eaccelerato rpedal must
be depressed muc hfurther in order to acceler -
ate .
You can select th eOff roa ddriv eprogram at
speeds below 60 mph (96 km/h). The Drive
program"Offroad" Max .Speed 60 mphmessage appear sin th emultifunction display. If
you driv eat speeds of mor ethan 60 mph
(96 km/ h)and select the Offroaddrive pro-
gram, the Drive More Slowly
message
Driving systems219
Driving and parking
Z
Page 222 of 398

appears in the multifunction display. The last
active drive program is selected again.
Do not use theOffroadprogram on roads that
are snow-covered or icy or if you have installed
your vehicle with snow chains.
Selecting the Offroad program
Selecting the Offroad program
XTo select drive program: turn DYNAMIC
SELECT controller :until indicator lamp ;
lights up.
The Drive Program "Offroad1" Max.
Speed 60 mphmessage appears in the mul-
tifunction display.
The vehicle is raised by +2.4 in (60 mm).
The vehicle is lowered to normal level again if
you:
Rdrive at speeds above 37 mph (60 km/h) (all
vehicles except Mercedes-AMG vehicles)
Rdrive at speeds above 43 mph (70 km/h)
(Mercedes-AMG vehicles)
Rdrive at speeds between 40 mph (64 km/h)
and 43 mph (70 km/h) for approximately
20 seconds (Mercedes-AMG vehicles)
The vehicle changes from the Offroaddrive pro-
gram to the Comfortdrive program if you drive
faster than 70 mph (112 km/h).
The Drive More Slowly
message appears in
the multifunction display.
Further information about "Driving off-road"
(
Ypage 170).
Off-road programs (vehicles with Off-
Road Engineering package)
General notes
The Offroad andOffroad Plus drive programs
assist you when driving off-road. The engine's
performance characteristics and the gearshift-
ing characteristics of the automatic transmis-
sion are adapted for this purpose. ABS, ESP
®
and 4ETS programs especially adapted to off-
road driving are activated. An accelerator pedal
curve suitable for the terrain is selected, i.e. the
accelerator pedal must be depressed further to
accelerate.
Do not use the OffroadorOffroad Plus drive
programs on roads that are snow-covered or icy,
or if you have installed your vehicle with snow
chains.
Offroad drive program
:DYNAMIC SELECT controller
;Offroad program indicator lamp
Select the Offroadprogram for easily negotia-
ble off-road terrain, e.g. dirt tracks, gravel or
sandy surfaces. The engine's torque is restric-
ted to a limited degree and the drive wheels can
spin. The spinning wheels produce a cutting
effect for better traction. ABS, ESP
®and 4ETS
programs especially adapted to off-road driving are activated. A gentle accelerator pedal curve
is also selected, i.e. the accelerator pedal must
be depressed much further in order to acceler-
ate.
You can select the Offroaddrive program at
speeds below 60 mph (96 km/h). The Drive
Program "Offroad" Max. Speed 60 mphmessage appears in the multifunction display. If
you drive at speeds above 60 mph(96 km/h)
and select the Offroaddrive program, the
Drive More Slowly
message appears in the
220Driving systems
Driving and parking
Page 223 of 398

multifunction display. The last active drive pro-
gram is selected again.
Selecting the Offroad program
XTo select a drive program: turn DYNAMIC
SELECT controller:until indicator lamp ;
lights up.
The Drive program "Offroad" Max.
speed 60 mphmessage appears in the mul-
tifunction display.
The vehicle is raised by +1.2 in (30 mm).
The vehicle changes from the Offroaddrive pro-
gram to the Comfortdrive program if you drive
faster than 70 mph (112 km/h).
The Drive more slowly
message appears in
the multifunction display.
Offroad Plus drive program
:DYNAMIC SELECT controller
;Offroad Plus drive program indicator lamp
Select the Offroad Plus drive program for rough
terrain, e.g. for steep and/or uneven terrain or
for driving on rocky terrain.
Your vehicle has an automatically activated dif-
ferential lock for the transfer case. It controls
the balance between the front and rear axles.
The differential lock improves the vehicle's trac-
tion. 4ETS (
Ypage 70) controls the balance
between both wheels on an axle.
Selecting the Offroad Plus drive program
XTo select drive program: turn DYNAMIC
SELECT controller :until indicator lamp ;
lights up.
The Drive program "Offroad Plus"
Max.speed25mphmessage appears in the
multifunction display.
RThe Offroad Plus program is selected and
the vehicle is raised by +1.2 in (30 mm)
compared with the Offroaddrive program.
RDSR is switched on.
RThe differential lock is closed.
You can select the Offroad Plus drive program at
speeds below 25 mph (40 km/h).
The Offroad Plus drive program automatically
switches to the Offroad drive program if you
drive faster than 30 mph (45 km/h). The Drive
more slowlymessage appears in the multi-
function display.
Further information about "Driving off-road"
(
Ypage 170).
LOW RANGE off-road gear (vehicles
with the Off-Road Engineering package)
Important safety notes
GWARNING
If you select the LOW RANGE off-road gear on
a slippery road surface, the wheels could lose traction:
Rif you remove your foot from the accelera-
tor pedal when driving
Rif off road ABS intervenes when braking
If the wheels lose traction. the vehicle can no
longer be steered. There is an increased dan-
ger of skidding and accidents.
Never select the LOW RANGE off-road gear
when driving on slippery road surfaces.
GWARNING
If you do not wait for the transfer case gear
change process to complete, the transfer
case could remain in the neutral position. The power transmission to the driven wheels is
then interrupted. There is a danger of the
vehicle rolling away unintentionally. There is a
risk of an accident.
Wait until the transfer case shift process is
completed.
Do not turn off the engine while changing gear
and do not shift the automatic transmission to
another position.
Driving systems221
Driving and parking
Z
Page 224 of 398
General notes
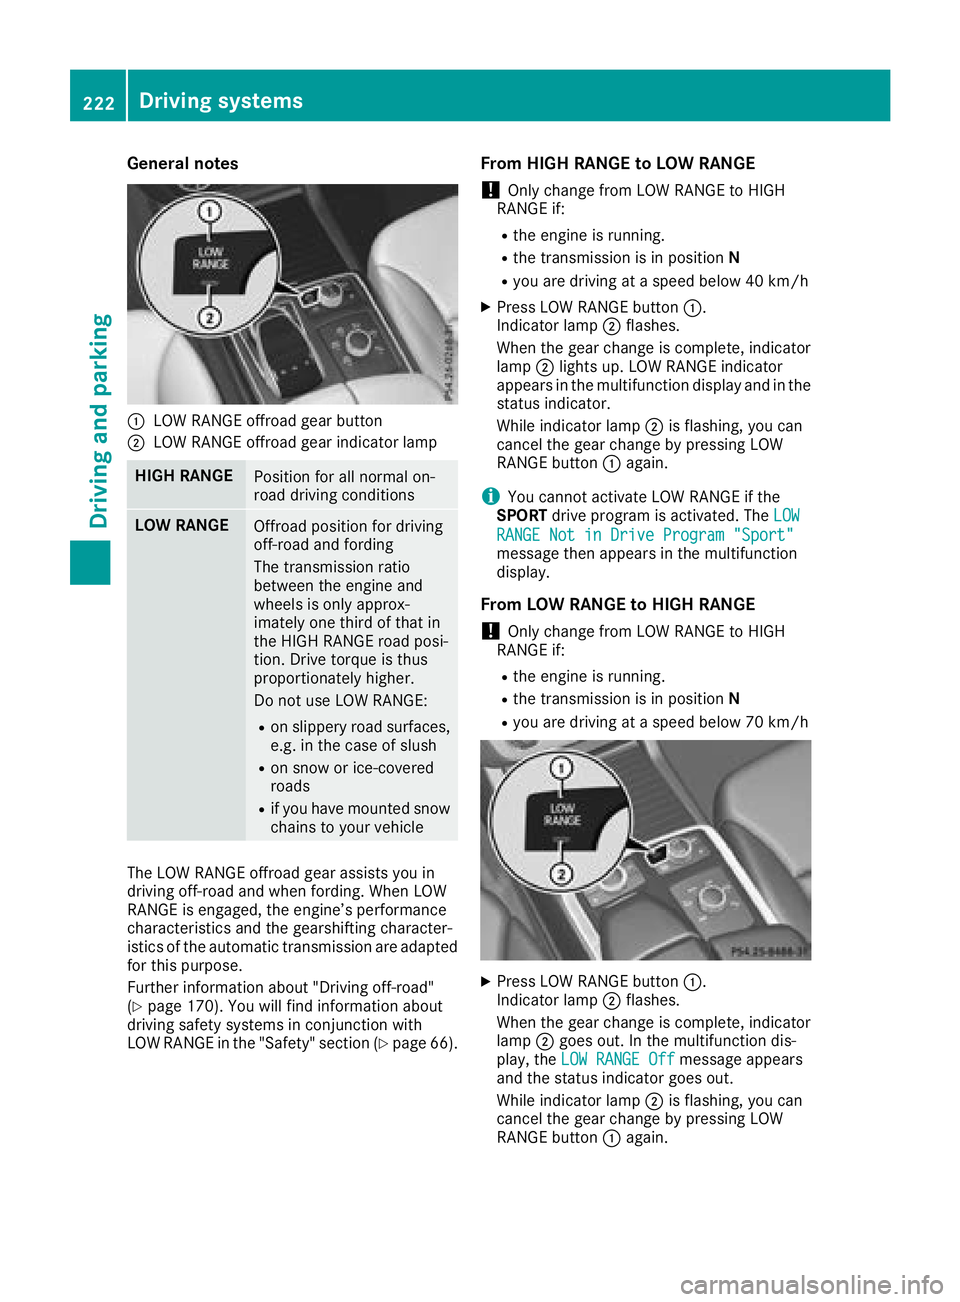
:LOW RANGE offroad gear button
;LOW RANGE offroad gear indicator lamp
HIGH RANGEPosition for all normal on-
road driving conditions
LOW RANGEOffroad position for driving
off-road and fording
The transmission ratio
between the engine and
wheels is only approx-
imately one third of that in
the HIGH RANGE road posi-
tion. Drive torque is thus
proportionately higher.
Do not use LOW RANGE:
Ron slippery road surfaces,
e.g. in the case of slush
Ron snow or ice-covered
roads
Rif you have mounted snow
chains to your vehicle
The LOW RANGE offroad gear assists you in
driving off-road and when fording. When LOW
RANGE is engaged, the engine’s performance
characteristics and the gearshifting character-
istics of the automatic transmission are adapted
for this purpose.
Further information about "Driving off-road"
(
Ypage 170). You will find information about
driving safety systems in conjunction with
LOW RANGE in the "Safety" section (
Ypage 66).
From HIGH RANGE to LOW RANGE
!Only change from LOW RANGE to HIGH
RANGE if:
Rthe engine is running.
Rthe transmission is in position N
Ryou are driving at a speed below 40 km/h
XPress LOW RANGE button:.
Indicator lamp ;flashes.
When the gear change is complete, indicator
lamp ;lights up. LOW RANGE indicator
appears in the multifunction display and in the
status indicator.
While indicator lamp ;is flashing, you can
cancel the gear change by pressing LOW
RANGE button :again.
iYou cannot activate LOW RANGE if the
SPORT drive program is activated. The LOW
RANGE Not in Drive Program "Sport"message then appears in the multifunction
display.
From LOW RANGE to HIGH RANGE
!Only change from LOW RANGE to HIGH
RANGE if:
Rthe engine is running.
Rthe transmission is in position N
Ryou are driving at a speed below 70 km/h
XPress LOW RANGE button:.
Indicator lamp ;flashes.
When the gear change is complete, indicator
lamp ;goes out. In the multifunction dis-
play, the LOW RANGE Off
message appears
and the status indicator goes out.
While indicator lamp ;is flashing, you can
cancel the gear change by pressing LOW
RANGE button :again.
222Driving systems
Driving and parking
Page 230 of 398
Most U.S. states and all Canadian provinces
require by law:
RSafety chains between the towing vehicle and
the trailer. The chains should be cross-wound
under the trailer drawbar. They must be fas-
tened to the vehicle's trailer coupling, not to
the bumper or the axle.
Leave enough play in the chains to make tight
cornering possible.
RA separate brake system for certain types of
trailer.
RSafety switch for braked trailers. Check the
specific legal requirements applicable to your
state.
If the trailer becomes detached from the tow-
ing vehicle, the safety feature triggers the
trailer brakes.
Towing a trailer
There are numerous legal requirements con-
cerning the towing of a trailer, e.g. speed restric-
tions. Make sure that your car/trailer combina-tion complies with the local regulations:
Rin your place of residence
Rin the location to which you are driving
The police and local authorities can provide reli-
able information.
Observe the following when towing a trailer:
RTo gain driving experience and to become
accustomed to the new handling characteris-
tics, you should practice the following in a
traffic-free location:
-cornering
-stopping
-backing up
RBefore driving, check:
-trailer tow hitch
-safety switch for braked trailers
-safety chains
-electrical connections
-lights
-wheels
RAdjust the exterior mirrors to provide an
unobstructed view of the rear section of the
trailer.
RIf the trailer has electronically controlled
brakes, pull away carefully. Brake manually using the brake controller and check whether
the brakes function correctly.
RSecure any objects on the trailer to prevent
the cargo from slipping when the vehicle is in
motion.
RWhen you couple up a trailer, check at regular
intervals that the load is firmly secured. If the
trailer is equipped with trailer lights and
brakes, check the trailer to ensure that these
are working.
RBear in mind that the handling will be less
stable when towing a trailer than when driving
without one. Avoid sudden steering move-
ments.
RThe vehicle/trailer combination is heavier,
accelerates more slowly, has a decreased
gradient climbing capability and a longer
braking distance.
It is more susceptible to side winds and
requires more careful steering.
RIf possible, do not brake suddenly, but instead
depress the brake pedal moderately at first so
that the trailer can activate its brakes. Then
increase the pressure on the brake pedal.
RIf the automatic transmission repeatedly
shifts between gears on uphill or downhill gra-
dients, shift to a lower gear using the left-hand
steering wheel paddle shifter.
A lower gear and lower speed reduce the risk
of engine failure.
RWhen driving downhill, shift to a lower gear to
utilize the engine's braking effect.
Avoid continuous brake application as this
may overheat the vehicle brakes and, if instal-
led, the trailer brakes.
RIf the coolant temperature increases dramat-
ically while the air-condit ioning system is
switched on, switch off the air-conditioning
system.
Coolant heat can also be dissipated by open-
ing the windows and switching the ventilation blower and the interior temperature to the
highest level.
RWhen overtaking, pay particular attention to
the extended length of your vehicle/trailer
combination.
Due to the length of the vehicle/trailer com-
bination, you require additional road space in
relation to the vehicle you are overtaking
before you can change back to the original
lane.
228Towing a trailer
Driving and parking
Page 245 of 398
Settings menu
Introduction
Depending on the equipment installed in the
vehicle, In the Sett.menu you have the follow-
ing options:
RChanging the instrument cluster settings
(Ypage 243)
RChanging the light settings (Ypage 243)
RChanging the vehicle settings (Ypage 244)
RChanging the convenience settings
(Ypage 244)
RRestoring the factory settings (Ypage 245)
Instrument cluster submenu
Selecting the distance unit
The Display Unit Speedometer / Odome‐ter:function allows you to choose whether
certain displays appear in kilometers or miles in
the multifunction display.
XPress the =or; button on the steering
wheel to select the Sett.menu.
XPress the:or9 button to select the
Instrument Clustersubmenu.
XPress ato confirm.
XPress the :or9 button to select the
Display Unit Speedometer / Odometer
function.
You will see the selected setting: kmormiles.
XPress the abutton to save the setting.
The selected unit of measurement for distance
applies to:
RDigital speedometer in the Tripmenu
ROdometer and the trip odometer
RTrip computer
RCurrent consumption and the range
RNavigation instructions in the Navimenu
RCruise control
RDistance Pilot DISTRONIC
RASSYST PLUS service interval display
Selecting permanent display
ThePermanent Display:function allows you
to choose whether the multifunction display
always shows the outside temperature or the
speed. The speed display is inverse to the speedome-
ter.
XPress the
=or; button on the steering
wheel to select the Sett.menu.
XPress the:or9 button to select the
Instrument Clustersubmenu.
XConfirm by pressing aon the steering
wheel.
XPress the :or9 button to select the
Permanent Display:function.
The current setting, Outside Temperature,
Speedometer [km/h]or Speedometer[mph]appears.
XTo change the setting: pressaagain.
Light submenu
Setting the daytime running lamps
This function is not available in Canada.
XPress the =or; button on the steering
wheel to select the Sett.menu.
XPress the:or9 button to select the
Lightsubmenu.
XPress ato confirm.
XPress :or9 to select the DaytimeRunning Lightsfunction.
If the DaytimeRunningLightsfunction has
been switched on, the cone of light and the
W symbol in the multifunction display are
shown in orange.
XPress the abutton to save the setting.
Further information on daytime running lamps
(
Ypage 115).
Switching the Intelligent Light System
on/off
XPress the =or; button on the steering
wheel to select the Sett.menu.
XPress the:or9 button to select the
Lightsubmenu.
XPress ato confirm.
XPress the :or9 button to select the
Intell. Light Systemfunction.
If the Intell. Light Systemfunction has
been switched on, the cone of light and the
L symbol in the multifunction display are
shown in orange.
XPress the abutton to save the setting.
When you activate Intell. Light System
,
you activate the following functions:
Menus and submenus243
On-board computer and displays
Z