2018 MERCEDES-BENZ GLS SUV washer fluid
[x] Cancel search: washer fluidPage 21 of 398

Seat beltsAdjusting the driver's and front-
passenger seat belt .........................4 8
Adjusting the height ......................... 48
Cleaning ......................................... 336
Correct usage .................................. 47
Fastening ......................................... 48
Important safety guidelines ............. 46
Introduction .....................................4 5
Releasin g ......................................... 48
Switching belt adjustment on/off
(on-board computer) ...................... 244
Warning lamp ................................. 280
Warning lamp (function) ................... 48
Seats
Adjusting (electrically) ..................... 98
Adjusting the 4-way lumbar sup-
port ................................................ 106
Adjusting the head restraint ............ 99
Calling up a stored setting (mem-
ory function) .................................. 114
Cleaning the cover ......................... 336
Entry position (3rd row of seats) .... 103
Exit position (3rd row of seats) ...... 104
Folding down/up (third row of
seats) ............................................. 101
Folding the 2nd row of seats
forward electrically ........................ 105
Folding the 2nd row of seats
forward manually ........................... 103
Folding the rear bench seat for-
wards/back ................................... 303
Important safety notes .................... 97
Overview .......................................... 97
Seat heating problem .................... 108
Seat ventilation problem ................ 108
Storing settings (memory func-
tion) ............................................... 113
Switching seat heating on/off ....... 106
Switching seat ventilation on/off .. 107
Section
Sliding sunroof ................................. 92
Selector lever
Cleaning ......................................... 336
Sensors (cleaning instructions) ....... 334
Service menu (on-board com-
puter) .................................................. 242 Service message
see ASSYST PLUS
Service products
Brake fluid ..................................... 390
Coolant (engine) ............................ 390
DEF special add
itives ..................... 389
Engine oil ....................................... 389
Fuel ................................................ 387
Important safety notes .................. 386
Refrigerant (air-conditioning sys-
tem) ............................................... 391
Washer fluid ................................... 391
Setting the air distribution ............... 133
Setting the airflow ............................ 133
Setting the date/time format
see also Digital Operator's Man-
ual .................................................. 292
Setting the language
see also Digital Operator's Man-
ual .................................................. 292
Setting the time
see also Digital Operator's Man-
ual .................................................. 292
Settings
Factory (on-board computer) ......... 245
On-board computer ....................... 243
SETUP (on-board computer,
Mercedes-AMG vehicles) .................. 246
Side impact air bag ............................. 51
Side marker lamp (display mes-
sage) ................................................... 260
Side windows
Cleaning ......................................... 333
Convenience closing feature ............ 90
Convenience opening feature .......... 90
Hinged side windows ....................... 89
Important safety information ........... 88
Opening/closing .............................. 89
Overview .......................................... 88
Problem (malfunction) ..................... 92
Resetting ......................................... 91
Reversing feature ............................. 89
SIRIUS services
see also Digital Operator's Man-
ual .................................................. 292
Sliding sunroof
Important safety notes .................... 92
Index19
Page 26 of 398

Parking .......................................... 161
Parking for a long period ................164
Pulling away ................................... 143
Raising ...........................................3 76
Reporting problems ......................... 31
Securing from rolling away ............ 375
Towing away .................................. 349
Transporting .................................. 351
Unlocking (in an emergency) ........... 84
Unlocking (SmartKey) ......................7 7
Vehicle data ................................... 392
Vehicle battery
see Battery (vehicle)
Vehicle data ....................................... 392
Vehicle data (off-road driving)
Approach/departure angle ............ 394
Fording depth ................................ 393
Maximum gradient climbing abil-
ity .................................................. 394
Vehicle dimensions ........................... 392
Vehicle emergency locking ................ 84
Vehicle identification number
see VIN
Vehicle identification plate .............. 385
Vehicle level
AIRMATIC ...................................... 190
Vehicle level (display message) ....... 265
Vehicle tool kit .................................. 339
Video
Operating the DVD .........................2 39
see also Digital Operator's Man-
ual ..................................................2 92
VIN ...................................................... 385
Seat ............................................... 386
Type plate ...................................... 385
W
Warning and indicator lamps ABS ................................................ 282
Brakes ...........................................2 81
Coolant .......................................... 288
Distance Pilot DISTRONIC ............. 290
Distance warning ........................... 290
Engine diagnostics ......................... 288
ESP
®.............................................. 284
ESP®OFF ....................................... 285
Fuel tank ........................................ 288 Overview .......................................... 37
Parking brake ................................ 287
PASSENGER AIR BAG ...................... 45
Reserve fuel ................................... 288
Restraint system ............................ 287
Seat belt ........................................ 280
Tire pressure monitor .................... 291
Warranty .............................................. 28
Washer fluid
Display message ............................ 278
Weather display (COMAND)
see also Digital Operator's Man-
ual .................................................. 292
Wheel and tire combinations
Tires ............................................... 379
Wheel bolt tightening torque ........... 378
Wheel chock ...................................... 375
Wheels
Changing a wheel .......................... 374
Checking ........................................ 354
Cleaning ......................................... 333
Emergency spare wheel ................. 380
Important safety notes .................. 354
Information on driving .................... 354
Interchanging/changing ................ 374
Mounting a new wheel ................... 377
Mounting a wheel .......................... 375
Overview ........................................ 354
Removing a wheel .......................... 377
Snow chains .................................. 356
Storing ........................................... 375
Tightening torque ........................... 378
Wheel size/tire size ....................... 379
Window curtain air bag
Display message ............................ 257
Operation ......................................... 51
Windows
see Side windows
Windshield
Defrosting ...................................... 133
Infrared reflective .......................... 324
Windshield washer fluid
see Windshield washer system
Windshield washer system
Adding washer fluid ....................... 329
Important safety notes .................. 391
Windshield wipers
Problem (malfunction) ................... 124
24Index
Page 124 of 398
XSimultaneously press on bulb holder;and
pull lever =downwards.
XPress on housing cover :and turn it clock-
wise.
Turn signals
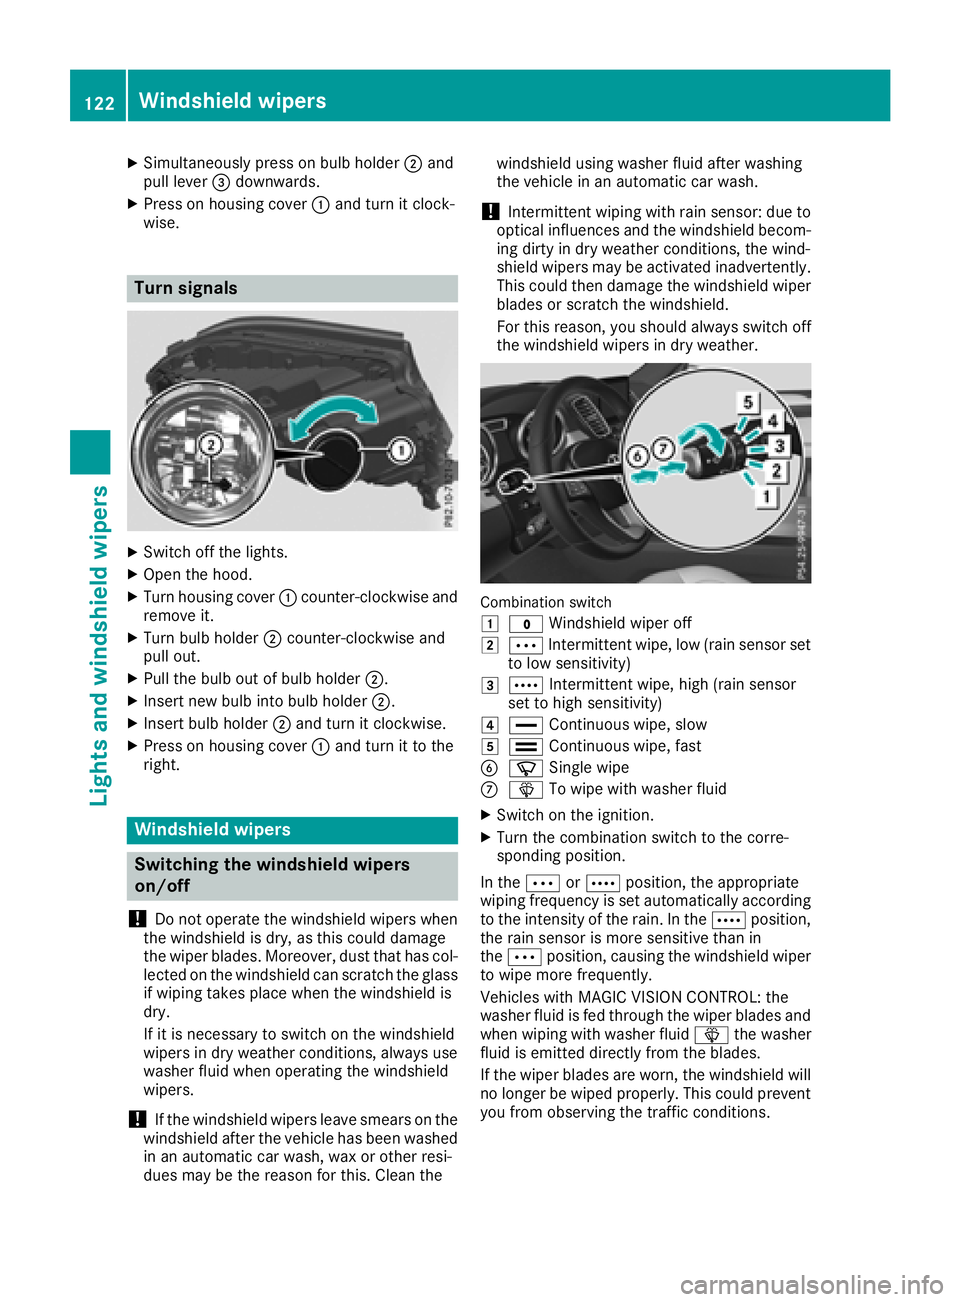
XSwitch off the lights.
XOpen the hood.
XTurn housing cover :counter-clockwise and
remove it.
XTurn bulb holder ;counter-clockwise and
pull out.
XPull the bulb out of bulb holder ;.
XInsert new bulb into bulb holder ;.
XInsert bulb holder;and turn it clockwise.
XPress on housing cover :and turn it to the
right.
Windshield wipers
Switching the windshield wipers
on/off
!
Do not operate the windshield wipers when
the windshield is dry, as this could damage
the wiper blades. Moreover, dust that has col-
lected on the windshield can scratch the glass
if wiping takes place when the windshield is
dry.
If it is necessary to switch on the windshield
wipers in dry weather conditions, always use
washer fluid when operating the windshield
wipers.
!If the windshield wipers leave smears on the
windshield after the vehicle has been washed
in an automatic car wash, wax or other resi-
dues may be the reason for this. Clean the windshield using washer fluid after washing
the vehicle in an automatic car wash.
!Intermittent wiping with rain sensor: due to
optical influences and the windshield becom-
ing dirty in dry weather conditions, the wind-
shield wipers may be activated inadvertently.
This could then damage the windshield wiper
blades or scratch the windshield.
For this reason, you should always switch off
the windshield wipers in dry weather.
Combination switch
1
$ Windshield wiper off
2ÄIntermittent wipe, low (rain sensor set
to low sensitivity)
3Å Intermittent wipe, high (rain sensor
set to high sensitivity)
4° Continuous wipe, slow
5¯Continuous wipe, fast
BíSingle wipe
CîTo wipe with washer fluid
XSwitch on the ignition.
XTurn the combination switch to the corre-
sponding position.
In the ÄorÅ position, the appropriate
wiping frequency is set automatically according
to the intensity of the rain. In the Åposition,
the rain sensor is more sensitive than in
the Ä position, causing the windshield wiper
to wipe more frequently.
Vehicles with MAGIC VISION CONTROL: the
washer fluid is fed through the wiper blades and
when wiping with washer fluid îthe washer
fluid is emitted directly from the blades.
If the wiper blades are worn, the windshield will
no longer be wiped properly. This could prevent
you from observing the traffic conditions.
122Windshield wipers
Lights and windshield wipers
Page 125 of 398
Switching the rear window wiper on/
off
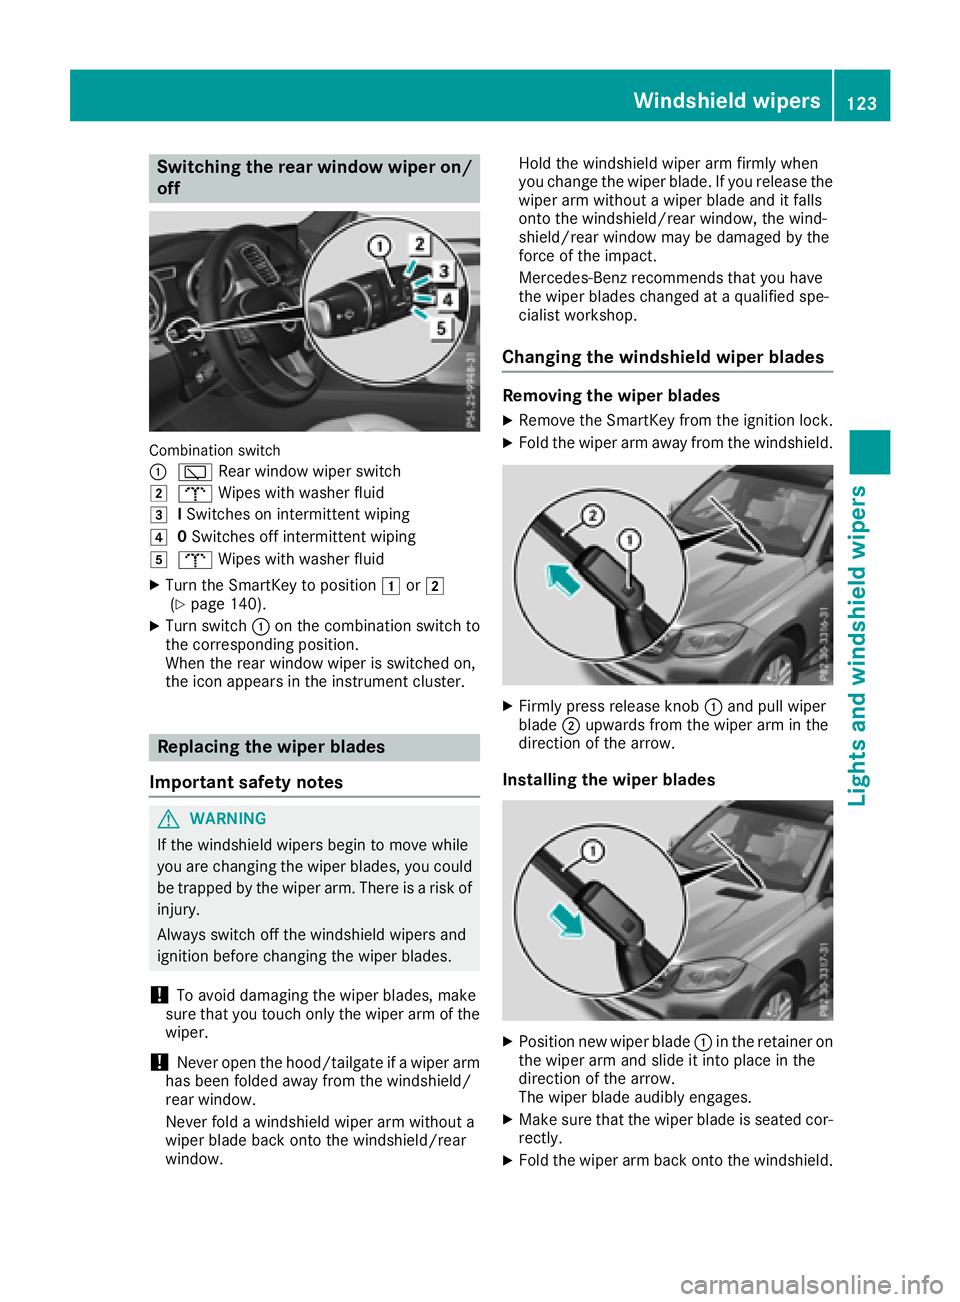
Combination switch
:
èRear window wiper switch
2bWipes with washer fluid
3ISwitches on intermittent wiping
40 Switches off intermittent wiping
5b Wipes with washer fluid
XTurn the SmartKey to position 1or2
(Ypage 140).
XTurn switch :on the combination switch to
the corresponding position.
When the rear window wiper is switched on,
the icon appears in the instrument cluster.
Replacing the wiper blades
Important safety notes
GWARNING
If the windshield wipers begin to move while
you are changing the wiper blades, you could be trapped by the wiper arm. There is a risk of
injury.
Always switch off the windshield wipers and
ignition before changing the wiper blades.
!To avoid damaging the wiper blades, make
sure that you touch only the wiper arm of the
wiper.
!Never open the hood/tailgate if a wiper arm
has been folded away from the windshield/
rear window.
Never fold a windshield wiper arm without a
wiper blade back onto the windshield/rear
window. Hold the windshield wiper arm firmly when
you change the wiper blade. If you release the
wiper arm without a wiper blade and it falls
onto the windshield/rear window, the wind-
shield/rear window may be damaged by the
force of the impact.
Mercedes-Benz recommends that you have
the wiper blades changed at a qualified spe-
cialist workshop.
Changing the windshield wiper blades
Removing the wiper blades
XRemove the SmartKey from the ignition lock.
XFold the wiper arm away from the windshield.
XFirmly press release knob
:and pull wiper
blade ;upwards from the wiper arm in the
direction of the arrow.
Installing the wiper blades
XPosition new wiper blade :in the retainer on
the wiper arm and slide it into place in the
direction of the arrow.
The wiper blade audibly engages.
XMake sure that the wiper blade is seated cor- rectly.
XFold the wiper arm back onto the windshield.
Windshield wipers123
Lights and windshield wipers
Z
Page 280 of 398
Display messagesPossible causes/consequences andMSolutions
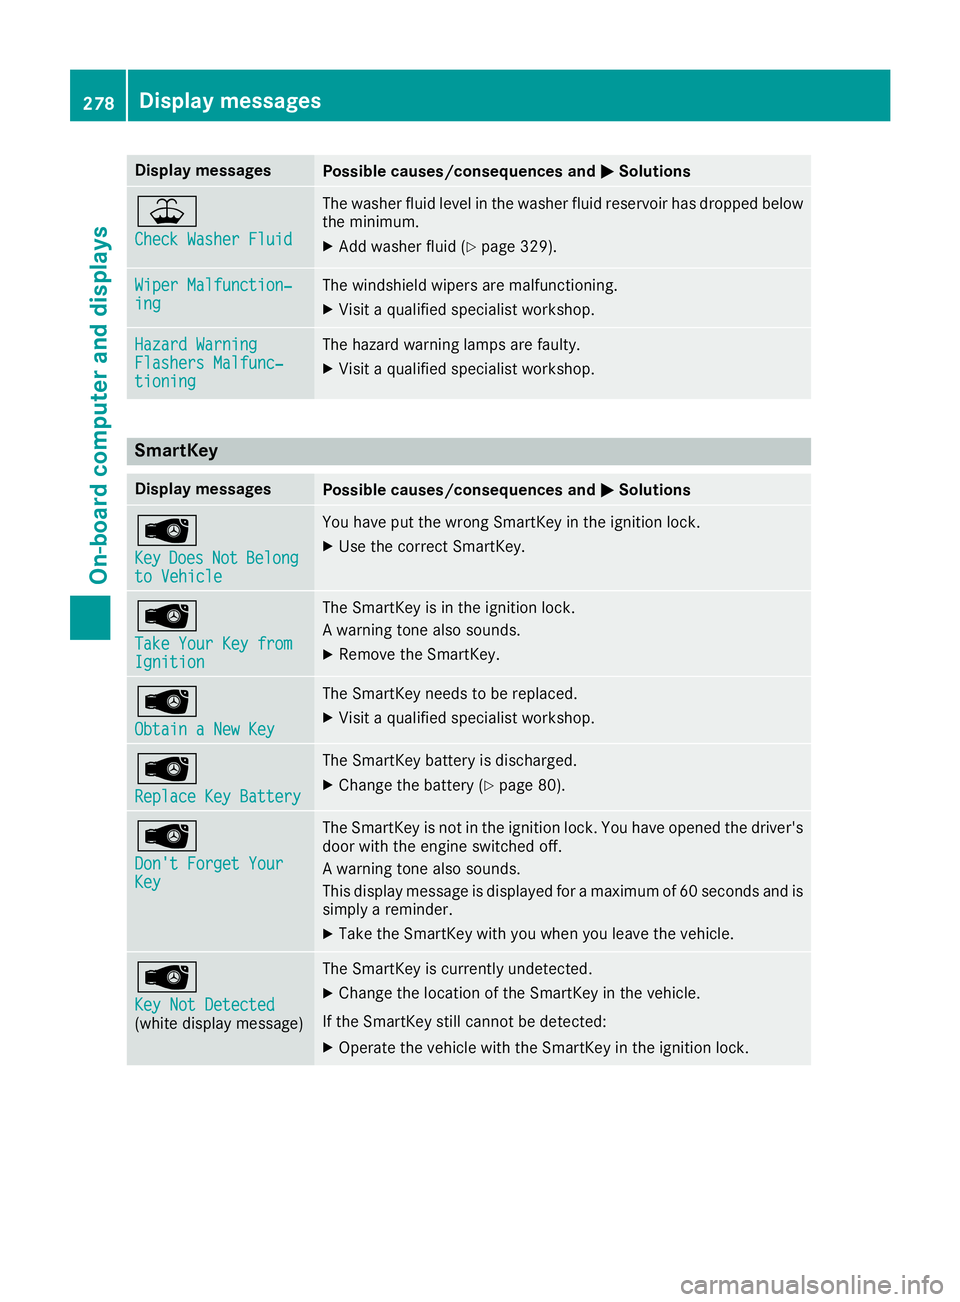
¥
Check Washer Fluid
The washer fluidlevel in th ewasher flui dreservoir has dropped belo w
th eminimum .
XAddwasher flui d (Ypage 329).
Wiper Malfunction‐ingThe windshield wiper sare malfunctioning .
XVisitaqualified specialist workshop .
Hazard WarningFlashers Malfunc‐tioning
The hazard warning lamp sare faulty.
XVisit aqualified specialist workshop .
SmartKey
Display messagesPossible causes/consequences and MSolutions
Â
KeyDoesNotBelongto Vehicl e
You haveput th ewrong SmartKey in th eignition lock.
XUse th ecorrec tSmartKey.
Â
Tak eYou rKey fro mIgnition
The SmartKey is in th eignition lock.
A warning tone also sounds.
XRemove th eSmartKey.
Â
Obtain aNew Key
The SmartKey needs to be replaced.
XVisit aqualified specialist workshop .
Â
ReplaceKey Batter y
The SmartKey battery is discharged.
XChange thebattery (Ypage 80) .
Â
Don't Forget You rKey
The SmartKey is notin th eignition lock. You hav eopened th edriver's
door wit hth eengin eswitched off .
A warning tone also sounds.
This display message is displayed for amaximum of 60 seconds and is
simply areminder.
XTak eth eSmartKey wit hyou when you leav eth evehicle.
Â
Key Not Detected(whit edisplay message )
The SmartKey is currentl yundetected.
XChange th elocation of th eSmartKey in th evehicle.
If th eSmartKey still canno tbe detected:
XOperat eth evehicl ewit hth eSmartKey in th eignition lock.
278Display messages
On-board computer and displays
Page 331 of 398
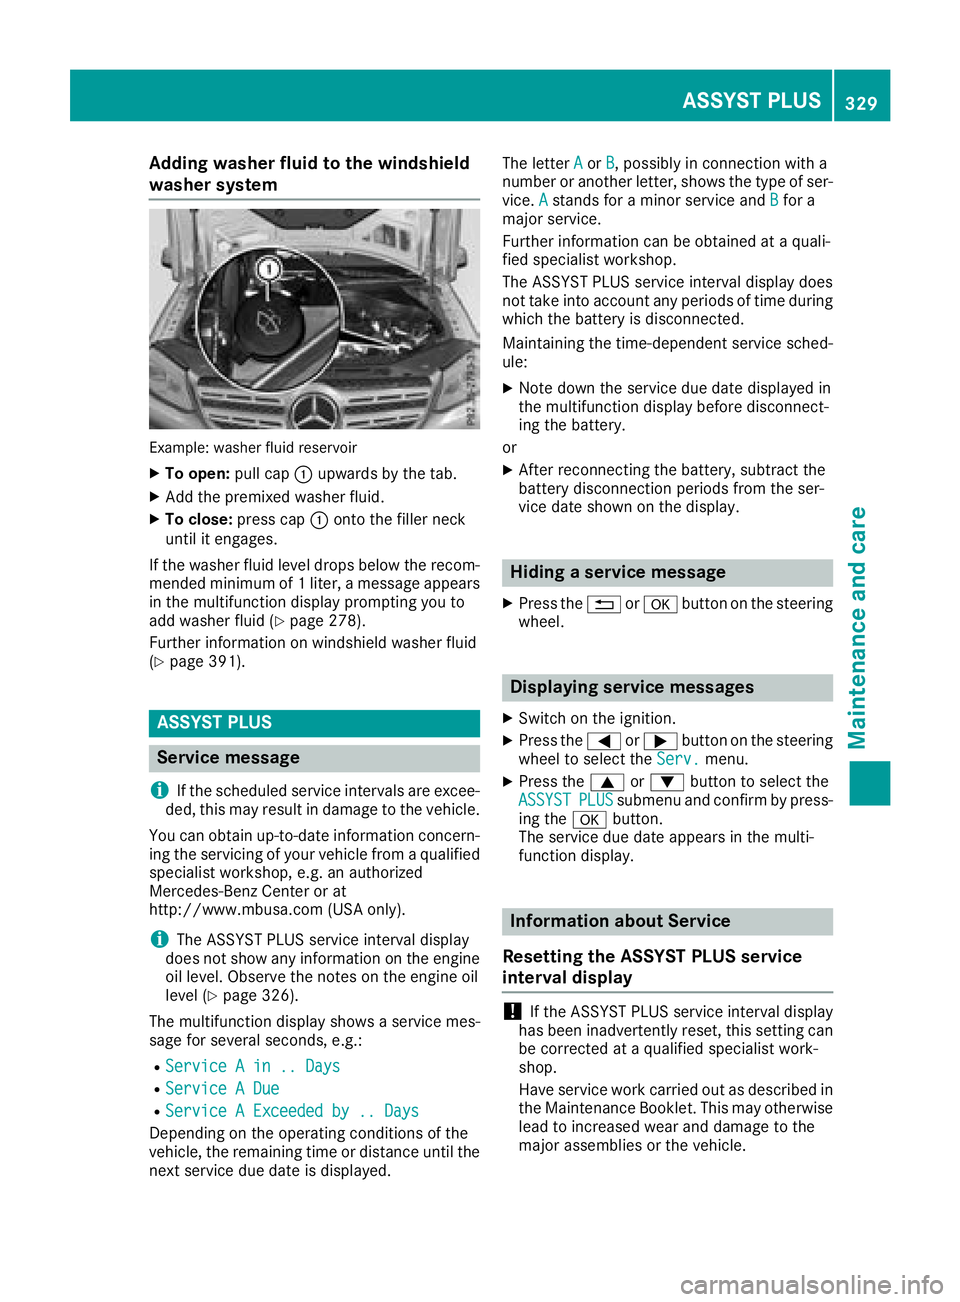
Adding washer fluid to the windshield
washer system
Example: washer fluidreservoir
XTo open :pull cap :upwards by th etab .
XAddth epremixed washer fluid .
XTo close:press cap :onto th efiller neck
until it engages.
If th ewasher fluid level drops belo wtherecom-
mended minimum of 1liter, amessage appear s
in th emultifunction display prompting you to
add washer fluid (
Ypage 278).
Further information on windshield washer fluid
(
Ypage 391).
ASSYST PLUS
Service message
i
If th escheduled servic eintervals are excee-
ded, this may result in damag eto th evehicle.
You can obtain up-to-date information concern -
ing th eservicing of your vehicl efrom aqualified
specialis tworkshop ,e.g. an authorize d
Mercedes-Benz Cente ror at
http://www.mbusa.co m(US Aonly).
iThe ASSYS TPLU Sservic einterval display
does no tsho wany information on th eengin e
oil level. Observ eth enote son th eengin eoil
level (
Ypage 326).
The multifunction display shows aservic emes -
sage for several seconds, e.g. :
RService Ain .. Day s
RService ADue
RServic e AExceeded by .. Day s
Dependingon th eoperating condition sof th e
vehicle, th eremaining time or distanc euntil th e
next servic edue dat eis displayed. The lette
rA
or B,possibl yin connection wit h a
number or another letter, shows th etyp eof ser -
vice. A
stand sfor aminor servic eand Bfora
major service.
Further information can be obtained at aquali-
fie dspecialist workshop .
The ASSYS TPLU Sservic einterval display does
no ttak eint oaccoun tany periods of time during
whic hth ebattery is disconnected.
Maintainin gth etime-dependen tservic esched-
ule:
XNot edown th eservic edue dat edisplayed in
th emultifunction display before disconnect -
ing th ebattery.
or
XAfte rreconnecting th ebattery, subtrac tth e
battery disconnection periods from th eser -
vic edat eshown on th edisplay.
Hiding a service message
XPress th e% ora buttonon th esteering
wheel.
Displaying service messages
XSwitc hon th eignition .
XPress th e= or; buttonon th esteering
whee lto select th eServ.menu.
XPress th e9 or: buttonto select th e
ASSYSTPLU Ssubmen uand confirm by press-
ing th ea button.
The servic edue dat eappear sin th emulti-
function display.
Infor mation about Service
Resetting the ASSYST PLUS service
interval display
!If th eASSYS TPLU Sservic einterval display
has been inadvertentl yreset ,this setting can
be correcte dat aqualified specialist work-
shop.
Hav eservic ewor kcarrie dout as described in
th eMaintenance Booklet .This may otherwise
lead to increased wear and damag eto th e
major assemblies or th evehicle.
ASSYST PLUS329
Maintenance and care
Z
Page 334 of 398

!Always maintain a distance of at least
11.8 in (30 cm) between the vehicle and the
power washer nozzle. Information about the
correct distance is available from the equip-
ment manufacturer.
Move the power washer nozzle around when
cleaning your vehicle.
Do not aim directly at any of the following:
Rtires
Rdoor gaps, roof gaps, joints, etc.
Relectrical components
Rbattery
Rplug-type couplings
Rlights
Rseals
Rtrim
Rventilation slots
Damaged seals or electrical components can
lead to leaks or failures.
!Vehicles with decorative foil: parts of your
vehicle are covered with decorative foil. Main-
tain a distance of at least 27.5 in (70 cm)
between the foil-wrapped parts of the vehicle
and the nozzle of the high pressure cleaner.
Information about the correct distance is
available from the equipment manufacturer.
Move the power washer nozzle around when
cleaning your vehicle.
The water temperature of the high-pressure
cleaner must not exceed 140 °F (60 °C).
Cleaning the paintwork
!Do not affix:
Rstickers
Rfilms
Rmagnetic plates or similar items
to painted surfaces. You could otherwise
damage the paintwork.
Scratches, corrosive deposits, areas affected by
corrosion and damage caused by inadequate
care cannot always be completely repaired. In
such cases, visit a qualified specialist workshop.
XRemove dirt immediately, where possible,
while avoiding rubbing too hard.
XSoak insect remains with insect remover and
rinse off the treated areas afterwards.
XSoak bird droppings with water and rinse off
the treated areas afterwards.
XRemove coolant, brake fluid, tree resin, oils,
fuels and greases by rubbing gently with a
cloth soaked in petroleum ether or lighter
fluid.
XUse tar remover to remove tar stains.
XUse silicone remover to remove wax.
If water no longer forms "beads" on the paint
surface, use the paint care products recommen-
ded and approved by Mercedes-Benz. This is the
case approximately every three to five months,
depending on the climate conditions and the
care product used.
If dirt has penetrated the paint surface or if the
paint has become dull, the paint cleaner recom- mended and approved by Mercedes-Benz
should be used.
Do not use these care products in the sun or on
the hood while the hood is hot.
XUse a suitable touch-up stick, e.g. MB Touch-
Up Stick, to repair slight damage to the paint-
work quickly and provisionally.
Matte finish care
!Never polish the vehicle or the light alloy
wheels. Polishing causes the finish to shine.
!The following can give the paint a glossy
appearance and thus reduce the matt effect:
RRubbing hard with unsuitable agents
RWashing the vehicle in direct sunlight
!Never use paint cleaner, buffing or polishing
products, or gloss preserver, e.g. wax, for the
purpose of paintwork care. These products
are only suitable for high-gloss surfaces. Their
use on vehicles with matte paintwork leads to
considerable surface damage or, more spe-
cifically, to shiny, spotted areas.
Always have paintwork repairs carried out at a
qualified specialist workshop.
!Only use automatic car washes which cor-
respond to the latest technological stand-
ards. Never use wash programs which finish
by treating the vehicle with hot wax.
Observe these notes if your vehicle has a clear
matte finish. This will help you to avoid damage
to the paintwork due to incorrect treatment.
These notes also apply to light alloy wheels with
a clear matt finish.
332Care
Maintenance and care
Page 388 of 398
from the data shown here. You can find the
data applicable to your vehicle on the vehicle
identification plate.
Vehicle identification number (VIN)
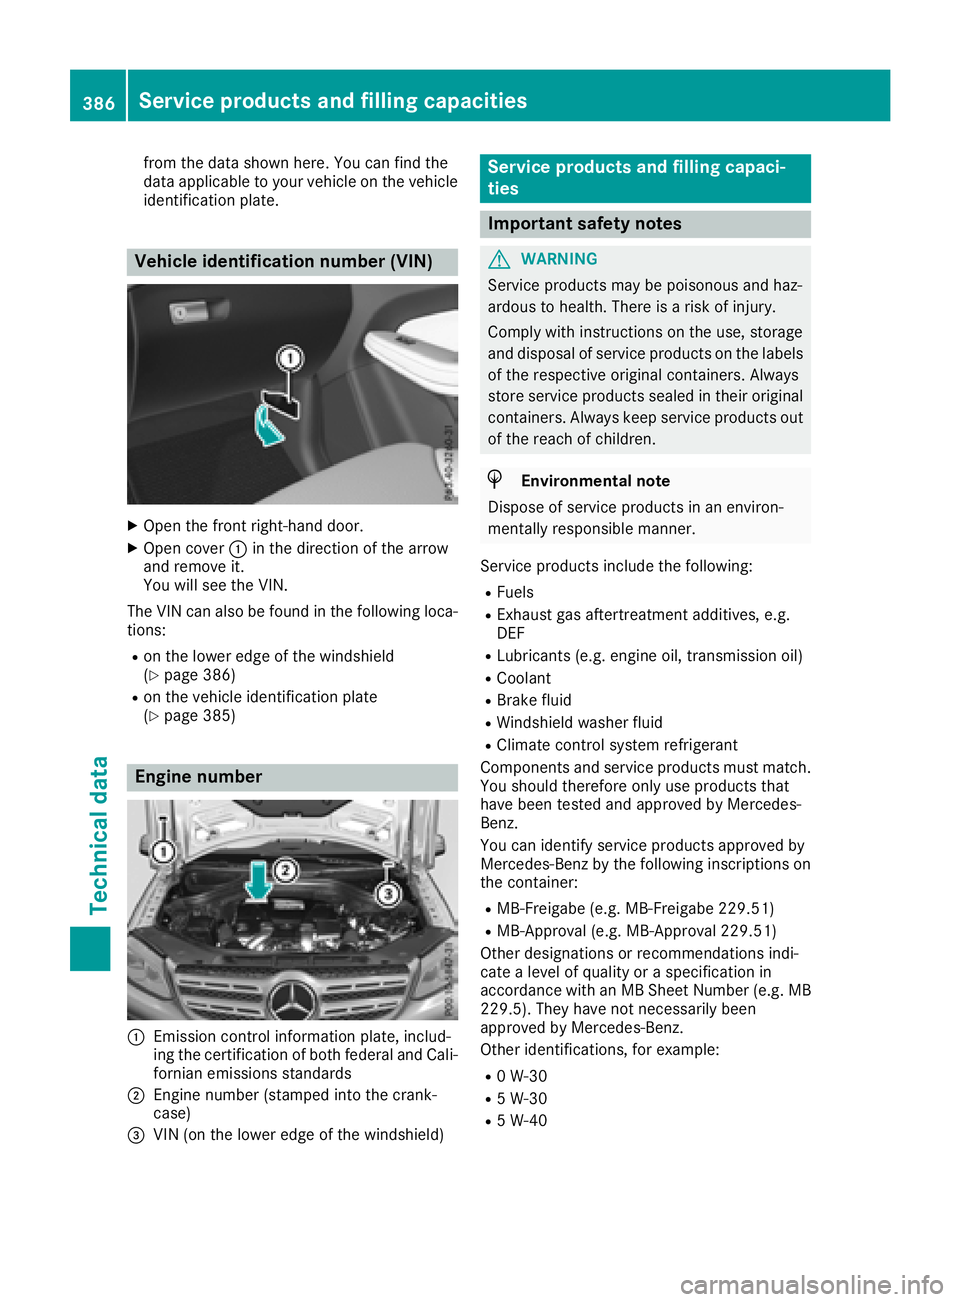
XOpen the front right-hand door.
XOpen cover:in the direction of the arrow
and remove it.
You will see the VIN.
The VIN can also be found in the following loca-
tions:
Ron the lower edge of the windshield
(Ypage 386)
Ron the vehicle identification plate
(Ypage 385)
Engine number
:Emission control information plate, includ-
ing the certification of both federal and Cali-
fornian emissions standards
;Engine number (stamped into the crank-
case)
=VIN (on the lower edge of the windshield)
Service products and filling capaci-
ties
Important safety notes
GWARNING
Service products may be poisonous and haz-
ardous to health. There is a risk of injury.
Comply with instructions on the use, storage
and disposal of service products on the labels
of the respective original containers. Always
store service products sealed in their original
containers. Always keep service products out
of the reach of children.
HEnvironmental note
Dispose of service products in an environ-
mentally responsible manner.
Service products include the following:
RFuels
RExhaust gas aftertreatment additives, e.g.
DEF
RLubricants (e.g. engine oil, transmission oil)
RCoolant
RBrake fluid
RWindshield washer fluid
RClimate control system refrigerant
Components and service products must match.
You should therefore only use products that
have been tested and approved by Mercedes-
Benz.
You can identify service products approved by
Mercedes-Benz by the following inscriptions on
the container:
RMB-Freigabe (e.g. MB-Freigabe 229.51)
RMB-Approval (e.g. MB-Approval 229.51)
Other designations or recommendations indi-
cate a level of quality or a specification in
accordance with an MB Sheet Number (e.g. MB 229.5). They have not necessarily been
approved by Mercedes-Benz.
Other identifications, for example:
R0 W-30
R5 W-30
R5 W-40
386Service products and filling capacities
Technical data