2018 MERCEDES-BENZ G-CLASS weight
[x] Cancel search: weightPage 13 of 294

Genuine parts...................................... 23
Glove box ........................................... 210
Google™ Local Search
see also Digital Operator's Man-
ual .................................................. 203
GTW (Gross Trailer Weight) (defini-
tion) .................................................... 274
H
Hazard warning lamps ........................ 88
Head restraints
Adjusting .........................................7 6
Adjusting (rear) ................................ 77
Installing/removing (rear) ................ 77
Luxury .............................................. 76
Resetting (front) ............................... 76
see NECK-PRO head restraints
see NECK-PRO luxury head restraints
Headlamps
Cleaning system (function) .............. 87
Cleaning system (notes) ................ 287
Fogging up ....................................... 88
Protective grille ................................ 91
see Automatic headlamp mode
Heating
see Climate control
High beam flasher ............................... 88
High-beam headlamps
Display message ............................ 180
Switching on/off .............................. 88
Hill start assist .................................. 107
HOLD function
Activating ....................................... 143
Activation conditions ..................... 143
Deactivating ................................... 143
Function/notes ............................. 142
General notes ................................ 142
Home address
see also Digital Operator's Man-
ual .................................................. 203
Hood
Closing ........................................... 231
Display message ............................ 190
Important safety notes .................. 230
Opening ......................................... 230
Horn ...................................................... 31
Hydroplaning ..................................... 127
I
Ignition lock
see Key positions
Immobilizer .......................................... 62
Indicator lamp
Replacing bulbs (rear) ...................... 92
Insect protection on the radiator .... 231
Instrument cluster
Overview .......................................... 32
Warning and indicator lamps ........... 32
Instrument cluster lighting .............. 160
Interior lighting
Automatic control ............................ 89
Delayed switch-off (on-board
computer) ...................................... 169
Overview .......................................... 89
iPod
®
see also Digital Operator's Man-
ual .................................................. 203
J
Jack Pump lever ..................................... 276
Storage location ............................ 244
Using ............................................. 276
Jump starting (engine) ...................... 249
K
Key positions
SmartKey ....................................... 105
L
Language (on-board computer) ........ 168
Lap time (RACETIMER) ...................... 172
LATCH-type (ISOFIX) child seat
anchors ................................................ 52
License plate lamp (display mes-
sage) ................................................... 180
Light sensor (display message) ....... 180
Lights
Activating/deactivating the inte-
rior lighting delayed switch-off ....... 169
Automatic headlamp mode .............. 87
Combination switch ......................... 88
Fogged up headlamps ...................... 88
Index11
Page 20 of 294

Tail lampReplacing bulbs ............................... 92
Tail lamps
Display message ............................ 180
Tank content
Fuel gauge ....................................... 32
Technical data
Capacities ...................................... 283
Drawbar load (maximum) ............... 291
Information .................................... 281
Trailer loads ................................... 291
Vehicle data ................................... 288
Telephone
Accepting a call ............................. 166
Authorizing a mobile phone (con-
necting) ......................................... 207
Connecting a mobile phone (gen-
eral information) ............................ 206
Display message ............................ 191
Menu (on-board computer) ............ 166
Number from the phone book ........ 167
Redialing ........................................ 167
Rejecting/ending a call ................. 166
see also Digital Operator's Man-
ual .................................................. 203
see Mobile phone
Temperature
Coolant .......................................... 161
Coolant (on-board computer) ......... 171
Engine oil (on-board computer) ...... 171
Outside temperature ...................... 160
Setting (climate control) .................. 99
Tilt/sliding sunroof
see Sliding sunroof
Time
see separate operating instructions
Timing (RACETIMER) ......................... 172
Tire pressure
Calling up (on-board computer) ..... 263
Checking manually ........................ 263
Display message ............................ 187
Maximum ....................................... 262
Notes ............................................. 261
Recommended ............................... 260
Tire pressure monitor
Checking the tire pressure elec-
tronically ........................................ 264
Function/notes ............................. 263 General notes ................................ 263
Important safety notes .................. 263
Radio type approval for the tire
pressure monitor ........................... 266
Restarting ...................................... 265
Warning lamp ................................. 202
Warning message .......................... 265
Tires
Aspect ratio (definition) ................. 275
Average weight of the vehicle
occu pants (
definition) .................... 273
Bar (definition) ............................... 273
Changing a wheel .......................... 275
Characteristics .............................. 273
Checking ........................................ 257
Curb weight (definition) ................. 274
Definition of terms ......................... 273
Direction of rotation ...................... 276
Display message ............................ 187
Distribution of the vehicle occu-
pants (definition) ............................ 275
DOT (Department of Transporta-
tion) (definition) ............................. 273
DOT, Tire Identification Number
(TIN) ............................................... 272
GAWR (Gross Axle Weight Rating)
(definition) ..................................... 274
GTW (Gross Trailer Weight) (defi-
nition) ............................................ 274
GVW (Gross Vehicle Weight) (def-
inition) ........................................... 274
GVWR (Gross Vehicle Weight Rat-
ing) (definition) .............................. 274
Important safety notes .................. 257
Increased vehicle weight due to
optional equipment (definition) ...... 274
Information on driving .................... 257
Kilopascal (kPa) (definition) ........... 274
Labeling (overview) ........................ 270
Load bearing index (definition) ...... 275
Load index ..................................... 272
Load index (definition) ................... 274
Maximum load on a tire (defini-
tion) ............................................... 274
Maximum loaded vehicle weight
(definition) ..................................... 274
Maximum permissible tire pres-
sure (definition) ............................. 274
18Index
Page 21 of 294

Maximum tire load .........................272
Maximum tire load (definition) ....... 274
Optional equipment weight (defi-
nition) ............................................ 275
PSI (pounds per square inch) (def-
inition) ...........................................2 75
Replacing ....................................... 275
Service life ..................................... 258
Sidewall (definition) ....................... 275
Snow chains .................................. 259
Speed rating (definition) ................ 274
Storing ...........................................2 76
Structure and characteristics
(definition) ..................................... 273
Summer tires in winter .................. 259
Temperature .................................. 269
TIN (Tire Identification Number)
(definition) ..................................... 275
Tire bead (definition) ......................2 75
Tire pressure (definition) ................ 275
Tire pressures (recommended) ...... 274
Tire size (data) ............................... 279
Tire size designation, load-bearing
capacity, speed rating .................... 270
Tire tread ....................................... 258
Tire tread (definition) ..................... 275
Total load limit (definition) ............. 275
Traction ......................................... 269
Traction (definition) ....................... 275
Tread wear ..................................... 269
TWR (permissible trailer drawbar
noseweight) (definition) ................. 275
Uniform Tire Quality Grading
Standards ...................................... 269
Uniform Tire Quality Grading
Standards (definition) .................... 273
Wear indicator (definition) ............. 275
Wheel and tire combination ........... 279
Wheel rim (definition) .................... 274
see Flat tire
Top Tether ............................................ 52
Tow-starting
Emergency engine starting ............ 254
Important safety notes .................. 251
Towing a trailer
Axle load, permi
ssible .................... 291
Cleaning the trailer tow hitch ......... 240
Coupling up a trailer ...................... 157 Decoupling a trailer ....................... 158
Driving tips .................................... 154
ESP
®(Electronic Stability Pro-
gram) ............................................... 61
Important safety notes .................. 153
Installing the ball coupling ............. 156
Lights display message .................. 180
Pulling away with a trailer .............. 107
Shift range ..................................... 115
Trailer loads ................................... 291
Trailer tow hitch ............................. 291
Towing away
Important safety guidelines ........... 251
In the event of malfunctions .......... 253
With both axles on the ground ....... 252
Towing eye
Front .............................................. 252
Rear ............................................... 252
Traffic reports
see also Digital Operator's Man-
ual .................................................. 203
Trailer
7-pin connector ............................. 159
Power supply ................................. 159
Trailer coupling
see Towing a trailer
Trailer loads
Technical data ............................... 291
Trailer loads and drawbar nose-
weights ............................................... 159
Trailer tow hitch
Ball position ................................... 291
Trailer towing
PARKTRONIC ................................. 145
Permissible trailer loads and
drawbar noseweights ..................... 159
Transfer case
General notes ................................ 149
Shift range ..................................... 149
Shifting .......................................... 149
Shifting (general notes) .................. 149
Shifting (important safety notes) ... 149
Shifting to neutral .......................... 150
Switching off the off-road gear
ratio ............................................... 150
Switching on the off-road gear
ratio ............................................... 149
Index19
Page 22 of 294

Transmissionsee Automatic transmission
Transmission positions .................... 114
Transporting the vehicle .................. 253
Traveling uphill
Brow of hill ..................................... 132
Trim pieces (cleaning instruc-
tions) .................................................. 241
Trip computer (on-board com-
puter) .................................................. 163
Trip odometer
Calling up ....................................... 163
Resetting (on-board computer) ...... 163
Turn signals
Display message ............................ 180
Replacing bulbs (front) ..................... 91
Switching on/off .............................. 88
TV
Operating (on-board computer) ..... 166
see Separate operating instructions
Two-way radio
Frequencies ................................... 281
Installation ..................................... 281
Transmission output (maximum) .... 281
TWR (Tongue Weight Rating) (defi-
nition) ................................................. 275
Type identification plate
see Vehicle identification plate
U
UnlockingEmergency unlocking ....................... 68
From inside the vehicle (central
unlocking button) ............................. 67
USB devices
Connecting to the Media Inter-
face ...............................................2 08
V
Vanity mirror
Sun visor ........................................ 216
Vehicle
Correct use ...................................... 27
Data acquisition ............................... 28
Display message ............................ 190
Equipment ....................................... 24 Individual settings .......................... 168
Limited Warranty .............................2
8
Loading .......................................... 266
Locking (in an emergency) ............... 68
Locking (SmartKey) .......................... 63
Lowering ........................................ 278
Maintenance .................................... 25
Operation outside the USA/
Canada ............................................ 25
Parking .......................................... 122
Parking for a long period ................ 124
Pulling away ................................... 106
Raising ........................................... 276
Securing from rolling away ............ 276
Tow-starting ................................... 254
Towing ........................................... 251
Transporting .................................. 253
Unlocking (in an emergency) ........... 68
Unlocking (SmartKey) ...................... 63
Vehicle data ................................... 288
Vehicle data ....................................... 288
Vehicle data (off-road driving)
Approach/departure angle ............ 290
Fording depth ................................ 290
Maximum gradient climbing abil-
ity .................................................. 290
Vehicle dimensions ........................... 288
Vehicle emergency locking ................ 68
Vehicle identification number
see VIN
Vehicle identification plate .............. 282
Vehicle tool kit .................................. 244
Ventilation
Setting the airflow ........................... 99
Video
Operating the DVD ......................... 166
see also Digital Operator's Man-
ual .................................................. 203
VIN
Type plate ...................................... 282
W
Warning and indicator lampsABS ................................................ 194
Brakes ........................................... 193
Check Engine ................................. 199
Coolant .......................................... 199
20Index
Page 25 of 294

Protecting the environment
General notes
HEnvironmental note
Daimler's declared policy is one of compre-
hensive environmental protection.
The objectives are for the natural resources
that form the basis of our existence on this
planet to be used sparingly and in a manner
that takes the requirements of both nature
and humanity into account.
You too can help to protect the environment
by operating your vehicle in an environmen-
tally responsible manner.
Fuel consumption and the rate of engine,
transmission, brake and tire wear are affected by these factors:
Roperating conditions of your vehicle
Ryour personal driving style
You can influence both factors. You should
bear the following in mind:
Operating conditions:
Ravoid short trips as these increase fuel con-
sumption.
Ralways make sure that the tire pressures
are correct.
Rdo not carry any unnecessary weight.
Rremove roof racks once you no longer need
them.
Ra regularly serviced vehicle will contribute
to environmental protection. You should
therefore adhere to the service intervals.
Ralways have service work carried out at a
qualified specialist workshop.
Personal driving style:
Rdo not depress the accelerator pedal when
starting the engine.
Rdo not warm up the engine when the vehicle
is stationary.
Rdrive carefully and maintain a safe distance
from the vehicle in front.
Ravoid frequent, sudden acceleration and
braking.
Rchange gear in good time and use each gear
only up to Ôof its maximum engine speed.
Rswitch off the engine in stationary traffic.
Rkeep an eye on the vehicle's fuel consump-
tion.
Environmental concerns and recom-
mendations
Wherever the Operator's Manual requires you to
dispose of materials, first try to regenerate or re-
use them. Observe the relevant environmental
rules and regulations when disposing of materi-
als. In this way you will help to protect the envi-
ronment.
Genuine Mercedes-Benz parts
HEnvironmental note
Daimler AG also supplies reconditioned major
assemblies and parts which are of the same
quality as new parts. They are covered by the
same Limited Warranty entitlements as new
parts.
!Air bags and Emergency Tensioning Devi-
ces, as well as control units and sensors for
these restraint systems, may be installed in
the following areas of your vehicle:
Rdoors
Rdoor pillars
Rdoor sills
Rseats
Rcockpit
Rinstrument cluster
Rcenter console
Do not install accessories such as audio sys-
tems in these areas. Do not carry out repairs or welding. You could impair the operating
efficiency of the restraint systems.
Have aftermarket accessories installed at a
qualified specialist workshop.
You could jeopardize the operating safety of
your vehicle if you use parts, tires and wheels as
well as accessories relevant to safety which
have not been approved by Mercedes-Benz. This
could lead to malfunctions in safety-relevant
Genuine Mercedes-Benz parts23
Introduction
Z
Page 42 of 294

vehicle occupant back in the direction of the
backrest.
The Emergency Tensioning Device does not cor-
rect an incorrect seat position or the routing of
an incorrectly fastened seat belt.
When triggered, a seat belt force limiter helps to
reduce the force exerted by the seat belt on the
vehicle occupant.
The seat belt force limiters for the front seats are
synchronized with the front air bags, which
absorb part of the deceleration force. This can
reduce the force exerted on the vehicle occu-
pants during an accident.
!If the front-passenger seat is not occupied,
do not engage the seat belt tongue in the
buckle on the front-passenger seat. Other-
wise, in addition to other systems, the Emer-
gency Tensioning Device could also be trig-
gered in the event of an accident and would
need to be replaced.
Important safety notes
The use of seat belts and child restraint systems
is required by law in:
Rall 50 states
Rthe U.S. territories
Rthe District of Columbia
Rall Canadian provinces
Even where this is not required by law, all vehicle
occupants should correctly fasten their seat
belts before starting the journey.
GWARNING
If the seat belt is not worn correctly, it cannot
perform its intended protective function. An
incorrectly fastened seat belt can also cause
injuries, for example, in the event of an acci-
dent or when braking or changing direction
abruptly. This poses an increased risk of injury
or even fatal injury.
Always ensure that all vehicle occupants have
their seat belts fastened correctly and are sit-
ting properly. The components of the restraint system work in
conjunction with each other. They can only
deploy their protective function if, at all times, all
vehicle occupants:
Rhave fastened their seat belts correctly
(Ypage 41)
Rhave the seat and head restraint adjusted
properly (Ypage 74)
GWARNING
The seat belt does not offer the intended level of protection if you have not moved the back-
rest to an almost vertical position. When brak-
ing or in the event of an accident, you could
slide underneath the seat belt and sustain
abdomen or neck injuries, for example. This
poses an increased risk of injury or even fatal injury.
Adjust the seat properly before beginning
your journey. Always ensure that the backrest
is in an almost vertical position and that the
shoulder section of your seat belt is routed
across the center of your shoulder.
GWARNING
Persons less than 5 ft (1.50 m) tall cannot
wear the seat belt correctly without an addi-
tional and suitable restraint system. If the
seat belt is not worn correctly, it cannot per-
form its intended protective function. An
incorrectly fastened seat belt can also cause
injuries, for example, in the event of an acci-
dent or when braking or changing direction
abruptly. This poses an increased risk of injury or even fatal injury.
For this reason, always secure persons under
5 ft (1.50 m) tall in suitable additional restraint
systems.
If a child younger than twelve years old and
under 5 ft (1.50 m) in height is traveling in the
vehicle:
Ralways secure the child in a child restraint
system suitable for this Mercedes-Benz vehi-
cle. The child restraint system must be appro-
priate to the age, weight and size of the child
Ralways observe the instructions and safety
notes on "Children in the vehicle"
(
Ypage 50) in addition to the child restraint
40Occupant safety
Safety
Page 54 of 294

ing systems on the child restraint system
checked at a qualified specialist workshop,
before you install a child restraint system
again.
The securing systems of child restraint systems
are:
Rthe seat belt system
Rthe LATCH-type (ISOFIX) securing rings
Rthe Top Tether anchorages
iIf it is absolutely necessary to install a child
restraint system on the front-passenger seat,
always observe the information on "Child
restraint systems on the front-passenger
seat" (
Ypage 55). There you will also find
information on deactivating the front-
passenger front air bag.
All child restraint systems must meet the fol-
lowing standards:
RU.S. Federal Motor Vehicle Safety Standards
213 and 225
RCanadian Motor Vehicle Safety Standards
213 and 210.2
Confirmation that the child restraint system cor-
responds to the standards can be found on an
instruction label on the child restraint system.
This confirmation can also be found in the instal-
lation instructions that are included with the
child restraint system.
Observe the warning labels in the vehicle inte-
rior and on the child restraint system.
LATCH-type (ISOFIX) child seat secur-
ing system
GWARNING
LATCH-type (ISOFIX) child restraint systems
do not offer sufficient protection for children
whose weight combined with the child
restraint system is greater than 65 lbs (29 kg) and who are secured using the safety belt
integrated in the child restraint system. In the
event of an accident, a child might not be
restrained correctly. This poses an increased
risk of injury or even fatal injury.
If the child and the child restraint system
together weigh more than 65 lbs (29 kg), only
use LATCH-type (ISOFIX) child restraint sys-
tems with which the child is also secured with
the vehicle seat belt. Also secure the child
restraint system with the Top Tether belt, if
available.
Always comply with the manufacturer's instal-
lation and operating instructions for the child
restraint system used.
Before every trip, make sure that the LATCH-
type (ISOFIX) child restraint system is engaged
correctly in both LATCH-type (ISOFIX) securing
rings
!When installing the child restraint system,
make sure that the seat belt for the middle
seat does not get trapped. The seat belt could
otherwise be damaged.
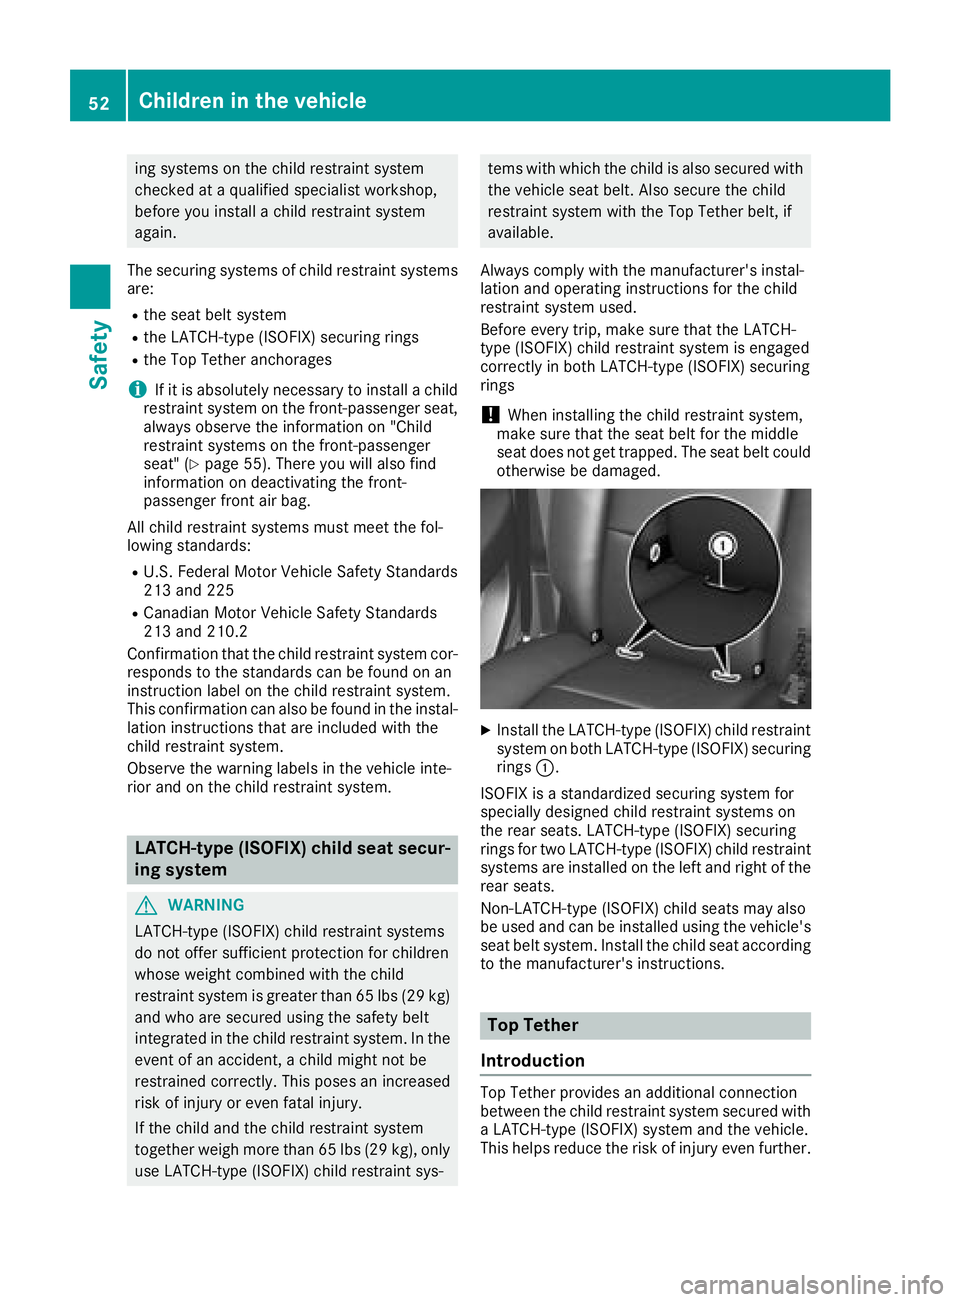
XInstall the LATCH-type (ISOFIX) child restraint system on both LATCH-type (ISOFIX) securing
rings :.
ISOFIX is a standardized securing system for
specially designed child restraint systems on
the rear seats. LATCH-type (ISOFIX) securing
rings for two LATCH-type (ISOFIX) child restraint
systems are installed on the left and right of the
rear seats.
Non-LATCH-type (ISOFIX) child seats may also
be used and can be installed using the vehicle's
seat belt system. Install the child seat according
to the manufacturer's instructions.
Top Tether
Introduction
Top Tether provides an additional connection
between the child restraint system secured with
a LATCH-type (ISOFIX) system and the vehicle.
This helps reduce the risk of injury even further.
52Children in the vehicle
Safety
Page 129 of 294

Have brake pads installed and brake fluid
replaced at a qualified specialist workshop.
If the brake system has only been subject to
moderate loads, you should test the functional-
ity of your brakes at regular intervals.
Information on BAS (Brake Assist) (
Ypage 59).
For safety reasons, Mercedes-Benz recom-
mends only installing the following brake disks
and brake pads/linings:
Rbrake disks that have been approved by
Mercedes-Benz
Rbrake pads/linings that have been approved
by Mercedes-Benz or that are of an equivalent
standard of quality
Other brake disks or brake pads/linings can
compromise the safety of your vehicle.
Always replace all brake disks and brake pads/ linings on an axle at the same time. Always
install new brake pads/linings when replacing
brake disks.
The vehicle is equipped with lightweight brake
disks to which the wheel assembly with rim and
threaded connection is matched.
The use of brake discs other than those
approved by Mercedes-Benz may alter track
width and is subject to approval, if applicable.
Shock-type loads when handling the brake
discs, such as when changing wheels, can lead
to a reduction in comfort when driving with light- weight brake discs. Avoid shock-type loads on
the lightweight brake disks, particularly on the
brake plate.
Mercedes-Benz recommends that you only use
brake fluid that has been specially approved for
your vehicl
e by Mercedes-Benz, or which corre-
sponds to an equivalent quality standard. Brake
fluid which has not been approved for
Mercedes-Benz vehicles or which is not of an
equivalent quality could affect your vehicle's
operating safety.
High-performance brake (Mercedes-
AMG vehicles)
The AMG brake systems are designed for heavy
loads. This may lead to noise when braking.
This will depend on:
RSpeed
RBraking force
RAmbient conditions, e.g. temperature and
humidity The wear of individual brake system compo-
nents such as the brake pads/linings or brake
discs depends on individual driving style and
operating conditions.
For this reason, it is impossible to state a mile-
age that will be valid under all circumstances. An
aggressive driving style will lead to high wear.
You can obtain more information on this from a
qualified specialist workshop.
New and replaced brake pads and discs only
reach their optimum braking effect after several
hundred kilometers of driving. Compensate for
this by applying greater force to the brake pedal.
Keep this in mind, and adapt your driving and
braking accordingly during this break-in period.
Excessive heavy braking results in correspond-
ingly high brake wear. If the brake pads/linings
have reached their wear limit, the multifunction
display shows a corresponding message. Espe-
cially for high performance driving, it is impor-
tant to maintain and have the brake system
checked regularly.
Driving on slippery surfaces
!
Where possible, avoid spinning the drive
wheels when pulling away on slippery roads.
You could otherwise damage the drive train.
This type of damage is not covered by the
terms of the Mercedes-Benz warranty.
XEngage the differential locks if necessary
(Ypage 151).
Driving on wet roads
Hydroplaning
If water has accumulated to a certain depth on
the road surface, there is a danger of hydro-
planing occurring, even if:
Ryou drive at low speeds
Rthe tires have adequate tread depth
For this reason, in the event of heavy rain or in
conditions in which hydroplaning may occur,
you must drive in the following manner:
Rlower your speed
Ravoid ruts
Ravoid sudden steering movements
Rbrake carefully
Driving tips127
Driving and parking
Z