2018 MERCEDES-BENZ CLA COUPE warning
[x] Cancel search: warningPage 258 of 326
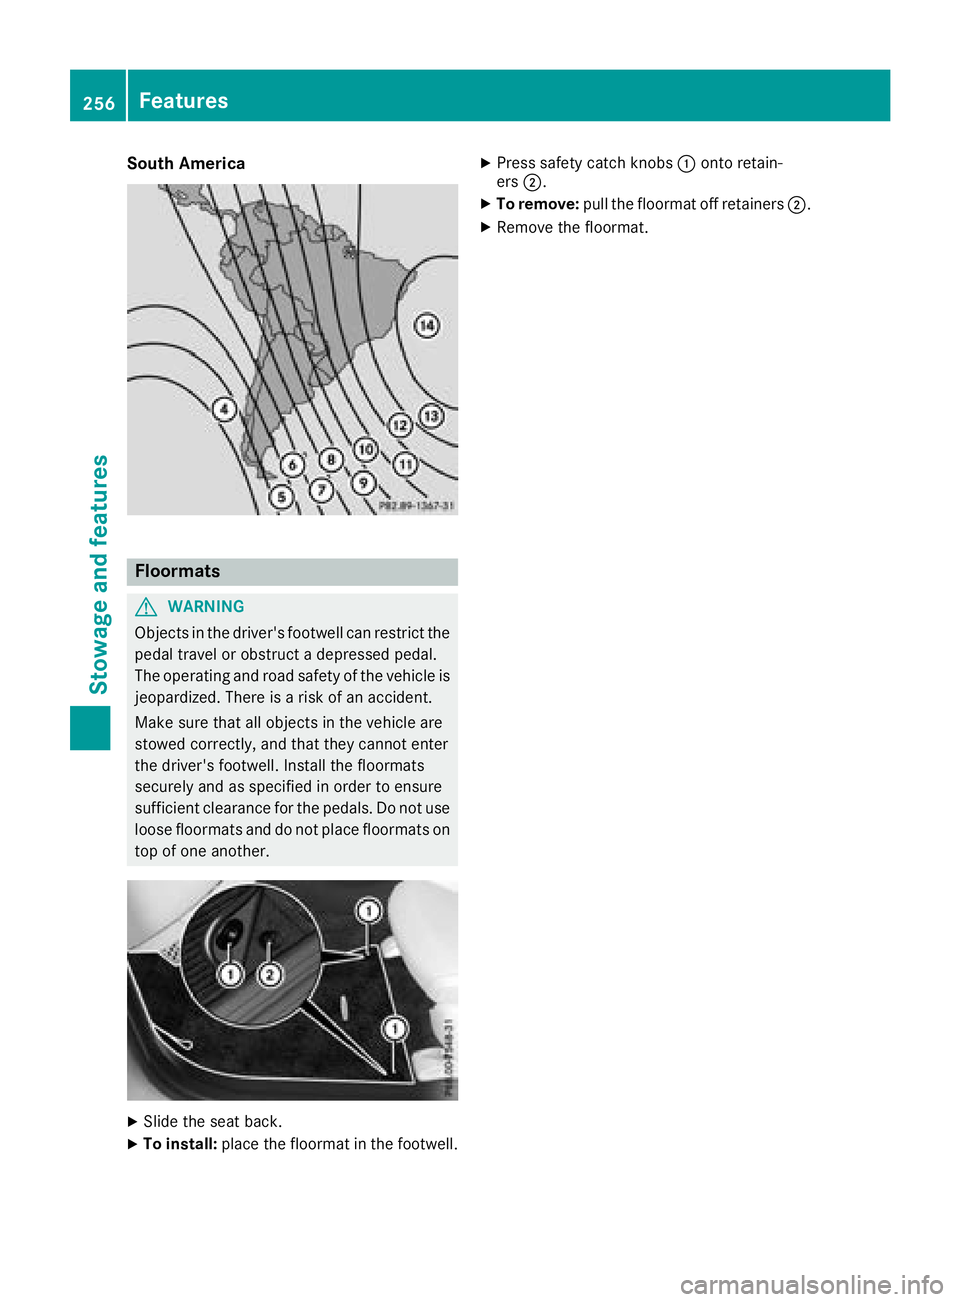
South America
Floormats
GWARNING
Object sinthe driver's footwell can restrict the
pedal travel or obstruct adepressed pedal.
The operating and road safety of the vehicle is
jeopardized. There is arisk of an accident.
Make sure that all object sinthe vehicle are
stowed correctly, and that they cannot enter
the driver's footwell. Install the floormats
securely and as specified in order to ensure
sufficient clearance for the pedals. Do not use
loose floormats and do not place floormats on
top of one another.
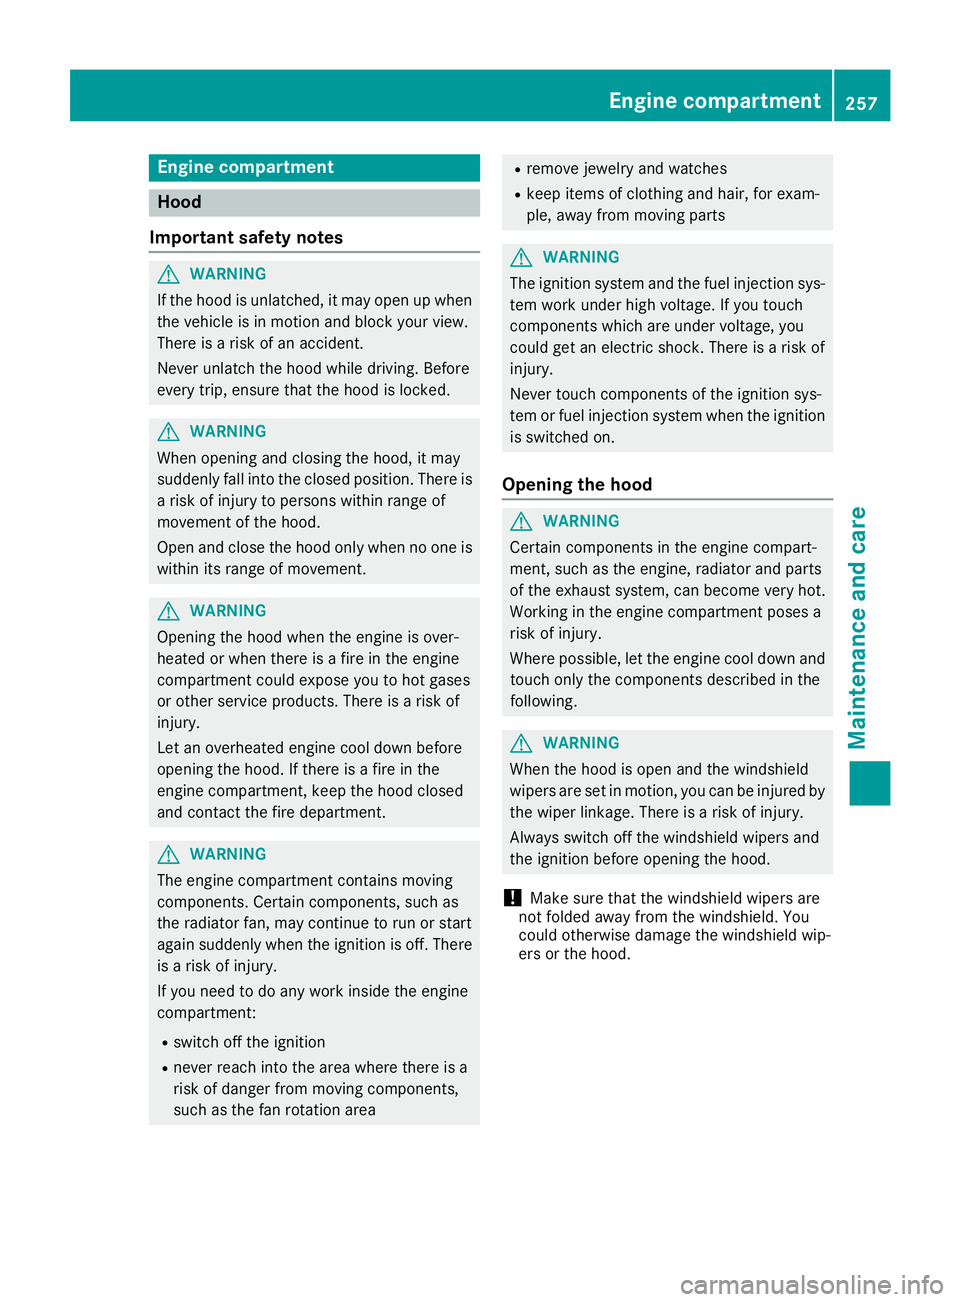
XSlide the seat back.
XTo install: place the floormat in the footwell.
XPress safety catch knobs :onto retain-
ers ;.
XTo remove: pull the floormat off retainers ;.
XRemove the floormat.
256Features
Stowage and features
Page 259 of 326
Engine compartment
Hood
Important safety notes
GWARNING
If th ehood is unlatched, it may open up when
th ev ehicle is in motion and blocky our view.
Thereisar isk of an accident.
Never unlatch th ehood while driving .Before
ever ytrip, ensure that th ehood is locked.
GWARNING
When opening and closingt hehood,itm ay
suddenly fall int othe closed position.T hereis
ar isk of injury to personsw ithin range of
movementoft hehood.
Open and close th ehood only when no onei s
within its range of movement.
GWARNING
Opening th ehood when th eengine is over-
heated or when there is afireint heengine
compartmen tcoul de xpose you to hot gases
or other servic eproducts. Thereisar isk of
injury.
Let an overheate dengine coo ldown before
opening th ehood.Ift here is afireint he
engine compartment, keep th ehood closed
and contac tthe fired epartment.
GWARNING
The engine compartmen tcontain smoving
components. Certain components, sucha s
th er adiator fan ,may continue to run or start
again suddenly when th eignition is off .There
is ar isk of injury.
If you nee dtodoany work inside th eengine
compartment:
Rswitch off th eignition
Rnever reac hintot he area wheret here is a
risk of danger from moving components,
suchast hefan rotatio narea
Rremove jewelry and watches
Rkeep items of clothing and hair, for exam-
ple, away from moving parts
GWARNING
The ignition system and th efuel injection sys-
te mw ork unde rhigh voltage. If you touch
component swhicha re unde rvoltage, you
coul dget an electric shock. Thereisar isk of
injury.
Never touch component softheignition sys-
te morf uel injection system when th eignition
is switched on.
Opening th ehood
GWARNING
Certain component sintheengine compart-
ment, suchast heengine ,radiator and parts
of th eexhaust system, can become ver yhot.
Workin gintheengine compartmen tposesa
risk of injury.
Wherep ossible, let th eengine coo ldown and
touch only th ecomponent sdescribe dinthe
following.
GWARNING
When th ehood is open and th ewindshield
wipersa re set in motion,y ou can be injured by
th ew iper linkage. Thereisar isk of injury.
Always switch off th ewindshield wipersa nd
th ei gnition before opening th ehood.
!Makes ure that th ewindshield wipersa re
no tfolded away from th ewindshield. You
coul dotherwise damag ethe windshield wip-
ers or th ehood.
Engine compartment257
Maintenance and care
Z
Page 260 of 326
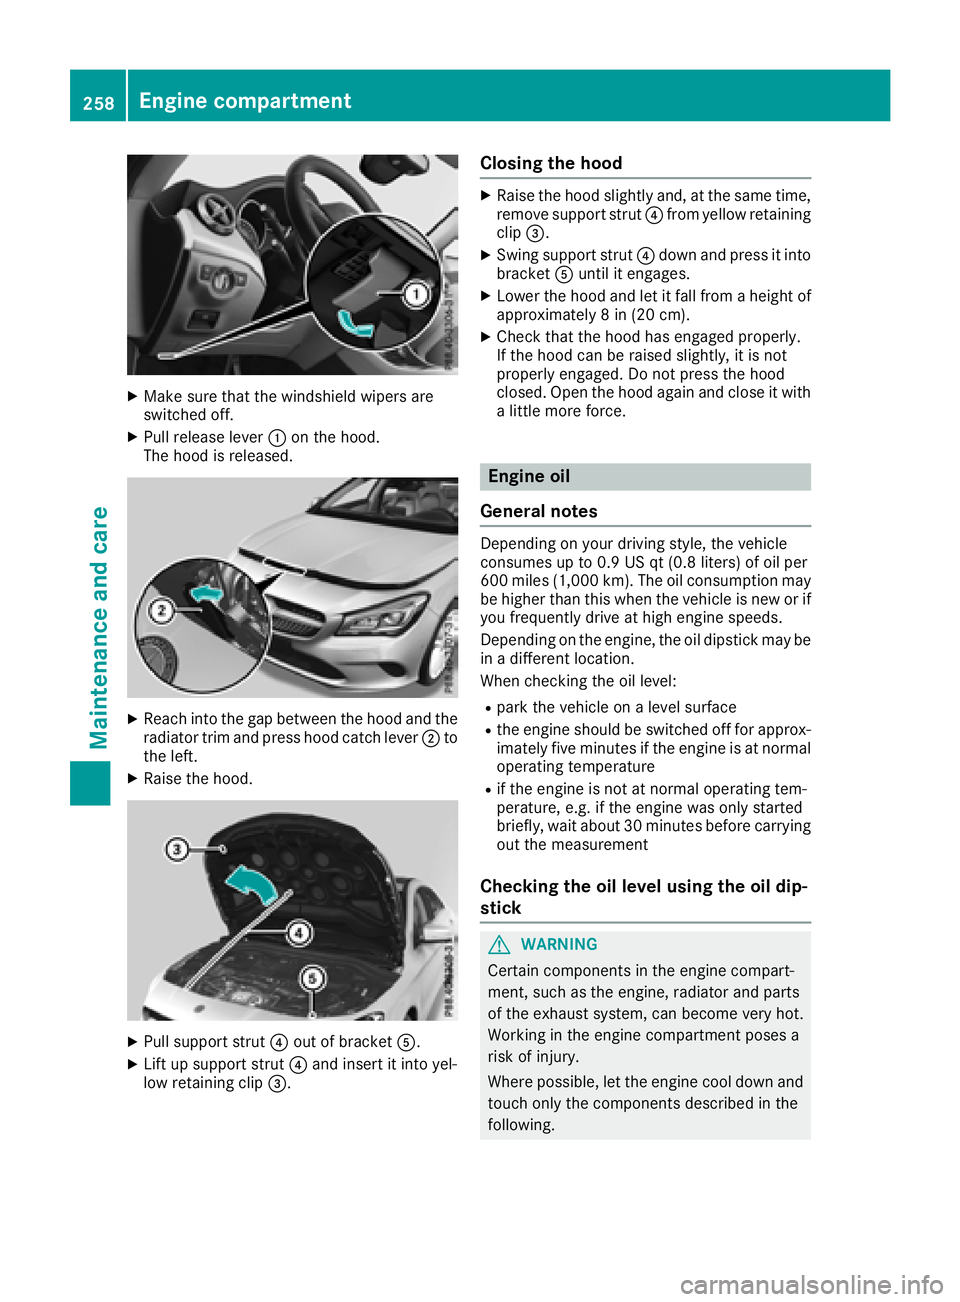
XMake sure that the windshield wipers are
switched off.
XPull release lever:on the hood.
The hood is released.
XReach into the gap between the hood and the radiator trim and press hood catch lever ;to
the left.
XRaise the hood.
XPull support strut ?out of bracket A.
XLift up support strut ?and insert it into yel-
low retaining clip =.
Closing the hood
XRaise the hood slightly and, at the same time,
remove support strut ?from yellow retaining
clip =.
XSwing support strut ?down and press it into
bracket Auntil it engages.
XLower the hood and let it fall from aheight of
approximately 8in(20 cm).
XCheck that the hood has engaged properly.
If the hood can be raised slightly, it is not
properly engaged. Do not press the hood
closed. Open the hood again and close it with
alittle more force.
Engine oil
General notes
Depending on your driving style, the vehicle
consumes up to 0.9 US qt (0.8 liters) of oil per
600 miles (1,000 km). The oil consumption may
be higher than this when the vehicle is new or if
you frequently drive at high engine speeds.
Depending on the engine, the oil dipstick may be
in ad ifferent location.
When checking the oil level:
Rpark the vehicle on alevel surface
Rthe engine should be switched off for approx-
imately five minutes if the engine is at normal
operating temperature
Rif the engine is not at normal operating tem-
perature, e.g. if the engine was only started
briefly, wait about 30 minutes before carrying
out the measurement
Checking the oil level using the oil dip-
stick
GWARNING
Certain components in the engine compart-
ment, such as the engine, radiator and parts
of the exhaust system, can become very hot.
Working in the engine compartmentp oses a
risk of injury.
Where possible, let the engine cool down and touch only the components described in the
following.
258Engine compartment
Maintenance and care
Page 261 of 326
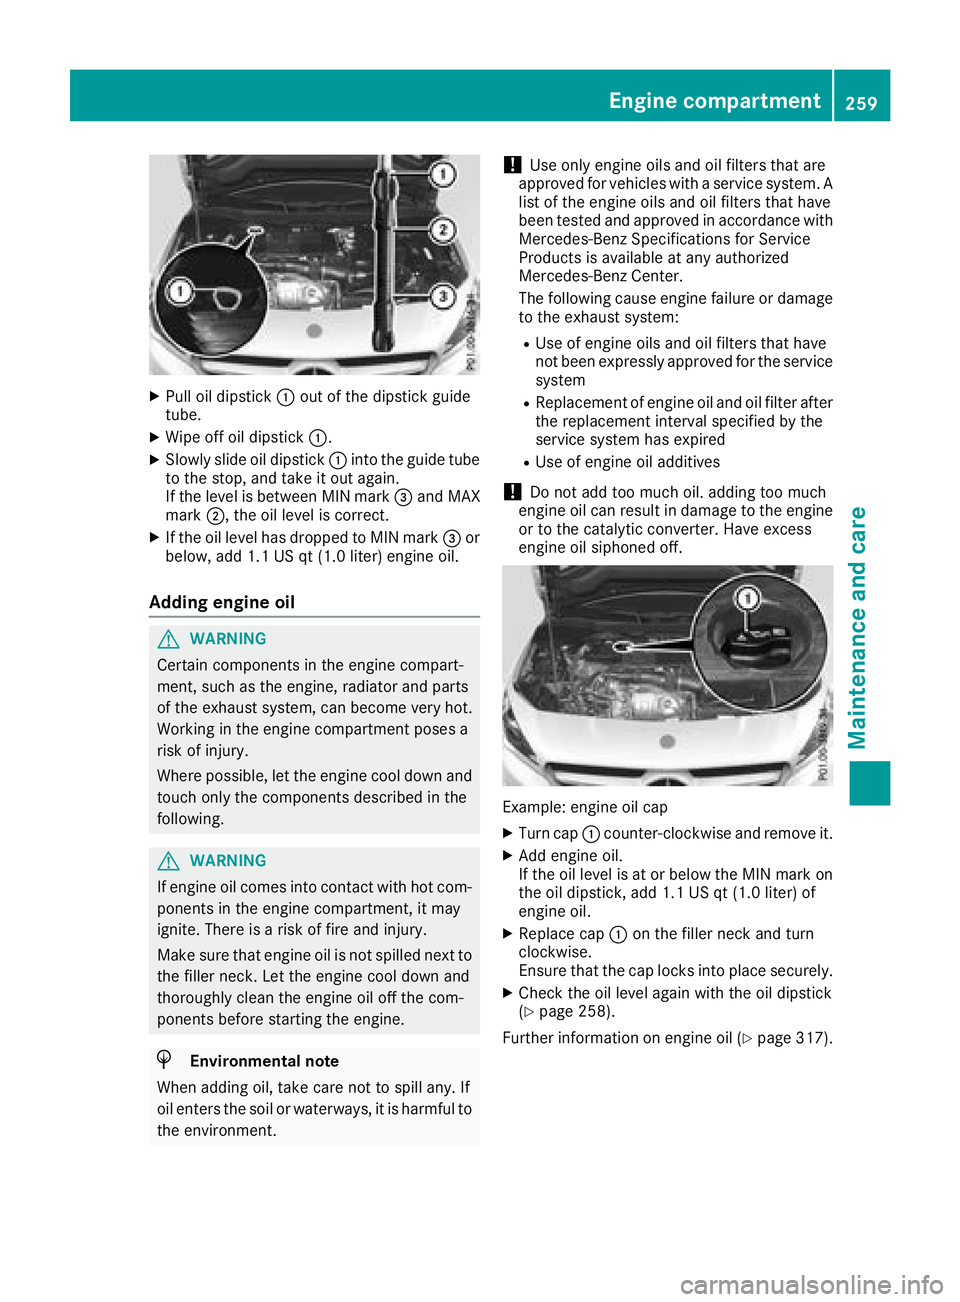
XPull oil dipstick:out of the dipstick guide
tube.
XWipe off oil dipstick :.
XSlowly slide oil dipstick :into the guide tube
to the stop, and take it out again.
If the level is between MIN mark =and MAX
mark ;,the oil level is correct.
XIf the oil level has dropped to MIN mark =or
below, add 1.1 US qt (1.0 liter) engine oil.
Adding engine oil
GWARNING
Certain components in the engine compart-
ment ,such as the engine, radiator and parts
of the exhaust system, can become very hot.
Workingint he engine compartment poses a
risk of injury.
Where possible, let the engine cool down and touch only the components described in the
following.
GWARNING
If engine oil comes into contact with hot com- ponentsint he engine compartment ,itmay
ignite. There is arisk of fire and injury.
Make sure that engine oil is not spilled next to
the filler neck.L et the engine cool down and
thoroughly clean the engine oil off the com-
ponentsb efore starting the engine.
HEnvironmenta lnote
When adding oil, take care not to spill any. If
oil enter sthe soil or waterways, it is harmful to
the environment.
!Use only engine oils and oil filters that are
approved for vehicles with aservice system. A
list of the engine oils and oil filters that have
been tested and approved in accordancew ith
Mercedes-Benz Specifications for Service
Products is availableata ny authorized
Mercedes-Benz Center.
The following cause engine failure or damage
to the exhaust system:
RUse of engine oils and oil filters that have
not been expressly approved for the service
system
RReplacement of engine oil and oil filter after
the replacement interval specified by the
service system has expired
RUse of engine oil additives
!Do not add too much oil. adding too much
engine oil can result in damage to the engine
or to the catalytic converter. Have excess
engine oil siphoned off.
Example: engine oil cap
XTurn cap :counter-clockwise and remove it.
XAdd engine oil.
If the oil level is at or below the MIN mark on
the oil dipstick ,add 1.1 US qt (1.0 liter) of
engine oil.
XReplace cap :on the filler neck and turn
clockwise.
Ensure that the cap locks into place securely.
XCheck the oil level again with the oil dipstick
(Ypage 258).
Further information on engine oil (
Ypage 317).
Engine compartment259
Maintenance and care
Z
Page 262 of 326
Checking and addingother service
products
Checking coolan tlevel
GWARNING
The coolings ystem is pressurized, particularly
when th emotor is warm .Ifyou open th ecap,
you coul dbescalded if hot coolant sprays out.
Thereisar iskofi njury.
Let th eenginec ooldown before you open the
cap. Wear gloves and eye protection.S lowly
open th ecap to relieve pressure.
!The coolant may only be checked and cor-
recte dwhen th eengineisc ool(coolantt em-
peratur ebelow 10 4‡(40 †) .Checkin gthe
coolantw hen thecoolantt emperatur eis
above1 04‡(40 †) ma yresult in damage to
th ee ngineortot heengin ecoolings ystem.
XPar kthe vehicl eonal evel surface.
Only chec kthe coolan tlevel when th evehicl e
is on alevel surfac eand th eengineh as cooled
down .
XTurn th eSmartKey to position 2in th eigni-
tion loc k(Ypage 122).
XCheckthe coolan ttem perature display in th e
instrumen tcluster.
The coolan ttem perature mus tbebelow
10 4‡ (40 †).
XTurn th eSmartKey to position g
(Ypage 122) in th eignition loc k.
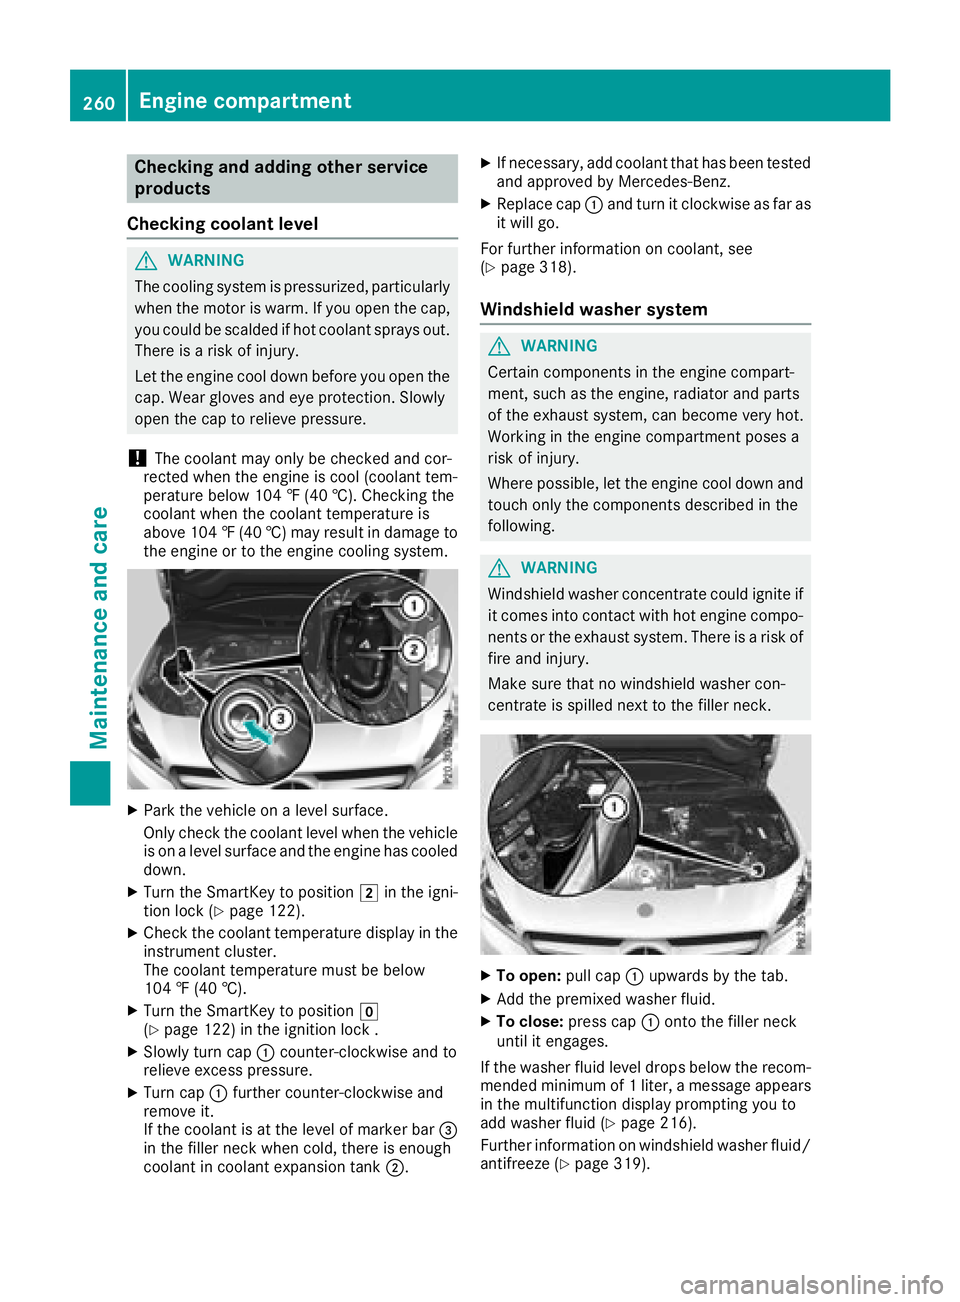
XSlowly turncap : counter-clockwise and to
reliev eexces spressure.
XTurn cap :further counter-clockwise and
remove it .
If th ecoolan tisatt helevel of marke rbar=
in th efiller neck when cold, there is enough
coolan tincoolan texpansion tan k;.
XIf necessary, add coolan ttha thas been tested
and approve dbyMercedes-Benz.
XReplacecap : and tur nitclockwise as far as
it will go.
Fo rfurther information on coolant, see
(
Ypage 318).
Windshiel dwasher system
GWARNIN G
Certain component sintheengin ecom part-
ment, suc hastheengine, radiato rand part s
of th eexhaust system, can become ver yhot.
Working in th eenginec om partmen tposes a
ris kofi njury.
Where possible, let th eenginec ooldown and
touch only th ecom ponent sdescribed in th e
following.
GWARNIN G
Windshield washer concentrate could ignit eif
it comes into contact wit hhot engin ecom po-
nent sort heexhaust system. There is arisko f
fir ea nd injury.
Mak esuret hatnow indshield washer con-
centrat eisspilled next to th efiller neck .
XTo open: pull cap:upwards by th etab.
XAd dthe premixed washer fluid.
XTo close: press cap :onto th efiller neck
until it engages.
If th ewasher flui dlevel drops belo wthe recom-
mended minimum of 1liter, amessage appears
in th emultifunction display promptin gyou to
add washer flui d(
Ypage 216).
Further information on windshield washer fluid/
antifreez e(
Ypage 319).
260Engine compartment
Maintenance and care
Page 264 of 326
quently. Under arduous operatingconditions,
the tires must be checked more often. Further
information can be obtained at aqualified spe-
cialist workshop, e.g. an authorized Mercedes-
BenzC enter.
Driving abroad
An extensive Mercedes-Benz Service network is
also available in other countries. You can obtain
further information from any authorized
Mercedes-Benz Center.
Care
General notes
HEnvironmental note
Dispose of empty packagin gand cleaning
cloths in an environmentally responsible man-
ner.
!For cleanin gyour vehicle, do not use any of
the following:
Rdry, rough or hard cloths
Rabrasive cleanin gagents
Rsolvents
Rcleanin gagent scontainin gsolvents
Do not scrub.
Do not touch the surfaces or protective films
with hard objects, e.g. aring or ice scraper.
You could otherwise scratch or damage the
surfaces and protective film.
!Do not park your vehicle for along period of
time directly after cleaning, particularly after
cleanin gthe wheel rim with wheel cleaner.
Wheel cleaner can lead to the increased cor-
rosion of the brake discs and pads. Therefore,
drive for afew minutes after cleaning. By
heating up the brakes, the brake discs and
pads dry. The vehicle can then be parked for a
long period of time.
Regular care of your vehicle is acondition for
retaining the quality in the long term.
Use care productsa nd cleaningagent srecom-
mended and approved by Mercedes-Benz.
Washing the vehicle and cleaning the
paintwork
Automatic car wash
GWARNING
Braking efficiency is reduced after washing
the vehicle. There is arisk of an accident.
After the vehicle has been washed, brake
carefully while paying attention to the traffic
condition suntil full brakin gpower is restored.
!When Distance Pilot DISTRONIC or the
HOLD function is activated, the vehicle
brakes automatically in certain situations.
To avoid damage to the vehicle, deactivate
Distance Pilot DISTRONIC and the HOLD
function in the following or similar situations:
Rwhen towing the vehicle
Rin the car wash
!Never clean your vehicle in aTouchless
Automatic Car Wash as these use special
cleanin gagents. These cleanin gagent scan
damage the paintwor korplastic parts.
!Make sure that the automatic transmission
is in position Nwhen washing your vehicle in
at ow-through car wash. The vehicle could be
damaged if the transmission is in another
position.
!Make sure that:
Rthe side windows and the sliding sunroof
are fully closed.
Rthe blower is switched off.
Rthe windshield wiper switch is at position 0.
The vehicle may otherwise be damaged.
You can wash the vehicle in an automatic car
wash from the very start.
If the vehicle is very dirty, pre-wash it before
cleanin gitinana utomatic car wash.
After using an automatic car wash, wipe off wax
from the windshield and the wiper blades. This
will prevents mears and reduce wiping noises
caused by residue on the windshield.
Washing by hand
In some countries, washing by hand is only
allowed at specially equipped washing bays.
Observe the legal requirements in each country.
262Care
Maintenance and care
Page 265 of 326
XDo not usehot water and do not wash the
vehicl eindirect sunlight.
XUse asofts po ngetoc lean.
XUseamildc leaning agent, such as acar
shampo oapproved by Mercedes-Benz.
XThoroughl yhosed ownthe vehicl ewithag en-
tle jet of water.
XDo not point the water jet directl ytowards the
ai ri nlet.
XUse plenty of water and rinse ou tthe sponge
frequently.
XRinse the vehicl ewithc lean water and dry
thoroughl ywithac hamois.
XDo not le tthe cleaning agent dry on the paint-
work.
Carefully remove al ldeposit sofroads alta s
soo naspossibl ew hend rivin ginw inter.
Powe rwashers
GWARNING
The water jet fromac ircular jet nozzle(dirt
blasters )can cause invisible exterio rdamag e
to the tire sorchassisc omponents. Compo-
nents damage dinthisw aymayf ailu nexpect-
edly .There is ariskofana ccident.
Do not us epower washers with circular jet
nozzles to clean the vehicle. Hav edamaged
tire sorc hassisc omponents replaced imme-
diately.
!Alway smaintain adistance of at least
11.8 in (30 cm )between the vehicl eand the
powe rwashern ozzle. Informatio nabout the
correct distance is availabl efromt he equip-
ment manufacturer.
Mov ethe powe rwashern ozzlearound when
cleaning your vehicle.
Do not ai mdirectl yata ny of the following:
RTires
RDoorg aps,roofgaps, joints, etc.
RElectrical components
RBattery
RConnectors
RLamps
RSeals
RTrim
RVentilatio nslots Damaged seals or electrical components can
lead to leaks or failures.
!Vehicles with decorative film: parts of your
vehicl earecovered with adecorative film.
Maintain adistance of at leas t27.5 in (70 cm)
between the parts of the vehicl ecovered with
the fil mand the nozzl eofthe high pressure
cleaner.
Informatio nabout the correct distance is
availabl efromt he eq uip
ment manufacturer.
Mov ethe powe rwashern ozzlearound when
cleaning your vehicle.
Cleanin gthe paintwork
!Do not affix:
Rstickers
Rfilms
Rmagnetic plate sorsimilar items
to painte dsurfaces .You could otherwise
damage the paintwork.
Scratches, corrosive deposits, area saffecte dby
corrosion and damage caused by inadequate
car ecanno talway sbec ompletel yrepaired .In
such cases, visit aquali fied specialis tworkshop.
XRemov edirti mmediately, where possible,
whil eavoidin grubbi ng too hard.
XSoakinsect remains with insect remove rand
rinse off the treated area safterwards.
XSoa kbirdd ropping swithw ater and rinse off
the treated area safterwards.
XRemov ecoolant, brake fluid ,tree resin, oils,
fuel sand greases by rubbing gently with a
cloth soaked in petroleu mether or lighter
fluid.
XUse tar remove rtoremove tar stains.
XUse silicone remove rtoremove wax.
If water no longe rforms "beads "onthe paint
surface, us ethe paint car eproducts recommen-
de da nd approved by Mercedes-Benz. Thi sisthe
cas eapproximately every threetof ivem onths,
depending on the climate conditions and the
car eproduct used.
If dirt hasp enetrated the paint surface or if the
paint hasb ecome dull ,the paint cleane rrecom-
mend ed a
nd approved by Mercedes-Benz
shoul dbeu sed.
Do not us ethese car eproducts in the sunoro n
the hoo dwhile the hoo dishot.
Care263
Maintenance and care
Z
Page 266 of 326
XUseasuitablet ouch-up stick, e.g. MB Touch-
Up Stick,tor epair slight damage to the paint-
work quickly and provisionally.
Mattef inish care
!Never polish the vehicle or the light alloy
wheels. Polishing causes the finish to shine.
!The following may cause the paint to
become shiny and thus reduce the matte
effect:
Rstrong rubbing of the paintwork with
unsuitablem aterials
Rfrequent use of automatic car washes
Rwashing the vehicle in direct sunlight
!Never use paint cleaner, buffing or polishing
products, or gloss preserver, e.g. wax, for the
purpose of paintwork care. These products
are only suitablef or high-gloss surfaces. Their
use on vehicles with matte paintwork leads to considerable surface damage or, more spe-
cifically,tos hiny, spotted areas.
Alwaysh ave paintwork repairs carried out at a
qualified specialist workshop.
!Do not use wash programs with ahot wax
treatment under any circumstances.
Observe these notes if your vehicle has aclear
matte finish. This will help you to avoid damage to the paintwork due to incorrect treatment.
These notes also apply to light alloy wheels with
ac lear matte finish.
The vehicle should ideally be washed by hand
using asoft sponge, car shampoo and plenty of
water.
Use only insect remover and car shampoo from
the range of approved Mercedes-Benz care
products.
Cleaning the vehiclep arts
Cleaning the wheels
GWARNING
The water jet from acircular jet nozzle (dirt
blasters) can cause invisible exterior damage
to the tires or chassis components. Compo-
nentsd amagedint his way may fail unexpect-
edly.T here is arisk of an accident.
Do not use power washers with circular jet
nozzles to clean the vehicle. Have damaged
tires or chassis componentsr eplaced imme-
diately.
!Do not use acidic wheel cleaning products
to remove brake dust. This could damage
wheel bolts and brake components.
!Do not park your vehicle for along period of
time directly after cleaning, particularlya fter
cleaning the wheel rim with wheel cleaner.
Wheel cleaner can lead to the increased cor-
rosion of the brake discs and pads. Therefore, drive for afew minutes after cleaning. By
heating up the brakes, the brake discs and
pads dry. The vehicle can then be parked for a
long period of time.
Cleaning the windows
GWARNING
You could become trapped by the windshield wipers if they start moving while cleaning the
windshieldorw iper blades. There is arisk of
injury.
Alwayss witch off the windshieldw ipers and
the ignition before cleaning the windshieldo r
wiper blades.
!Only fold the windshieldw ipers awayfrom
the windshieldw hen vertical. Otherwise, you
will damage the hood.
!Do not use dry cloths, abrasive products,
solvents or cleaning agents containing sol-
vents to clean the inside of the windows. Do
not touch the insides of the windows with
hard objects, e.g. an ice scraper or ring. There
is otherwise arisk of damaging the windows.
!Cleant he water drainage channels of the
windshielda nd the rear window at regular
intervals. Deposits such as leaves, petals and
pollen may under certain circumstances pre-
vent water from draining away. This can lead
to corrosion damage and damage to elec-
tronic components.
XCleant he inside and outside of the windows
with adamp cloth and acleaning product that
is recommended and approved by Mercedes-
Benz.
264Care
Maintenance and care