2018 MERCEDES-BENZ CLA COUPE warning
[x] Cancel search: warningPage 267 of 326
Cleaning wiper blades
GWARNING
You coul dbecome trapped by th ewindshield
wipersift heys tart moving while cleanin gthe
windshield or wiper blades.T hereisarisko f
injury.
Always switch off th ewindshield wipersa nd
th ei gnition before cleanin gthe windshield or
wiper blades.
!Only fold th ewindshield wipersa way from
th ew indshield when vertical. Otherwise, you
will damaget hehood.
!Do no tpull th ewiper blade. Otherwise, the
wiper blade coul dbedamaged.
!Do notclean wiper blades to ooften and do
no trub them to ohard .Otherwise, th egraph-
ite coatin gcoul dbed amaged. This could
caus ewiper noise.
!Holdthe wiper arm securely when folding
back .The windshield coul dbedamaged if the
wiper arm smacks against it suddenly.
XFol dthe windshield wiper arm saway from the
windshield.
XCarefully clean th ewiper blades withad amp
cloth.
XFol dthe windshield wiper arm sback again
before switching on th eignition.
Cleaning th eexterior lighting
!Only use cleanin gagents or cleanin gcloths
whicha re suitable for plastic light lenses.
Unsuitable cleanin gagents or cleanin gcloths
coul dscratch or damag ethe plastic light len-
ses.
XClean th eplastic lenses of th eexteri or lights
withaw et sponge and amild cleanin gagent,
e.g .M ercedes-Ben zcar shampoo or cleaning
cloths.
Cleaning th emirror turn signals
!Only use cleanin gagents or cleanin gcloths
that are suitable for plastic lenses.U nsuitable
cleanin gagents or cleanin gcloth scould
scratch or damaget heplastic lenses of the
mirror tur nsignals.
XClean th eplastic lenses of th emirror tur nsig-
nals in th eexteri or mirror housing usingaw et
sponge and mild cleanin gagent, e.g.
Mercedes-Ben zcar shampoo or cleaning
cloths.
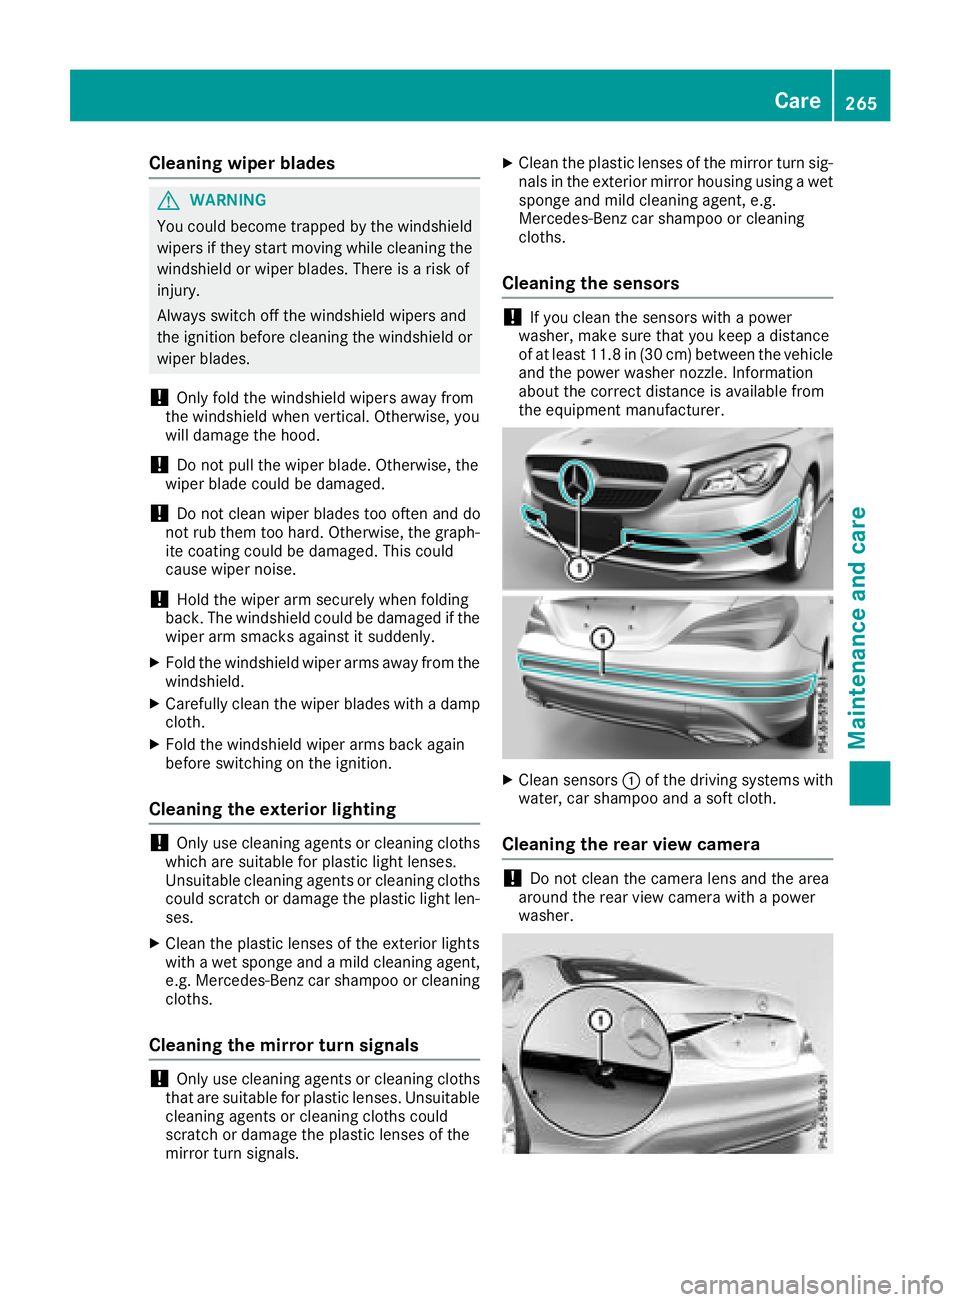
Cleaning th esensors
!If you clean th esensorsw ithapower
washer, mak esure that you keep adistance
of at least 11.8 in (30 cm)between the vehicl e
and th epower washer nozzle. Information
about th ecorrec tdistanc eisavailabl efrom
th ee quipment manufacturer.
XClean sensors :of th edriving systems with
water, car shampoo and asoftc loth.
Cleaning th erearv iew camera
!Do no tclean th ecamera lensa nd thearea
aroun dthe rear view camera with apower
washer.
Care265
Maintenance and care
Z
Page 268 of 326
XMake sure that the vehicle is atastandstill
and the SmartKey is in key position 2in the
ignition lock.
XOpen the camera cover for cleaning via the
multimedia system (see the separate operat-
ing instructions).
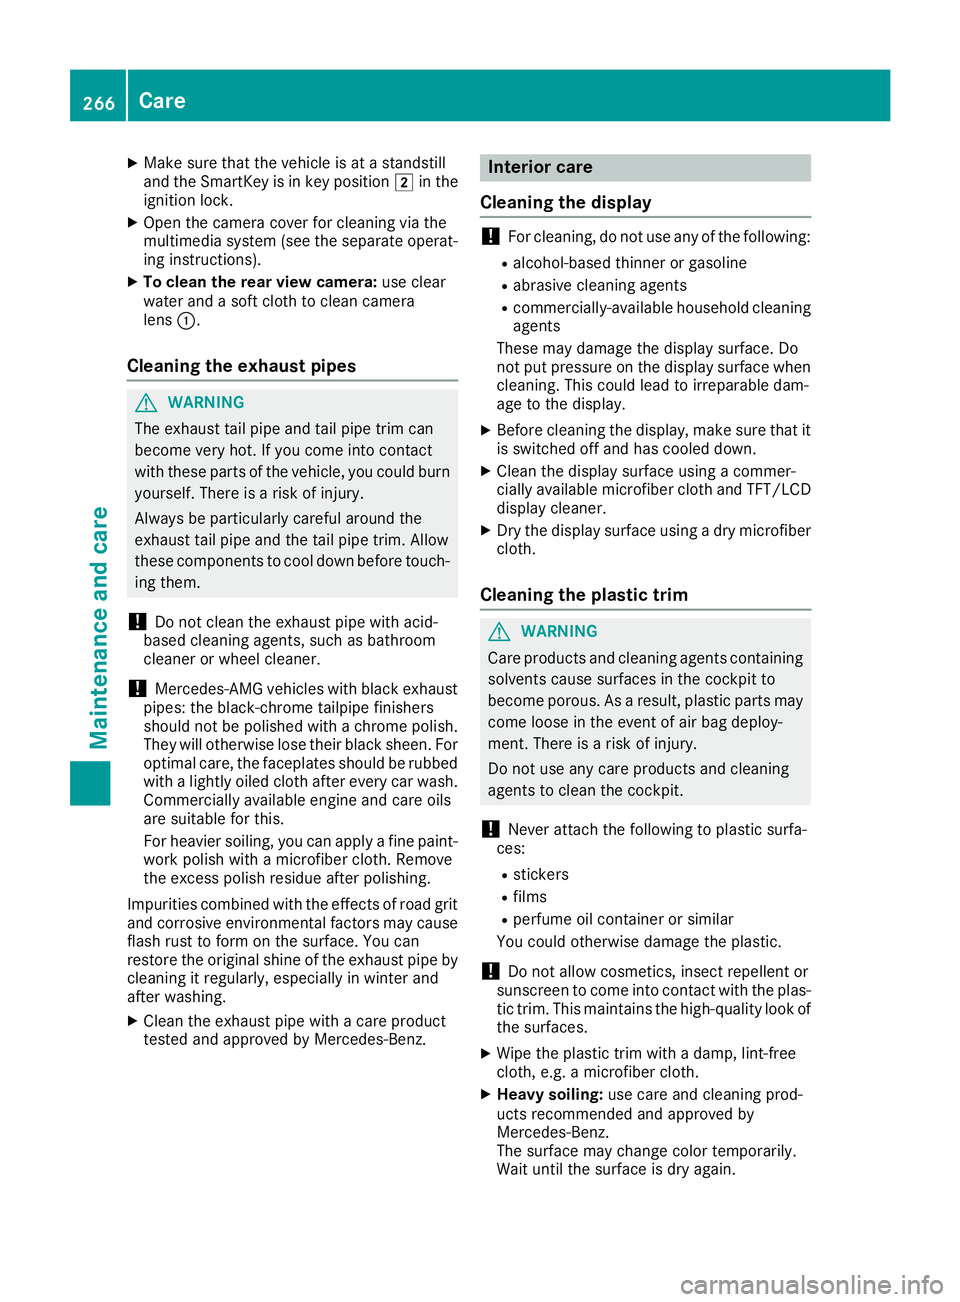
XTo clean the rear view camera: use clear
water and asoft cloth to clean camera
lens :.
Cleaningt he exhaust pipes
GWARNING
The exhaust tail pipe and tail pipe trim can
become very hot. If you come into contact
with these parts of the vehicle, you could burn
yourself. There is arisk of injury.
Always be particularly careful around the
exhaust tail pipe and the tail pipe trim. Allow
these components to cool down before touch-
ing them.
!Do not clean the exhaust pipe with acid-
based cleaning agents, such as bathroom
cleaner or wheel cleaner.
!Mercedes-AMG vehicles with black exhaust
pipes: the black-chrome tailpipe finishers
should not be polished with achrome polish.
They will otherwise lose their black sheen. For
optimal care, the faceplates should be rubbed with alightly oiled cloth after every car wash.
Commercially available engine and care oils
are suitable for this.
For heavier soiling, you can apply afine paint-
work polish with amicrofiber cloth. Remove
the excess polish residue after polishing.
Impurities combined with the effectsofr oad grit
and corrosive environmental factors may cause
flash rust to form on the surface. You can
restore the original shine of the exhaust pipe by
cleaning it regularly,e specially in winter and
after washing.
XClean the exhaust pipe with acare product
tested and approved by Mercedes-Benz.
Interior care
Cleaningt he display
!For cleaning, do not use any of the following:
Ralcohol-based thinner or gasoline
Rabrasive cleaning agents
Rcommercially-availableh ousehold cleaning
agents
These may damage the display surface. Do
not put pressure on the display surface when cleaning. This could lead to irreparable dam-
age to the display.
XBefore cleaning the display,m ake sure that it
is switched off and has cooled down.
XClean the display surface using acommer-
cially available microfiber cloth and TFT/LCD
display cleaner.
XDry the display surface using adry microfiber
cloth.
Cleaningt he plastic trim
GWARNING
Care products and cleaning agents containing solvents cause surfaces in the cockpit to
become porous. As aresult, plastic parts may
come loose in the event of air bag deploy-
ment. There is arisk of injury.
Do not use any care products and cleaning
agents to clean the cockpit.
!Never attach the following to plastic surfa-
ces:
Rstickers
Rfilms
Rperfume oil container or similar
You could otherwise damage the plastic.
!Do not allow cosmetics, insect repellent or
sunscreen to come into contact with the plas-
tic trim. This maintains the high-quality look of
the surfaces.
XWipe the plastic trim with adamp, lint-free
cloth, e.g. amicrofiber cloth.
XHeavy soiling: use care and cleaning prod-
ucts recommended and approved by
Mercedes-Benz.
The surface may change color temporarily.
Wait until the surface is dry again.
266Care
Maintenance and care
Page 269 of 326
Cleaning thesteering wheel and gear or
selector lever
XThoroughlyw ipe withadamp cloth or use
leather car eagents that have been recom-
mended and approved by Mercedes-Benz.
Cleaning genuine wood and trim ele-
ments
!Do no tuse solvent-based cleanin gagents
suchast ar remover, wheel cleaners, polishes
or waxes. Thereiso therwise ariskofd amag-
ing th esurface.
!Do no tuse chrom epolishont rimp ieces.
The trim pieces have achrom elook but are
mostly made of anodized aluminum and can
lose their shineifc hrom epolishisu sed. Use
ad amp, lint-free cloth instead when cleaning
th et rimp ieces.
If th echrome-plated trim pieces are very
dirty, you can use achrom epolish. If you are
unsure as to whether th etrimp ieces are
chrome-plated or not, consult an authorized
Mercedes-Ben zCenter.
XWipe th ewoodent rima nd trim pieces witha
damp, lint-free cloth ,e.g.am icrofiber cloth.
XHeavy soiling: use careand cleanin gprod-
uct srecommended and approved by
Mercedes-Benz.
Cleaning th eseat covers
General notes
!Do no tuse am icrofiber cloth to clean covers
made out of real leather,a rtificial leather or
DINAMICA.Ifu sed often,these can damage
th ec over.
Notet hatregular car eisessential to ensure that
th ea ppearanc eand comfor tofthecovers is
retaine dovertime.
Genuine leather seat covers
!To retain th enatural appearanc eofthe
leather,o bservethe followingc leaning
instructions:
RClean genuine leather covers carefull ywith
ad amp cloth and then wipe th ecovers
down withad ry cloth.
RMakesure that th eleather does not
become soaked. It may otherwise become
roug hand cracked.
ROnly use leather car eagents that have
been tested and approved by Mercedes-
Benz. You can obtain these from aqualified
specialist workshop.
Leather is anatural product.
It exhibitsn atural surface characteristics, for
example:
Rdifferences in th etextur e
Rmarks caused by growth and injury
Rslightn uances of color
Thesea re characteristic sofleather and not
material defects.
Seat coversofo ther materials
!Observethe followingw hen cleaning:
Rclean artificial leather covers withac loth
moistene dwithas olution containing 1%
detergent( e.g. dish washingl iquid).
Rclean cloth covers witham icrofiber cloth
moistene dwithas olution containing 1%
detergent( e.g. dish washingl iquid). Rub
c
arefull yand always wipe entir eseat sec-
tions to avoid leaving visible lines. Leave
th es eat to dry afterwards. Cleaning results
dependont hetype of dirt and how longi t
has been there.
Rclean DINAMICA covers withad amp cloth.
Makes ure that you wipe entir eseat sec-
tions to avoid leaving visible lines.
Cleaning th eseat belts
GWARNING
Seat beltsc an become severely weakened if
bleached or dyed. This coul dcaus ethe seat
beltstot earorf ail, for instance, in th eevent of
an accident. This posesani ncreased riskof
injury or fatal injury.
Never bleachord ye theseat belts.
Care267
Maintenance and care
Z
Page 272 of 326
Warning triangle
Removing/replacing the warning trian-
gle
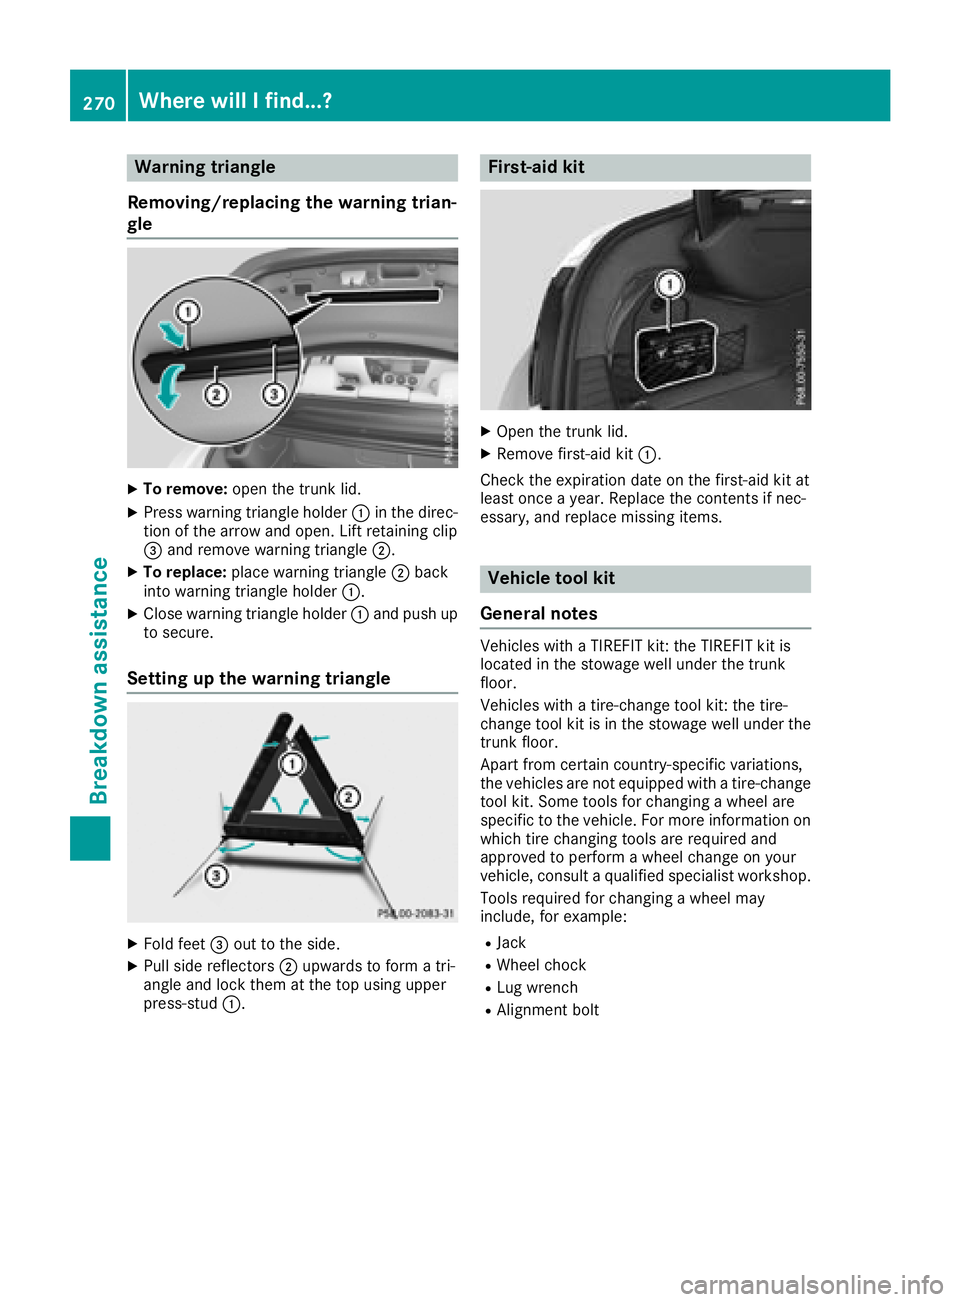
XTo remove: open the trunk lid.
XPress warning triangl eholder :in the direc-
tion of the arrow and open. Lift retaining clip
= and remove warning triangle ;.
XTo replace:place warning triangle ;back
into warning triangl eholder :.
XClose warning triangl eholder :and pus hup
to secure.
Setting up the warning triangle
XFold feet =out to the side.
XPullside reflectors ;upwards to form atri-
angl eand lock them at the top using upper
press-stud :.
First-aid kit
XOpen the trunk lid.
XRemove first-ai dkit:.
Check the expiration date on the first-ai dkit at
least once ayear. Replace the contents if nec-
essary, and replace missing items.
Vehicle tool kit
General notes
Vehicles with aTIREFIT kit: the TIREFIT kit is
located in the stowage wellu nder the trunk
floor.
Vehicles with atire-change tool kit: the tire-
change tool kit is in the stowage wellu nder the
trunk floor.
Apart from certain country-specificv ariations,
the vehicles are not equipped with atire-change
tool kit. Some tools for changing awheel are
specific to the vehicle. For more information on which tire changing tools are required and
approved to perform awheel change on your
vehicle, consul taqualified specialist workshop.
Toolsr equired for changing awheel may
include, for example:
RJack
RWheelc hock
RLug wrench
RAlignment bolt
270Where will Ifind...?
Breakdown assistance
Page 273 of 326
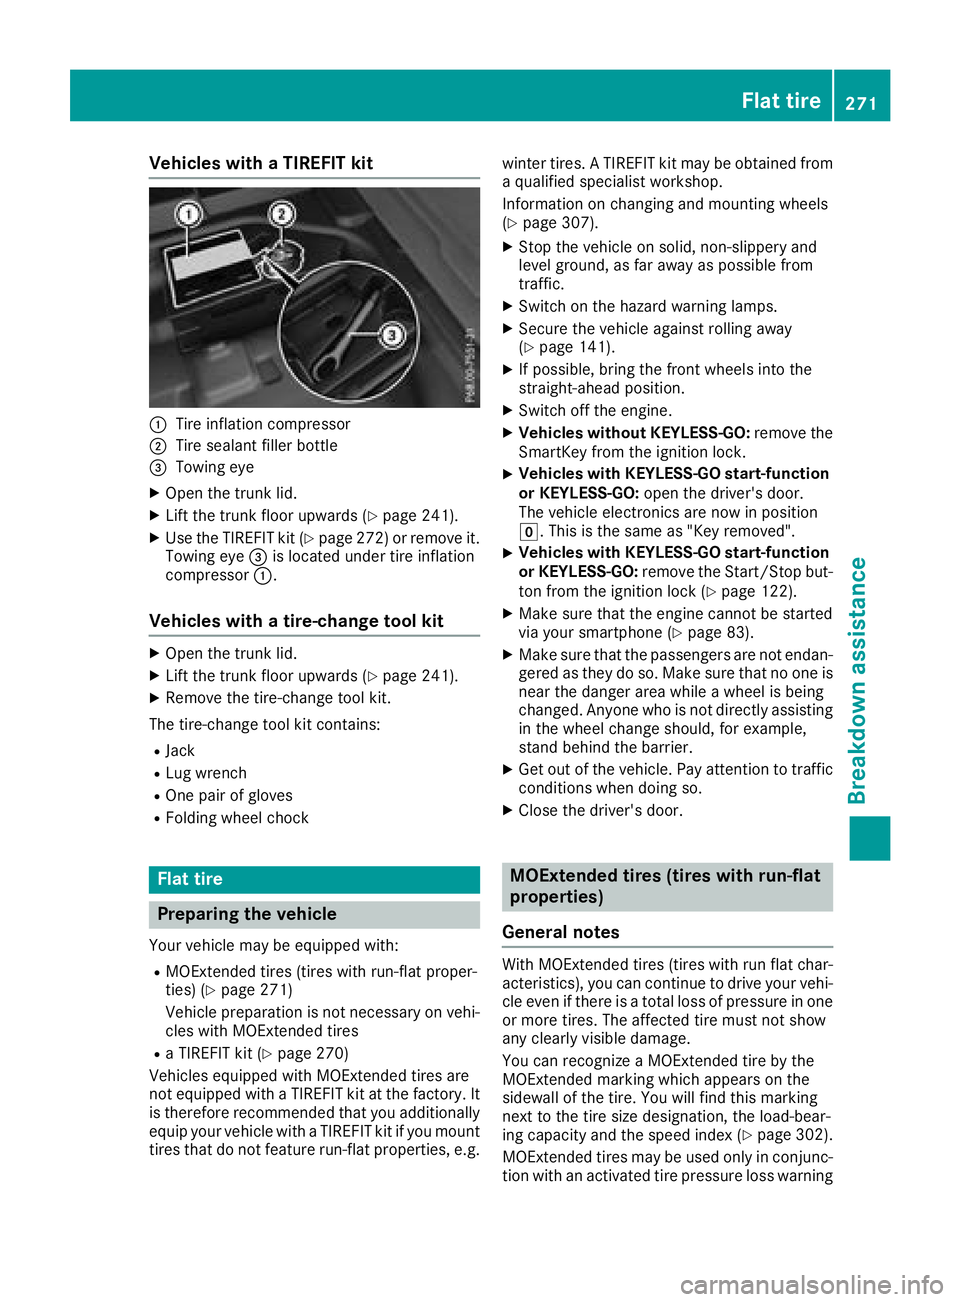
Vehicles withaTIREFI Tkit
:Tire inflation compressor
;Tire sealant fille rbottle
=Towing eye
XOpe nthe trunk lid.
XLiftthe trunk floor upwards (Ypage 241).
XUse the TIREFIT kit (Ypage 272 )orremove it.
Towing eye =is located under tire inflation
compressor :.
Vehicles with atire-chang etool kit
XOpen the trunk lid.
XLift the trunk floor upwards (Ypag e241).
XRemove the tire-change tool kit.
The tire-change tool kit contains:
RJack
RLug wrench
ROne pai rofgloves
RFolding wheelc hock
Flat tire
Preparing the vehicle
Yourvehiclem ay be equipped with:
RMOExtended tires (tires with run-flat proper-
ties) (Ypage271)
Vehiclep reparation is not necessary on vehi-
cles with MOExtended tires
RaT IREFIT kit (Ypag e270)
Vehicles equipped with MOExtended tires are
not equipped with aTIREFIT kit at the factory. It
is therefore recommended that you additionally
equip you rvehiclew ithaTIREFIT kit if you mount
tires that do not feature run-flat properties, e.g. winter tires.
ATIREFIT kit may be obtained from
aq ualified specialist workshop.
Information on changing and mounting wheels
(
Ypag e307).
XStop the vehicleons olid, non-slippery and
level ground ,asfar awa yaspossible from
traffic.
XSwitch on the hazard warning lamps.
XSecure the vehiclea gainst rolling away
(Ypag e141).
XIf possible, bring the front wheels into the
straight-ahead position.
XSwitch off the engine.
XVehicles without KEYLESS-GO: remove the
SmartKey from the ignitio nlock.
XVehicles with KEYLESS-GO start-function
or KEYLESS-GO: open the driver'sd oor.
The vehiclee lectronics are now in position
g.T his is the same as "Key removed".
XVehicles with KEYLESS-GO start-function
or KEYLESS-GO: remove the Start/Stop but-
ton from the ignitio nlock (
Ypag e122).
XMake sure that the engine cannot be started
via you rsmartphone (Ypag e83).
XMake sure that the passengers are not endan-
gered as they do so. Make sure that no one is
near the dange rarea while awhee lisb eing
changed .Anyone who is not directly assisting
in the wheelc hange should, for example,
stand behind the barrier.
XGet out of the vehicle. Pay attention to traffic
conditions when doing so.
XClose the driver'sd oor.
MOExtended tires (tires with run-flat
properties)
General notes
With MOExtended tires (tires with run flat char-
acteristics) ,you can continue to drive you rvehi-
cle even if there is atotal loss of pressure in one
or more tires. The affected tire must not show
any clearly visible damage.
You can recognize aMOExtended tire by the
MOExtended marking which appears on the
sidewal lofthe tire. You wil lfind this marking
next to the tire size designation, the load-bear-
ing capacity and the speedi ndex (
Ypage302).
MOExtended tires may be used only in conjunc-
tion with an activated tire pressure loss warning
Flat tire271
Breakdown assistance
Page 274 of 326
system (Canadaonly) or tire pressure monitor
(USA only).
If ap ressure loss warning message appears
in the multifunction display:
Robserve the instructions in the displaym es-
sages (Ypage 211).
Rcheck the tire for damage
Rif driving on, observe the following notes
The driving distance possible in run-flat mode is
approximately 50 miles (80 km) when the vehi-
cle is partiallyl aden. When the vehicle is fully
laden it is approximately 19 miles (30 km).
In addition to the vehicle load, the driving dis-
tance possible depends upon:
Rvehicle speed
Rroad condition
Routside temperature
The driving distance possible in run-flat mode
may be reduced by extreme driving conditions
or maneuvers, or it can be increased through a
moderate style of driving.
The driving distance possible in run-flat mode is
counted from the moment the tire pressure loss
warning appears in the multifunction display.
You must not exceed amaximum speed of
50 mph (80 km/h).
When replacing one or all tires, please observe
the following specifications for your vehicle's
tires:
Rsize
Rtype and
Rthe "MOExtended" marking
If at ire has gone flat and cannot be replaced
with aMOExtended tire, astandard tire may be
used as atemporary measure. Make sure that
you use the proper size and type (summer or
winter tire).
Vehicles equipped with MOExtended tires are
not equipped with aTIREFIT kit at the factory. It
is therefore recommended that you additionally
equip your vehicle with aTIREFIT kit if you mount
tires that do not feature run-flat properties, e.g.
winter tires. ATIREFIT kit may be obtained from
aq ualified specialist workshop.
Important safety notes
GWARNING
When driving in emergency mode, the driving
characteristics deteriorate, e.g. when corner-
ing, accelerating quickly and when braking.
There is arisk of an accident.
Do not exceed the stated maximum speed.
Avoid abrupt steering and driving maneuvers, and driving over obstacles (curbs, potholes,
off-road). This applies in particular to aladen
vehicle.
Stop driving in emergency mode if:
Ryou hear banging noises.
Rthe vehicle starts to shake.
Ryou see smoke and smell rubber.
RESP®is intervenin gconstantly.
Rthere are tears in the sidewalls of the tire.
After driving in emergency mode, have the
wheel rims checked at aqualified specialist
workshop with regard to their further use. The
defective tire must be replaced in every case.
TIREFIT kit
Important safety notes
TIREFIT is atire sealant.
Only valid for USA: You can use TIREFIT to seal
punctures of up to 0.16 in (4 mm), particularly
those in the tire tread. You can use TIREFIT at
outside temperatures down to Ò4‡(Ò20 †).
GWARNING
In the following situations, the tire sealant is
unable to provide sufficient breakdown assis-
tance, as it is unable to seal the tire properly:
Rthere are cuts or punctures in the tire larger
than those mentioned above.
Rthe wheel rim is damaged.
Ryou have driven at very low tire pressures or on aflat tire.
There is arisk of an accident.
Do not drive the vehicle. Contact aqualified
specialist workshop.
GWARNING
The tire sealant is harmful and causes irrita-
tion. It must not come into contact with your
skin, eyes or clothing or be swallowed. Do not
272Flat tire
Breakdown assistance
Page 276 of 326
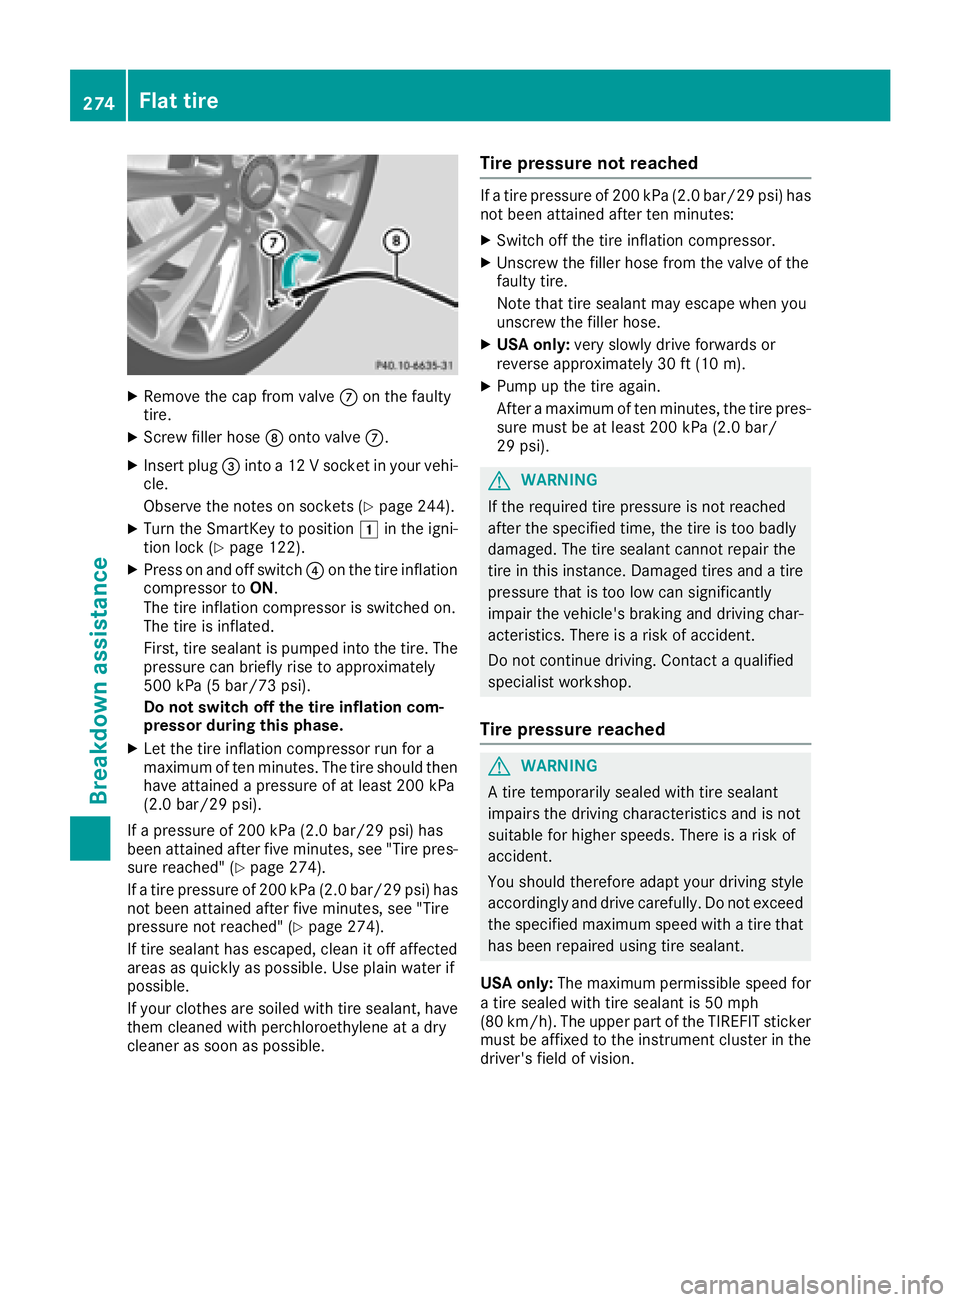
XRemove thecap from valv eC on th efault y
tire.
XScrew filler hos eD onto valv eC.
XInser tplug =intoa12Vs ocketinyour vehi-
cle .
Observ ethe note sons ockets (
Ypage 244).
XTurn theSmartKey to position 1in th eigni-
tion loc k(Ypage 122).
XPress on and off switch ?on th etirei nflation
compressor to ON.
The tire inflation compressor is switched on .
The tire is inflated.
First ,tires ealan tispumped int othe tire. The
pressur ecan briefly ris etoapproximately
50 0k Pa(5 bar/73 psi) .
Do not switch off th etirei nflation com -
pressor during this phase .
XLet thetirei nflation compressor run for a
maximum of te nminutes. The tire should then
hav eattained apressur eofatl east 200kPa
(2.0 ba r/29 psi) .
If ap ressur eof200 kP a(2.0 ba r/29 psi) ha s
been at tained after fiv eminutes, see" Tire pres-
sure reached" (
Ypage 274).
If at ire pressure of 200 kPa (2.0 bar/29 psi) has
not been attaine dafter fiv eminutes, see" Tire
pressure not reached" (
Ypage 274).
If tire sealant hase scaped ,clean it off affected
area sasq uickl yasp ossible. Use plai nwater if
possible.
If your clothesa resoile dwitht ire seala
nt, have
themc leanedwithp erchloroethylene at adry
cleane rassoona spossible.
Tire pressure no treached
Ifat ire pressure of 200 kPa (2.0 bar/29p si)h as
not been attaine dafter ten minutes:
XSwitch off the tire inflatio ncompressor.
XUnscrew the fille rhosef romt he valve of the
faulty tire.
Note thatt ire sealant maye scap ew heny ou
unscrew the fille rhose.
XUS Ao nly: veryslowl ydrive forwards or
revers eapproximately 30 ft (10 m).
XPump up the tire again.
After amaximum of ten minutes, the tire pres-
sure must be at leas t200 kPa (2.0 ba r/
29 psi) .
GWARNING
If the required tire pressure is not reached
afte rthe specified time ,the tire is too badly
damaged. The tire sealant cannot repai rthe
tire in this instance. Damaged tire sand atire
pressure that is too low can significantly
impai rthe vehicle's braking and driving char-
acteristics. There is ariskofa ccident.
Do not continu edriving .Contact aquali fied
specialist workshop.
Tire pressure reached
GWARNING
At ire temporaril yseale dwitht ire sealant
impairs the driving characteristics and is not
suitablef or higher speeds .There is arisko f
accident.
You shoul dtherefore adap tyou rd riving style
accordingly and drive carefully .Donot exceed
the specified maximum speed with atire that
hasb eenr epaired using tire sealant.
USA only: The maximum permissible speed for
at ire seale dwitht ire sealant is 50 mph
(80 km/h). The upper part of the TIREFIT sticker
mus tbea ffixed to the instrument cluster in the
driver'sf ield of vision.
274Flat tire
Breakdown assistance
Page 277 of 326
Ifat ire pressure of 200 kPa (2.0 bar/29 psi) has
been attained after ten minutes:
XSwitch off the tire inflation compressor.
XUnscrew the fillerh ose from the valve of the
faulty tire.
Note that tire sealant may escape when you
unscrew the fillerh ose.
XUSA only:Stow the tire sealant bottle and the
tire inflation compressor.
XPull away immediately.
XStop after driving for approximately ten
minutes and check the tire pressure with the
tire inflation compressor.
The tire pressure must now be at least
130 kPa (1.3 bar/19 psi).
GWARNING
If the required tire pressure is not reached
after driving for ashort period,t he tire is too
badlyd amaged. The tire sealant cannot repair
the tire in this instance. Damaged tires and a
tire pressure that is too low can significantly
impair the vehicle's braking and driving char-
acteristics. There is arisk of accident.
Do not continue driving. Contact aqualified
specialist workshop.
iUSA only: In cases such as the one men-
tioned above,c ontact an authorized
Mercedes-Benz Center. Or call
1-800-FOR-MERCedes (in the USA) or
1-800-387-0100 (in Canada).
XUSA only: Correct the tire pressure if it is still
at least 130 kPa (1.3 bar/19 psi). See the Tire
and Loading Information placard on the driv-
er's side B-pillarort he tire pressure table in
the fuel fillerf lap for values.
XTo increase the tire pressure: switch on the
tire inflation compressor.
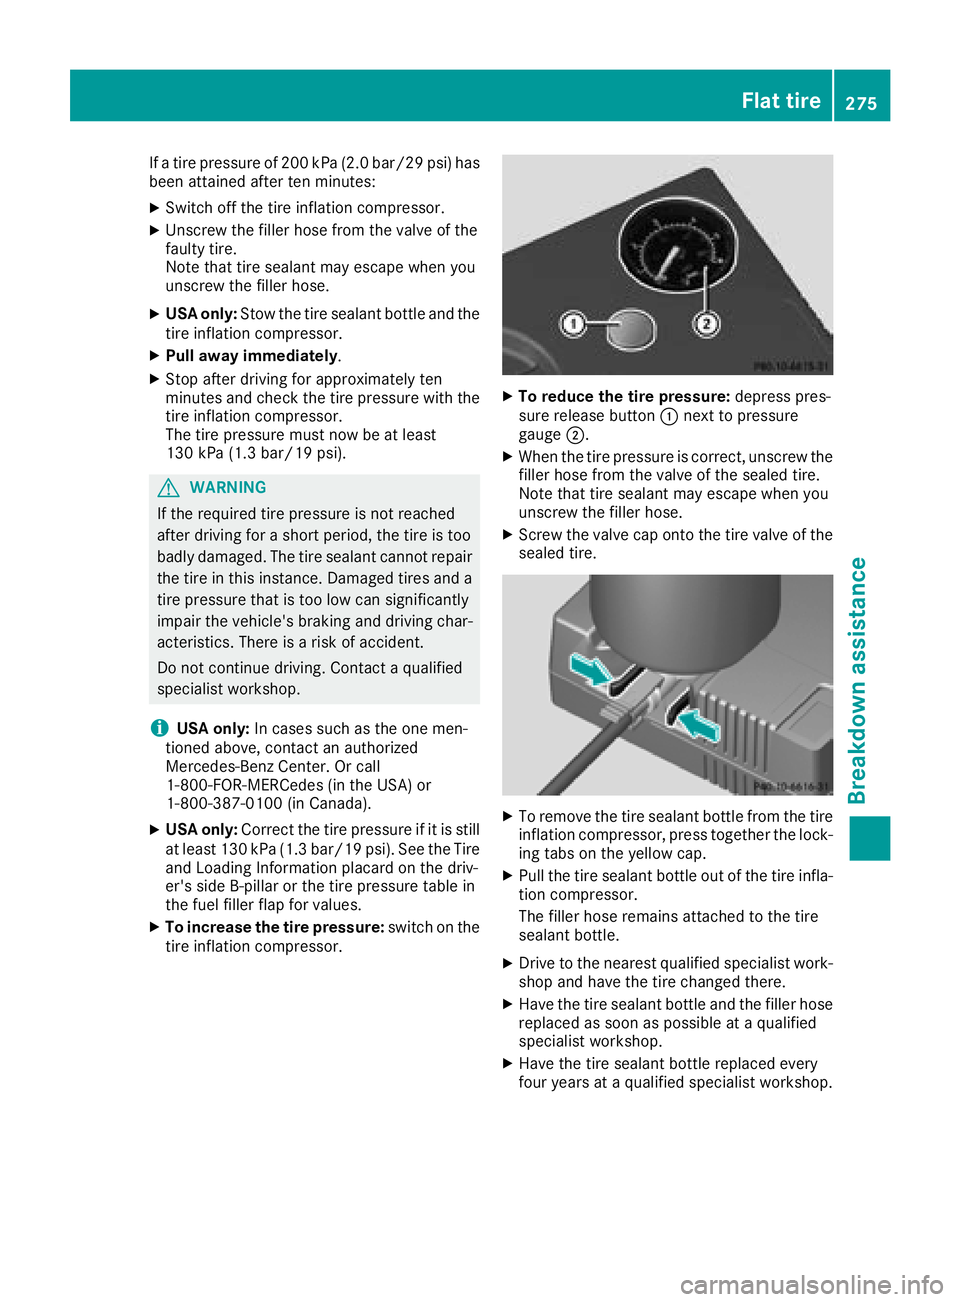
XTo reduce the tire pressure: depresspres-
sure release button :next to pressure
gauge ;.
XWhen the tire pressure is correct, unscrew the
fillerhose from the valve of the sealed tire.
Note that tire sealant may escape when you
unscrew the fillerh ose.
XScrew the valve cap onto the tire valve of the
sealed tire.
XTo remove the tire sealant bottle from the tire
inflation compressor, press together the lock-
ing tabs on the yellow cap.
XPullthe tire sealant bottle out of the tire infla-
tion compressor.
The fillerh ose remains attached to the tire
sealant bottle.
XDrive to the nearest qualifieds pecialist work-
shop and have the tire changed there.
XHave the tire sealant bottle and the fillerh ose
replaced as soon as possible at aqualified
specialist workshop.
XHave the tire sealant bottle replaced every
four years at aqualifieds pecialist workshop.
Flat tire275
Breakdowna ssistance
Z