2018 MERCEDES-BENZ CLA COUPE warning
[x] Cancel search: warningPage 300 of 326
CountryRadio type approval number
ne doit pas produire de brouil-
lage, et (2) L'autisatuer de l'ap-
pareil doit accepter tout brouil-
lage radioelectrique subi, meme
si le brouillage est susceptible
d'en compromettre le fonc-
tionnement. WARNING: Changes
or modifications not expressively
approved by thepartyr esponsi-
ble for compliance could void the
users authorityt ooperate the
equipment .The ter m"IC:"b efore
th er adio certification number
onl ysignifies Canada technical
specifications were met.
CanadaIC: 2546A-MW2433A
IC:2546A-GG4 This devic ecom-
plies with part 15 of th eFCC
rules and with licens eexempt
RSS standards of Industry Can-
ada. Operatio nissubject to the
following conditions. (1) This
devic emay not cause harmful
interference, and (2) This device
must accept any interference
received ,includingi nterference
that may cause undesiredo per-
ation. Le present appareil est
conforme d'industrie Canada
applicables aux appereils radio
exemptsdel icense. L'exploita-
tio ne st authorisee aux deux con-
ditionss uivantes.(1). L'appareil
ne doit pas produire de brouil-
lage, et (2) L'autisatuer de l'ap-
pareil doit accepter tout brouil-
lage radioelectrique subi, meme
si le brouillage est susceptible
d'en compromettre le fonc-
tionnement. WARNING: Changes
or modifications not expressively
approved by th epartyr esponsi-
ble for compliance could void the
users authorityt ooperate the
equipment .The ter m"IC:"b efore
th er adio certification number
onl ysignifies Canada technical
specifications were met.
IC: 2546A-MC34MA4
Loading th evehicle
Instruction labels for tires and loads
GWARNING
Overloadedt ires can overheat,c ausing a
blowout.O verloadedt ires can also impair the
steeringa nd driving characteristic sand lead
to brakef ailure. Thereisar isk of accident.
Observe th eload rating of th etires. The load
rating must be at least half of th eGAWR of
your vehicle .Never overload th etires by
exceedingt hemaximum load.
Two instruction labels on your vehicle show the maximum possible load.
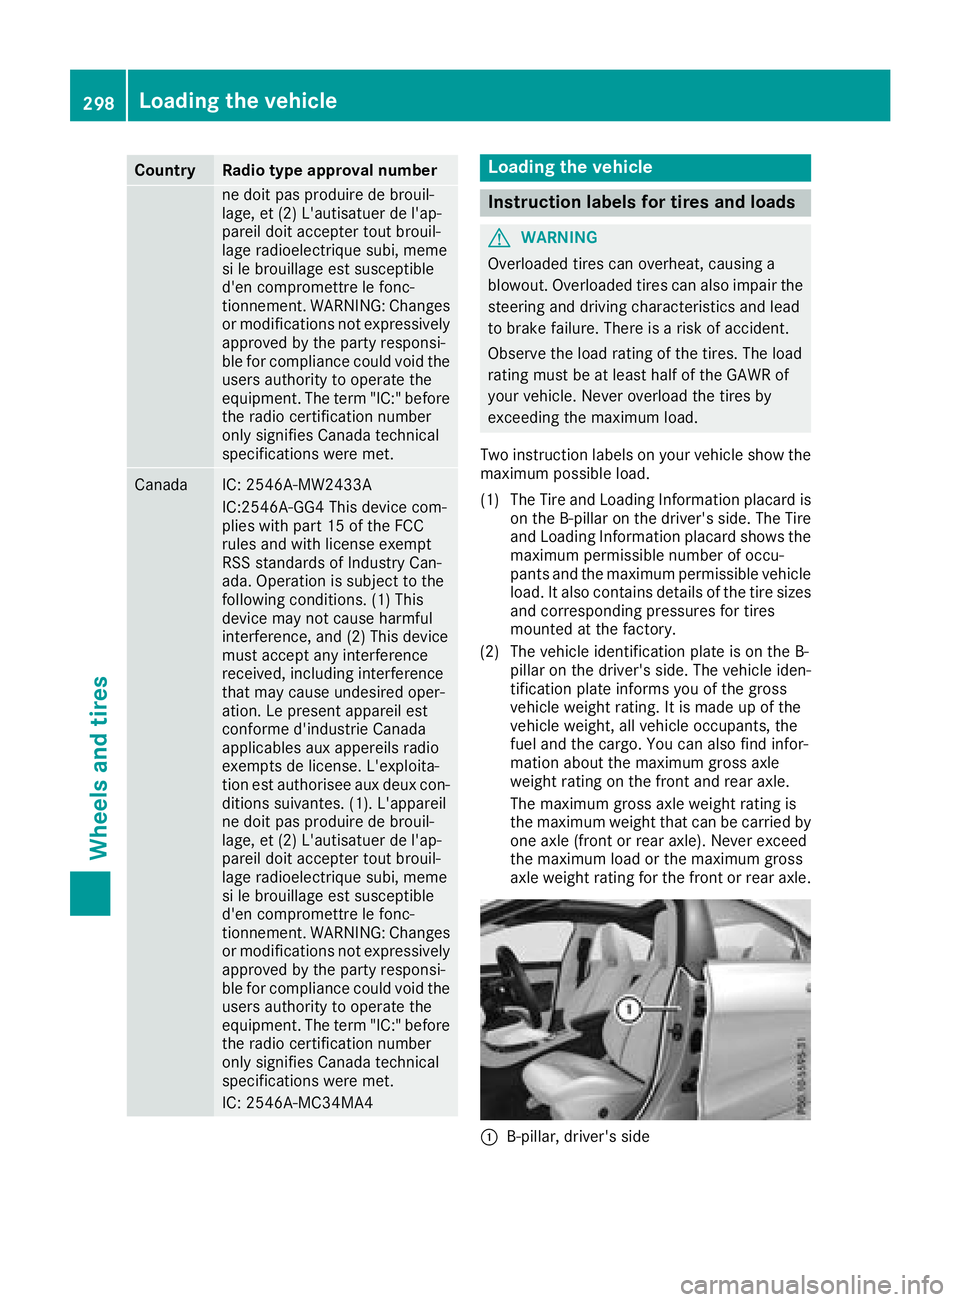
(1) The Tire and LoadingI nformation placar dis
on th eB-pillar on th edriver' sside. The Tire
and LoadingI nformation placar dshows the
maximum permissible number of occu-
pant sand th emaximum permissible vehicle
load. It also contain sdetails of th etires izes
and corresponding pressures for tires
mounted at th efactory.
(2) The vehicle identification plateisont heB-
pillar on th edriver' sside. The vehicle iden-
tification platei nformsyou of thegross
vehicle weight rating .Itismade up of the
vehicle weight,a ll vehicle occupants, the
fuel and th ecargo. You can also fin dinfor-
mation about th emaximum gross axle
weight rating on th efront and rear axle.
The maximum gross axle weight rating is
th em aximum weight that can be carried by
one axle (front or rear axle) .Never exceed
th em aximum load or th emaximum gross
axle weight rating for th efront or rear axle.
:B-pillar ,driver' sside
298Loading th evehicle
Wheels and tires
Page 303 of 326
Permissible Gross Vehicle Weight Rating
(GVWR):the gross weight of the vehicle, all pas-
sengers, load and trailer load/noseweight (if
applicable) must not exceed the permissible
gross vehicle weight.
Gross Axle Weight Rating (GAWR): the maxi-
mum permissible weight that can be carried by
one axle (front or rear axle).
To ensure that your vehicle does not exceed the
maximum permissible values (gross vehicle
weight and maximum gross axle weight rating),
have your loaded vehicle (including driver, occu-
pants, cargo, and full trailer load if applicable)
weighed on asuitable vehicle weighbridge.
All about wheelsa nd tires
Uniform Tire Quality Grading Stand-
ards
Overview of Tire Quality Grading Stand-
ards
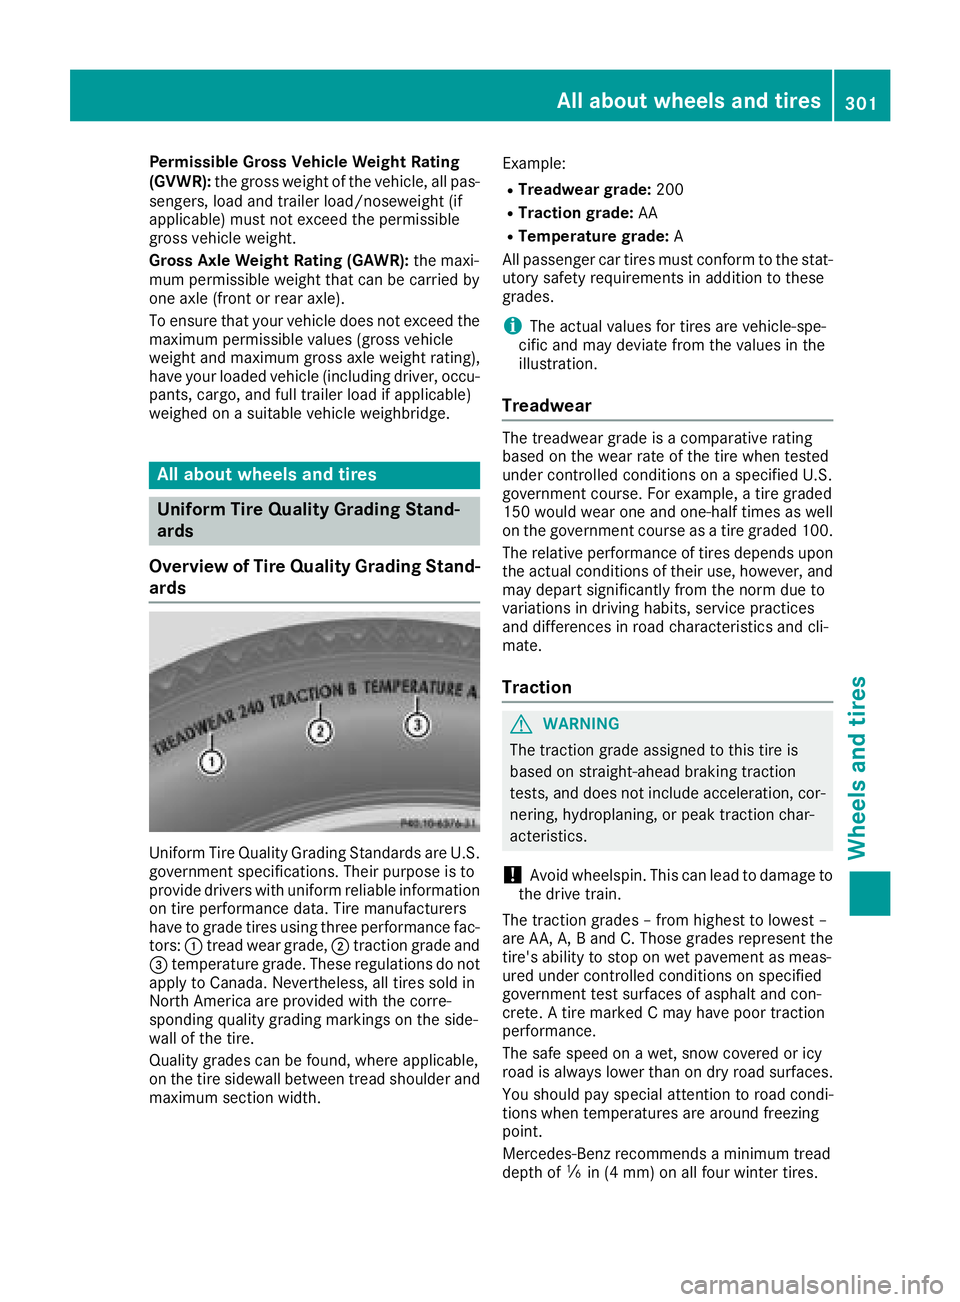
Uniform Tire Quality Grading Standards are U.S. governments pecifications. Their purpose is to
provide drivers with uniform reliable information
on tire performance data. Tire manufacturers
have to grade tires using three performance fac-
tors: :tread wear grade, ;traction grade and
= temperature grade. These regulations do not
apply to Canada. Nevertheless, all tires sold in
North America are provided with the corre-
sponding quality grading markings on the side-
wall of the tire.
Quality grades can be found, where applicable,
on the tire sidewallb etween tread shoulder and
maximum section width. Example:
RTreadwear grade:
200
RTraction grade:AA
RTemperaturegrade:A
All passenger car tires must conformtot he stat-
utory safety requirements in addition to these
grades.
iThe actual values for tires are vehicle-spe-
cific and may deviate from the values in the
illustration.
Treadwear
The treadwear grade is acomparative rating
based on the wear rate of the tire when tested
under controlled conditionsonas pecified U.S.
governmentc ourse. For example, atire graded
150 would wear one and one-half times as well
on the governmentc ourse asatire graded 100.
The relative performance of tires depends upon the actual conditionsoft heir use, however, and
may depart significantly from the norm due to
variations in driving habits, service practices
and differences in road characteristics and cli-
mate.
Traction
GWARNING
The traction grade assigned to this tire is
based on straight-ahead braking traction
tests, and does not include acceleration, cor-
nering, hydroplaning, or peak traction char-
acteristics.
!Avoid wheelspin. This can lead to damage to
the drive train.
The traction grades –from highest to lowest –
are AA, A, Band C. Those grades represent the
tire's ability to stop on wet pavement as meas-
ured under controlled conditionsons pecified
governmentt est surfaces of asphalt and con-
crete. Atire marked Cmay have poor traction
performance.
The safe speed on awet, snow covered or icy
road is always lower than on dry road surfaces.
You should pay special attention to road condi-
tions when temperatures are around freezing
point.
Mercedes-Benzr ecommendsaminimum tread
depth of ãin (4 mm) on all four winter tires.
All about wheels and tires301
Wheels and tires
Z
Page 304 of 326
Observe the legally required minimum tire tread
depth (Ypage 288). Winter tires can reduce the
braking distance on snow-covered surfaces in
comparison with summer tires. The braking dis-
tance is still much further than on surfaces that
are not icy or covered with snow. Take appro-
priate care when driving.
Further information on winter tires (M+S tires)
(
Ypage 289).
Temperature
GWARNING
The temperature grade for this tire is estab-
lished for atire that is properly inflated and
not overloaded.E xcessive speed, underinfla-
tion, or excessive loading, either separately or
in combination, can cause excessive heat
build-up and possible tire failure.
The temperature grades are A(the highest), B,
and C, representing the tire's resistance to the
generation of heat and its ability to dissipate
heat when tested under controlled conditions
on aspecified indoor laboratory test wheel. Sus-
tained high temperature can cause the material
of the tire to degenerate and reduce tire life, and
excessive temperature can lead to sudden tire
failure. The grade Ccorresponds to alevel of
performance which all passenger car tires must
meet under the Federal Motor Vehicle Safety
Standard No. 109. Grades BandArepresent
higher levels of performance on the laboratory
test wheel than the minimum required by law.
Tire labeling
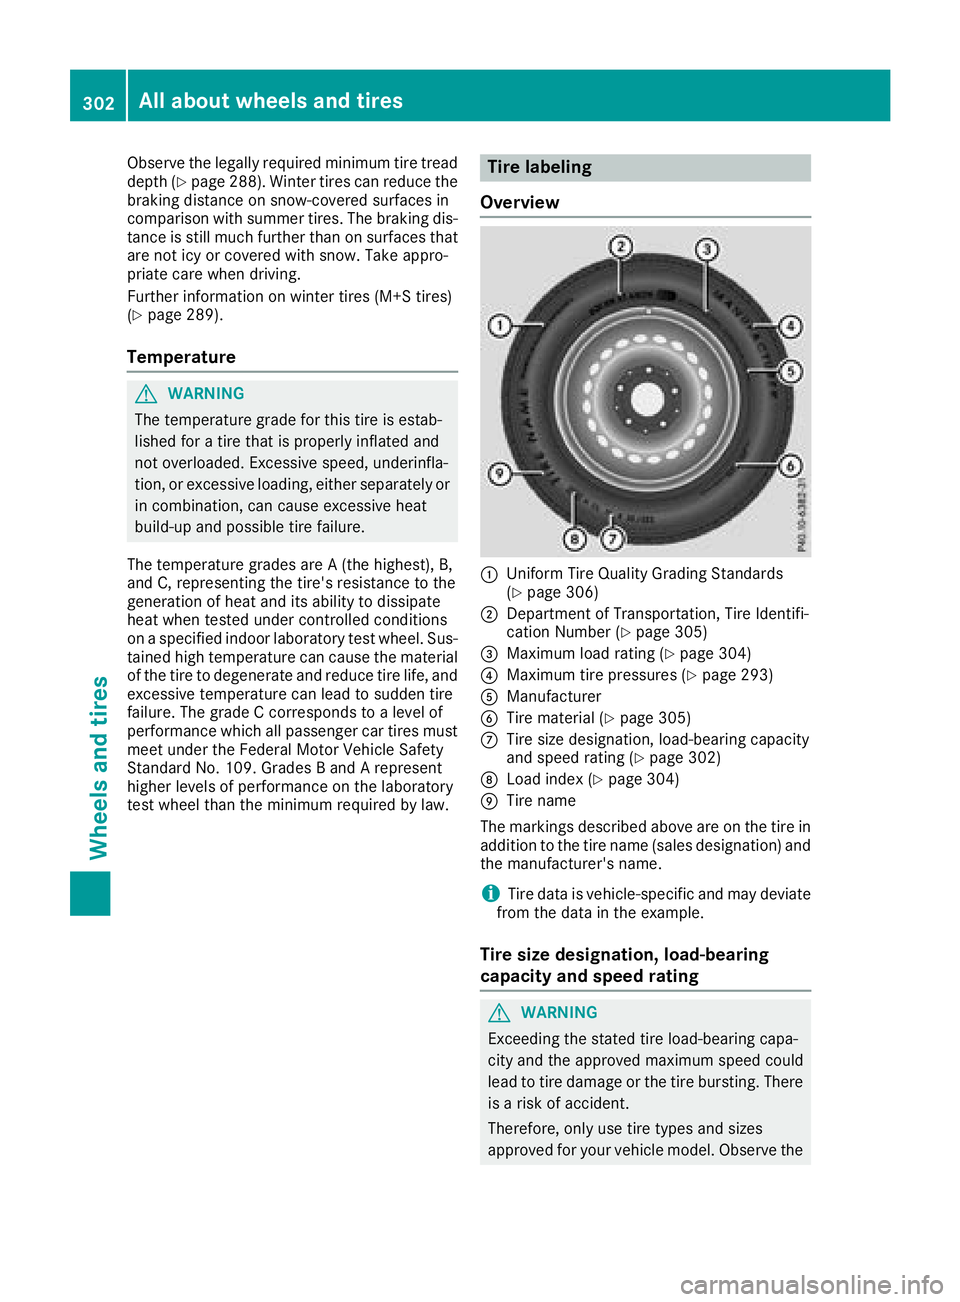
Overview
:Uniform Tire Quality Grading Standards
(Ypage 306)
;Department of Transportation, Tire Identifi-
cation Number (Ypage 305)
=Maximum load rating (Ypage 304)
?Maximum tire pressures (Ypage 293)
AManufacturer
BTire material (Ypage 305)
CTire size designation, load-bearing capacity
and speed rating (Ypage 302)
DLoad index (Ypage 304)
ETire name
The markings described above are on the tire in
addition to the tire name (sales designation) and
the manufacturer's name.
iTire data is vehicle-specific and may deviate
from the data in the example.
Tire size designation, load-bearing
capacity and speed rating
GWARNING
Exceeding the stated tire load-bearing capa-
city and the approved maximum speed could
lead to tire damage or the tire bursting. There is ar isk of accident.
Therefore, only use tire types and sizes
approved for your vehicle model. Observe the
302All about wheels and tires
Wheels and tires
Page 309 of 326
PSI (pounds per squareinch)
Astandard unit of measure for tire pressure.
Aspect ratio
Relationship between tire height and tire width
in percent.
Tire pressure
This is pressure inside the tire applying an out-
ward force to each square inch of the tire's sur-
face. The tire pressure is specified in pounds per
square inch (psi), in kilopascal (kPa) or in bar.
The tire pressure should only be corrected when
the tires are cold.
Cold tire pressure
The tires are cold:
Rif the vehicle has been parked with the tires
out of direct sunlight for at least three hours
and
Rif the vehicle has not been driven further than
1m ile (1.6 km)
Tread
The part of the tire that comes into contact with
the road.
Bead
The tire bead ensures that the tire sits securely
on the wheel. There are several steel wires in the
bead to prevent the tire from coming loose from
the wheel rim.
Sidewall
The part of the tire between the tread and the
bead.
Weight of optional extras
The combined weight of those optional extras
that weigh more than the replaced standard
parts and more than 2.3 kg (5 lbs). These
optional extras, such as high-performance
brakes, level control, aroof rack or ahigh-per-
formanceb attery, are not included in the curb
weight and the weight of the accessories.
TIN (Tire Identification Number)
This is aunique identifier which can be used by
at ire manufacturer to identify tires, for example
for aproduct recall, and thus identify the pur-
chasers. The TIN is made up of the manufactur-
er's identity code, tire size, tire type code and
the manufacturing date.
Load bearing index
The load bearing index (also load index) is acode
that contains the maximum load bearing capa-
city of atire.
Traction
Traction is the result of friction between the tires
and the road surface.
Treadwear indicators
Narrow bars (tread wear bars) that are distrib-
uted over the tire tread. If the tire tread is level
with the bars, the wear limit of áin (1.6 mm)
has been reached.
Occupant distribution
The distribution of occupants in avehicle at their
designated seating positions.
Total load limit
Nominal load and luggage load plus 68 kg
(15 0lbs)m ultiplied by the number of seats in
the vehicle.
Changing awheel
Flat tire
The "Breakdown assistance" section
(Ypage 271) contains information and notes on
how to deal with aflat tire. Information on driv-
ing with MOExtended tires in the event of aflat
tire can be found under "MOExtended tires (tires
with run-flat characteristics" (
Ypage 271).
Rotating the wheels
GWARNING
Interchanging the front and rear wheels may
severely impair the driving characteristics if
the wheels or tires have different dimensions. The wheel brakes or suspension components
may also be damaged. There is arisk of acci-
dent.
Rotate front and rear wheels only if the wheels and tires are of the same dimensions.
!On vehicles equippedw ithatire pressure
monitor ,electronic components are located
in the wheel.
Changing awheel307
Wheels and tires
Z
Page 310 of 326

Tire-mounting tools should not be used near
the valve. This could damage the electronic
components.
Only have tires changed ataqualified spe-
cialist workshop.
Observe the instructions and safety notes in the
"Changing awheel" section (
Ypage 307).
The wear pattern sonthe front and rear tires
differ, depending on the operating conditions.
Rotate the wheels before aclear wear pattern
has formed on the tires. Frontt ires typically
wear more on the shoulders and the rear tires in
the center.
On vehicles that have the same size front and
rear wheels, you can rotat ethe wheels accord-
ing to the intervals in the tire manufacturer's
warranty book in your vehicle documents. If no
warranty book is available, the tires should be
rotated every 3,000 to 6,000 miles (5,000 to
10,000k m).D ependin gontire wear, this may
be required earlier. Do not change the direction
of wheel rotation.
Clean the contact surfaces of the wheel and the brake disc thoroughly every time awheel is rota-
ted. Check the tire pressure and, if necessary,
restart the tire pressure loss warning system
(Canada only) or the tire pressure monitor (USA
only).
Direction of rotation
Tires with aspecified direction of rotation have
additional benefits ,e.g. if there is arisk of hydro-
planing. These advantages can only be gained if
the tires are installed corresponding to the
direction of rotation.
An arrow on the sidewall of the tire indicates its
correctd irection of rotation.
Storing wheels
Storewheels that are not being used in acool,
dry and preferably dark place. Protectt he tires
from oil, grease, gasoline and diesel.
Mounting awheel
Preparing the vehicle
XStop the vehicle on solid, non-slippery and
level ground.
XApply the electric parking brake manually.
XBring the front wheels into the straight-ahead position.
XShift the transmission to position j.
XSwitch off the engine.
XVehicles without KEYLESS-GO:remove the
SmartKey from the ignition lock.
XVehicles with KEYLESS-GO start-function
or KEYLESS-GO: open the driver's door.
The vehicle electronics are now in position
u.T his is the same as “key removed”.
XVehicles with KEYLESS-GO start-function
or KEYLESS-GO: remove the Start/Stop but-
ton from the ignition lock (
Ypage 122).
XMake sure that the engine cannot be started
via your smartphon e(Ypage 83).
XIf included in the vehicle equipment, remove
the tire-change tool kit from the vehicle.
XSafeguard the vehicle against rolling away
(Ypage 141).
iApart from certain country-specific varia-
tions, the vehicles are not equipped with a
tire-change tool kit. Some tools for changing a
wheel are specific to the vehicle. For more
information on which tools are required to
perform awheel change on your vehicle, con-
sult aqualified specialist workshop.
Necessary tire-changing tools can include, for
example:
RJack
RWheel chock
RLug wrench
308Changing awheel
Wheels and tires
Page 311 of 326

Securing the vehicle to prevent it from
rolling away
If your vehicle is equippedwithaw heel chock,i t
can be found in the tire-change tool kit
(
Ypage 270).
The folding wheel chock is an additional safety
measure to prevent the vehicle from rolling
away,f or example when changing awheel.
XFold both plates up :.
XFold out lower plate ;.
XGuide the lugs on the lower plate fully into the
openings in base plate =.
XPlace chocksorother suitable items under
the front and rear of the wheel that is diago-
nally opposite the wheel you wish to change.
Raising the vehicle
GWARNING
If you do not position the jack correctly at the
appropriate jackingp oint of the vehicle, the
jack could tip over with the vehicle raised.
There is arisk of injury.
Only position the jack at the appropriate jack-
ing point of the vehicle. The base of the jack
must be positioned vertically, directly under
the jackingp oint of the vehicle.
!Only position the jack at the appropriate
jackingp oint of the vehicle. Otherwise, you
could damage the vehicle.
Observe the following when raising the vehi-
cle:
RTo raise the vehicle, only use the vehicle-spe-
cific jack that has been tested and approved
by Mercedes-Benz. If used incorrectly, the
jack could tip over with the vehicle raised.
RThe jack is designed only to raise and hold the
vehicle for ashort time while awheel is being
changed. It must not be used for performing
maintenance work under the vehicle.
RAvoid changing the wheel on uphill and down-
hill slopes.
RBefore raising the vehicle, secure it from roll-
ing away by applying the parking brake and
insertingw heel chocks. Do not disengage the
parking brake while the vehicle is raised.
RThe jack must be placed on afirm, flat and
non-slip surface. On aloose surface, alarge,
flat, load-bearing underlay must be used. On a
slippery surface, anon-slip underlay must be
used, e.g. rubber mats.
RDo not use wooden blocks or similar objects
as ajack underlay. Otherwise, the jack will not
be able to achieve its load-bearing capacity
due to the restricted height.
RMake sure that the distance between the
underside of the tires and the ground does not
exceed 1.2 in (3 cm).
RNever place your hands and feet under the
raised vehicle.
RDo not lie under the vehicle.
RDo not start the engine when the vehicle is
raised.
RDo not open or close adoor or the trunk lid
when the vehicle is raised.
RMake sure that no persons are present in the
vehicle when the vehicle is raised.
Changing awheel309
Wheels and tires
Z
Page 312 of 326

XUsing lug wrench:,loosen the bolts on the
wheel you wish to change by abouto ne full
turn. Do not unscrew the bolts completely.
Jacking points
The jacking points are located just behind the
front wheel housings and just in front of the rear
wheel housings (arrows).
Mercedes-AMG vehicles and vehicles with
AMG Line: to protect the vehicle body, the vehi-
cle has covers installed next to the jacking
points on the outer sills.
Covers, front (example: vehicles with AMG Line)
XMercedes-AMG vehicles and vehicles
with AMG Line: fold cover;upwards.
XTake ratchet wrench Aout of the vehicle tool
kit and place it on the hexagon nut of jack ?
so that the letters AUFare visible.
XPosition jack ?at jacking point =.
XMake sure the foot of the jack is directly
beneath the jacking point.
XTurn ratchet wrench Auntil jack ?sits
completely on jacking point =and the base
of the jack lies evenly on the ground.
XTurn ratchet wrench Auntil the tire is raised
am aximum of 1.2 in (3 cm )from the ground.
Removing awheel
!Do not place wheel bolts in sand or on adirty
surface. The bolt and wheel hub threads could
otherwise be damagedw hen you screw them
in.
XUnscrew the wheel bolts.
XRemove the wheel.
Mounting anew wheel
GWARNING
Oiled or greased wheel bolts or damaged
wheel bolts/hub threads can cause the wheel
310Changing awheel
Wheels and tires
Page 313 of 326
bolts to come loose. Asaresult, you could
lose awheel while driving .There is arisk of
accident.
Never oil or grease wheel bolts. In the event of
damage to the threads, contact aqualified
specialist workshop immediately. Have the
damaged wheel bolts or hub threads
replaced/renewed. Do not continue driving.
GWARNING
If you tighten the wheel bolts or wheel nuts
when the vehicle is raised, the jack could tip
over. There is arisk of injury.
Only tighten the wheel bolts or wheel nuts
when the vehicle is on the ground.
Always pay attention to the instructions and
safety notes in the "Changing awheel" section
(
Ypage 307).
Only use wheel bolts that have been designed
for the wheel and the vehicle. For safety rea-
sons, Mercedes-Benz recommends that you
only use wheel bolts which have been approved for Mercedes-Benz vehicles and the respective
wheel.
!To preventd amage to the paintwork, hold
the wheel securely against the wheel hub
while screwingint he first wheel bolt.
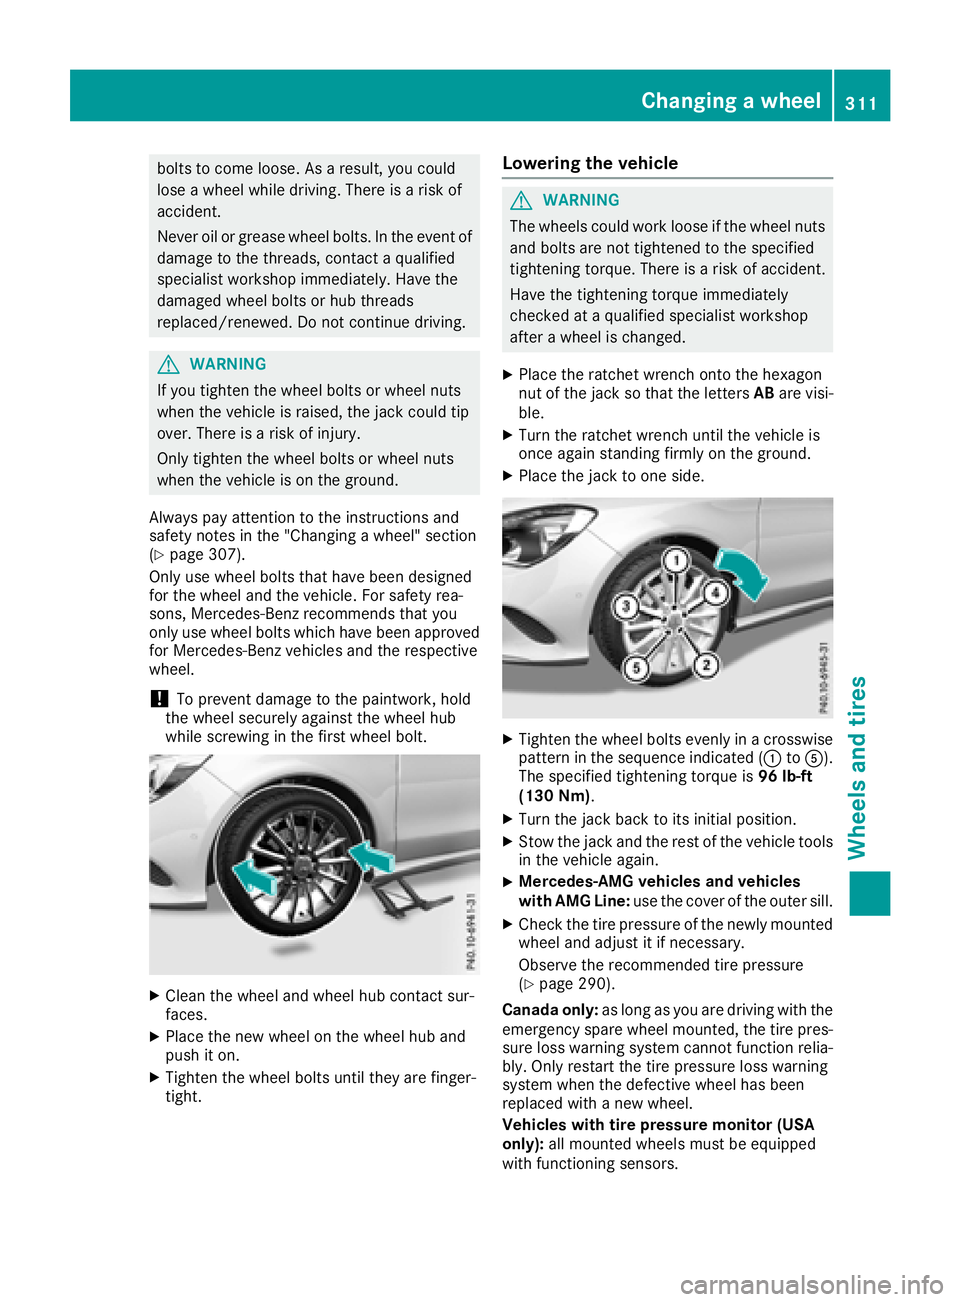
XClean the wheel and wheel hub contact sur-
faces.
XPlace the new wheel on the wheel hub and
push it on.
XTighten the wheel bolts until they are finger-
tight.
Lowering the vehicle
GWARNING
The wheels could work loose if the wheel nuts and bolts are not tightened to the specified
tightenin gtorque. There is arisk of accident.
Have the tightenin gtorque immediately
checked at aqualified specialist workshop
after awheel is changed.
XPlace the ratchet wrenc hontot he hexagon
nut of the jack so that the letters ABare visi-
ble.
XTurn the ratchet wrenc huntil the vehicle is
onc eagain standing firmly on the ground.
XPlace the jack to one side.
XTighten the wheel bolts evenly in acrosswise
pattern in the sequence indicated (: toA).
The specified tightenin gtorque is 96 lb-ft
(130 Nm) .
XTurn the jack back to its initial position.
XStow the jack and the rest of the vehicle tools
in the vehicle again.
XMercedes-AMG vehicles and vehicles
with AMG Line: use the cover of the outer sill.
XCheck the tire pressure of the newly mounted
wheel and adjust it if necessary.
Observe the recommended tire pressure
(
Ypage 290).
Canadao nly:as long as you are driving with the
emergency spare wheel mounted, the tire pres-
sure loss warning system cannot function relia-
bly. Only restart the tire pressure loss warning
system when the defective wheel has been
replaced with anew wheel.
Vehicles with tir epressure monitor (USA
only): all mounted wheels must be equipped
with functioning sensors.
Changing awheel311
Wheels and tires
Z