2018 MERCEDES-BENZ CLA COUPE light
[x] Cancel search: lightPage 246 of 326
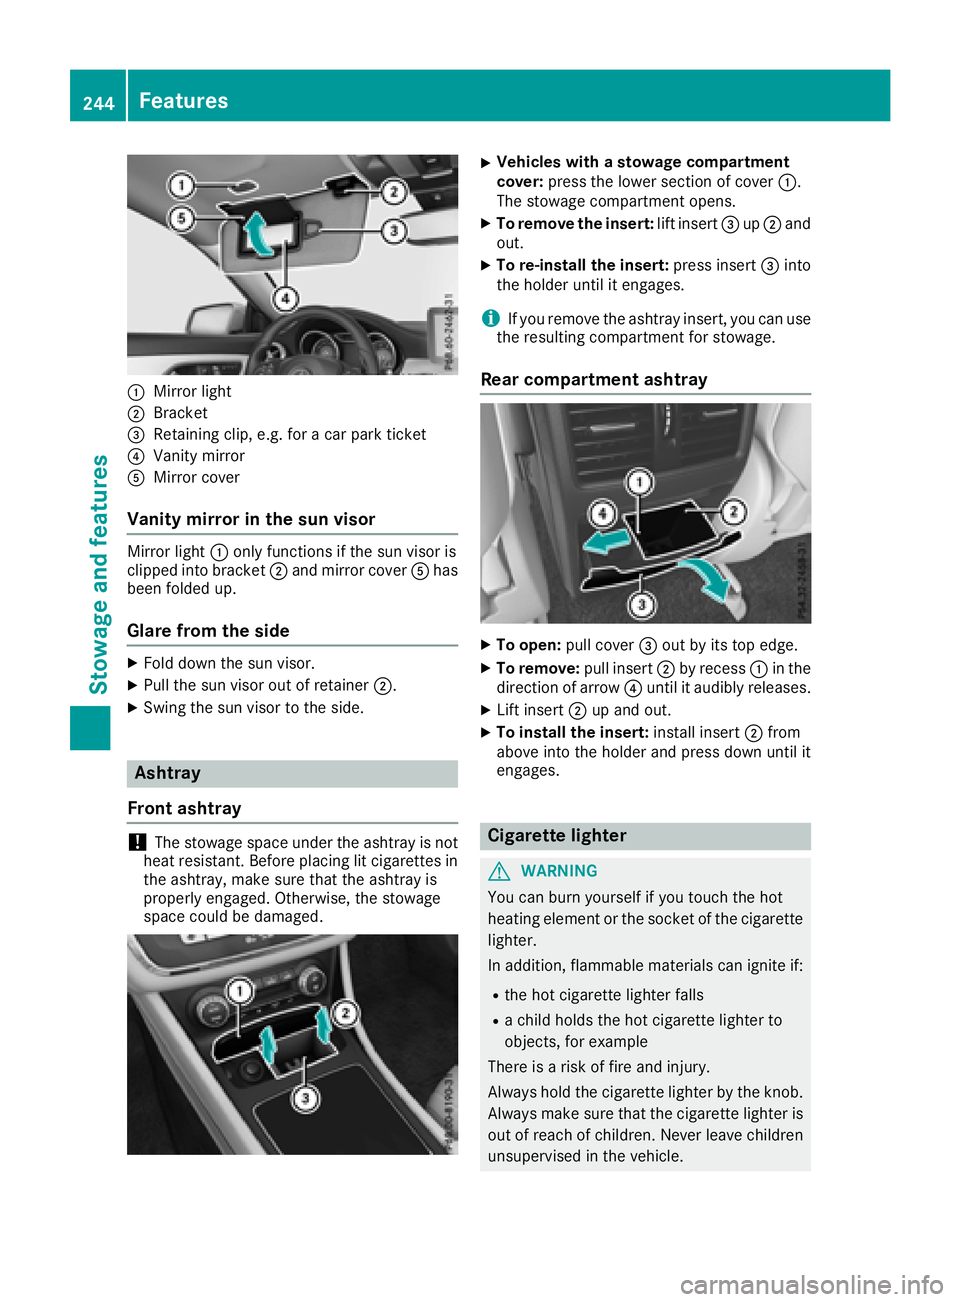
:Mirror light
;Bracket
=Retaining clip, e.g. foracar park ticket
?Vanity mirror
AMirror cover
Vanity mirror in the sun visor
Mirror light :only functions if the sun visor is
clipped into bracket ;and mirror cover Ahas
been folded up.
Glare from the side
XFold down the sun visor.
XPull the sun visor out of retainer ;.
XSwing the sun visor to the side.
Ashtray
Front ashtray
!The stowage space under the ashtray is not
heat resistant. Before placing lit cigarettes in the ashtray, make sure that the ashtray is
properly engaged. Otherwise, the stowage
space could be damaged.
XVehicles with astowage compartment
cover: press the lower section of cover :.
The stowage compartmento pens.
XTo remove the insert:lift insert=up; and
out.
XTo re-install the insert: press insert=into
the holder until it engages.
iIf you remove the ashtray insert, you can use
the resulting compartmentf or stowage.
Rear compartment ashtray
XTo open:pull cover =out by its top edge.
XTo remove: pull insert;by recess :in the
direction of arrow ?until it audibly releases.
XLift insert ;up and out.
XTo install the insert: install insert;from
above into the holder and press down until it
engages.
Cigarette lighter
GWARNING
You can burn yourself if you touch the hot
heating element or the socket of the cigarette lighter.
In addition, flammable materials can ignite if:
Rthe hot cigarette lighter falls
Rac hild holds the hot cigarette lighter to
objects, for example
There is arisk of fire and injury.
Always hold the cigarette lighter by the knob.
Always make sure that the cigarette lighter is
out of reach of children. Never leave children
unsupervised in the vehicle.
244Features
Stowage and features
Page 247 of 326
Your attention must always be focused on the
traffic conditions. Only use the cigarettelighter
when road and traffic condition spermit.
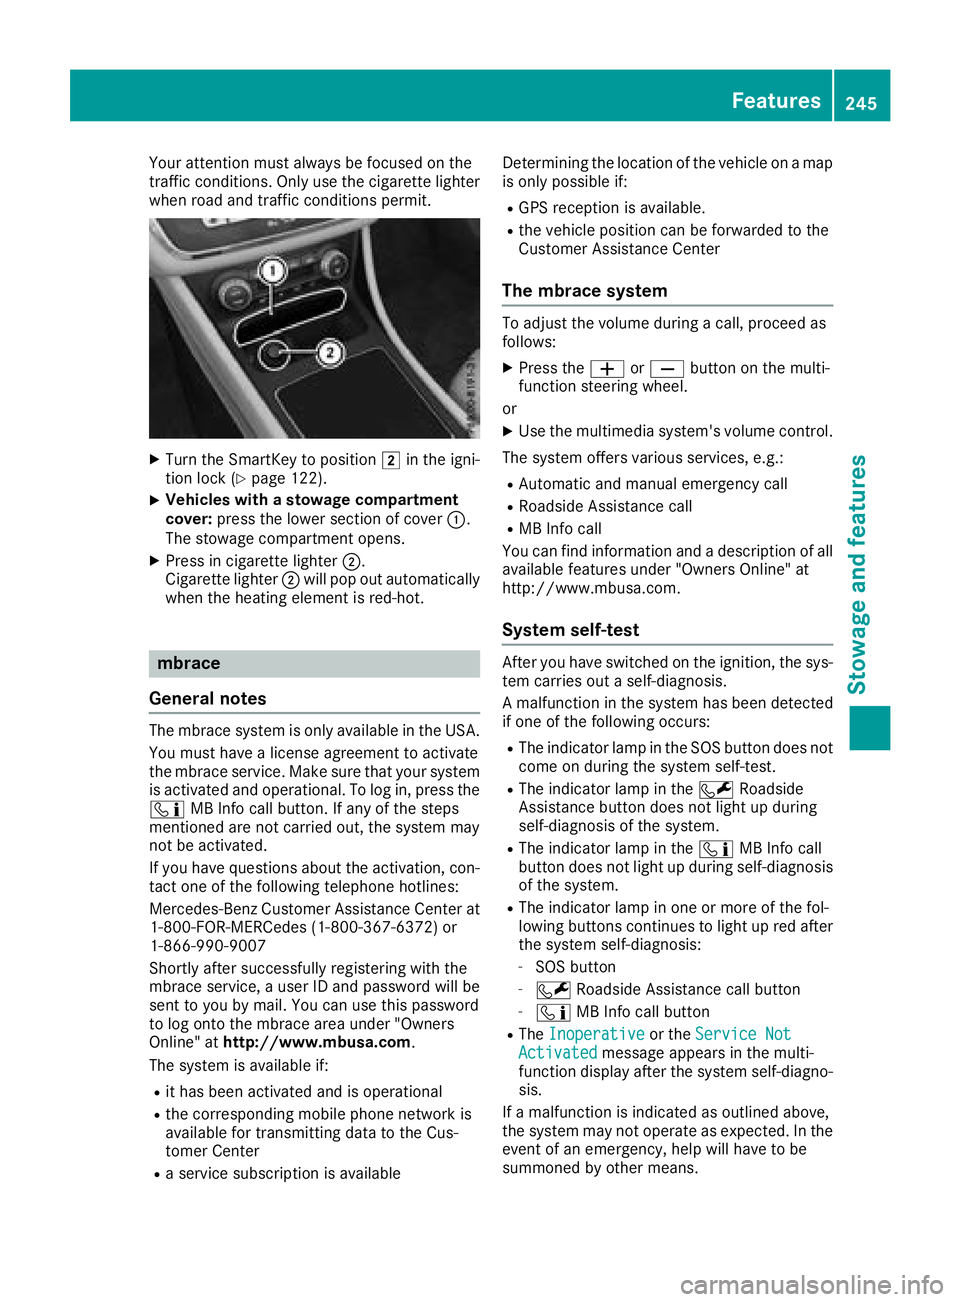
XTurn the SmartKey to position 2in the igni-
tion lock (Ypage 122).
XVehicles with astowag ecompartment
cover: press the lower section of cover :.
The stowage compartmento pens.
XPress in cigarettelighter ;.
Cigarette lighter ;will pop out automatically
when the heatin gelementisr ed-hot.
mbrace
Genera lnotes
The mbraces ystemiso nly available in the USA.
You must have alicense agreement to activate
the mbraces ervice. Make sure that your system
is activate dand operational. To log in, press the
ï MB Inf ocall button. If any of the steps
mentioned are not carried out, the syste mmay
not be activated.
If you have questions about the activation, con-
tac tone of the followingt elephone hotlines:
Mercedes-Ben zCustomer Assistance Center at
1-800-FOR-MERCedes (1-800-367-6372) or
1-866-990-9007
Shortly afte rsuccessfully registeringw ith the
mbraces ervice,auser ID and password will be
sent to you by mail. You can use this password
to log ont othe mbracea rea under "Owners
Online" at http://www.mbusa.com.
The syste misavailable if:
Rit has been activate dand is operational
Rthe corresponding mobile phonen etwork is
available for transmitting data to the Cus-
tomer Center
Ras ervice subscription is available Determining the location of the vehicle on
amap
is only possible if:
RGPS receptio nisavailable.
Rthe vehicle position can be forwarded to the
Customer Assistance Center
Them brace system
To adjust the volume during acall, proceed as
follows:
XPress the WorX button on the multi-
function steeringw heel.
or
XUse the multimedia system's volume control.
The syste moffers various services, e.g.:
RAutomatic and manual emergenc ycall
RRoadside Assistance call
RMB Inf ocall
You can findi nformation and adescription of all
available features under "Owner sOnline" at
http://www.mbusa.com.
System self-test
After you have switched on the ignition, the sys-
tem carries out aself-diagnosis.
Am alfunction in the syste mhas been detected
if one of the followingo ccurs:
RThe indicator lamp in the SOS button does not
com eond uring the syste mself-test.
RThe indicator lamp in the FRoadside
Assistance button does not light up during
self-diagnosis of the system.
RThe indicator lamp in the ïMB Inf ocall
button does not light up during self-diagnosis
of the system.
RThe indicator lamp in one or more of the fol-
lowing buttons continues to light up red after
the syste mself-diagnosis:
-SOS button
-F Roadside Assistance call button
-ïMB Inf ocall button
RThe Inoperativeor the Service NotActivatedmessagea ppears in the multi-
function display afte rthe syste mself-diagno-
sis.
If am alfunction is indicated as outlined above,
the syste mmay not operatease xpected. In the
eventofane mergency, help will have to be
summoned by other means.
Features245
Stowage and features
Z
Page 254 of 326
Currently inactiveareas can beactivated bytext
message.
Triggering th evehicle alarm
Witht hisf unction,y ou can triggert heveh icle's
panic alarm via text message. An alarm sounds
and th eexteri or lighting flashes. Dependin gon
th es etting, th epanic alarm lastsf iveort ensec-
onds. Afterwards, th ealarm switches off.
Garage door opener
General notes
The HomeLink®garag edoor opener integrated
in ther ear-view mirror allowsyou to operate up
to three different door and gates ystems.
Use th eintegrate dgarag edoor opener only on
garag edoorst hat:
Rhave safety stop and revers efeatures and
Rmee tcurren tU.S.federal safety standards
Once programed, th eintegrate dgarag edoor
opener inther ear-view mirror willassumet he
function of th egarag edoor system' sremote
control. Pleasea lso read theoperatin ginstruc-
tions for th egarag edoor system.
When programmin gagaragedoor opener, park
th ev ehicle outside theg arage. Do no tleave the
enginer unningwhile programming.
Certain garag edoor drives are incompatib le
wit hthe integrate dgarag edoor opener. Ifyou
have difficult yprograming th eintegrate dgarage
door opener, contact aMercedes-Ben zService
Center.
Alternatively, you can call th efollowin gtele-
phonea ssistance services:
RUSA:Mercedes-Ben zCustomerA ssistance
Cente rat1-800-FOR -MERCe des
RCanada: CustomerS erviceat
1-800-387-0100
RHomeLink®hotlin e1-800-355-351 5(free of
charge)
Morei nformatio nonHomeLink
®and/or com-
patible product sisalso availab leonlin eat
http:/ /www. homelin k.com.
Notes on the declaration of conformity
(
Ypage 27).
USA: FCC ID: CB2HMIHL4
Canada: IC: 279B-HMIHL4
Important safety notes
GWARNING
When you operate or program the garag edoor
with the integrated garag edoor opener, per-
sons in the range of movement of the garage
door can become trapped or struck by the
garag edoor. There is arisk of injury.
When using the integrated garag edoor
opener, always make sure that nobody is
within the range of movement of the garage
door.
GWARNING
Combustion engines emit poisonouse xhaust
gases such as carbon monoxide. Inhaling
these exhaust gases leadstop oisoning. There
is ar isk of fatal injury. Therefore never leave
the engine running in enclosed spaces with-
out sufficient ventilation.
Programming
Programming the buttons
Pay attention to the "Important safety notes"
(Ypage 252).
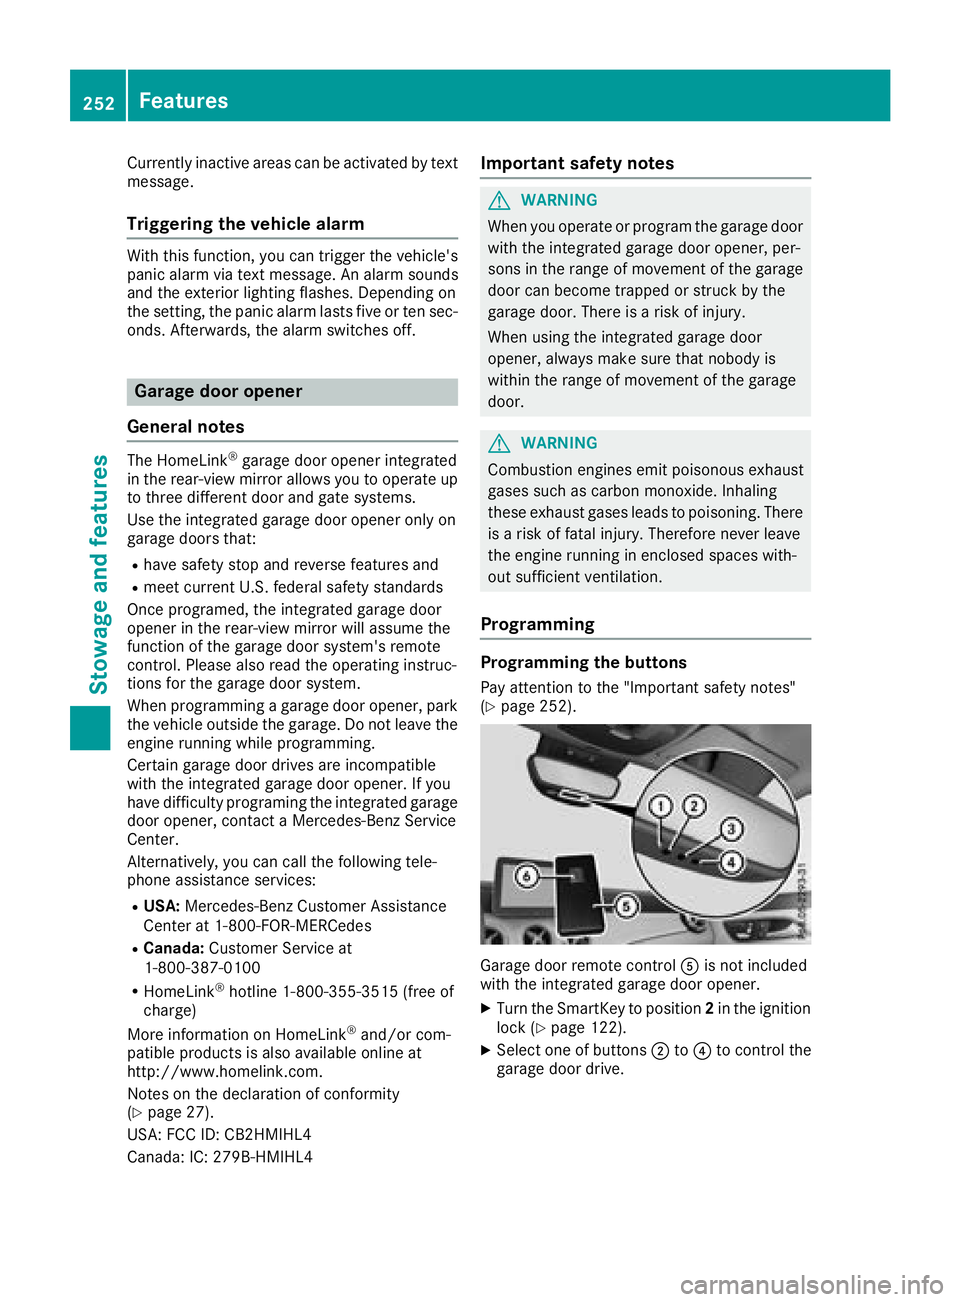
Garage door remote control Ais not included
with the integrated garag edoor opener.
XTurn the SmartKey to position 2in the ignition
lock (Ypage 122).
XSelect one of buttons ;to? to control the
garag edoor drive.
252Features
Stowage and features
Page 255 of 326
XTo start program mode:press and holdone
of buttons ;to? on the integrated garage
door opener.
The garag edooro penerisn ow in program
mode. After ashort time ,indicator lamp :
lights up yellow.
Indicato rlam p: lights up yellow as soona s
button ;,=or? is stored for the first time.
If the selecte dbutton hasa lready been pro-
gramed,i ndicator lamp :will onlyl ight up
yellow afte rten seconds have elapsed.
XReleas ebutton ;, =or?.I ndicator
lamp :flashesy ellow.
XTo program the remote control: point
garag edoorremote control Atoward sbut-
tons ;to? on the rear-view mirror at adis-
tance of 2to8in(5t o20c m).
XPress and hol dbutton Bon remote control
A unti lindicator lamp :lights up green.
Whe nindicator lamp :lights up green: pro-
gramming is finished.
Whe nindicator lamp :flashesg reen: pro-
gramming wa ssuccessful. The next step is to
synchronize the rolling code(
Ypage 253).
XReleas ebutton Bon remote control Afor
the garag edoord rive system.
If indicator lamp :lights up red:r epeatthe
programing procedur efor the corresponding
button on the rear-view mirror. Whe ndoing
so, var ythe distance between remote control
A and the re
ar-view mirror.
The required distance between remote con-
trol Aand the integrated garag edooropener
depends on the garag edoord rive system.
Several attempts might be necessary.Y ou
shoul dtest every positio nfor at least
25 seconds before trying another position.
Synchronizin gthe rolling code
Paya ttentio ntothe "Important safety notes"
(Ypage 252).
If the garag edoors ystem uses arolling code,
yo uw illa lsoh avetos ynchronize the garage
door system with the integrated garag edoor
opene rinthe rear-view mirror. To do thisy ouwill
nee dtou sethe programming button on the door
drive controlp anel.T he programming button
maybel ocate dind ifferent place sdepen ding on
the manufacturer. It is usuall yloc ate dont he
door drive uni tonthe garag eceiling.
Familiarize yoursel fwitht he garag edoord rive
operating instructions, e.g .under "Program- ming additional remote controls", before carry-
ing outt
he following steps.
Your vehicl emustbew ithinr each of the garage
door or gate opene rdrive. Make sure thatn ei-
ther your vehicl enor any persons/objects are
present withint he sweepofthe door or gate.
XTurn the SmartKey to position 2in the ignition
lock (Ypage 122).
XGe toutof the vehicle.
XPress the programming button on the door
drive unit.
Usually ,you now have 30 seconds to initiate
the next step.
XGe tinto the vehicle.
XPress previously programed button ;,=
or ? on the integrated garag edooro pener
repeatedly and in quick succession unti lthe
door closes.
The rolling codes ynchronizatio nist hen com-
plete.
Note sonp rogrammin gthe remote con-
trol
Canadia nradio frequency laws require a"break"
(o ri nterruption) of the transmission signals
afte rbroadcasting for afew seconds. Therefore,
thes esignals mayn ot last long enough for the
integrated garag edooro pener. The signalisn ot
detectedd uring programming. Comparable with
Canadia nlaw ,someU .S. garag edooro peners
also feature a"break".
Proceedasf ollows:
Rif youliveinC anada
Rif yo uhaved ifficultie sprogramming the
garag edooro pener(regardless of where you
live) as yo ufollo wthe programming steps.
XPress and hol done of buttons ;to? on the
integrated garag edooro pener.
After ashort time ,indicator lamp :lights up
yellow.
XReleas ethe button.
Indicato rlam p: flashesy ellow.
XPress button Bof garag edoorre mote con-
trol Afor two seconds, then release it for two
seconds.
XPress button Bagai nfor two seconds.
XRepeat thiss equence on button Bof remote
control Aunti lindicator lamp :lights up
green.
Whe nindicator lamp :lights up green: pro-
gramming is finished.
Features253
Stowag eand featur es
Z
Page 256 of 326
When indicator lamp:flashes green: pro-
gramming was successful. The next step is to
synchronize the rolling code.
XRelease button Bof remotec ontrolAof the
garage door drive.
If indicator lamp :lights up red: repeat the
programmingp rocess for the corresponding
button on the rear-view mirror. When doing
so, vary the distanc ebetween remotec ontrol
A and the rear-view mirror.
The required distanc ebetween remotec on-
trol Aand the integrated garage door opener
depends on the garage door drive system.
Several attempts might be necessary. You
should test every position for at least
25 seconds before trying another position.
Problems when programming
If you are experiencing problems programming
the integrated garage door opener on the rear-
view mirror, take not eofthe following instruc-
tions:
RCheck the transmitter frequenc yused by
garage door drive remotec ontrolAand
whether it is supported. The transmitter fre-
quency can usually be found on the back of
remotec ontrolAfor the garage door drive.
The integrated garage door opener is com-
patible with devices that have units which
operate in the frequenc yrange of 280 to
433 MHz.
RReplace the batteries in garage door remote
control A.This increases the likelihood that
garage door remotec ontrolAwill transmit a
stron gand precise signal to the integrated
garage door opener.
RWhen programming, hold remotec ontrolA
at varying distances and angles from but-
tons ;to? which you are programming. Try
various angles at adistanc ebetween 2and
8i nches (5to 20 cm) or at the same angle but
at varying distances.
RIf another remotec ontrolAis available for
the same garage door drive, repeat the same
programmings teps with this remotec ontrol
A.B eforep erforming these steps, make sure
that new batteries have been installed in
garage door drive remotec ontrolA.
RNote that some remotec ontrols only transmit
for alimited amount of time (the indicator
lamp on t
he remotec
ontrol goes out). Press button
Bon remotec ontrolAagain before
transmission ends.
RAlign the antenna cable of the garage door
opener unit. This can improve signal recep-
tion/transmission.
Opening/closing the garage door
After it has been programmed, the integrated
garage door opener performst he function of the
garage door system remotec ontrol. Please also
read the operating instruction sfor the garage
door system.
XTurn the SmartKey to position 2in the ignition
lock (Ypage 122).
XPress button ;,=or? which you have
programmed to operate the garage door.
Garage door system with afixed code: indi-
cator lamp :lights up green.
Garage door system with arolling code: indi-
cator lamp :flashes green.
The transmitter will transmit asignal as long
as the button is pressed. The transmission is
halted after amaximum of ten seconds and
indicator lamp :lights up yellow.
XPress button ;,=or? again if necessary.
Clearing the memory
Make sure that you clear the memory of the
integrated garage door opener before selling the
vehicle.
XTurn the SmartKey to position 2in the ignition
lock (Ypage 122).
XPress and hold buttons ;and ?.
The indicator lamp initially lights up yellow
and then green.
XRelease buttons ;and ?.
The memory of the integrated garage door
opener in the rear-view mirror is cleared.
254Features
Stowage and features
Page 260 of 326
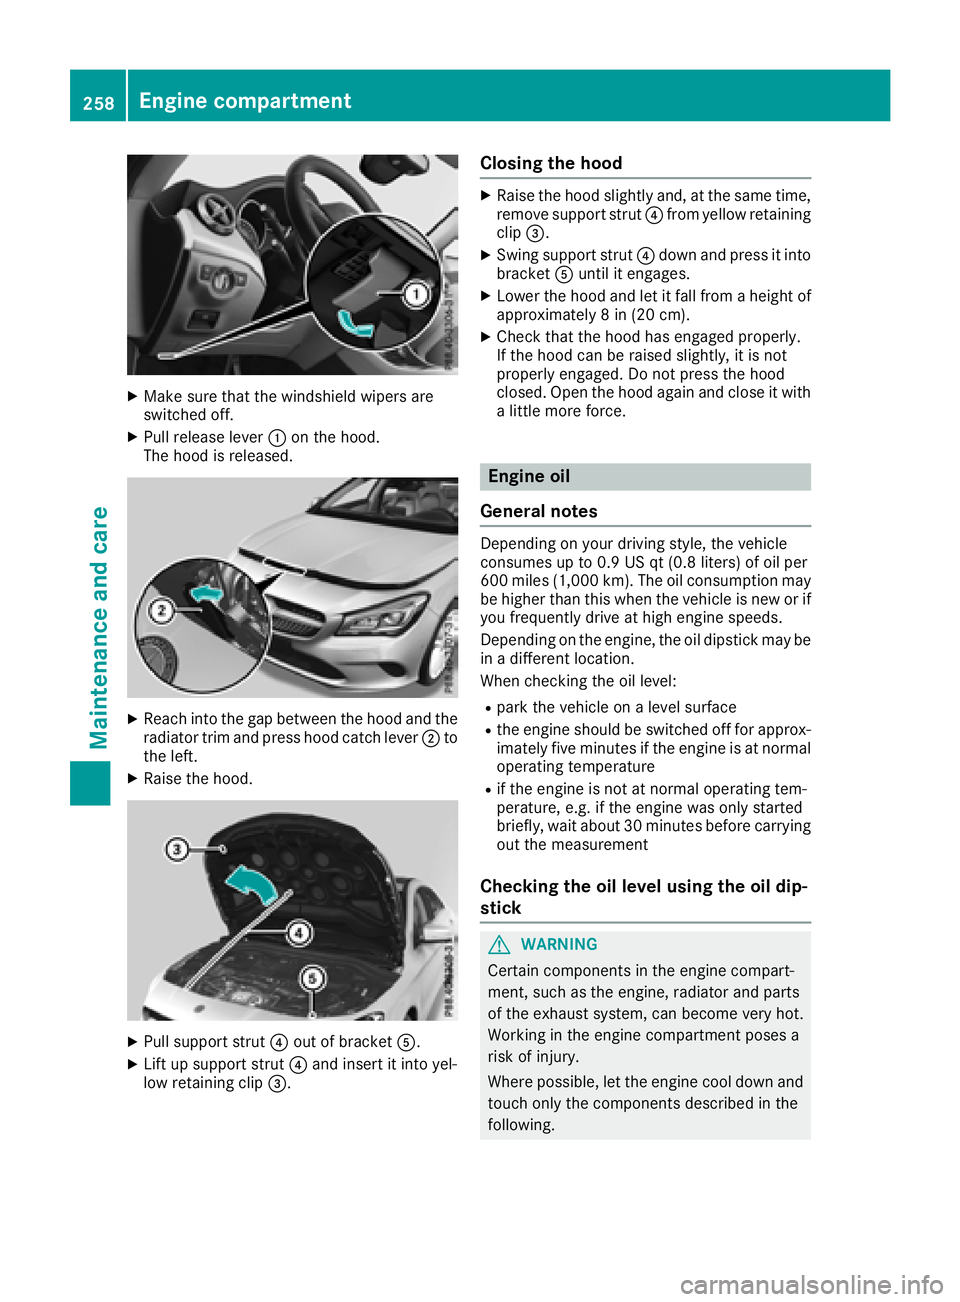
XMake sure that the windshield wipers are
switched off.
XPull release lever:on the hood.
The hood is released.
XReach into the gap between the hood and the radiator trim and press hood catch lever ;to
the left.
XRaise the hood.
XPull support strut ?out of bracket A.
XLift up support strut ?and insert it into yel-
low retaining clip =.
Closing the hood
XRaise the hood slightly and, at the same time,
remove support strut ?from yellow retaining
clip =.
XSwing support strut ?down and press it into
bracket Auntil it engages.
XLower the hood and let it fall from aheight of
approximately 8in(20 cm).
XCheck that the hood has engaged properly.
If the hood can be raised slightly, it is not
properly engaged. Do not press the hood
closed. Open the hood again and close it with
alittle more force.
Engine oil
General notes
Depending on your driving style, the vehicle
consumes up to 0.9 US qt (0.8 liters) of oil per
600 miles (1,000 km). The oil consumption may
be higher than this when the vehicle is new or if
you frequently drive at high engine speeds.
Depending on the engine, the oil dipstick may be
in ad ifferent location.
When checking the oil level:
Rpark the vehicle on alevel surface
Rthe engine should be switched off for approx-
imately five minutes if the engine is at normal
operating temperature
Rif the engine is not at normal operating tem-
perature, e.g. if the engine was only started
briefly, wait about 30 minutes before carrying
out the measurement
Checking the oil level using the oil dip-
stick
GWARNING
Certain components in the engine compart-
ment, such as the engine, radiator and parts
of the exhaust system, can become very hot.
Working in the engine compartmentp oses a
risk of injury.
Where possible, let the engine cool down and touch only the components described in the
following.
258Engine compartment
Maintenance and care
Page 265 of 326
XDo not usehot water and do not wash the
vehicl eindirect sunlight.
XUse asofts po ngetoc lean.
XUseamildc leaning agent, such as acar
shampo oapproved by Mercedes-Benz.
XThoroughl yhosed ownthe vehicl ewithag en-
tle jet of water.
XDo not point the water jet directl ytowards the
ai ri nlet.
XUse plenty of water and rinse ou tthe sponge
frequently.
XRinse the vehicl ewithc lean water and dry
thoroughl ywithac hamois.
XDo not le tthe cleaning agent dry on the paint-
work.
Carefully remove al ldeposit sofroads alta s
soo naspossibl ew hend rivin ginw inter.
Powe rwashers
GWARNING
The water jet fromac ircular jet nozzle(dirt
blasters )can cause invisible exterio rdamag e
to the tire sorchassisc omponents. Compo-
nents damage dinthisw aymayf ailu nexpect-
edly .There is ariskofana ccident.
Do not us epower washers with circular jet
nozzles to clean the vehicle. Hav edamaged
tire sorc hassisc omponents replaced imme-
diately.
!Alway smaintain adistance of at least
11.8 in (30 cm )between the vehicl eand the
powe rwashern ozzle. Informatio nabout the
correct distance is availabl efromt he equip-
ment manufacturer.
Mov ethe powe rwashern ozzlearound when
cleaning your vehicle.
Do not ai mdirectl yata ny of the following:
RTires
RDoorg aps,roofgaps, joints, etc.
RElectrical components
RBattery
RConnectors
RLamps
RSeals
RTrim
RVentilatio nslots Damaged seals or electrical components can
lead to leaks or failures.
!Vehicles with decorative film: parts of your
vehicl earecovered with adecorative film.
Maintain adistance of at leas t27.5 in (70 cm)
between the parts of the vehicl ecovered with
the fil mand the nozzl eofthe high pressure
cleaner.
Informatio nabout the correct distance is
availabl efromt he eq uip
ment manufacturer.
Mov ethe powe rwashern ozzlearound when
cleaning your vehicle.
Cleanin gthe paintwork
!Do not affix:
Rstickers
Rfilms
Rmagnetic plate sorsimilar items
to painte dsurfaces .You could otherwise
damage the paintwork.
Scratches, corrosive deposits, area saffecte dby
corrosion and damage caused by inadequate
car ecanno talway sbec ompletel yrepaired .In
such cases, visit aquali fied specialis tworkshop.
XRemov edirti mmediately, where possible,
whil eavoidin grubbi ng too hard.
XSoakinsect remains with insect remove rand
rinse off the treated area safterwards.
XSoa kbirdd ropping swithw ater and rinse off
the treated area safterwards.
XRemov ecoolant, brake fluid ,tree resin, oils,
fuel sand greases by rubbing gently with a
cloth soaked in petroleu mether or lighter
fluid.
XUse tar remove rtoremove tar stains.
XUse silicone remove rtoremove wax.
If water no longe rforms "beads "onthe paint
surface, us ethe paint car eproducts recommen-
de da nd approved by Mercedes-Benz. Thi sisthe
cas eapproximately every threetof ivem onths,
depending on the climate conditions and the
car eproduct used.
If dirt hasp enetrated the paint surface or if the
paint hasb ecome dull ,the paint cleane rrecom-
mend ed a
nd approved by Mercedes-Benz
shoul dbeu sed.
Do not us ethese car eproducts in the sunoro n
the hoo dwhile the hoo dishot.
Care263
Maintenance and care
Z
Page 266 of 326
XUseasuitablet ouch-up stick, e.g. MB Touch-
Up Stick,tor epair slight damage to the paint-
work quickly and provisionally.
Mattef inish care
!Never polish the vehicle or the light alloy
wheels. Polishing causes the finish to shine.
!The following may cause the paint to
become shiny and thus reduce the matte
effect:
Rstrong rubbing of the paintwork with
unsuitablem aterials
Rfrequent use of automatic car washes
Rwashing the vehicle in direct sunlight
!Never use paint cleaner, buffing or polishing
products, or gloss preserver, e.g. wax, for the
purpose of paintwork care. These products
are only suitablef or high-gloss surfaces. Their
use on vehicles with matte paintwork leads to considerable surface damage or, more spe-
cifically,tos hiny, spotted areas.
Alwaysh ave paintwork repairs carried out at a
qualified specialist workshop.
!Do not use wash programs with ahot wax
treatment under any circumstances.
Observe these notes if your vehicle has aclear
matte finish. This will help you to avoid damage to the paintwork due to incorrect treatment.
These notes also apply to light alloy wheels with
ac lear matte finish.
The vehicle should ideally be washed by hand
using asoft sponge, car shampoo and plenty of
water.
Use only insect remover and car shampoo from
the range of approved Mercedes-Benz care
products.
Cleaning the vehiclep arts
Cleaning the wheels
GWARNING
The water jet from acircular jet nozzle (dirt
blasters) can cause invisible exterior damage
to the tires or chassis components. Compo-
nentsd amagedint his way may fail unexpect-
edly.T here is arisk of an accident.
Do not use power washers with circular jet
nozzles to clean the vehicle. Have damaged
tires or chassis componentsr eplaced imme-
diately.
!Do not use acidic wheel cleaning products
to remove brake dust. This could damage
wheel bolts and brake components.
!Do not park your vehicle for along period of
time directly after cleaning, particularlya fter
cleaning the wheel rim with wheel cleaner.
Wheel cleaner can lead to the increased cor-
rosion of the brake discs and pads. Therefore, drive for afew minutes after cleaning. By
heating up the brakes, the brake discs and
pads dry. The vehicle can then be parked for a
long period of time.
Cleaning the windows
GWARNING
You could become trapped by the windshield wipers if they start moving while cleaning the
windshieldorw iper blades. There is arisk of
injury.
Alwayss witch off the windshieldw ipers and
the ignition before cleaning the windshieldo r
wiper blades.
!Only fold the windshieldw ipers awayfrom
the windshieldw hen vertical. Otherwise, you
will damage the hood.
!Do not use dry cloths, abrasive products,
solvents or cleaning agents containing sol-
vents to clean the inside of the windows. Do
not touch the insides of the windows with
hard objects, e.g. an ice scraper or ring. There
is otherwise arisk of damaging the windows.
!Cleant he water drainage channels of the
windshielda nd the rear window at regular
intervals. Deposits such as leaves, petals and
pollen may under certain circumstances pre-
vent water from draining away. This can lead
to corrosion damage and damage to elec-
tronic components.
XCleant he inside and outside of the windows
with adamp cloth and acleaning product that
is recommended and approved by Mercedes-
Benz.
264Care
Maintenance and care