2018 MERCEDES-BENZ CLA COUPE light
[x] Cancel search: lightPage 267 of 326
Cleaning wiper blades
GWARNING
You coul dbecome trapped by th ewindshield
wipersift heys tart moving while cleanin gthe
windshield or wiper blades.T hereisarisko f
injury.
Always switch off th ewindshield wipersa nd
th ei gnition before cleanin gthe windshield or
wiper blades.
!Only fold th ewindshield wipersa way from
th ew indshield when vertical. Otherwise, you
will damaget hehood.
!Do no tpull th ewiper blade. Otherwise, the
wiper blade coul dbedamaged.
!Do notclean wiper blades to ooften and do
no trub them to ohard .Otherwise, th egraph-
ite coatin gcoul dbed amaged. This could
caus ewiper noise.
!Holdthe wiper arm securely when folding
back .The windshield coul dbedamaged if the
wiper arm smacks against it suddenly.
XFol dthe windshield wiper arm saway from the
windshield.
XCarefully clean th ewiper blades withad amp
cloth.
XFol dthe windshield wiper arm sback again
before switching on th eignition.
Cleaning th eexterior lighting
!Only use cleanin gagents or cleanin gcloths
whicha re suitable for plastic light lenses.
Unsuitable cleanin gagents or cleanin gcloths
coul dscratch or damag ethe plastic light len-
ses.
XClean th eplastic lenses of th eexteri or lights
withaw et sponge and amild cleanin gagent,
e.g .M ercedes-Ben zcar shampoo or cleaning
cloths.
Cleaning th emirror turn signals
!Only use cleanin gagents or cleanin gcloths
that are suitable for plastic lenses.U nsuitable
cleanin gagents or cleanin gcloth scould
scratch or damaget heplastic lenses of the
mirror tur nsignals.
XClean th eplastic lenses of th emirror tur nsig-
nals in th eexteri or mirror housing usingaw et
sponge and mild cleanin gagent, e.g.
Mercedes-Ben zcar shampoo or cleaning
cloths.
Cleaning th esensors
!If you clean th esensorsw ithapower
washer, mak esure that you keep adistance
of at least 11.8 in (30 cm)between the vehicl e
and th epower washer nozzle. Information
about th ecorrec tdistanc eisavailabl efrom
th ee quipment manufacturer.
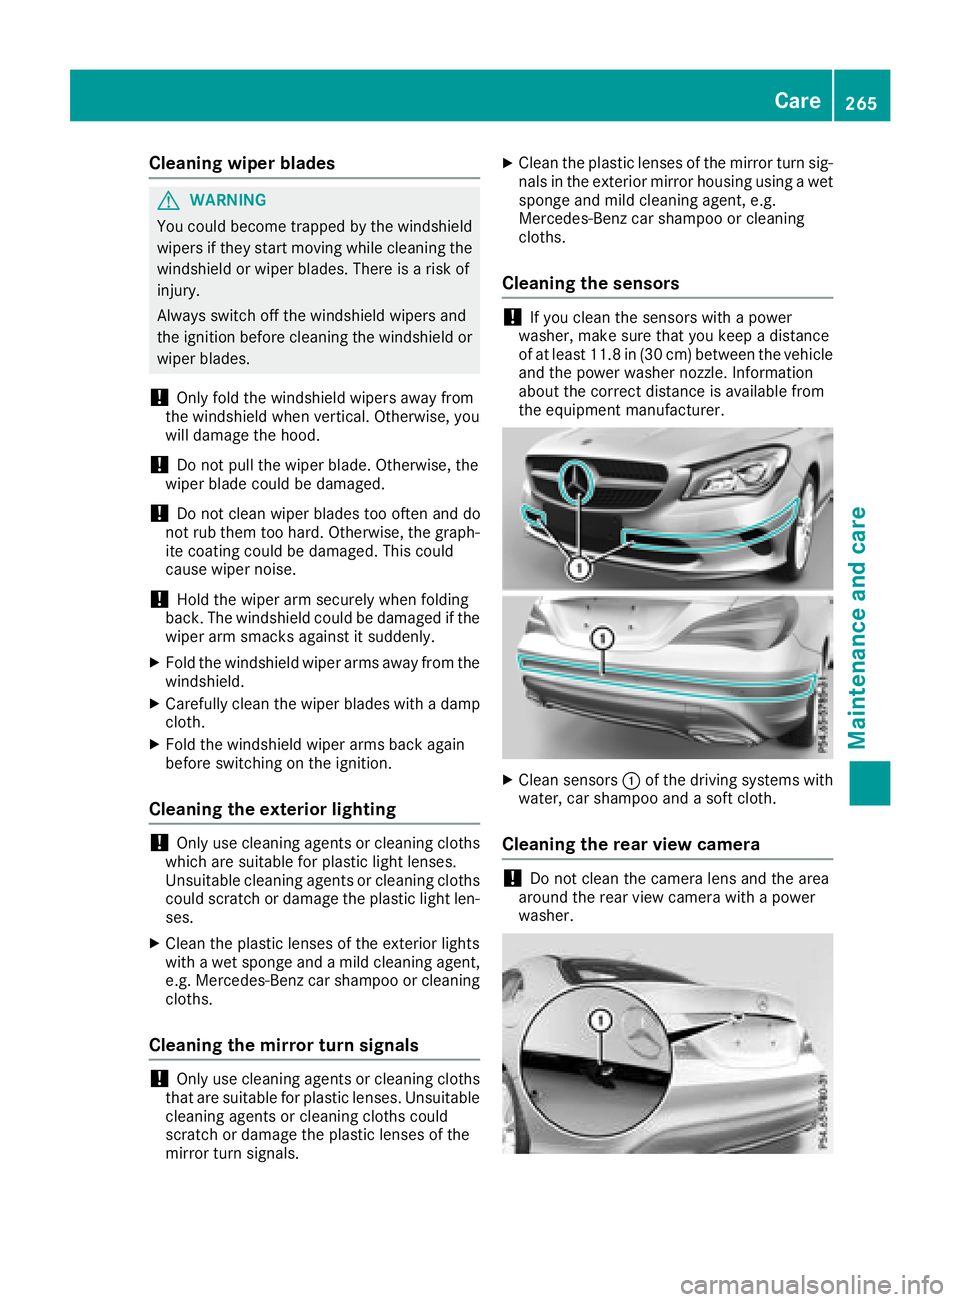
XClean sensors :of th edriving systems with
water, car shampoo and asoftc loth.
Cleaning th erearv iew camera
!Do no tclean th ecamera lensa nd thearea
aroun dthe rear view camera with apower
washer.
Care265
Maintenance and care
Z
Page 268 of 326
XMake sure that the vehicle is atastandstill
and the SmartKey is in key position 2in the
ignition lock.
XOpen the camera cover for cleaning via the
multimedia system (see the separate operat-
ing instructions).
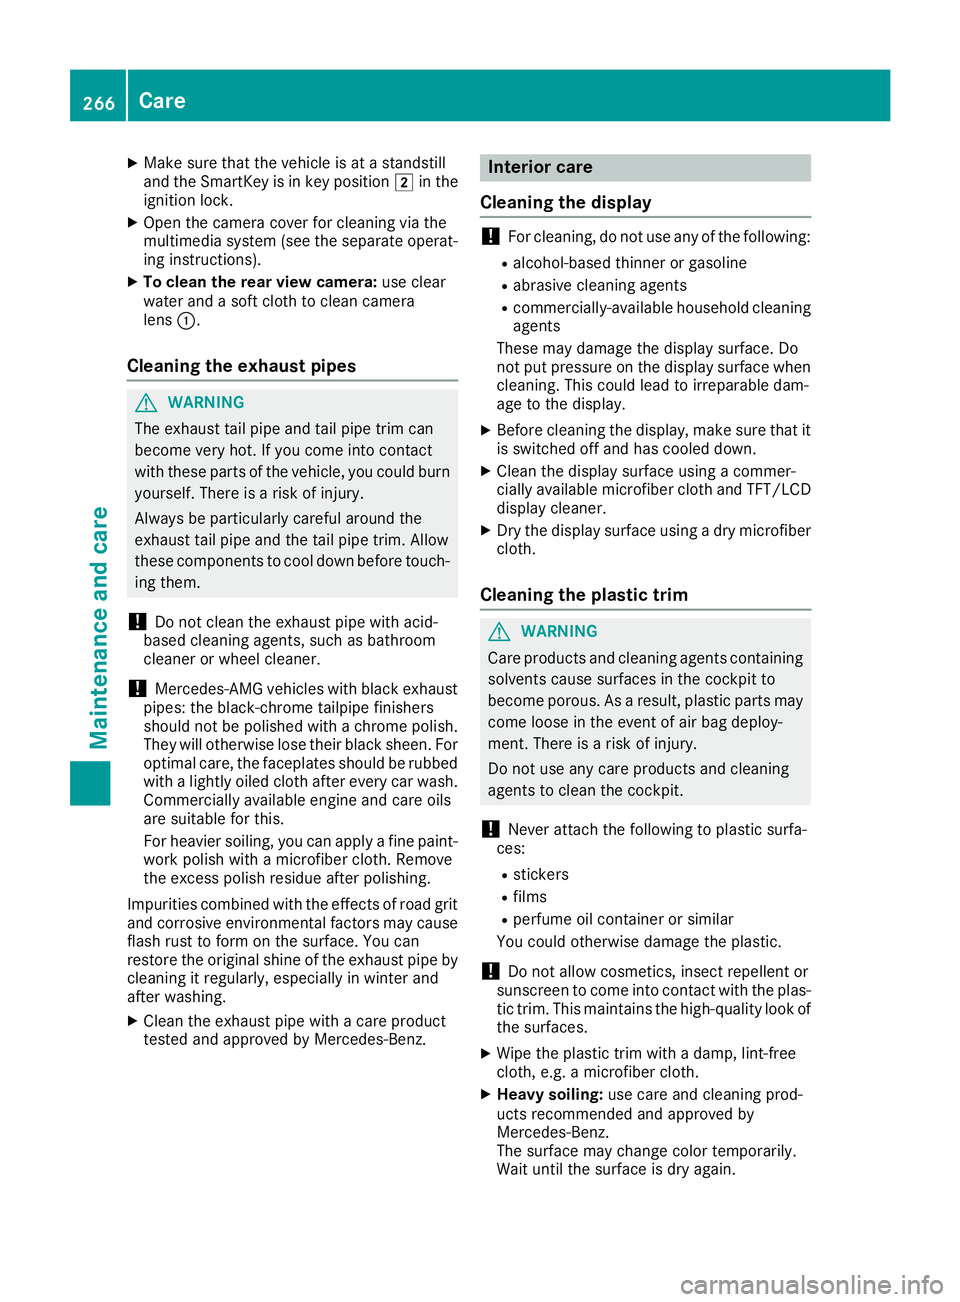
XTo clean the rear view camera: use clear
water and asoft cloth to clean camera
lens :.
Cleaningt he exhaust pipes
GWARNING
The exhaust tail pipe and tail pipe trim can
become very hot. If you come into contact
with these parts of the vehicle, you could burn
yourself. There is arisk of injury.
Always be particularly careful around the
exhaust tail pipe and the tail pipe trim. Allow
these components to cool down before touch-
ing them.
!Do not clean the exhaust pipe with acid-
based cleaning agents, such as bathroom
cleaner or wheel cleaner.
!Mercedes-AMG vehicles with black exhaust
pipes: the black-chrome tailpipe finishers
should not be polished with achrome polish.
They will otherwise lose their black sheen. For
optimal care, the faceplates should be rubbed with alightly oiled cloth after every car wash.
Commercially available engine and care oils
are suitable for this.
For heavier soiling, you can apply afine paint-
work polish with amicrofiber cloth. Remove
the excess polish residue after polishing.
Impurities combined with the effectsofr oad grit
and corrosive environmental factors may cause
flash rust to form on the surface. You can
restore the original shine of the exhaust pipe by
cleaning it regularly,e specially in winter and
after washing.
XClean the exhaust pipe with acare product
tested and approved by Mercedes-Benz.
Interior care
Cleaningt he display
!For cleaning, do not use any of the following:
Ralcohol-based thinner or gasoline
Rabrasive cleaning agents
Rcommercially-availableh ousehold cleaning
agents
These may damage the display surface. Do
not put pressure on the display surface when cleaning. This could lead to irreparable dam-
age to the display.
XBefore cleaning the display,m ake sure that it
is switched off and has cooled down.
XClean the display surface using acommer-
cially available microfiber cloth and TFT/LCD
display cleaner.
XDry the display surface using adry microfiber
cloth.
Cleaningt he plastic trim
GWARNING
Care products and cleaning agents containing solvents cause surfaces in the cockpit to
become porous. As aresult, plastic parts may
come loose in the event of air bag deploy-
ment. There is arisk of injury.
Do not use any care products and cleaning
agents to clean the cockpit.
!Never attach the following to plastic surfa-
ces:
Rstickers
Rfilms
Rperfume oil container or similar
You could otherwise damage the plastic.
!Do not allow cosmetics, insect repellent or
sunscreen to come into contact with the plas-
tic trim. This maintains the high-quality look of
the surfaces.
XWipe the plastic trim with adamp, lint-free
cloth, e.g. amicrofiber cloth.
XHeavy soiling: use care and cleaning prod-
ucts recommended and approved by
Mercedes-Benz.
The surface may change color temporarily.
Wait until the surface is dry again.
266Care
Maintenance and care
Page 269 of 326
Cleaning thesteering wheel and gear or
selector lever
XThoroughlyw ipe withadamp cloth or use
leather car eagents that have been recom-
mended and approved by Mercedes-Benz.
Cleaning genuine wood and trim ele-
ments
!Do no tuse solvent-based cleanin gagents
suchast ar remover, wheel cleaners, polishes
or waxes. Thereiso therwise ariskofd amag-
ing th esurface.
!Do no tuse chrom epolishont rimp ieces.
The trim pieces have achrom elook but are
mostly made of anodized aluminum and can
lose their shineifc hrom epolishisu sed. Use
ad amp, lint-free cloth instead when cleaning
th et rimp ieces.
If th echrome-plated trim pieces are very
dirty, you can use achrom epolish. If you are
unsure as to whether th etrimp ieces are
chrome-plated or not, consult an authorized
Mercedes-Ben zCenter.
XWipe th ewoodent rima nd trim pieces witha
damp, lint-free cloth ,e.g.am icrofiber cloth.
XHeavy soiling: use careand cleanin gprod-
uct srecommended and approved by
Mercedes-Benz.
Cleaning th eseat covers
General notes
!Do no tuse am icrofiber cloth to clean covers
made out of real leather,a rtificial leather or
DINAMICA.Ifu sed often,these can damage
th ec over.
Notet hatregular car eisessential to ensure that
th ea ppearanc eand comfor tofthecovers is
retaine dovertime.
Genuine leather seat covers
!To retain th enatural appearanc eofthe
leather,o bservethe followingc leaning
instructions:
RClean genuine leather covers carefull ywith
ad amp cloth and then wipe th ecovers
down withad ry cloth.
RMakesure that th eleather does not
become soaked. It may otherwise become
roug hand cracked.
ROnly use leather car eagents that have
been tested and approved by Mercedes-
Benz. You can obtain these from aqualified
specialist workshop.
Leather is anatural product.
It exhibitsn atural surface characteristics, for
example:
Rdifferences in th etextur e
Rmarks caused by growth and injury
Rslightn uances of color
Thesea re characteristic sofleather and not
material defects.
Seat coversofo ther materials
!Observethe followingw hen cleaning:
Rclean artificial leather covers withac loth
moistene dwithas olution containing 1%
detergent( e.g. dish washingl iquid).
Rclean cloth covers witham icrofiber cloth
moistene dwithas olution containing 1%
detergent( e.g. dish washingl iquid). Rub
c
arefull yand always wipe entir eseat sec-
tions to avoid leaving visible lines. Leave
th es eat to dry afterwards. Cleaning results
dependont hetype of dirt and how longi t
has been there.
Rclean DINAMICA covers withad amp cloth.
Makes ure that you wipe entir eseat sec-
tions to avoid leaving visible lines.
Cleaning th eseat belts
GWARNING
Seat beltsc an become severely weakened if
bleached or dyed. This coul dcaus ethe seat
beltstot earorf ail, for instance, in th eevent of
an accident. This posesani ncreased riskof
injury or fatal injury.
Never bleachord ye theseat belts.
Care267
Maintenance and care
Z
Page 270 of 326
!Do not clean the seat belts using chemical
cleaning agents. Do not dry the seat belts by
heating at temperatures above 176 ‡(80 †)
or in direct sunlight.
XUse clean, lukewarm water and soaps olution.
Cleaning the headliner and carpets
XHeadliner:if it is very dirty,u seasoft brus hor
dry shampoo.
XCarpets: use the carpe tand textile cleaning
agents recommended and approved by
Mercedes-Benz.
268Care
Maintenancea nd care
Page 271 of 326
Where willIfind...?
Reflective safety jacket
Removing/replacing the reflective
safety jacket
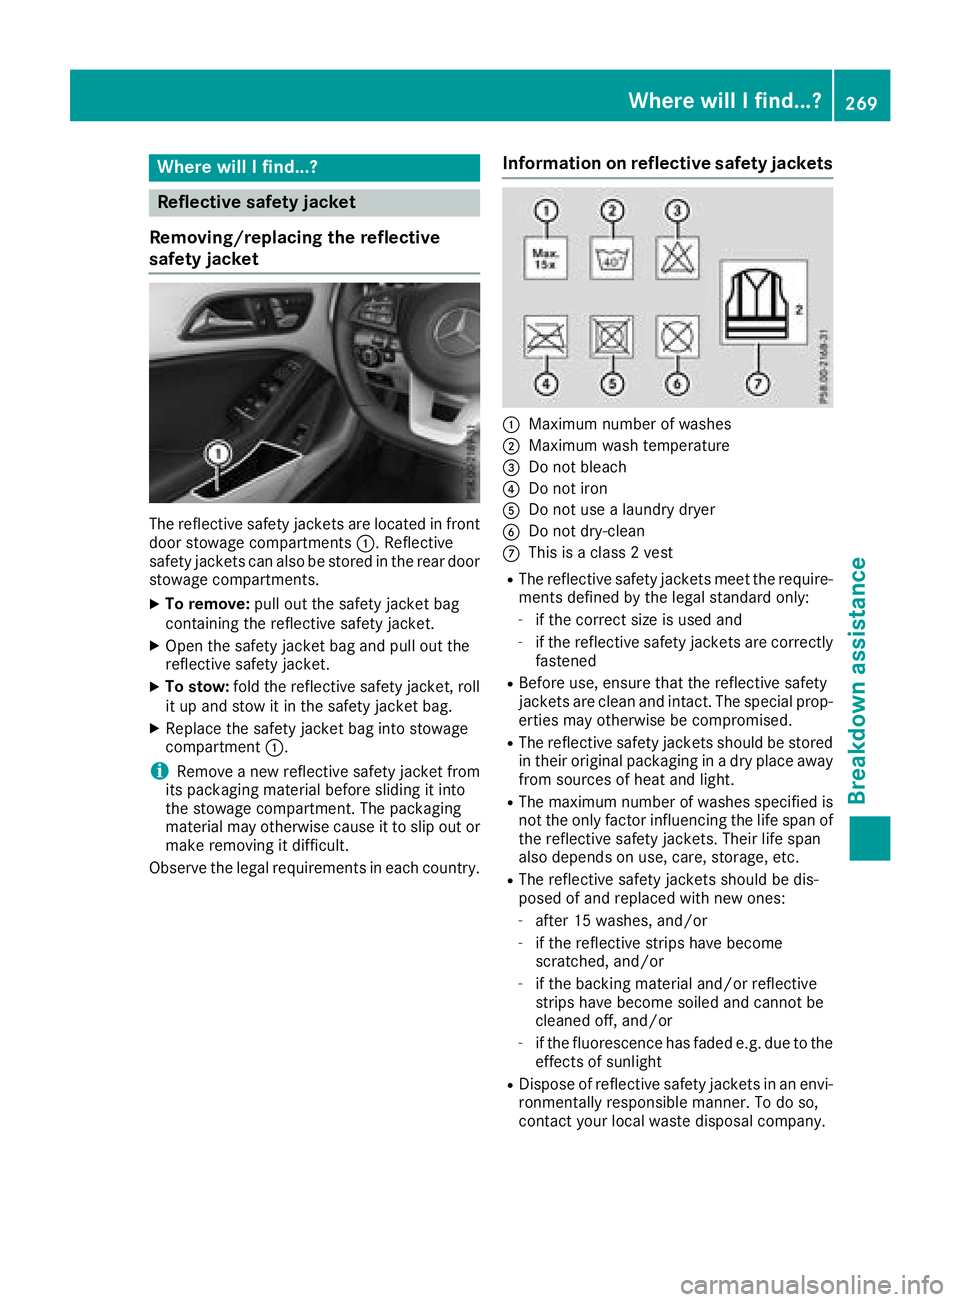
The reflective safety jackets are located in front
door stowage compartments :.Reflective
safety jackets can als obestored in the rear door
stowage compartments.
XTo remove: pullout the safety jacket bag
containing the reflective safety jacket.
XOpen the safety jacket bag and pul lout the
reflective safety jacket.
XTo stow: fold the reflective safety jacket, roll
it up and stow it in the safety jacket bag.
XReplace the safety jacket bag into stowage
compartment :.
iRemoveanew reflective safety jacket from
its packaging material before sliding it into
the stowage compartment. The packaging
material may otherwise caus eittoslipout or
make removing it difficult.
Observe the legalr equirements in each country.
Information on reflective safety jackets
:Maximum numberofwashes
;Maximum wash temperature
=Do not bleach
?Do not iron
ADo not use alaundry dryer
BDo not dry-clean
CThis is aclass2v est
RThe reflective safety jackets meet the require-
ments defined by the legals tandard only:
-if the correct size is usedand
-if the reflective safety jackets are correctly
fastened
RBefore use ,ensure that the reflective safety
jackets are cleana nd intact. The special prop-
erties may otherwise be compromised.
RThe reflective safety jackets should be stored
in their original packaging in adry place away
from sources of heata nd light.
RThe maximumnumbe rofwashes specified is
not the only factor influencing the life spano f
the reflective safety jackets. Theirl ife span
als od epends on use ,care, storage ,etc.
RThe reflective safety jackets should be dis-
posedofa nd replaced with new ones:
-after 15 washes, and/or
-if the reflective strips have become
scratched,and/or
-if the backing material and/or reflective
strips have become soiled and cannot be
cleaned off, and/or
-if the fluorescence has fade de.g. due to the
effects of sunlight
RDisposeofr eflective safety jackets in an envi-
ronmentall yresponsiblem anner. To do so,
contact you rlocalw aste disposal company.
Where will Ifind...?269
Breakdown assistance
Page 278 of 326
Battery (vehicle)
Important safety notes
Specialtool sand expert knowledg eare required
when working on the battery ,e.g.r emovala nd
installation. Yo ushoul dtherefore have al lwork
involving the battery carrie doutataq uali fied
specialist workshop.
GWARNING
Wor kcarrie doutincorrectly on the battery
can lead ,for example, to ashort circui tand
thusd amagethe vehicl eelectronics .Thisc an
lead to functio nrestrictions applying to
safety-relevant systems, e.g the lighting sys-
tem, the ABS (anti-lock braking system )orthe
ESP
®(Electronic Stability Program). The oper-
ating safety of your vehicl emaybe restricted.
Yo uc ould lose controloft he vehicle, for
example:
Rwhen braking
Rin the event of abrupt steering maneuvers
and/or when the vehicle's speed is not
adapted to the roadc onditions
There is ariskofana ccident.
In the event of ashort circui torasimilar inci-
dent, contact aquali fied specialist workshop
immediately. Do not drive any further .You
shoul dhavea llwork involving the battery car-
rie do utataq uali fied specialist workshop.
For further informatio nabout ABS and ESP
®,
see (Ypage 61 )and (Ypage 64).
GWARNING
Electrostati cbuild -upc an lead to the creation
of sparks, which could ignite the highl yexplo-
sive gases of abattery.T here is ariskofa n
explosion.
Before handling the battery ,touch the vehicle
body to remove any existing electrostatic
build-up.
The highl yflammabl egasmixture form swhen
charging the battery as well as when jump-start-
ing. Alway
smakes uret hatn either yo unor the bat-
tery is electrostaticall ycharged. Abuild -upo f
electrostatic charge can be caused ,for exam-
ple:
Rby wearing clothing made from synthetic
fibers
Rdu etof rictionbetween clothing and seats
Rif yo upushorp ullt he battery across the car-
pe toro thersyntheti cmaterials
Rif yo urub the battery with acloth
GWARNING
During the charging process ,abattery produ-
ces hydrogen gas. If ashort circui toccurs or
sparks are created,t he hydrogen gascan
ignite .There is ariskofane xplosion.
RMake sure thatt he positive terminal of a
connected battery does not come into con- tact with vehicl eparts.
RNever place meta lobjects or tool sonabat-
tery.
RIt is important thaty ouobserve the descri-
be do rder of the battery terminal swhen
connecting and disconnecting abattery.
RWhe njump-starting ,makes uret hatt he
battery pole swithi de ntical polarity are
connected.
RIt is particularly important to observe the
describe dorder when connecting and dis-
connecting the jumper cables.
RNever connect or disconnect the battery
terminal swhile the engine is running.
GWARNING
Battery aci discaustic .There is ariskofi njury.
Avoidc ontact with skin, eyes or clothing. Do
not inhal eany battery gases .Donot lean over
the battery .Keepc hildren away from batter-
ies. Wash away battery aci dimmediatelyw ith
plenty of clean water and see kmedica latten-
tion.
HEnvironmental note
Batterie scontain dangerous
substances. It is against the
la wtod ispose of them with
276Battery (vehicle)
Breakdo wn assis tance
Page 281 of 326
GWARNING
During charging and jump-starting, explosive gasesc an escapefrom the battery .There is arisk
of an explosion.
Particularl yavoi dfire, open flames, creating sparks and smoking. Ensure there is sufficient ven-
tilation while charging and jump-starting. Do not leano verabattery.
GWARNING
During the charging process,ab attery produces hydrogen gas. If ashort circui toccurs or sparks
are created ,the hydrogen gas can ignite. There is arisk of an explosion.
RMake sure that the positive terminal of aconnected battery does not come into contact with
vehiclep arts.
RNever place metal objects or tools on abattery.
RIt is important that you observe the described order of the battery terminal swhen connecting
and disconnecting abattery.
RWhen jump-starting, make sure that the battery polesw ith identical polarity are connected.
RIt is particularlyimportant to observe the described order when connecting and disconnecting
the jumper cables.
RNever connect or disconnect the battery terminal swhile the engine is running.
GWARNING
Ad ischarged battery can freeze at temperatures below freezing point. When jump-starting the
vehicleorc harging the battery,g asescan escapef rom the battery.T here isarisk of an explosion.
Allow the frozen battery to thaw out before charging it or jump-starting.
!Avoid repeated and lengthy starting attempts. Otherwise, the catalytic converter coul dbe
damaged by the non-combusted fuel.
If the indicator/warning lamp sdonot light up in the instrument cluster at low temperatures, it is very
likelyt hat the discharged battery has frozen. In this case you may neither jump-start the vehiclen or
charge the battery.L et the battery thaw first. The service life of athawed-out battery may be shorter.
The starting characteristics can be impaired,p articularlyatlow temperatures. Have the thawed-out
battery checked at aqualified specialist workshop.
Do not start the vehicleu singarapi dc harging device. If you rvehicle's battery is discharged, the
engine can be jump-started from another vehicleorf romasecond battery using jumper cables.
Observe the following points:
RThe battery is not accessible in all vehicles. If the other vehicle's battery is not accessible,j ump-
start the vehicleu singasecond battery or ajump-starting device.
RYou may only jump-start the vehiclew hen the engine and exhaust system are cold.
RDo not start the engine if the battery is frozen. Let the battery thaw first.
ROnly jump-start from batterieswitha12Vv oltagerating.
ROnly use jumper cables that are not damaged and have asufficient cross-section and insulated
terminal clamps.
RMake sure that the two vehicles do not touch.
Jump-starting279
Breakdown assistance
Z
Page 282 of 326
Make sure that:
RThe jumper cables are not damaged.
RNon-insulated parts of the terminal clamps do not come into contact with other metal parts while
the jumper cables are connected to the battery.
RThe jumper cables cannot come into contact with parts that can move when the engine is running,
such as the V-belt pulleyorthe fan.
XSecure the vehicle by applying the electric parking brake.
XShift the transmission to position j.
XTurn the SmartKey to positiongin the ignition lock and remove it.
XSwitch off all electrical consumers, e.g. rear window defroster, lighting, etc.
XOpen the hood.
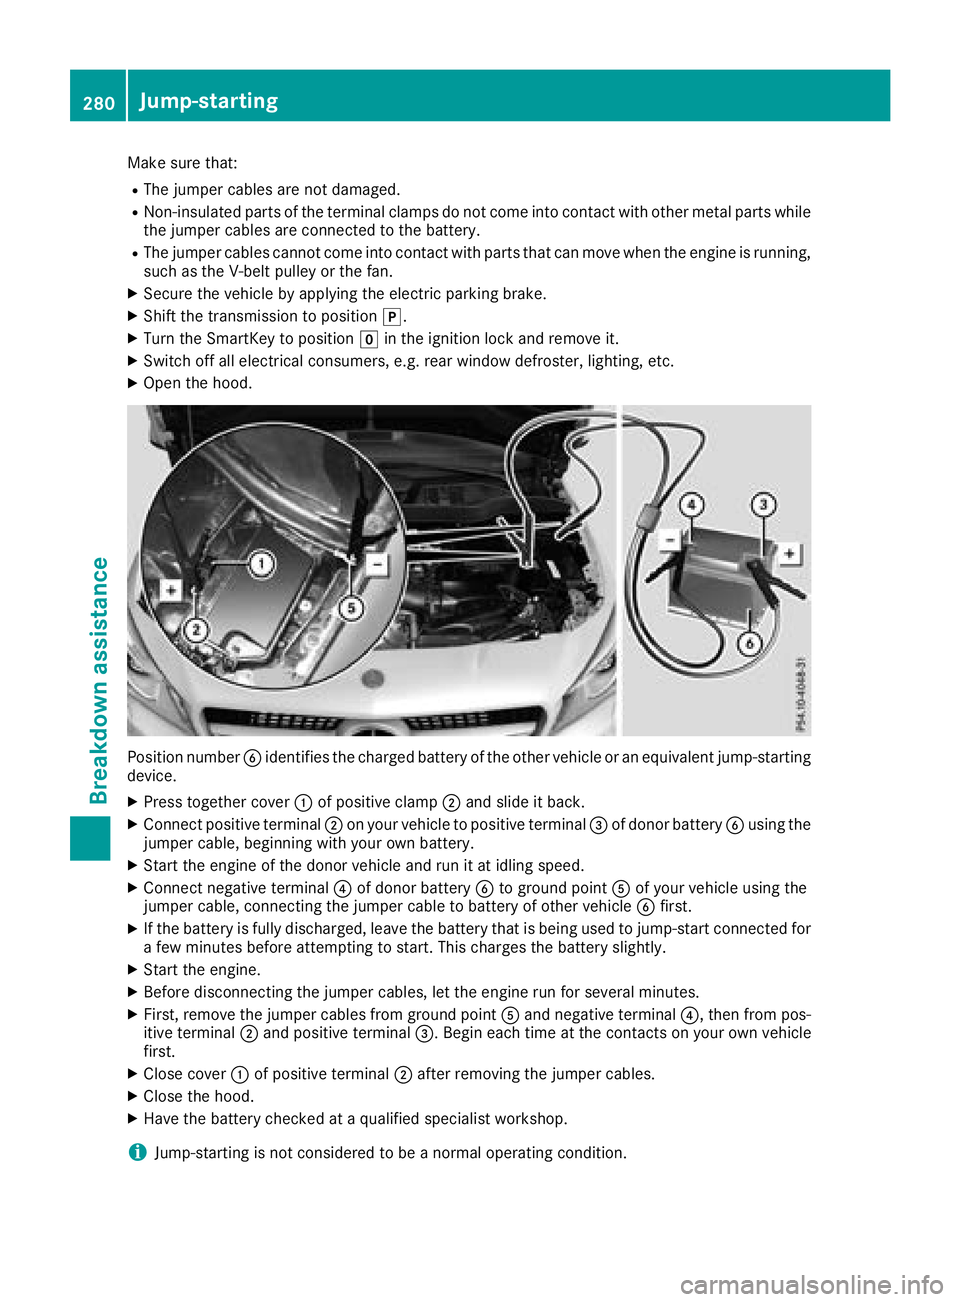
Position number Bidentifies the charged battery of the other vehicle or an equivalent jump-starting
device.
XPress together cover :of positive clamp ;and slide it back.
XConnect positive terminal ;on your vehicle to positive terminal =of donor battery Busing the
jumper cable, beginning with your own battery.
XStart the engine of the donor vehicle and run it at idling speed.
XConnect negative terminal ?of donor battery Bto ground point Aof your vehicle using the
jumper cable, connecting the jumper cable to battery of other vehicle Bfirst.
XIf the battery is fully discharged, leave the battery that is being used to jump-start connected for
afew minutes before attempting to start. This charges the battery slightly.
XStart the engine.
XBefore disconnecting the jumper cables, let the engine run for several minutes.
XFirst, remove the jumper cables from ground point Aand negative terminal ?,then from pos-
itive terminal ;and positive terminal =.Begin each time at the contacts on your own vehicle
first.
XClose cover :of positive terminal ;after removing the jumper cables.
XClose the hood.
XHave the battery checked at aqualified specialist workshop.
iJump-starting is not considered to be anormal operating condition.
280Jump-starting
Breakdown assistance