Page 49 of 248

47
To take effect, this deactivation must
be carried out each time the ignition is
switched off.
Reactivating the volumetric
protection
F Unlock the vehicle using the unlocking button on the remote control.
F
L
ock the vehicle using the remote control.
The alarm activates again with the two
protections; the indicator lamp in button A
flashes once per second.
Triggering of the alarm
This is indicated by the sound of the siren
and the flashing of the direction indicators for
around thirty seconds.
After triggering, the protection is operational
again.
If the alarm is triggered ten times in
succession, on the eleventh occasion it
becomes inactive. Rapid flashing of the indicator lamp in
button A informs you that the alarm was
triggered during your absence. When the
ignition is switched on, this flashing stops
immediately.
To avoid triggering the alarm, when
washing your vehicle lock it using the key
in the driver's door lock.
Failure of the remote control
F Unlock the vehicle using the key in the
driver's door lock.
F
O
pen the door; the alarm is triggered.
F
S
witch on the ignition; this stops the alarm.
Locking the vehicle without
activating the alarm
F Lock or deadlock the vehicle using the key in the driver's or passenger's door lock.
Malfunction
When the ignition is switched on, illumination of
the indicator lamp in button A for ten seconds
indicates a
fault in the siren.
Have it checked in the dealer network or by
a
qualified workshop.
Automatic activation
(Depending on country of sale.)
The alarm is activated automatically 2 minutes
after the last door or the boot is closed.
F
T
o avoid triggering the alarm on entering the
vehicle, first press the unlocking button on
the remote control.
Electric windows
Equipped, on the driver side, with an anti-pinch
protection function.
1. Driver's electric window control.
2. Passenger's electric window control.
02
Access
Page 50 of 248

48
The electric window controls remain
active for approximately 45 seconds after
the ignition is turned off, or until a
door is
opened. During this period of 45
seconds,
if you open a
door while operating
a
window, the window stops. Any new
electric window command will be ignored
until the ignition is switched back on.
Electric passenger window
F Press or pull the control. The window stops as soon as the
switch is released.
Sequential electric driver
window
There are two options:
-
man
ual mode
F
P
ress or pull the control gently, without
exceeding the point of resistance. The
window stops as soon as the control is
released.
Safety anti-pinch
The sequential electrical window on the driver
side has an anti-pinch function.
When the window rises and meets an obstacle,
it stops and partially lowers again.
In the event of unwanted opening of the
window on closing (for example, when
f re ezing):
F
p
ress the control beyond the point of
resistance and release it; the window
opens fully,
F
t
hen immediately pull the control
without passing the point of resistance
until the window is fully closed,
F
c
ontinue to hold the control for
approximately one second after the
window has closed.
The safety anti-pinch function is not
operational during these operations.
Reinitialisation
If a fault occurs, you must reinitialise the
el ectric window operation:
F
r
elease the control and pull it again until the
window closes fully,
F
c
ontinue to hold the switch for
approximately one second after the window
has closed,
F
p
ress the control to lower the window
automatically to the low position.
The safety anti-pinch function is not
operational during these operations.
-
a
utomatic mode
F
P
ress or pull the switch fully, beyond the
point of resistance. The window opens
or closes completely when the switch is
released.
F
P
ressing the switch again stops the
movement of the window.
Always remove the key from the ignition
when leaving the vehicle, even for a
short
time.
In the event of contact during operation
of the windows, you must reverse the
movement of the window. To do this, press
the switch concerned.
When the driver operates the passenger
electric window switch, they should ensure
that no-one is preventing correct closing
of the window.
Be particularly aware of children when
operating the windows.
02
Access
Page 51 of 248

49
Doors
Opening
From outside
F After unlocking the vehicle using the remote control or the key, pull the door handle.
From inside
F Pull the door control to open the door; it unlocks the whole vehicle. Version with deadlocking
The interior door controls do not operate
when the vehicle is deadlocked.
Locking
- engine on and up to 6
mph
(10 km/h), this indicator lamp
lights up, accompanied by
a
message,
-
v
ehicle moving above
6
mph (10 km/h), this alert is
complemented by an audible
signal.
When a
door or the boot is not properly closed:
Central locking
Manual central locking
System to manually and fully lock or unlock the
doors from the inside.
Locking
If one of the doors is open, the central
locking from the inside does not take
place.
Unlocking
F Press the button again to unlock the vehicle.
The red indicator lamp in the button goes off.
When the vehicle is locked from the
outside, the red indicator lamp flashes and
the button is inactive.
F
I
n this case, use the key or the remote
control to unlock the vehicle.
F
P
ress this button to lock the vehicle.
The red indicator lamp in the button comes on.
02
Access
Page 52 of 248

50
Driving with the doors locked could make
it difficult for the emergency ser vices to
enter the vehicle in an emergency.
Automatic central locking
System to automatically and fully lock or unlock
the doors and the boot while driving.
You can activate or deactivate this function.
Locking
When the speed is above 6 mph (10 km/h), the
d oors and boot lock automatically.
If one of the doors is open, the automatic
central locking does not work.
If the boot is open, the automatic central
locking of the doors is active.
Unlocking
F Above 6 mph (10 km/h), press the button to
momentarily unlock the doors and boot.
Activation
Deactivation
F Press the button again for more than two seconds.
A confirmation message appears on the
screen, accompanied by an audible signal.
Back-up control
For mechanically locking and unlocking the
doors in the event of a fault with the central
locking system or a
battery failure.
In the event of a
fault with the central
locking system, it is essential to
disconnect the battery to lock the boot and
so ensure complete locking of the vehicle.
Locking the driver's door
F Insert the key in the lock and then turn it to the rear.
Unlocking the driver's door
F Insert the key in the lock and then turn it to the front.
Locking the passenger door
F Remove the black cap on the edge of the door, using the key.
F
I
nsert the key into the hole then turn it as far
as it will go.
F
R
emove the key and refit the cap.
F
P
ress this button for more than two
seconds.
A confirmation message appears on the
screen, accompanied by an audible signal.
02
Access
Page 53 of 248
51
Unlocking the passenger door
F Pull the interior door opening control.
Convertible roof
Your vehicle is equipped with an electrically
operated convertible roof.Electrically operated opening
and closing
The roof is opened and closed by pressing the
control located on the courtesy lamp, in the
opening direction 1 and the closing direction 2 .
The roof manoeuvres can be per formed:
-
w
ith the engine running, or
-
w
ith the ignition on. To maintain the level of charge in the
battery, it is advisable to operate the roof
with the engine running
.
Depending on the level of charge of the
battery, if the roof is operated with the
ignition switched on, starting the engine
may cause the roof to stop moving. To
continue moving the roof, repeat the
command after you have started the
engine.
Manoeuvre zones
You have two manoeuvre zones:
Zone A: horizontal manoeuvre zone, in
manual or automatic mode.
Zone B: vertical manoeuvre zone, in
automatic mode only.
02
Access
Page 54 of 248
52
Roof positions
Position 0:Roof completely closed.
Position 1: Stop position during automatic
closure of the roof.
Position 2: Roof open horizontally.
Position 3: Roof completely open.
Before operating the roof, make sure that
no-one inside or outside the vehicle is
exposed to any risk related to moving the
roof or the rear screen and that no objects
hinder this operation.
Opening
Manual mode
F In zone A , press and hold the control
without passing the point of resistance to
open the roof.
F
T
he roof stops when you release the
control. The roof can only be opened in zone B in
automatic
mode.
Automatic mode
F In zone A , press the control beyond the
point of resistance to start opening the roof.
During the automatic roof opening in zone
A , pressing the control stops the roof.
02
Access
Page 55 of 248

53
F Release the control: the roof will continue opening to the maximum horizontal position
(position 2 ).
During the full opening of the roof, the
rear screen is set down on the rear parcel
shelf. Do not place any object on the shelf
that could damage the screen or the roof.
Automatic opening of the roof in zone B is
not possible if the boot is open.
If there is a
problem, check that the boot is
properly closed. F
I n zone B, pressing the control opens the
roof completely (position 3 ).
During a
manoeuvre in zone B, stopping
the roof is not possible.
Pressing the control inverts the direction
of movement whatever the direction of the
press on the control.
This"anti-panic" function allows a
rapid
reversal of the roof 's direction of
movement in case of emergency.
Closing
Manual mode
F In zone A , press and hold the control
without passing the point of resistance to
close the roof.
F
T
he roof stops when you release the
control.
F
T
o close the roof completely, keep the
control pressed until the roof is heard to
lock.
02
Access
Page 56 of 248

54
If the roof is not locked correctly, repeat
the closure command with the engine
running.
If the problem persists, contact the dealer
network or a qualified workshop.
The closure of the roof in zone B can only
be done in automatic mode.
Automatic mode
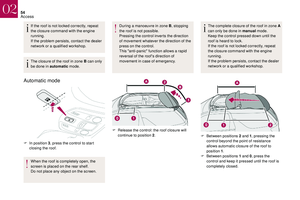
F In position 3, press the control to start
closing the roof.
When the roof is completely open, the
screen is placed on the rear shelf.
Do not place any object on the screen. During a
manoeuvre in zone B
, stopping
the roof is not possible.
Pressing the control inverts the direction
of movement whatever the direction of the
press on the control.
This "anti-panic" function allows a
rapid
reversal of the roof 's direction of
movement in case of emergency.
F
R
elease the control: the roof closure will
continue to position 2 . The complete closure of the roof in zone A
can only be done in manual
mode.
Keep the control pressed down until the
roof is heard to lock.
If the roof is not locked correctly, repeat
the closure command with the engine
running.
If the problem persists, contact the dealer
network or a qualified workshop.
F
Be
tween positions 2 and 1
, pressing the
control beyond the point of resistance
allows automatic closure of the roof to
position 1 .
F
Be
tween positions 1 and 0, press the
control and keep it pressed until the roof is
completely closed.
02
Access