Page 177 of 248

175
Dipped beam headlamps
Main beam headlampsF Remove the protective cover by pulling the tab.
F
D
isconnect the bulb connector.
F
S
pread the springs to release the bulb.
F
P
ull the bulb out and change it.
To refit, carry out these operations in reverse
o r d e r.
Sidelamps
F Remove the protective cover by pulling the tab.
F
D
isconnect the bulb connector.
F
S
pread the springs to release the bulb.
F
P
ull the bulb out and change it.
To refit, carry out these operations in reverse
o r d e r.
F
R
emove the protective cover by pulling the
tab.
F
P
ull the bulb holder by pressing the tabs on
both sides.
F
P
ull the bulb out and change it.
To refit, carry out these operations in reverse
o r d e r.
LED/Xenon headlamps
(LED: light-emitting diodes.)
1. Direction indicators (LED).
2. Sidelamps (LED).
3. Dipped beam headlights (Xenon).
4. Main beam headlamps (LED/Xenon).
5. LED daytime running lamps.
6. LED foglamps.
For the replacement of this type of lamp
(LED/Xenon), contact the dealer network or
a
qualified workshop.
08
In the event of a breakdown
Page 178 of 248
176
Integrated direction indicator side
repeaters
Contact the dealer network or a qualified
w orkshop to obtain the module.
LED foglamps
LED daytime running lampsRear lamps
Model with conventional bulb lamps
1. Brake/sidelamps (P21/5W).
2. Sidelamps (P5W).
3. Direction indicators (PY21W amber).
4. Foglamp (PR21W red) or reversing lamp
(P21W ).
Model with rear 3D lamps
F Insert a screwdriver towards the centre of
the repeater between the repeater and the
base of the mirror.
F
L
ever with the screwdriver to extract the
repeater and pull it out.
F
D
isconnect the connector from the repeater.
F
R
eplace the module.
To refit, carry out these operations in reverse
o r d e r. For the replacement of this type of diode
lamp, contact the dealer network or a
qualified
workshop.
For the replacement of this type of diode
lamp, contact the dealer network or a
qualified
workshop. 1.
3D LED sidelamps.
2. LED brake/sidelamps.
08
In the event of a breakdown
Page 179 of 248
177
3.LED side marker lamps.
4. Direction indicators (PY21W amber).
5. Foglamp (H21W red) or reversing lamp
(H21W ).
Amber or red colour bulbs, such as the
direction indicators or foglamps, must be
replaced by bulbs with identical colour and
specifications.
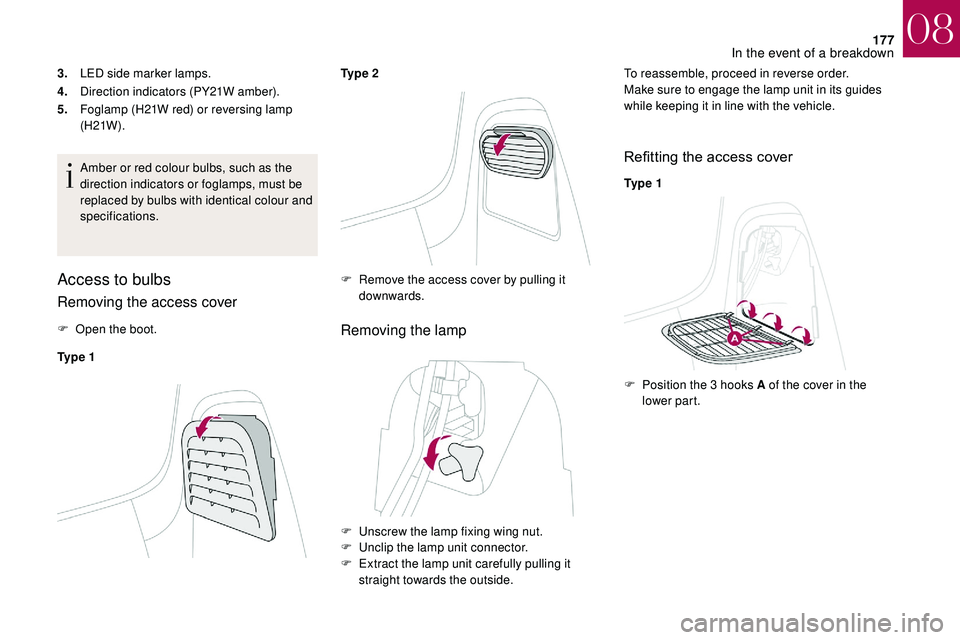
Access to bulbs
Removing the access cover
F Open the boot.
Ty p e 1 Ty p e 2Removing the lamp
To reassemble, proceed in reverse order.
Make sure to engage the lamp unit in its guides
while keeping it in line with the vehicle.
Refitting the access cover
Ty p e 1
F
R
emove the access cover by pulling it
downwards.
F
U
nscrew the lamp fixing wing nut.
F
U
nclip the lamp unit connector.
F
E
xtract the lamp unit carefully pulling it
straight towards the outside. F
P
osition the 3 hooks A of the cover in the
lower part.
08
In the event of a breakdown
Page 180 of 248
178
Ty p e 2
Changing bulbs
Model with conventional bulb lampsModel with rear 3D lamps
Direction indicators (4) and foglamp or
reversing lamp (5)
Replacing LED sidelamps and brake
lamps (diodes)
For the replacement of this type of diode
lamp, contact the dealer network or a
qualified
workshop.
F
T
ip the cover upwards and position the
hooks B under the boot trim.
F
Ra
ise the cover.
F
S
lide the cover so as to put it properly back
in place. F
P
osition the cover in the lower part.
F
T
ip the cover upwards.
F
T
urn the bulb a quarter of a turn and change
it.
F
S
pread the four tabs and remove the bulb
h o l d e r.
F
T
urn the bulb a
quarter turn and change it.
08
In the event of a breakdown
Page 181 of 248
179
Number plate lamps (LED)
Third brake lamp (4 x W5W bulbs)F Push centrally on the lamp body, while levering it with two screwdrivers to extract it
to the outside.
F
D
isconnect the connector and, if necessary,
the lamp screenwash tube.
F
T
urn the bulb holder corresponding to the
faulty bulb a
quarter turn.
F
P
ull the bulb out and change it.
To refit, carry out these operations in reverse
o r d e r.Third brake lamp (LED)
For the replacement of this type of LED lamp,
contact the dealer network or a qualified
workshop.
F
O
pen the boot.
F
R
emove the two blanking plugs A located
on the lining. For the replacement of this type of light emitting
diode lamp, contact the dealer network or
a
qualified workshop.
08
In the event of a breakdown
Page 182 of 248
180
Interior lighting
Courtesy lamp (1/W5W)
Unclip the cover of courtesy lamp 1 with a fine
s crewdriver, on the control side, to access the
faulty bulb.
Map reading lamps (2/W5W)
Unclip the cover of courtesy lamp 1 . To
access the faulty bulb, unclip the reading lamp
2
partition concerned.
Boot lamp (W5W) Footwell and central storage lighting
(W5W)
Unclip the unit to access the bulb.
Glove box lighting (W5W)Unclip the unit by pushing the base from
behind.
Unclip the unit to access the bulb.
08
In the event of a breakdown
Page 183 of 248

181
Changing a fuse
Access to the tools
The extraction tweezers and the locations for
spare fuses are installed behind the fusebox
cover on the dashboard.
Changing a fuse
F always replace the defective fuse with
a fuse of the same rating (same colour);
using a
different rating could cause
a
malfunction (risk of fire).
If the fault recurs after replacing a
fuse, have
the electrical system checked in the dealer
network or by a
qualified workshop.
Replacement with a
fuse not shown in
the allocation tables below may cause
a
serious malfunction of your vehicle.
Contact the dealer network or a
qualified
workshop.
F
U
nclip the fusebox cover by pulling the side.
F
R
emove the cover completely,
F
P
ull out the tweezers.
F
O
pen the glove box lid.
F
U
nclip the fusebox cover by pulling the side.
F
R
emove the cover completely,
F
P
ull out the tweezers.
Before changing a
fuse:
F
t
he cause of the failure must be identified
and rectified,
F
a
ll electrical consumers must be switched
of f,
F
s
top the vehicle and switch off the ignition,
F
I
dentify the faulty fuse using the existing
allocation tables and diagrams given in the
following pages.
To replace a
fuse, you must:
F
u
se the special tweezers to extract the fuse
from its housing and check the condition of
its filament, Good
Failed
Tw e e z e r s
08
In the event of a breakdown
Page 184 of 248
182
Installing electrical accessories
Your vehicle's electrical system is designed
to operate with standard or optional
equipment.
Before installing other electrical equipment
or accessories on your vehicle, contact the
dealer network or a qualified workshop.
DS AUTOMOBILES accepts no
responsibility for the cost incurred in
repairing your vehicle or for rectifying
malfunctions resulting from the installation of
accessories not supplied, not recommended
and not installed in accordance with its
specifications, in particular when the
combined power consumption of all of the
additional equipment connected exceeds
10
milliamperes.Fuses in the dashboard
The fusebox is placed in the lower dashboard
(left-hand side).
08
In the event of a breakdown