Page 89 of 230
, refer to \"Infor")
Parking on the r ight is described here . It is identi
cal when parking on the left.
I f the re is an obstacle next to the pa rking space
(such as a wa ll), refer to "Information for par king
next to obstacles" ¢
page 87.
~ Activate the tu rn s ignal.
~ Pos ition your vehicle next to a parked veh icle in
front of the desired parking space. The d istance
to this vehicle should be approximately 3 ft. (1
m) .
~ Turn the Infotainment system on and sh ift into
reverse gear. The parking system is turned on
and the
Cr oss park ing view is displayed.
~ Press the control button on the Infotainment
unit
(D ¢ fig . 94 . The Parall el parking view is
displayed .
~ Backup and align you r vehicle so the b lue a rea
@ borders on the rear end of the veh icle be
hind you or on the parking space line
¢ .&. in
General information on page 85,
¢ -Ol) in Gen
eral information on page 85 .
The blue area rep
resents an extension of the veh icle's outline by
approxim ately 16 ft (5 meters) to the rear. The
long side of the blue area shou ld be on the
curb . The entire blue area must fit into the
park ing space.
~ With the veh icle stopped, turn the steer ing
whee l to the r ight as far as it w ill go.
~ Bac k in to the park ing space unti l the b lue curve
¢ fig. 95 tou ches the curb¢.&. in Gen eral in
formation on page 85, ¢(Din General infor
mation on page 85 .
Stop the vehicle.
~ With the vehicle stopped, turn the steer ing
wheel to the left as far as it will go .
~ Continue to back into the parking space un til
the veh icle is parked parallel to the curb¢&.
in General information on page 85 , ¢ (Din
General information on page 85.@
ma rks the
rea r bumpe r. Stop t he veh icle, a t the la test,
when the red or ien tat io n line @ borders an ob
ject . Keep an eye on the front o f your vehicle
whi le doing this.
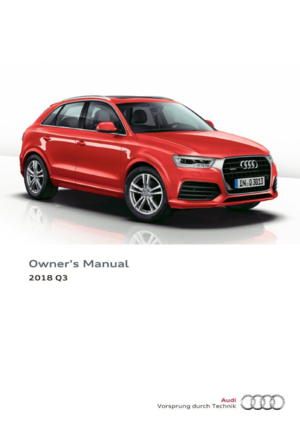
Parking next to obstacles
~ I f the re is an obstacle (such as a wall) next to the ......
~ pa rking space, pos ition the vehicle so t here is
8 mo re space on that side. Posi tion the long s ide of
g the blue s urface so that the re is sufficient space 00
Parking sy stem s
from the obstacle. The surface must not be
touching . You will a lso need to start turning the
stee ring wheel earlier . The bl ue curve
r:=:> fig . 95
must not touch the obstacle and shou ld have suf
ficien t room .
@ Note
Keep eno ugh distance from the curb to re
duce the risk of damage to the r ims.
(D Tips
The left or right orientation lines and surfaces
will be d isp layed , depend ing on the tu rn sig
nal be ing used.
Adjusting the display
and the warning tones
Applies to : vehicles wit h parking system pl us/rearview cam
era
The display and warning tones can be adjus ted in
the Infotainment.
~ Select: the I CAR I funct ion button > ( C ar) Sys
tems *
control but ton > Driver assist > Parking
aid .
Display
On * -
an optical display is shown for the parking
system p lus, a rearview came ra image is shown
for parking system plus with rearview camera*.
Off -when the parking system is switched off,
o n ly audib le signals are given .
Signal tones
Front volume* -
vol ume for the front area
Rear volume -volume for the rear area
Front frequency * -frequency for the front area
Rear frequency -frequency for the rea r a rea
Music volume while parking -when the par kin g
system is turned on, the vo lume of the audio/v id
eo source is lowered
The newly se lected level is demonstrated briefly
by the sound gene ra to r. .,.
87
Page 90 of 230

Parking sy stem s
(D Tips
-The warning tones can also be adjusted d i
rect ly from the visua l display or the rearv iew
camera image*. Simply press the
S ettings
control button.
- Changed settings are act ivated when the
parking system is switched on again.
- The settings are automatically stored and
assigned to the remote control key that is in
use.
Error messages
A pp lies to: ve hicles w ith parkin g system plus/rearview cam·
e ra
There is an error in the system if the LED in the
P,#A button is bl inking and yo u hear a continuous
alarm for a few seconds after switching on the parking system or when the parking system is al
ready act ivated. If the error is not corrected be
fore you switch off the ig nition, the LED in the
p,,; A
button will blink the next t ime you sw itch on the
pa rking system by s hift ing into reverse .
If a sensor is faulty, the~ symbol will appear in
front of/behind the vehicle in the Infotainment
d isplay. If a rear sensor is faulty, only obstacles
that are in areas @ and @ are displayed
¢page 83, fig. 85. If a front sensor is faulty, on ly
obstacles that a re in areas © and @are dis
p layed.
Drive to an authorized Aud i dea ler or authorized
Aud i Serv ice Facility immediately to have t he
malfunct io n corrected.
Trailer hitch
App lies to: ve hicles w ith parkin g system plus/rearview cam
era a nd trail er hitc h
For veh icles using the trailer socket, the parking
system rear sensors are not activated when you
shift into reverse gear or whe n you press the
p,, ;A
button . This results in the follow ing restr ictions .
Parking system plus*
There is no d istance warning for the rear. The
front sensors remain activated . The visual display
sw itches to tra iler mode .
88
Parking sy stem plus and rearview c amera *
There is no distance warning for the rear. The
front sensors remain activated . The visua l display
switches to trailer mode . The rearview camera
image will not show the orientation lines and the
blue surfaces.
(D Tips
Tra iler hitches that are not installed at the
factory may cause the parking system to mal
funct ion or they may restr ict its function.
Page 91 of 230

Description
Ele ctronic stabilization control (ESC) supports
driver safety . It reduces the risk of slipping and
improves")
Intelligent Technology Electronic stabilization
control (ESC)
Description
Ele ctronic stabilization control (ESC) supports
driver safety . It reduces the risk of slipping and
improves d riving stability. ESC detects critica l sit
uations such as the vehicle oversteering and un
dersteer ing or the wheels are spinning. The vehi
cle is stabilized by apply ing the brakes or reduc
ing engine torque . When the ESC engages, the
G1 indicator light b links in the instrument clus
ter.
T he follow ing systems are integrated in the ESC:
Ant i-loc k bra king s ystem (ABS)
ABS prevents the whee ls from locking when brak
ing. The vehicle can still be steered even during
hard brak ing. Apply steady pressure to the brake
pedal. Do not pump the pedal. A pulsing in the
b rake pedal indicates that the system is act ing to
stabilize the vehicle .
Brak e a ssist s ystem
The brake assist system can decrease braking dis
tance. It increases brak ing power when the driver
presses the brake pedal quickly in emergency sit
uations . You must press and hold the brake pedal
unti l the dangerous sit uat io n is ove r.
Anti-Slip Regulation (ASR )
ASR reduces eng ine power when the drive wheels
begin spinning and ad apts the force to the road
conditions . This makes it easier to start, acceler
ate and dr ive up hills .
Electronic differential lock (EDL )
The EDL applies the brakes to a whee l that starts
spinning and transfers the drive power to the
other driving wheel or wheels ( if the veh icle is
equ ipped w ith all wheel dr ive*) . This function is
n ot available at higher speeds .
0 ~ In extreme cases, EDL automatically switches off
~ to keep the brake on the braked wheel from over-N
8 heat ing . The vehicle is still work ing correctly . EDL 0
:::,
00
Intellig ent Technology
will swi tch on again automatically when condi
tions have returned to normal.
Steering recommendation
T he ESC he lps to s tabilize the vehicle by cha nging
t h e steer ing torque .
Selective wheel torque control
Se lective wheel torque control is used when driv
i ng on curves . The front whee l on the ins ide of
t h e curve or both wheels on the i nside of the
c ur ve are braked se lectively as needed. This al
lows mo re prec ise dr iving in c urves .
Automatic post -collision braking system
The "automat ic post -collis ion braking system"
can help to reduce the risk of sliding and of addi
tiona l co llisions after an accident.
If the a irbag
contro l modu le detects a collision above a certa in
vehicle speed, the ve hicle is br ake d by the ESC.
The vehicle does not brake automatically if:
- the dr iver presses the acce lerator pedal, or
- the bra king fo rc e generated by the pressed
brake pedal is greater than the braking force
that would be in itiated by the system, or
- the ESC, the brake system or the veh icle electri
cal system are not functioning.
A WARNING
- The ESC and its integrated systems cannot
overcome the lim its imposed by natura l
phys ica l laws. This is especially impo rtant
on slippery or wet roads. If the systems be
gi n a cting to s tabilize yo ur vehicle, you
should immedi ately alter your speed to
match the road and traffic conditions. Do
not let the inc reased safety provided tempt
you into taking risks. This could increase
your r isk o f a collis ion.
- Please note the r isk of a coll is ion increases
when dr iv ing fast, especially t hrough curves
and on slippery or wet roads, and when dr iv
ing too close to objects ahead. The ESC and
its integrated systems cannot always pre
vent co llisions - there is st ill a risk of acci
dents!
89
Page 92 of 230

Intelligent Technology
-Press the accelerator pedal carefully when
accelerating on even, slippery surfaces such
as ice and snow. The drive wheels can spin
even when these control systems are instal
led and this can affect driving stability and
increase the risk of a collision.
{D) Tips
-The ABS and ASR only function correctly
when all four wheels have a similar wear
Switching on/off
condition. Different tire sizes can lead to a
reduction in engine power.
- You may hear noises when the systems de
scribed are working .
£SC turns on automatically when you start the engine .
Fig. 96 Center console : OFF~ button
The following examples are unusual situations
where it may make sense to switch offroad mode
on to allow the wheels to spin:
- Rocking the vehicle to free it when it is stuck
- Driving in deep snow or on loose ground
- Driv ing on rough terrain when much of the car's
we ight is lifted off the wheels (axle artic ula
tion)
- Dr iv ing downh ill wh ile braking on loose g round
The ESC is designed to function in levels. Depend
ing on the level selected, the ESC stabilization
function is limited or switched off . The amount of
stabilization control wi ll differ depending on the
level. For your safety, sw
itch the offroad mode off in
advance.
ESC levels
Offroad mode on ESC/ASR off
Offroad mode off or
ESC/ASR on
Behavior
The ESC and ASR stabiliza-
The stabilization function is The
full stabilization func-
tion functions are limited not
available
¢ .&.. ESC and tion of the ESC and ASR is
¢ .&. . ASR are switched off. availab le again.
Operation Press the C; button briefly. Press and hold the C; button Press the C; button again.
longer than three seconds.
Indicator II turns on. II and lfil•U~ turn on. II turns off or II and
lights lfil•l~i turn off.
Messages Stabilization control (ESC):
Stabilization control (ESC): Stabilization control (ESC):
offroad. Warning! Reduced Off
. Warning! Reduced sta-
On
stability bility
90
...
Page 93 of 230

A WARNING
You should only switch offroad mode on or
switch ESC/ ASR off if your driving abilities
and the traffic conditions perm it. There is a
risk of s lid ing .
- The stabilization function is limited when
offroad mode is switched on . The driving
wheels could spin and the vehicle could
swerve, especially on slick or s lippery road
surfaces.
- There is no vehicle stabilization when ESC/
ASR are switched off.
Hill descent assist
Appl ies to: vehicles with hill hold assist
Hill descent assist makes it possible to drive
down a hill at a constant speed.
Fig. 97 Center console : hill descent assist butto n
• To switch the hill descent assist on, press the
~ button in the center console c} fig. 97. The
LED in the button turns on.
• Press the button again to switch it off. The LED
in the button turns off .
Hill descent assist brakes all four whee ls auto
matically in order to limit speed when driving ei
ther forward or reverse on hills with a grade up to
approximately 50% .
When hill descent assist is on, the speed your ve hicle was traveling when it entered the hill is
maintained . It is only possible to switch on the
assist when driving slower than 37 mph (60 km/
h). The assist begins shortly after you start driv-
e '.:: ing and continues up to approximate ly 19 mph
N r--. (30 km/h) . T he driver can increase or decrease N .... 0 0 ::, (X)
Intelligent Technology
the vehicle speed within these limits by pressing
the accelerator or brake pedal.
However, there must be enough tract ion. Hill de
scent assist
cannot function as expected, if for
example the hill is icy or if the surface is loose
¢,&. .
A blinking indicato r light. in the instrument
cluster will indicate if the system if actively regu
lating a specific speed up to approximately
19 mph (30 km/h). The indicator light stays on
continuously when in the ready mode.
The system does not work at speeds between 19
and 37 mph (30 and 60 km/h) . The system is
then in ready-mode . This is indicated by the LED
in the button turning on. The system automat i
cally switched off when you drive faster than 37
mph (60 km/h) . The LED will also turn off in this
scenario .
Hill descent assist is automatically activated un
der the following conditions:
- the LED in the button turns on
- the vehicle speed is lowe r than 19 mph (30 km/
h)
- the incline angle is at least around 10%
A WARNING
-
-Always adapt your speed to the weather,
road and traffic conditions. Do not let the
increased safety provided tempt you into
taking risks, because this increases the risk
of an accident.
- The hill descent assist system cannot over
come the laws of physics. Your driving style
must always be adapted to the current road
and traffic conditions .
- Hill descent ass ist may not be able to hold
your vehicle at a constant speed under all
conditions while dr iving on a hill (for exam
p le if ground under the vehicle is loose).
Brakes
New brake pads
New brake pads do not achieve their full braking
effect during the first 250 mi (400 km) . They
must be "broken in" first . However, you can
IJ,,
91
Page 94 of 230

Intelligent Technology
compensate for the slightly reduced brak ing
force by pressing firmly on the brake peda l. Avoid
heavy b raking during the break -in per iod .
Wear
Brake pad wear depends largely on the way the
veh icle is driven and on operat ing cond it ions.
This is especially t rue if you are driving frequently
in the city and on c urves or with a sporty driving
style.
Operating noise
Noises may occur when br aking depend ing on the
speed, b raking force and outs ide cond itions such
as temperature and humidity.
Effect of water or road salt
I n ce rtain s ituations, fo r example after driving
through water, in heavy ra in, afte r ove rnig ht con
densat ion or after washing your car, the braking
effe ct can be red uced by moisture or ice on the
b rake rotors and brake pads. The brakes must be
"dr ied" first with a few careful brake applica
tions.
At highe r speeds and with the windshie ld wipers
turned on, the brake pads press against the brake rotors for a short amount of time . This action,
which is not felt by the driver, happens at regular
intervals and ensures a better reaction time for
the brakes in wet weather.
The braking effect can also be reduced if you are
driving on salted roads and you do not apply the brakes for long periods of time. The laye r of salt
on the brake rotors and brake pads must be worn
off first when t he brakes a re applied ¢ ,& .
Corros ion
L eaving the vehicle par ked for long periods of
time, low mi leage and avo id ing heavy brak ing
can contribute to corrosion on the brake rotors
and to d irty b rake pads .
If you usually avoid heavy b raking or if there is
corros ion present, occasional heavy braking at
h igh speeds is recommended to clean the brake
rotors and pads¢,&.
92
Brake system malfunction
if you no tic e th at the b rake peda l t ravel has sud
denly gotten larger, then a brake ci rc u it may have
failed ¢.&. .
Low brake fluid level
When the b rake fluid level is low, malfunctions in
t h e b rake system may occur. The b rake fl uid leve l
i s e lec tron ically moni to red.
Brake booster
The brake booster amplifies the pressure you ap
ply to the brake pedal. It only works when the en
gine is runni ng ¢ ,& .
.8, WARNING
-On ly app ly the bra kes for the p urpose o f
cleaning the brake sys tem w hen road and
t raffic conditions permi t. You mus t not en
danger other roa d users . This increases the
risk of an accident.
-
- Never let the ve hicl e roll whi le the engine is
stopped because t his increases the risk of an
accident .
(D Note
- Never let the brakes "rub'' by pressing the
peda l lightly when braking is not actually
necessary . This causes t he b rakes to over
heat and increases braking distance and
causes wear.
- Be fore driving downhill a long d istance on a
steep hill, decrease your speed and select a lower gear. This makes use of the engine
brak ing effect and relieves the brakes . If
you need to bra ke add itiona lly, bra ke in in
te rvals and not cont inuous ly.
(D Tips
- If the brake booster is not working, you
must press the b rake peda l with much more
forc e than normal.
- If you retrofit your veh icle with a front spo il
er , wheel covers or sim ila r i tems, make su re
t h at the air flow to the fro nt wheels is not
inter rup ted. O therwise t he b rake system
c an be come too hot.
Page 95 of 230

0 co ......
"' ,....
"' ...... 0 0 :::,
00
Electromechanical
steering
The ele ctromechanical steering supports th e
driver's steering movements.
Power steering adapts electronically based on
the veh icle speed .
Indicat or lights and me ssages
• Steering fault! Do not dr ive vehi cle!
If th is ind icator lig ht tu rns on and stays o n and
this message appears, the power steer ing may
have failed.
Do
not c ont in u e d riving. See an authorized Aud i
dea ler o r autho rized Aud i Serv ice Facility fo r as
sis tance.
If the indicator light turns on, the steering wheel may be more diff icult to move or more sensitive
than usual. The steering wheel may also be at an
angle when dr iving straight .
Drive s low ly to an author ized Audi dealer or au
thor ized Audi Se rvice Fac ility to have the mal
function co rrected.
kr-ij Steering lock: System fault ! Please contact
dealer.
There is a malfunction in the electronic steering
l ock.
Drive to an authorized Aud i dea ler o r aut horized
Audi Service Facility immediately to have the
malfunction corrected.
A WARNING
-
Have the system malfunction corrected as
soon as possible by an author ized Audi dealer
or authorized Aud i Service Fac ility, as this in
creases the risk of a n accident .
(D Tips
If the . or i1:.ij indicator light only stays on
for a short time, you may continue dr iv ing.
Intellig ent Technology
All wheel drive (quattro)
Applies to: vehicles with all wheel drive
In all wheel drive, all four wheels are powered.
General information
In all whee l drive, the dr iving power is div ided be
tween all fou r wheels . This happens automatical
ly depending on yo ur driving behavior as we ll as
the cur rent road conditions . A lso see ¢
page 89 .
The all whee l dr ive concept is des igned for high
engine power. Yo ur vehicle is except iona lly pow
erfu l and has excellent driving characteristics
both under normal driving conditions and on
snow and ice. Always read and follow safety pre cautions
q .&, .
Winter ti res
By using all whee l drive, your veh icle has good
forward motion w ith standard tires in winter con
ditions . However, using winter or all season tires
on
all four wheels in the winter is recommended,
because th is w ill improve the
braking effect.
Snow chains
If there a re snow chain laws, snow cha ins m ust
also be used on ve hicles with all wheel drive
¢ page 181, Snow chains .
Replacing tires
For vehicle s wi th a ll wheel d rive, o nly wheels wi th
the same roll ing ci rcumfe rence sho uld be used.
Avoid using tires with di fferen t tread depths
¢ page 173, New tires or wheels.
A WARNING
- Also, in vehicles with all whee l drive, adapt
your driving style to the current road and traffic cond itions. Do not let the increased
safety prov ided tempt you into taking r isks,
because this increases the risk of an acc i
dent.
- The braking ab ility of your vehicle is limited
to the trac tion of the wheels. I n this way, it
is not different from a two w heel d rive vehi
cle. Do no t be tempte d to accelerate to a
h igh speed when the ro ad is s lippery, be -
cause t his increases t he risk of an acci den t. ...,
93
Page 96 of 230

Intelligent Technology
- Note that on wet streets, the front wheels
can "hyd roplane" if d riving at speeds that
are too high. Unlike front whee l drive
vehicles, the eng ine does not rev highe r sud
denly when the vehicle begins hyd roplaning.
Fo r this reason, adap t your speed to the
road co nditio ns to reduce t he risk of an acc i
dent.
Energy management
The starting ability is optimized
The energy management system manages the
electrical energy distribution and optimizes the
availability of electrical energy for starting the
engine.
When a ve hicle w ith a conventional e nergy sys
tem is not driven for a long time, the vehicle bat
tery is dra ined by equipment (for example, the
immobilizer) . In certain circumstances, there
could may not be enough energy to start the en
gine .
Your veh icle is equipped with a n intelligent ene r
gy management system for d istr ibut ing electric i
ty . This s ignificantly improves the sta rting ability
a nd increases t he ve hicle battery life .
The energy management system Is made up of
battery diagnosis , idling current management ,
and dynamic energy management .
Battery diagnosis
The batte ry diagnos is determines the ve hicle bat
tery charge level. The sensors dete rm ine the bat
tery voltage, the battery cur rent, and the battery
temperature. The c urrent charge level and the
pe rformance of the veh icle battery are deter
m ined based on th is .
Idling current management
The idling cu rrent management dec reases the
e n ergy used wh ile parked . With the eng ine
sw itched off, it manages the energy distribution
to the differe nt elect rical components. Data from
t he batte ry diagnos is is taken into account fo r
this.
94
De pend ing on the vehicle batte ry c harge level,
e lectrica l eq uip ment is switched off one item af
te r the other to p revent t he vehicle battery from
dra ining and to ma inta in the starting ab ility.
Dynamic energy management
W hile driv ing , d ynam ic ene rgy man ageme nt di s
tribu tes the ap propr iate amo unt of energy to t he
electrica l eq uip ment . It contro ls t he battery
c h arge level so that the amount o f energy is not
greater than the amount being generated in or
der to maintain an opt imal vehicle battery charge
l evel.
(D Tips
- Energy management cannot overcome the
laws of physics. Not e that the charge level
and length of the veh icl e bat tery life a re
limited .
- Wh en the sta rting ability is endangered, the
(•) indicator light t urns o n
c::> page 13.
What you should know
Maintaining the starting ability is the highest
priority .
A lot of st ress is placed on the veh icle battery
whe n driving short distances, d uring city d riving,
and at cold times of t he year. A lot of ene rgy is
u sed but li tt le is generated .
It is also critical
whe n the engi ne is no t ru nning but electrical
equipmen t is sw it c hed on . In t his ca se, energy is
u sed but none i s generate d.
In si tuati ons like t his, energy management w ill
ac tiv el y regulate the d is tr ibution of energy .
Long periods without use
If you do not drive yo ur vehicle for severa l days o r
wee ks, electrica l equ ipment is g radua lly sca led
bac k or sw itched off . Th is reduces energy use and
ensures the vehicle will be ab le to s tart a fter long
p er iods o f time . Some conven ience f unct ions,
s uch as in terior lig htin g, m ay not be available un
d er cert ain circu m sta nces. These c onve nien ce
f unct ions w ill be avail able ag ain once yo u sw itch
t h e ignit io n on and sta rt the eng ine. .,.
 1
1 2
2 3
3 4
4 5
5 6
6 7
7 8
8 9
9 10
10 11
11 12
12 13
13 14
14 15
15 16
16 17
17 18
18 19
19 20
20 21
21 22
22 23
23 24
24 25
25 26
26 27
27 28
28 29
29 30
30 31
31 32
32 33
33 34
34 35
35 36
36 37
37 38
38 39
39 40
40 41
41 42
42 43
43 44
44 45
45 46
46 47
47 48
48 49
49 50
50 51
51 52
52 53
53 54
54 55
55 56
56 57
57 58
58 59
59 60
60 61
61 62
62 63
63 64
64 65
65 66
66 67
67 68
68 69
69 70
70 71
71 72
72 73
73 74
74 75
75 76
76 77
77 78
78 79
79 80
80 81
81 82
82 83
83 84
84 85
85 86
86 87
87 88
88 89
89 90
90 91
91 92
92 93
93 94
94 95
95 96
96 97
97 98
98 99
99 100
100 101
101 102
102 103
103 104
104 105
105 106
106 107
107 108
108 109
109 110
110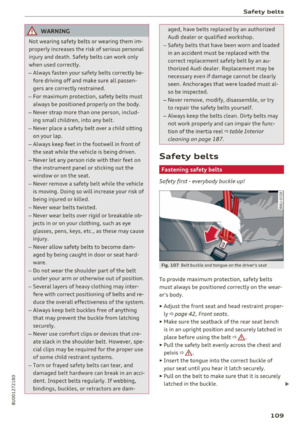 111
111 112
112 113
113 114
114 115
115 116
116 117
117 118
118 119
119 120
120 121
121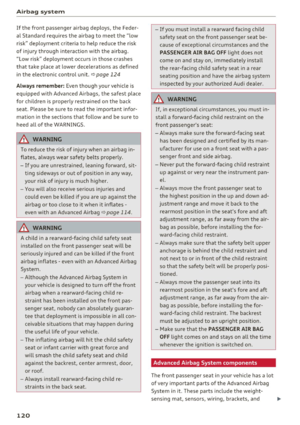 122
122 123
123 124
124 125
125 126
126 127
127 128
128 129
129 130
130 131
131 132
132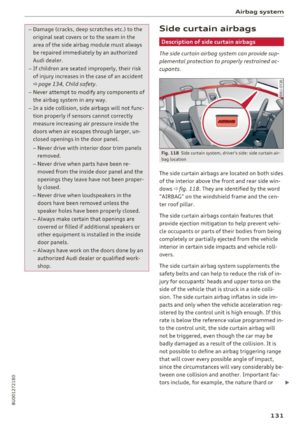 133
133 134
134 135
135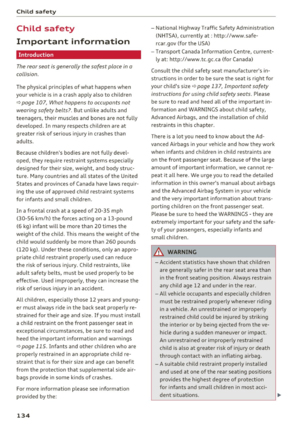 136
136 137
137 138
138 139
139 140
140 141
141 142
142 143
143 144
144 145
145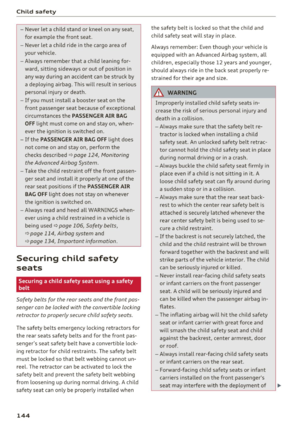 146
146 147
147 148
148 149
149 150
150 151
151 152
152 153
153 154
154 155
155 156
156 157
157 158
158 159
159 160
160 161
161 162
162 163
163 164
164 165
165 166
166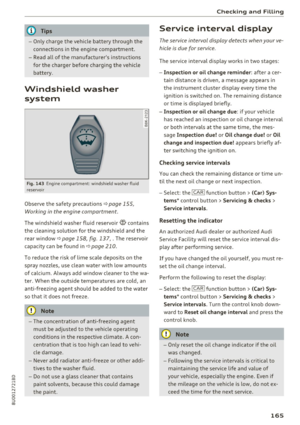 167
167 168
168 169
169 170
170 171
171 172
172 173
173 174
174 175
175 176
176 177
177 178
178 179
179 180
180 181
181 182
182 183
183 184
184 185
185 186
186 187
187 188
188 189
189 190
190 191
191 192
192 193
193 194
194 195
195 196
196 197
197 198
198 199
199 200
200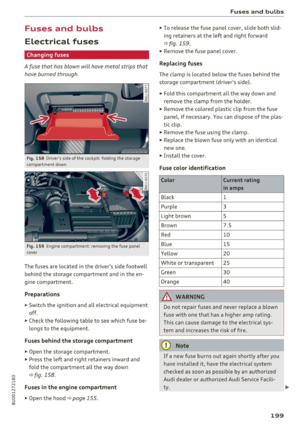 201
201 202
202 203
203 204
204 205
205 206
206 207
207 208
208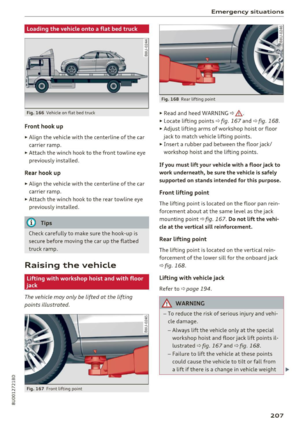 209
209 210
210 211
211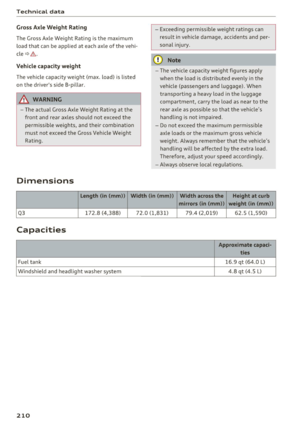 212
212 213
213 214
214 215
215 216
216 217
217 218
218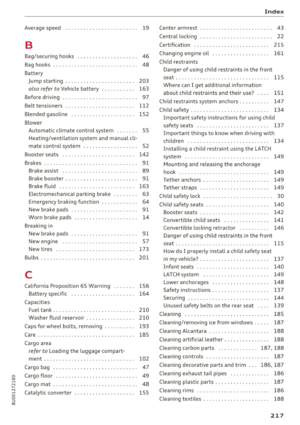 219
219 220
220 221
221 222
222 223
223 224
224 225
225 226
226 227
227 228
228 229
229