Page 49 of 230

a
co
...... N r--. N .... 0 0 ::, co
Storing* Depending on the vehicle equ ipment, yo u can
store the cover under the cargo floor
Q page49.
.&_ WARNING
- To reduce the risk of accidents, the luggage
compartment cover should never be unse
cured under any circumstances .
- The luggage compartment cover is not a surface for storing objects. Objects placed on the cover co uld endanger a ll vehicle oc
c u pan ts during sudden braking maneuvers
o r in a crash.
CD Note
To avoid damage , let t he luggage compart
ment cover roll up slow ly after removing .
Increasing the size of the luggage
compartment
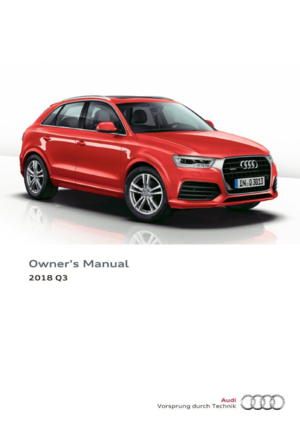
The rear seat backrests can be folded forward e i
ther s eparately or together .
Fig . 57 Backrest: re lease leve r
Folding the backrest forward
.,. Pull the release lever@Q
fig. 57 in the direc-
t ion of the arrow and fo ld the backrest forward .
Folding the backrest back into the upright
position
.,. Fold the backrest back up aga in until it latches
and the red marking ® is no longe r visible
Q _& .
Seats and storag e
.&_ WARNING
-~
-The backrest must be secure ly latched to
e nsu re the safety belt is protecting the rea r
seat pos itions .
- The bac krest must be securely latched so
objects cannot slide fo rwa rd out of the lug
gage compartment during sudde n braking .
CD Note
-If you move the front seat back when the
rear seat backrest is fo lded fo rwa rd, yo u
could damage the head restraints on the
rear seat . If necessary, remove the rear seat
hea d rest raint before mov ing the front seat
back
- To red uce the risk of damage, move the rea r
hea d res train ts down before f oldi ng the
rea r back res ts fo rw ar d Q
.&. in Rear head re
straint s on page 44.
- Make sure the o uter sa fety be lts are not
pinche d or d am aged when fol din g th e seat
back.
Tie-downs and luggage compartment net /
cargo bag
Applies to : vehicles with tie-downs/luggage compartment net
The luggage compartment net* prevents smaller
objects from sliding out of place .
Fig. 58 Luggage co mpa rt me nt: lu ggage compa rtme nt net •
st retc hed o ut
Read and follow a ll warn ings Q .& in Loading the
luggage compartment on page 102 .
Cargo net
.,. At ta ch the hoo ks for the l uggage compa rtment
net in t he tie -dow ns -ar rows-
Q fig. 58. ..,
47
Page 50 of 230

Sea ts and stor age
Cargo bag
.. Engage the two hooks on the side with the car
go bag to the tie-downs on the floor near the
rear seat.
.. Engage both eyes on the luggage compartment
net to the bag hooks * in the side trim panel.
You can a lso use the bag hooks* to hang light
purses, bags, etc.
A WARNING
For strength reasons, only ob jects with a max
imum weight of 10 lb (5 kg) should be se
cured in the luggage compartment net. Heavi
er objects a re not adequately secured . There
is risk of personal inj ury.
Bag hooks
F ig. 59 Luggage compartment : bag hooks (example)
The bag hooks can be used to prevent bags with
light contents from falling over.
A WARNING
Do not use the bag hooks to secure heavy ob
jects. Heavy objects are not adequately se cured. There is risk of pe rsonal injury.
48
Cargo mat
App lies to : vehicles with cargo mat
The cargo mat* protects the luggage compart
ment and bumper from dirt and scratches .
Fig. 60 Luggage compartment: cargo mat
r, .,,
~ co C0
You can use the cargo mat with the dirt -resistant
side or the decorative side . After loading or un
loading, fo ld up the cargo mat and close the lug
gage compartment lid. On ly store the cargo mat
if it is dry.
Pass-through with ski bag
App lies to: vehicles with pass-through an d ski bag
Long objects, such as skis or snowboards, can be
transported in the ski bag.
Fig. 61 Luggage compartment: pass-through in the back·
rest
F ig . 62 Rear bench seat: securing the ski sack
Page 51 of 230

a
co
...... N r--. N .-< 0 0 ::, co
Loading
• Press the release button in the luggage com
partment
c:> fig. 61 and fold the pass-through
toward the front.
• Push the ski bag through the op ening from the
luggage compartment . T he zipper must face
toward the rear
c:> ,& .
Securing
• Stick the strap @on th e bag in the center belt
latch
@ c:> fig. 62.
• Tighten and secure the strap©
A WARNING
-The ski sack is intended only for the trans
portation of skis and other light objects. To
reduce the risk of serious personal injury,
never transport heavy or pointed objects in
the ski sack.
- When braking rapidly or during an accident ,
the load could be displaced and cause injury
to occupants.
- Sharp edges on the load must be covered
for protection. Always fasten the belt tight ly around the sack and its contents
c:>fig . 62.
- For safety reasons, do not transport more
than two pairs of skis in the ski sack .
- You must secure the ski sack with the strap
after loading.
- Make sure all objects that you are transport
ing in the pass-through are secured. Other
wise they could slide around during sudden
braking maneuvers and cause injury .
(D Tips
-Only fold the bag up if it is dry.
- When transporting skis or snowboards, tighten the securing strap between the
bindings.
- Lay skis in the bag with the points facing
forward and snowboards and ski pole points
facing the rear.
-
Seats and storage
Reversible cargo floor
Applies to: vehicles with reversible cargo floor
Fig. 63 Lug gag e compar tmen t: reve rs ibl e ca rgo area floor
w ith the decora tive s ide faci ng up
Reversing the cargo area floor
You can use the reversible cargo area floor with
the dirt-resistant side or the decorative side .
.,. To turn up the dirt-resistant side, pull the cargo
floor up at the handle
c:> fig . 63 and out toward
the rear . Or
.,. To turn up the decorative side , take out the car
go floor at both handles on the left and right
side.
• Reinsert the cargo floor.
Roof rack
Applies to: vehicles with roof rack
Fig. 64 Attac hme nt point s for the roof rack
If luggage or cargo is to be carried on the roof,
you must observe the following :
- Only a specially designed roof rack may be used
on your vehicle . These roof racks are the basis
for a complete roof rack system. Additional at
tachments/carrier systems are necessary to
transport luggage and sports equipment. We ..,.
49
Page 52 of 230

Seat s and sto rage
recommend roof racks and attachments from
the Audi Genuine Accessories program .
- When installing the roof rack, make sure that it
is mounted on ly at the designated points on
the roof ¢
fig. 64.
-The permissib le roof load fo r your vehicle is
165 lb (7 5 kg). The roof load is the total of the
weight of the roof rack, the attachments and
the cargo you are carrying. However, you must
also note the permitted load of the carrier sys
tem being used . For the permitted axle load
and the permitted total vehicle weight, see
¢ page 209 .
A WARNING
-Fo llow the installation instructions p rovided
with the roof ra ck system. If you do not se
cure the roof rack system and objects on the
roo f correctly, they co uld come loose from
the vehicle and cause an accident .
- T he risk of an accident increases when using
a roof rack system, because it changes the
driving ch aracteristics by shift ing the center
of gravity and/or the increasing the surface
area exposed to wind. Adapt your driving
and speed to the current conditions.
Q;) Note
- If you use other roof luggage rack systems
or do not install the racks as intended, any
damage to the veh icle is not covered by the
warranty . Carefully follow the assembly and
i nsta llation instruct ions included w ith the
r oof rack car rier system.
- Make sure that the luggage compartment lid and the panorama glass roof* do not
come into contact with objects on the roof
when they are open.
@ For the sake of the environment
Your vehicle will requ ire more fuel due to the
increased wind resistance. So remove the roof
rac k after using it.
so
Page 53 of 230

0 co ......
"' ,-...
"' ...... 0 0 :::,
00
Warm and cold
Climate control system
Description
Depending on the vehicle equipment, different
systems could be installed:
- manual climate control system or
- automatic climate control system"
The climate control system circu lates, warms or
cools, and removes humidity from the air in the
vehicle interior. It is the most effective when the windows and panorama glass roof" are closed. If
there is a build-up of heat inside the vehicle, ven
tilation can help to speed up the cooling process .
Pollutant filt er
The pollutant filter removes pollutants such as
dust and pollen from the air.
Key rec ogn ition *
The automatic climate cont ro l system* settings
are stored and assigned to the remote control
key that is in use.
A WARNING
Poor visibility can lead to accidents.
- For safer driving, keep all windows free of
ice, snow and fog .
- Become familiar with the correct use and
function of the climate control system as
quickly as poss ible, espec ially with the de
frosting and defogging functions.
- When the temperature is below freezing,
only use the windshield washer system after
the windsh ield has been warmed by the cli
mate control system. The washer fluid could
Warm and c old
freeze on the windshield and impair visibili
ty.
@ Note
- If you suspect that the climate contro l sys
tem is damaged, switch the system off to
prevent further damage and have it checked
by an authorized Aud i dealer or authorized
Audi Service Facility.
- Repairs to the Audi climate control system
require special technical knowledge and
special tools. See an authorized Audi dea ler
or authorized Aud i Service Fac ility.
@) For the sake of the environment
- To save fuel, turn off the climate control
system cooling mode by pressing the A/C
button. This will also reduce emissions . The
cl imate control system is off when the LED
in the button turns off.
- In vehicles w ith the efficiency program*,
you can find other consumptio n information
and more economy tips
¢ page 20.
(D Tips
- To prevent interference with the heat ing
and cooling output and to prevent the win
dows from fogging over, the air intake in
fro nt of the windshie ld must be free of ice
,
snow or leaves.
- Condensation from the cooling system* can
dr ip and fo rm a pudd le of water under the
vehicle. This is norma l and does not mean
there is a leak .
- The energy management system may tem
porarily switch off certain functions, s uch as
the seat heating* or rear window defogger .
These systems are avai lable aga in as soon
as the energy supply has been restored.
5 1
Page 54 of 230

Warm and cold
Manual climate control system
Applies to: vehicles with manual climate control system Fig. 65 Manual climate control system controls
The functions can be switched on and off by
pressing the buttons or adjusted using the dial
and thumbwheel. The
LED in a button will light
up when the function is switched on.
Manual climate control system
For a comfortable temperature in cooling mode,
we recommend :
- in warmer times of the year, set the tempera
ture so that it is only a few degrees below the
outside temperature.
- set the blower at a moderate speed
- don't direct the air flow directly on the passen-
gers
A/C cooling mode
The cooling mode only functions with the blower turned on. You can turn the cooling system on or
off by pressing the A/C button . The air is not
cooled and humidity is not removed when cooling
mode is switched off. This can cause fog on the
windows. The cooling mode switches off auto-
52
matically when there are cold outside tempera
tures.
e / e Temperature
The temperature can be adjusted using the Left
dial.
8/5' Blower
Using the center knob, you can manually adjust
the volume of air generated by the blower to your
preferences. The blower should always run at a
low setting to prevent the windows from fogging
and to ensure a continuous exchange of air inside
the vehicle. When the windows are fogged, using
a higher blower speed and setting the knob to@
is recommended.
®l:.0/•.,g/~ Air distribution and vents
The air distribution can be adjusted with the right
knob. The setting between~ and
o,,,o provides a
comfortable atmosphere in most cases.
II>
Page 55 of 230

0 co ......
"' ,....
"' ...... 0 0 :::,
00
I n the@ setting, the windshield and side win
dows are defrosted or cleared of condensation as
qu ickly as possible. The rec irculat ion mode
switches off, but can be act ivated again manually
by pressing the~ button.
You can open or close the center and rear vents in
the cockpit and the vents in the rear center con
sole us ing the r idged thumbwhee ls. The levers
adjust the direction of the airflow from the vents.
To keep the front side windows from fogging up
in damp weather, we recommend opening the
side air vents and tilting them to the side.
~ R ecirc ulation mo de
In recircu lation mode, the a ir inside the vehicle is
circu lated and fi ltered. This prevents the unfil
tered air outside the vehicle from entering the
vehicle interior . Switching recircu lation mode on
when dr iving through a tunnel or when sitting in
traffic is recommended
¢ .&, . If recirculation
mode is sw itched on before the eng ine starts, it
will be switched off automatically after approx i
mate ly 20 minutes.
Recirculation mode is switched off in the defrost
setting®.
QW R ea r win dow defogger
The rear window defogger only operates when
the eng ine is running. It switches off automati-
Warm and c old
ca lly after approximately 10 to 20 minutes, de
pending on the outside temperature .
J Seat heating*
You can adjust the left and right heated seat
temperature using the left/right thumbwheel.
T he seat heating is switched off when the leve l is
set to 0.
A WARNING .-==-
- You sho uld not use the recircu lation mode
for an extended period since no fresh air is
drawn in. When the A/C system* is sw itched
off, the windows can fog up, which increas
es the risk of an acc ident.
- Individuals w ith reduced sensit ivity to pa in
or temperature could develop burns when
using the seat heat ing* function . To reduce
the r isk of inju ry, these individua ls sho uld
not use seat heating*.
Q) Note
To avoid damaging the seat heat ing* ele
ments, do not kneel on the seats o r place
heavy pressure on one area of the seat .
53
Page 56 of 230
 is recommende")
Warm and cold
Automatic climate control system
Applies to: vehicles with automatic climate control
Pressing AUTO button and setting the temperature to 72 °F (22 °C) is recommended.
Fig . 66 Cente r console: cont ro ls fo r auto matic cl imate co ntrol system
The f unct ions can be switched on and off by
pressing the b uttons or adjusted by turning the
knob. The
LE D in a button w ill light up when the
function is switched on.
Autom atic climate control sy stem
The automat ic climate control system automat i
cally maintains a temperatu re once it has been
set . In all heat ing mode funct ions except
defrost,
the blower on ly switches to a higher speed once
the engine coolant has rea ched a certa in temper
ature .
OFF climate control s ystem
The OFF button switches the climate control sys
tem on or off . A irflow from outside is blocked
when the climate con trol system is swit ched off .
AUTO
Automatic mode
Automatic mode ma intains a constant tempera
ture ins ide the vehicle . Air temperature, airflow
54
and air distrib ution are controlled automatically .
AUTO mode switches off once a button in the cli mate contro l system is pressed .
A/C
cooling mode
The cooling mode only functions with the blower
turned on . You can turn the cooling system on or
off by pressing the A/C button . The a ir is not
cooled and hum idity is not removed when cooling
mode is sw itc hed off. This can cause fog o n the
windows. The cooling mode sw itches off a uto
matically when there are cold outside tempera
tures.
- ! -Temperature
The tempe rature can be set for the dr iver and the
front passenger separately using the left/rig ht
knob. Tempe ra tu res can be set between a range
of 60 °F (+16 °C) and 84 °F (+28 °C) .
If outside of
th is range,
LO or HI will appear in the climate
contro l system display. At both of these settings, ..,_
 1
1 2
2 3
3 4
4 5
5 6
6 7
7 8
8 9
9 10
10 11
11 12
12 13
13 14
14 15
15 16
16 17
17 18
18 19
19 20
20 21
21 22
22 23
23 24
24 25
25 26
26 27
27 28
28 29
29 30
30 31
31 32
32 33
33 34
34 35
35 36
36 37
37 38
38 39
39 40
40 41
41 42
42 43
43 44
44 45
45 46
46 47
47 48
48 49
49 50
50 51
51 52
52 53
53 54
54 55
55 56
56 57
57 58
58 59
59 60
60 61
61 62
62 63
63 64
64 65
65 66
66 67
67 68
68 69
69 70
70 71
71 72
72 73
73 74
74 75
75 76
76 77
77 78
78 79
79 80
80 81
81 82
82 83
83 84
84 85
85 86
86 87
87 88
88 89
89 90
90 91
91 92
92 93
93 94
94 95
95 96
96 97
97 98
98 99
99 100
100 101
101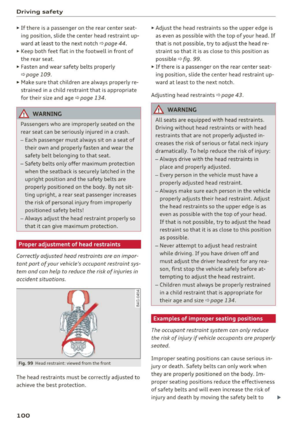 102
102 103
103 104
104 105
105 106
106 107
107 108
108 109
109 110
110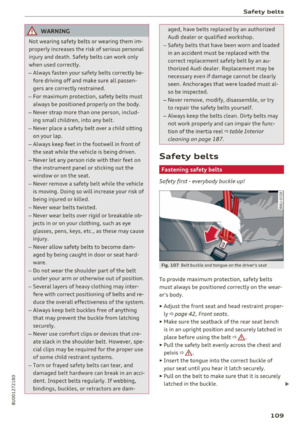 111
111 112
112 113
113 114
114 115
115 116
116 117
117 118
118 119
119 120
120 121
121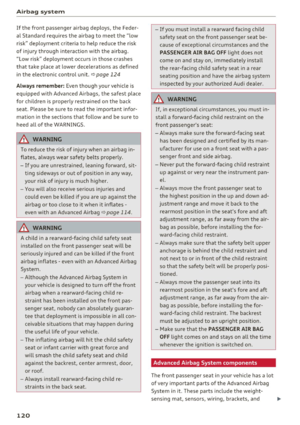 122
122 123
123 124
124 125
125 126
126 127
127 128
128 129
129 130
130 131
131 132
132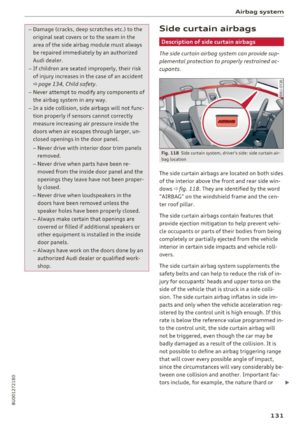 133
133 134
134 135
135 136
136 137
137 138
138 139
139 140
140 141
141 142
142 143
143 144
144 145
145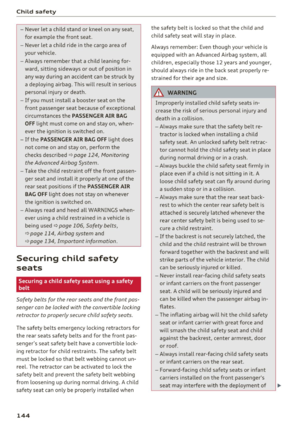 146
146 147
147 148
148 149
149 150
150 151
151 152
152 153
153 154
154 155
155 156
156 157
157 158
158 159
159 160
160 161
161 162
162 163
163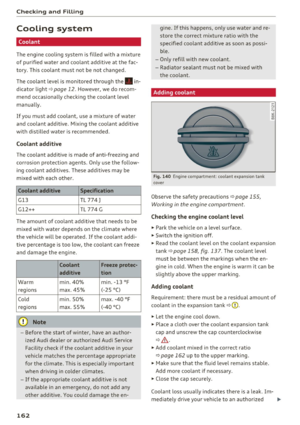 164
164 165
165 166
166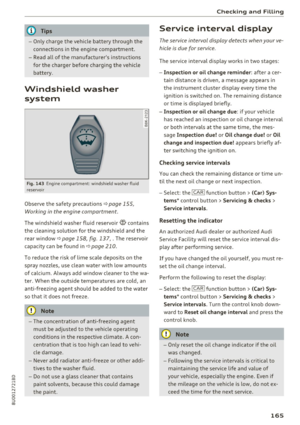 167
167 168
168 169
169 170
170 171
171 172
172 173
173 174
174 175
175 176
176 177
177 178
178 179
179 180
180 181
181 182
182 183
183 184
184 185
185 186
186 187
187 188
188 189
189 190
190 191
191 192
192 193
193 194
194 195
195 196
196 197
197 198
198 199
199 200
200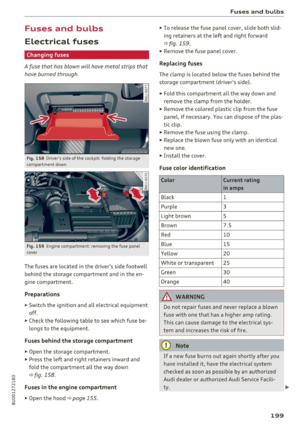 201
201 202
202 203
203 204
204 205
205 206
206 207
207 208
208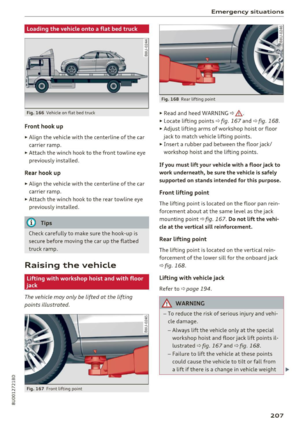 209
209 210
210 211
211 212
212 213
213 214
214 215
215 216
216 217
217 218
218 219
219 220
220 221
221 222
222 223
223 224
224 225
225 226
226 227
227 228
228 229
229