2017 PEUGEOT PARTNER TEPEE ELECTRIC light
[x] Cancel search: lightPage 14 of 252
12
Manual air conditioning
and heating
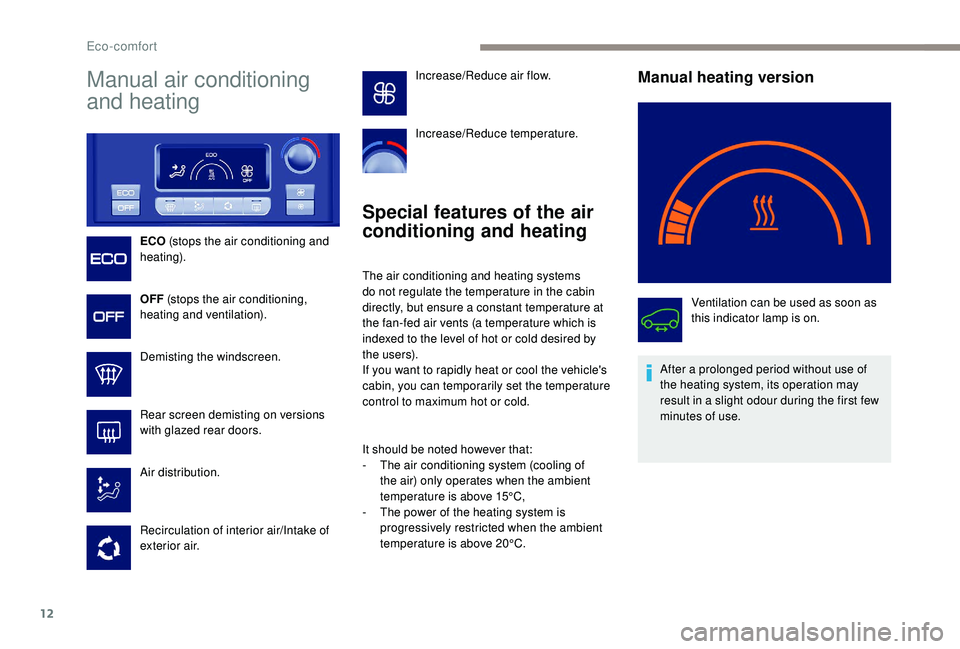
ECO (stops the air conditioning and
heating).
OFF (stops the air conditioning,
heating and ventilation).
Demisting the windscreen.
Rear screen demisting on versions
with glazed rear doors.
Air distribution.
Recirculation of interior air/Intake of
exterior air.
Special features of the air
conditioning and heating
The air conditioning and heating systems
do not regulate the temperature in the cabin
directly, but ensure a constant temperature at
the fan-fed air vents (a temperature which is
indexed to the level of hot or cold desired by
the users).
If you want to rapidly heat or cool the vehicle's
cabin, you can temporarily set the temperature
control to maximum hot or cold.
It should be noted however that:
-
T
he air conditioning system (cooling of
the air) only operates when the ambient
temperature is above 15°C,
-
T
he power of the heating system is
progressively restricted when the ambient
temperature is above 20°C.
Manual heating version
Ventilation can be used as soon as
this indicator lamp is on.
After a prolonged period without use of
the heating system, its operation may
result in a slight odour during the first few
minutes of use.
Increase/Reduce air flow.
Increase/Reduce temperature.
Eco-comfort
Page 19 of 252
17
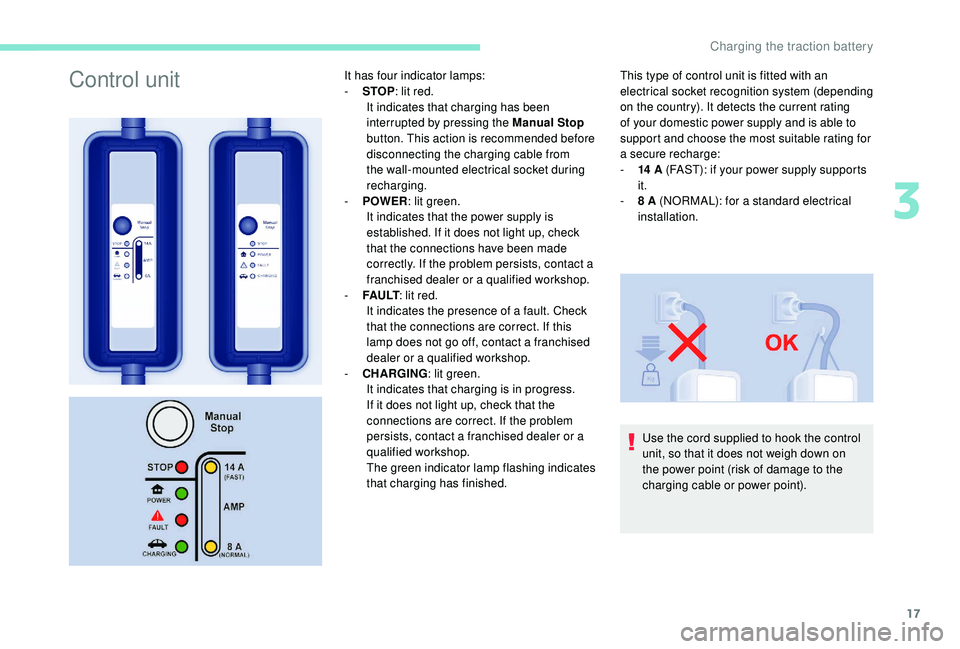
Control unitIt has four indicator lamps:
- S TOP: lit red.
It indicates that charging has been
interrupted by pressing the Manual Stop
button. This action is recommended before
disconnecting the charging cable from
the wall-mounted electrical socket during
recharging.
-
P
OWER : lit green.
It indicates that the power supply is
established. If it does not light up, check
that the connections have been made
correctly. If the problem persists, contact a
franchised dealer or a qualified workshop.
-
F
A U LT : lit red.
It indicates the presence of a fault. Check
that the connections are correct. If this
lamp does not go off, contact a franchised
dealer or a qualified workshop.
-
C
HARGING : lit green.
It indicates that charging is in progress.
If it does not light up, check that the
connections are correct. If the problem
persists, contact a franchised dealer or a
qualified workshop.
The green indicator lamp flashing indicates
that charging has finished. This type of control unit is fitted with an
electrical socket recognition system (depending
on the country). It detects the current rating
of your domestic power supply and is able to
support and choose the most suitable rating for
a secure recharge:
-
14
A (FAST): if your power supply supports
it.
-
8
A (NORMAL): for a standard electrical
installation.
Use the cord supplied to hook the control
unit, so that it does not weigh down on
the power point (risk of damage to the
charging cable or power point).
3
Charging the traction battery
Page 24 of 252
22
Take care of the cable and its
control unit
- Do not tread on it, submerge it in water, pull on it, or subject it to impacts. If the charging
cable or its control unit is damaged or worn,
do not use it.
-
T
o replace it, contact a franchised dealer or
a qualified workshop.
-
T
he same applies in the event of an impact,
even light, against the charging access flap
or the cover.
When charging has finished but the
cable is still connected, opening the
driver's door restarts charging for around
20
seconds.
Fast charging procedure
If you wear a pacemaker or any
other electrical medical device,
you must not use fast charging.
Do not approach a fast charging
point. However, if this happens,
leave the area as quickly as
possible. If necessary, ask
another person to charge your
vehicle.
Ensure that the charging point and its
cable are compatible with your vehicle.
-
C
heck before charging that the drive
selector is in position P and the ignition is
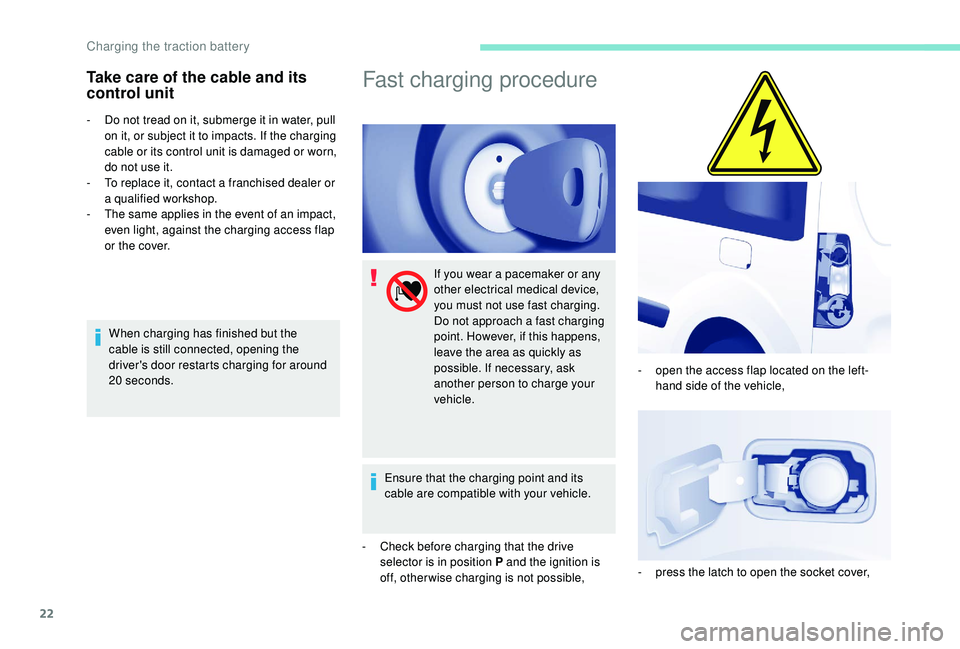
off, other wise charging is not possible, -
o
pen the access flap located on the left-
hand side of the vehicle,
-
p
ress the latch to open the socket cover,
Charging the traction battery
Page 27 of 252
25
In the event of an accident or
impact under the vehicle or on
one of the charging flaps
In the event of an accident or an impact to the
underbody of the vehicle (for example: contact
with a pole, a raised kerb or other urban
roadside fixture) or in the event of an impact,
even slight, to one of the charging flaps, these
circumstances may have serious repercussions
for your vehicle's electrical system or traction
battery and cause damage to them. Have
your vehicle checked as soon as possible by a
franchised dealer or a qualified workshop.
Never touch the 300 Volt components or the
orange cables exposed and visible inside or
outside of the vehicle.
In the case of serious damage to the traction
battery:
-
d
o not try to do anything to the vehicle
yourself,
-
n
ever touch liquids coming from the traction
battery and in the event of skin contact with
these products, wash abundantly with water
and contact a doctor as soon as possible. In the event of exposure to a fire
In the event of exposure to a fire, you and
your passengers should exit the vehicle
immediately. Never intervene yourself (risk
of electrocution). Contact the emergency
ser vices immediately. Warn them that your
vehicle is electric.
Washing precautions
Never wash the vehicle while the battery is on
charge.
Before washing the vehicle, check that the
access flaps are closed and the cover on each
charging socket is correctly closed.
In order to avoid damaging the electric units,
the use of a high pressure jet wash is strictly
forbidden:
-
u
nder the bonnet,
-
u
nder the vehicle, around the battery packs.
Do not use a pressure greater than 80
bar
when washing the bodywork.
Audible environment
On the outside
The driver must be particularly vigilant when
driving the electric vehicle as it makes very little
noise when moving.
On the inside
While in operation, you may hear noises that
are specific to an electric vehicle, such as:
-
t
he traction battery relays when starting,
-
t
he vacuum pump when braking,
-
t
yre or wind noise from the vehicle when
driving.
When parking on a slope, it is recommended
that you apply the parking brake before putting
the drive selector in P . When moving off, a
knock and a clicking sound may be heard,
which is normal.
3
Charging the traction battery
Page 40 of 252

2
.
.
Instrument panel 7
W arning and indicator lamps 8
I
ndic ators
18
Lighting dimmer
2
2
Trip computer
2
2
Date and time setting
2
3
Instruments and controls
4
K
ey
25
Remote control
2
5
Front doors
2
8
Sliding side door(s)
2
8
Operation in the event of a battery failure
2
9
Tailgate
29
Side-hinged rear doors
3
0
Rear roof flap
3
2
Central locking
3
3
Alarm
34
Rear windows
3
5
Electric windows
3
5Steering wheel adjustment
3
7
Mirrors
37
Surveillance mirror
3
8
Front seats
3
8
Individual passenger seat
4
0
Multi-Flex bench seat
4
0
Rear bench seat
4
2
Rear seats (5 seats) 4 3
Rear seats (7 seats) 4 6
Crew cab
5
0
Seat modularity and configurations
5
2
Front fittings
5
4
Seating area fittings
5
5
Zenith
56
Fragrance diffuser
5
7
Courtesy lamps
5
9
Rear fittings (5 seats)
6
0
Rear fittings (7 seats)
6
1
Load space layout
6
4
Heating/Manual air conditioning
6
6
Dual-zone automatic air conditioning
6
7
Recommendations for ventilation
and air conditioning
6
9
Demisting and defrosting
7
0Lighting control stalk
7
1
Automatic illumination of headlamps
7
2
LED daytime running lamps
7
2
Guide-me-home lighting
7
2
Cornering lighting
7
3
Direction indicators
7
3
Headlamp beam
7
3
Wiper control stalk 7 3
General safety recommendations
7
6
Hazard warning lamps
7
7
Horn
77
Emergency or assistance call
7
7
Anti-lock braking system (ABS/EBFD)
7
9
Emergency braking assistance (EBA)
7
9
Anti-slip regulation (ASR) and electronic
stability control (ESC)
7
9
Grip control
8
0
Seat belts
8
2
Airbags
85
Child seats
8
9
Deactivating the passenger's front airbag
9
0
Reactivating the passenger's front airbag
9
1
Recommended child seats
9
4
Locations for child seats secured using
a seat belt
9
5
ISOFIX mountings and child seats
9
8
Instructions for child seats
1
01
Child lock
1
02
Over view
Instruments
Access Ease of use and comfort
Safety
Lighting and visibility
Eco-driving
Contents
Page 42 of 252

4
Instruments and controls1.Lighting and direction indicator control
stalk.
2. Instrument panel with display.
3. Wiper/screenwash/trip computer control
stalk.
4. Ignition.
5. Audio system controls.
6. Driver's front airbag/horn.
7. Steering wheel height and reach
adjustment.
8. Cruise control/speed limiter controls.
9. Control panel: parking sensors, headlamp
beam adjustment, ESC, Stop & Start,
alarm (depending on country of sale).
10. Bonnet release.
11. Electric door mirror adjustment controls.
12 . Front window controls.
13. Switch panel: hazard warning lamps,
central locking, child lock (depending on
ve r s i o n).
14 . Cigarette lighter.
15. Heating/ventilation controls.
16. Electronic gearbox or Grip control
control.
17. Touch screen.
18. USB port (with electronic gearbox).
19. USB port (with manual gearbox).
Over view
Page 45 of 252
7
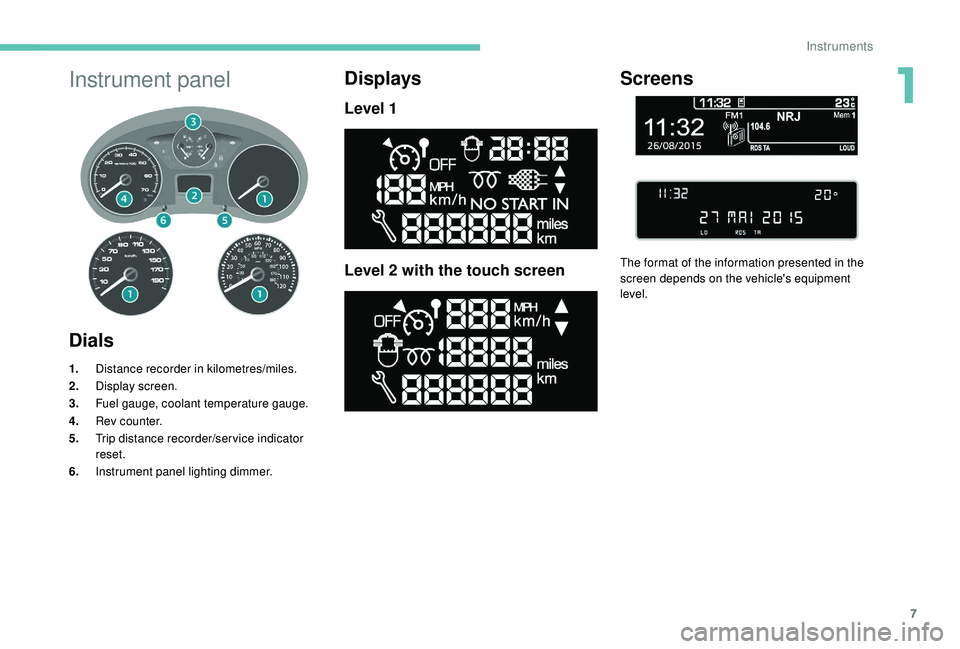
Instrument panel
Dials
1.Distance recorder in kilometres/miles.
2. Display screen.
3. Fuel gauge, coolant temperature gauge.
4. Rev counter.
5. Trip distance recorder/ser vice indicator
reset.
6. Instrument panel lighting dimmer.
Displays
Level 1
Level 2 with the touch screen
Screens
The format of the information presented in the
screen depends on the vehicle's equipment
level.
1
Instruments
Page 46 of 252
8
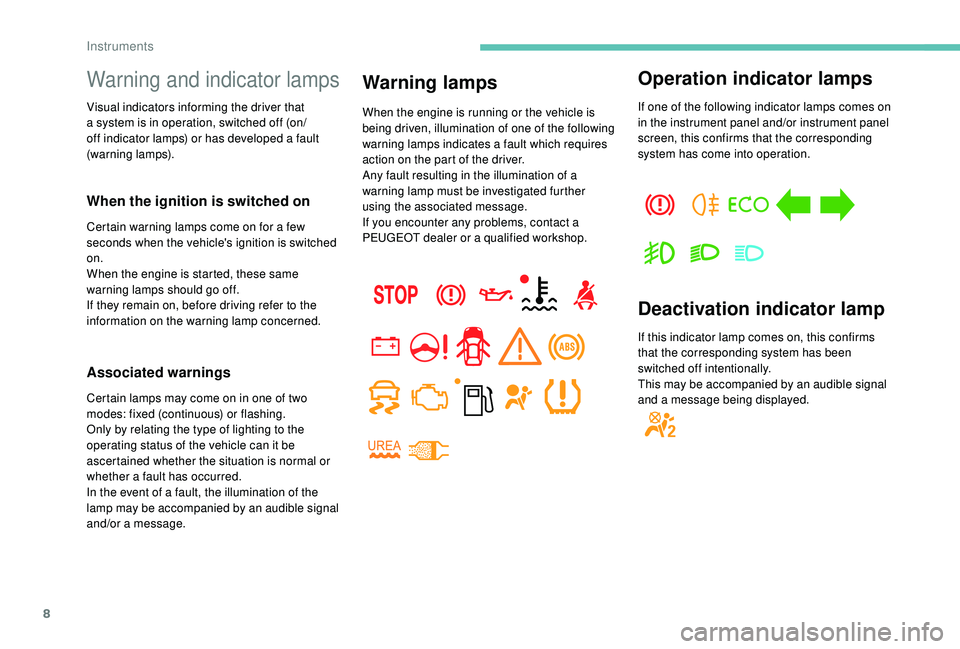
Warning and indicator lamps
Visual indicators informing the driver that
a system is in operation, switched off (on/
off indicator lamps) or has developed a fault
(warning lamps).
When the ignition is switched on
Certain warning lamps come on for a few
seconds when the vehicle's ignition is switched
on.
When the engine is started, these same
warning lamps should go off.
If they remain on, before driving refer to the
information on the warning lamp concerned.
Associated warnings
Certain lamps may come on in one of two
modes: fixed (continuous) or flashing.
Only by relating the type of lighting to the
operating status of the vehicle can it be
ascertained whether the situation is normal or
whether a fault has occurred.
In the event of a fault, the illumination of the
lamp may be accompanied by an audible signal
and/or a message.
Warning lamps
When the engine is running or the vehicle is
being driven, illumination of one of the following
warning lamps indicates a fault which requires
action on the part of the driver.
Any fault resulting in the illumination of a
warning lamp must be investigated further
using the associated message.
If you encounter any problems, contact a
PEUGEOT dealer or a qualified workshop.
Operation indicator lamps
If one of the following indicator lamps comes on
in the instrument panel and/or instrument panel
screen, this confirms that the corresponding
system has come into operation.
Deactivation indicator lamp
If this indicator lamp comes on, this confirms
that the corresponding system has been
switched off intentionally.
This may be accompanied by an audible signal
and a message being displayed.
Instruments