2017 PEUGEOT PARTNER TEPEE ELECTRIC light
[x] Cancel search: lightPage 179 of 252
141
Freezing of AdBlue®
AdBlue® freezes at temperatures below
around -11°C.
The SCR system includes a heater for the
AdBlue
® tank, allowing you to continue
driving in all weather conditions.
Topping up with AdBlue®
Before topping up, please read the
following warnings carefully.
Precautions in use
In certain conditions (high ambient
temperature, for example), the risk of ammonia
being released cannot be discounted: do not
inhale the fluid. Ammonia vapour has an irritant
effect on mucous membranes (eyes, nose and
throat).
Keep AdBlue
® out of reach of children, in
its original container or bottle.
Never transfer AdBlue
® to another
container: it would lose its purity.
Use only AdBlue
® liquid that meets the
ISO
22241 standard.
AdBlue
® is a urea-based solution. This fluid is
non-flammable, colourless and odourless (kept
in a cool area).
In the event of contact with the skin, wash the
affected area with soap and running water. In
the event of contact with the eyes, immediately
rinse the eyes with large amounts of water
or with an eye wash solution for at least
15
minutes. If a burning sensation or irritation
persists, get medical attention.
If swallowed, immediately rinse the mouth with
clean water and then drink plenty of water.Never dilute AdBlue® with water.
Never pour AdBlue® into the Diesel fuel tank.
Containers or bottles are available from a
PEUGEOT dealer or a qualified workshop.
You can also visit a ser vice station
equipped with AdBlue pumps specially
designed for passenger vehicles and light
goods vehicles. Never top up from an AdBlue
® dispenser
reserved for heavy goods vehicles.
Recommendations on storage
AdBlue® freezes below around -11°C and
deteriorates above 25°C. It is recommended
that bottles or containers are stored in a cool
place and protected from direct sunlight.
Under these conditions, the fluid can be kept
for at least a year.
If the fluid has frozen, it can be used once
it has completely thawed out at ambient
temperature.
Never store bottles or containers of
AdBlue
® in your vehicle.
Do not dispose of AdBlue
® bottles or
containers in the household waste.
Place them in a container provided for
this purpose or take them to your dealer.
7
Practical information
Page 182 of 252
144
If the vehicle is equipped with a towbar, it is
sometimes necessary to raise the vehicle
slightly to make it easier to remove the spare
wheel from its carrier.
In certain ground conditions and/or when
transporting heavy loads, consult with a
PEUGEOT dealer or a qualified workshop.
The jack and the tool kit are specific to your
vehicle. Do not use them for any other purpose.
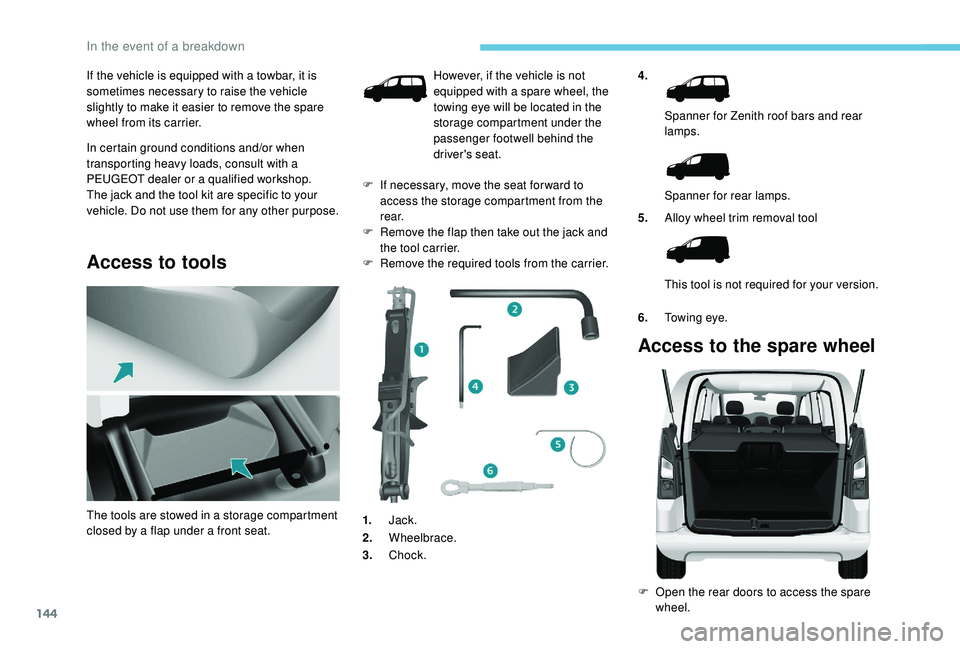
Access to tools
4.Spanner for Zenith roof bars and rear
lamps.
Spanner for rear lamps.
5. Alloy wheel trim removal tool
This tool is not required for your version.
6. Towing eye.
Access to the spare wheel
F Open the rear doors to access the spare
wheel.
The tools are stowed in a storage compartment
closed by a flap under a front seat. However, if the vehicle is not
equipped with a spare wheel, the
towing eye will be located in the
storage compartment under the
passenger footwell behind the
driver's seat.
F
I
f necessary, move the seat for ward to
access the storage compartment from the
r e a r.
F
R
emove the flap then take out the jack and
the tool carrier.
F
R
emove the required tools from the carrier.
1. Jack.
2. Wheelbrace.
3. Chock.
In the event of a breakdown
Page 187 of 252
149
Comply with the wheel trim fitting
procedure to avoid breaking of the
fixing tab and distor tion on the edge of
the wheel trim.
Correct
valve position: above the ring.
Changing a bulb
Types of bulb
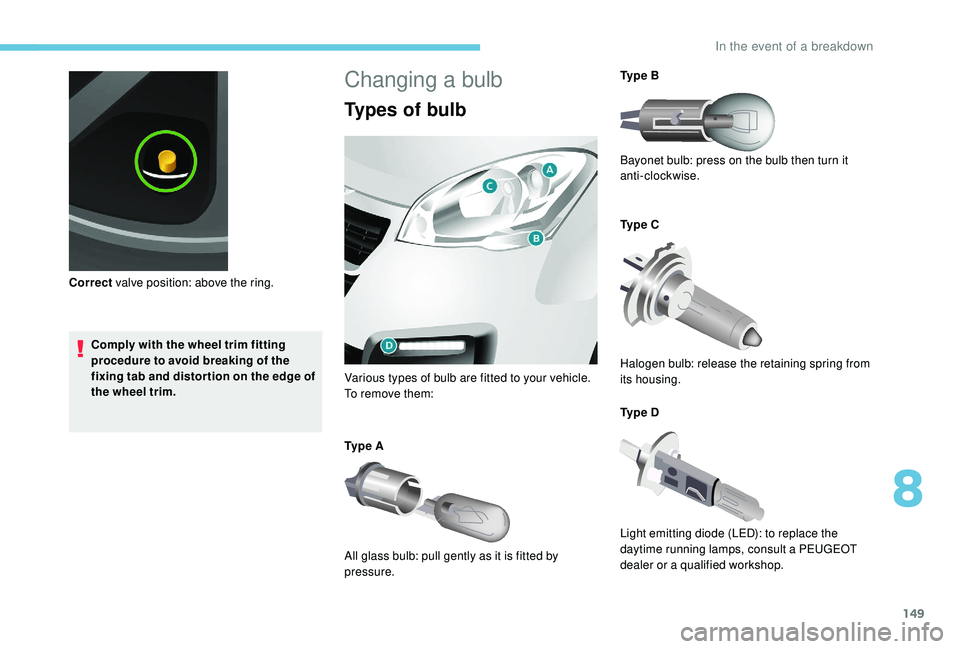
Various types of bulb are fitted to your vehicle.
To remove them:
Ty p e A
All glass bulb: pull gently as it is fitted by
pressure. Ty p e B
Bayonet bulb: press on the bulb then turn it
anti-clockwise.
Ty p e C
Halogen bulb: release the retaining spring from
its housing.
Ty p e D
Light emitting diode (LED): to replace the
daytime running lamps, consult a PEUGEOT
dealer or a qualified workshop.
8
In the event of a breakdown
Page 189 of 252
151
Foglamps
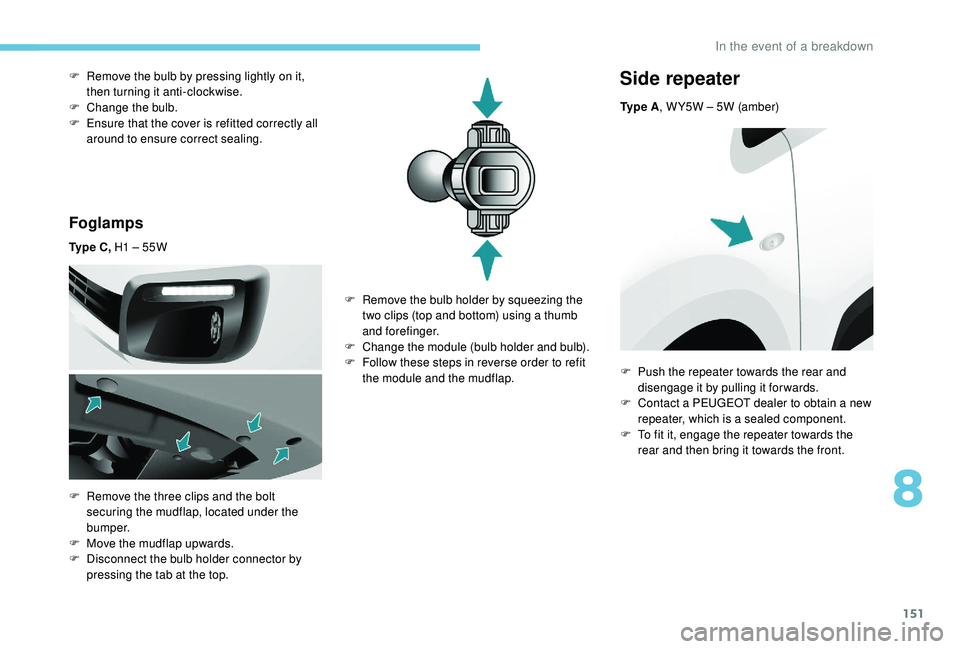
Ty p e C , H1 – 55W
F
R
emove the three clips and the bolt
securing the mudflap, located under the
b u m p e r.
F
M
ove the mudflap upwards.
F
D
isconnect the bulb holder connector by
pressing the tab at the top.
F
R
emove the bulb by pressing lightly on it,
then turning it anti-clockwise.
F
C
hange the bulb.
F
E
nsure that the cover is refitted correctly all
around to ensure correct sealing.
Side repeater
Ty p e A , W Y5W – 5W (amber)
F
R
emove the bulb holder by squeezing the
two clips (top and bottom) using a thumb
and forefinger.
F
C
hange the module (bulb holder and bulb).
F
F
ollow these steps in reverse order to refit
the module and the mudflap. F
P
ush the repeater towards the rear and
disengage it by pulling it forwards.
F
C
ontact a PEUGEOT dealer to obtain a new
repeater, which is a sealed component.
F
T
o fit it, engage the repeater towards the
rear and then bring it towards the front.
8
In the event of a breakdown
Page 191 of 252
153
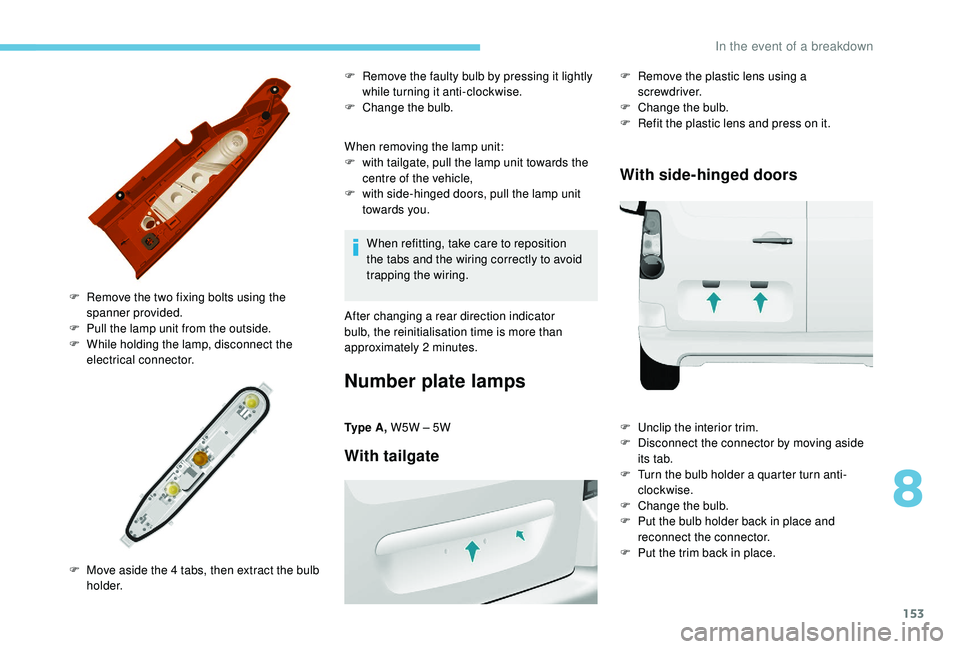
When removing the lamp unit:
F w ith tailgate, pull the lamp unit towards the
centre of the vehicle,
F
w
ith side-hinged doors, pull the lamp unit
towards you.
F
R
emove the two fixing bolts using the
spanner provided.
F
P
ull the lamp unit from the outside.
F
W
hile holding the lamp, disconnect the
electrical connector.
F
M
ove aside the 4 tabs, then extract the bulb
h o l d e r. F
R
emove the faulty bulb by pressing it lightly
while turning it anti-clockwise.
F
C
hange the bulb.
When refitting, take care to reposition
the tabs and the wiring correctly to avoid
trapping the wiring.
After changing a rear direction indicator
bulb, the reinitialisation time is more than
approximately 2
minutes.
Number plate lamps
Ty p e A , W5W – 5W
With tailgate
F Remove the plastic lens using a
screwdriver.
F
C
hange the bulb.
F
R
efit the plastic lens and press on it.
With side-hinged doors
F Unclip the interior trim.
F D isconnect the connector by moving aside
its tab.
F
T
urn the bulb holder a quarter turn anti-
clockwise.
F
C
hange the bulb.
F
P
ut the bulb holder back in place and
reconnect the connector.
F
P
ut the trim back in place.
8
In the event of a breakdown
Page 199 of 252

161
Characteristics of engines
and towed loads
Engines
The engine specifications (capacity, max.
power, max. speed, energy, CO
2 emissions,
etc.) associated with your vehicle are indicated
on the registration document, as well as in
sales brochures.
These characteristics correspond to the values
type-approved on a test bed, under conditions
defined in European legislation (Directive
1999/99/EC).
For more information, contact a PEUGEOT
dealer or a qualified workshop.
Weights and towed loads
The weights and towed loads relating to
your vehicle are indicated on the registration
document, as well as in sales brochures.
These values are also indicated on the
manufacturer's plate or label.
For more information, contact a PEUGEOT
dealer or a qualified workshop. The GTW values and the towed loads listed are
valid for a maximum altitude of 1,000
metres.
The towed load must be reduced by steps of
10% for each additional 1,000 metres.
The maximum authorised nose weight
corresponds to the weight permitted on the
towball.
GT W: Gross train weight.
When exterior temperatures are high,
the vehicle per formance may be limited
in order to protect the engine. When the
exterior temperature is higher than 37°C,
limit the towed weight.
Towing using a lightly loaded vehicle can
adversely affect roadholding.
Braking distances are increased when
towing a trailer.
When using a vehicle to tow, never
exceed a speed of approximately 60 mph
(100
km/h) (obser ve the local legislation
in force). If the exterior temperature is high, it is
recommended that the engine is allowed
to idle for 1 to 2
minutes after the vehicle
comes to a stop, to facilitate its cooling.
9
Technical data
Page 225 of 252
13
The synchronisation of a smartphone
allows users to display the smartphone's
applications adapted to the
MirrorLink
TM technology on the vehicle
sc
reen.
The principles and standards
are constantly changing, for the
communication process between the
smartphone and the system to operate,
it is essential that the smartphone is
unlocked; update the operating system of
the smartphone as well as the date and
time of the smartphone and the system.
For the list of supported smartphones, go
to the brand's website in your country.
As a safety measure, some applications
can only be viewed with the vehicle
stationary; display is interrupted once the
vehicle is moving.
Please note:
-
i
f your smartphone is supported, to
make it "MirrorLink
TM" compatible,
some phone manufacturers
nevertheless invite you to first
download a dedicated application. When connecting a smartphone
to the system, it is recommended
that Bluetooth
® is started on the
smartphone.
Connect a USB cable. The
smartphone charges when
connected by a USB cable.
From the system, press " Connected
services " to display the primary
page.
Press "MirrorLink
TM" to start
the application of the system.
Start the application on the
smartphone (optional, depending
on the smartphone and operating
syste m).
During the procedure, several screen
pages relating to the association of
certain functions are displayed.
Accept to start and complete the
connection. If only one application has been downloaded to
the smartphone, it starts automatically.
Access to the different audio sources remains
accessible in the margin of the MirrorLink
TM
display, using touch buttons in the upper bar.
Access to the system’s menus is possible at
any time using the dedicated buttons.
Voice recognition
Press the end of the lighting control stalk to
start the voice recognition of your smartphone
via the system.
Voice recognition requires the use of a
compatible smartphone first connected to the
vehicle by Bluetooth.
CarPlay®
CarPlay® smartphone connection
As a safety measure and because it
requires sustained attention by the driver,
using a smartphone when driving is
prohibited.
All operations must be done with the
vehicle stationary .
Once the connection is established, a page
is displayed with the applications already
downloaded to your smartphone and adapted
to MirrorLink
TM technology.
.
7-inch touch screen
Page 226 of 252
14
The synchronisation of a smartphone
allows users to display the smartphone's
applications adapted to the
CarPlay
® technology on the vehicle
sc
reen.
As the processes and standards are
constantly changing, it is recommended
that you keep your smartphone's operating
system updated.
For the list of supported smartphones, go
to the brand's website in your country.
As a safety measure, some applications
can only be viewed with the vehicle
stationary; display is interrupted once the
vehicle is moving.
Connect a USB cable. The
smartphone charges when
connected by the USB cable.
On connecting the USB cable, the
" Telephone " function changes to
" CarPlay " in the menu carousel.
Press " CarPlay " to display the
CarPlay
® inter face. Or
Connect a USB cable. The
smartphone charges when
connected by the USB cable.
From the system, press " Connected
services " to display the primary
page.
Press " CarPlay " to display the
CarPlay
® inter face.
During the procedure, one or more screen
pages relating to the association of certain
functions are displayed on connection.
When the telephone menu is displayed, on
connecting the USB cable the display changes
automatically to CarPlay mode.
When another menu is displayed, on
connecting the USB cable a message is
displayed in the upper bar indicating activation
of CarPlay mode.
Press Open to display the CarPlay mode.
Voice recognition
Press the end of the lighting control stalk to
start thye voice recognition of your smartphone
via the system.
Telephone
Pairing a Bluetooth®
telephone
For reasons of safety and because
it requires sustained attention by the
driver, the pairing of a Bluetooth
® mobile
telephone with the hands-free system of
your audio system must be done with the
vehicle stationary .
Procedure (short) from the
telephone
In the Bluetooth® menu of your device, select
the system name in the list of devices detected.
Enter a code of at least 4 figures in the device
and confirm.
Enter this same code in the system,
select "OK" and confirm.
7-inch touch screen