2017 PEUGEOT PARTNER TEPEE ELECTRIC light
[x] Cancel search: lightPage 53 of 252
15
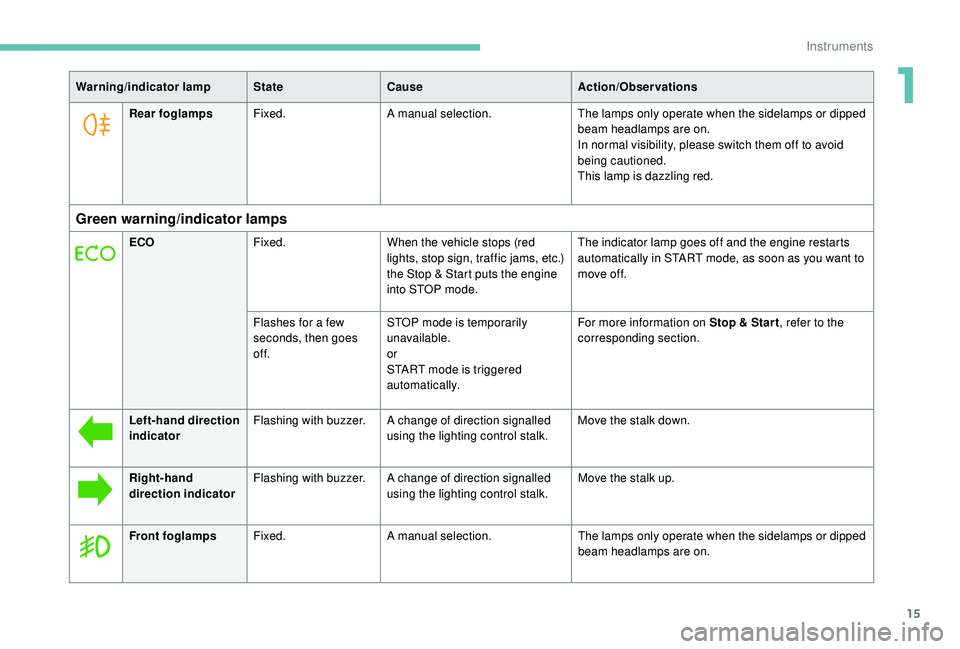
Warning/indicator lampStateCause Action/Observations
Rear foglamps Fixed. A manual selection. The lamps only operate when the sidelamps or dipped
beam headlamps are on.
In normal visibility, please switch them off to avoid
being cautioned.
This lamp is dazzling red.
Green warning/indicator lamps
ECOFixed. When the vehicle stops (red
lights, stop sign, traffic jams, etc.)
the Stop & Start puts the engine
into STOP mode. The indicator lamp goes off and the engine restarts
automatically in START mode, as soon as you want to
move off.
Flashes for a few
seconds, then goes
of f. STOP mode is temporarily
unavailable.
or
START mode is triggered
automatically. For more information on Stop & Star t
, refer to the
corresponding section.
Left-hand direction
indicator Flashing with buzzer. A change of direction signalled
using the lighting control stalk. Move the stalk down.
Right-hand
direction indicator Flashing with buzzer. A change of direction signalled
using the lighting control stalk. Move the stalk up.
Front foglamps Fixed. A manual selection. The lamps only operate when the sidelamps or dipped
beam headlamps are on.
1
Instruments
Page 54 of 252
16
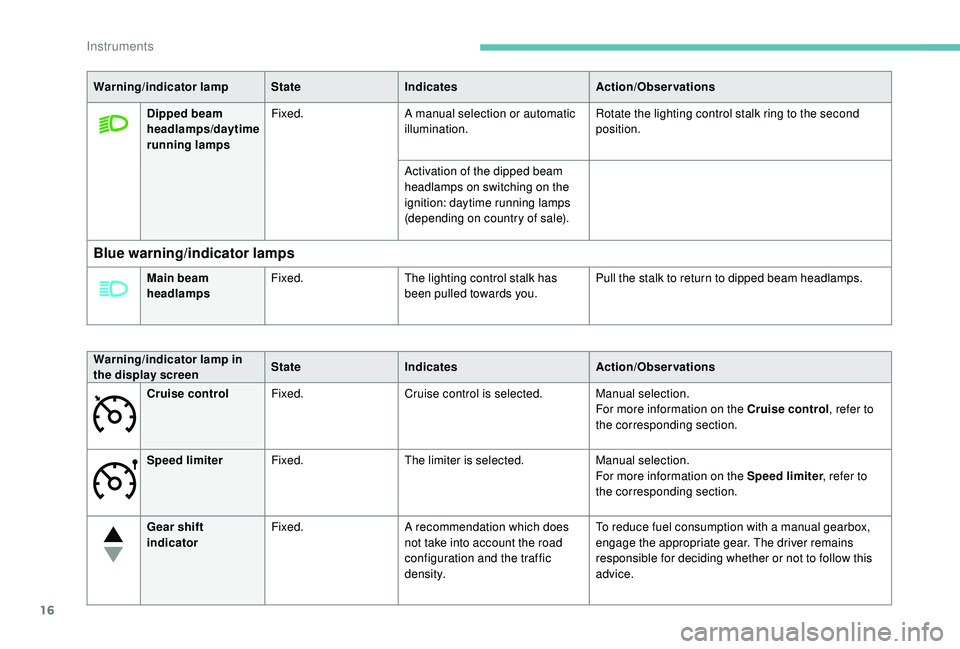
Warning/indicator lampStateIndicates Action/Observations
Dipped beam
headlamps/daytime
running lamps Fixed.
A manual selection or automatic
illumination. Rotate the lighting control stalk ring to the second
position.
Activation of the dipped beam
headlamps on switching on the
ignition: daytime running lamps
(depending on country of sale).
Blue warning/indicator lamps
Main beam
headlamps Fixed.
The lighting control stalk has
been pulled towards you. Pull the stalk to return to dipped beam headlamps.
Warning/indicator lamp in
the display screen State
Indicates Action/Observations
Cruise control Fixed. Cruise control is selected. Manual selection.
For more information on the Cruise control , refer to
the corresponding section.
Speed limiter Fixed. The limiter is selected. Manual selection.
For more information on the Speed limiter , refer to
the corresponding section.
Gear shift
indicator Fixed.
A recommendation which does
not take into account the road
configuration and the traffic
density. To reduce fuel consumption with a manual gearbox,
engage the appropriate gear. The driver remains
responsible for deciding whether or not to follow this
advice.
Instruments
Page 57 of 252

19
Following this operation, if you wish to
disconnect the battery, lock the vehicle
and wait at least five minutes for the reset
to be taken into account.
Engine oil level indicator
Depending on your vehicle’s engine, when the
ignition is switched on, the engine oil level is
indicated for a few seconds after the ser vice
information.
Oil level correctLow oil level
Oil level gauge fault
The level read will only be correct if the
vehicle is on level ground and the engine
has been stopped for more than thirty
minutes.
For more information on Checking the
levels
and, in particular, the oil level, refer
to the corresponding section.
The flashing of OIL- -
indicates a malfunction
of the engine oil level gauge. Contact a
PEUGEOT dealer or a qualified workshop. The flashing of OIL , together with the Ser vice
warning lamp, accompanied by an audible
signal and a message on the screen, indicates
a low oil level which could damage the engine.
If the low oil level is confirmed by checking with
the dipstick, the level must be topped up.
F
p
ress the trip distance recorder reset button
and keep it pressed,
F
s
witch on the ignition.
The distance recorder display begins a
countdown.
When the display indicates " =0", release the
button; the spanner disappears.
Trip recorder reset button
F With the ignition on, press the button until zeros
appear.
Fuel gauge
The fuel level is tested every time the ignition is
turned to the "on" position.
If the gauge is positioned on:
-
1 : t
he tank is full, about 60 litres.
-
0 : t
he use of the reser ve is started, the
warning lamp lights up permanently. When
the warning lamp comes on, the reser ve is
approximately 8
litres.
1
Instruments
Page 58 of 252

20
For more information on Fuel, refer to the
corresponding section.
Coolant temperature
If the needle is positioned before the red
zone: normal operation.
In arduous conditions of use or hot climatic
conditions, the needle may move close to the
red graduations.
What to do if the needle goes into the red
zone:
F
s
low down the vehicle or let the engine idle. What to do if the warning lamp lights up:
F
s
top immediately, switch off the ignition. The
fan may continue to operate for a certain
time up to approximately ten minutes,
F
w
ait for the engine to cool down in order
to check the coolant level and top it up if
necessary.
Since the cooling system is under pressure,
follow these instructions to avoid any risk of
burns:
F
w
ait at least one hour after the engine stops
to intervene,
F
u
nscrew the cap by 1/4 of a turn to allow the
pressure to drop,
F
w
hen the pressure has dropped, check the
level in the expansion bottle,
F
i
f necessary, remove the cap to top up.
If the needle remains in the red zone, have
it checked by a PEUGEOT dealer or by a
qualified workshop.
For more information on Levels , refer to
the corresponding section.
AdBlue® fluid range
indicators
Alert settings and display
Different levels of alert are triggered according
to the remaining driving range threshold.
You will be informed as each mileage threshold
is reached and the alerts will change from
temporary to permanent.
-
T
he 1
st alert is triggered at a remaining
driving range of 1,500 miles (2,400 km).
-
T
he 2
nd alert is triggered at a remaining
driving range of 375 miles (600 km).
Up to 0
miles, at which point it will be
impossible to restart the engine after a stop.
Driving range
F Press this button to display the information.
With the touch screen: F
s
elect the "Driving assistance"
menu,
F
s
elect "Diagnostic",
F
s
elect CHECK.
Above 3,000
miles (5,000 km), the value is not
defined.
Instruments
Page 60 of 252

22
Trip computer
In the event of the detection of a faultIf it is a temporary fault, the alert
disappears during the next journey,
after self-diagnostic checks of the SCR
emissions control system.
These warning lamps come on, accompanied
by an audible signal and the display of the
"Emissions fault" message.
The alert is triggered while driving as soon
as the fault is detected for the first time, then
when switching on the ignition for subsequent
journeys, while the fault persists.
During the permitted driving phase (between
685 and 0
miles (1,100 and 0 km))If a fault with the SCR system is confirmed (after
31
miles (50 km) covered with the permanent
display of the message signalling a fault), these
warning lamps come on and the UREA warning
lamp flashes, accompanied by an audible
signal and the display of a message indicating
the remaining range expressed in miles or
kilometres.
While driving, the message is displayed every
30 seconds while the fault with the SCR
emission control system persists.
The alert is repeated when switching on the
ignition.
You should go to a PEUGEOT dealer or a
qualified workshop as soon as possible.
Other wise you will not be able to restart the
vehicle.
Starting prevented
Each time the ignition is switched on, these
warning lamps come on and the UREA
warning lamp flashes, accompanied by an
audible signal and the display of the message
"Emissions fault: Starting prevented". You have exceeded the authorised driving
limit: the starting inhibition system does
not allow the engine to be started.
To be able to restart the engine, you must call
on a PEUGEOT dealer or a qualified workshop.Lighting dimmer
F With the lighting on, press the button to adjust
the brightness of the
instruments and controls.
When the lighting reaches
the minimum (or maximum)
setting, release this
button, then press again to
increase (or decrease) it.
Release the button when the desired level is
reached.
Instruments
Page 64 of 252
26
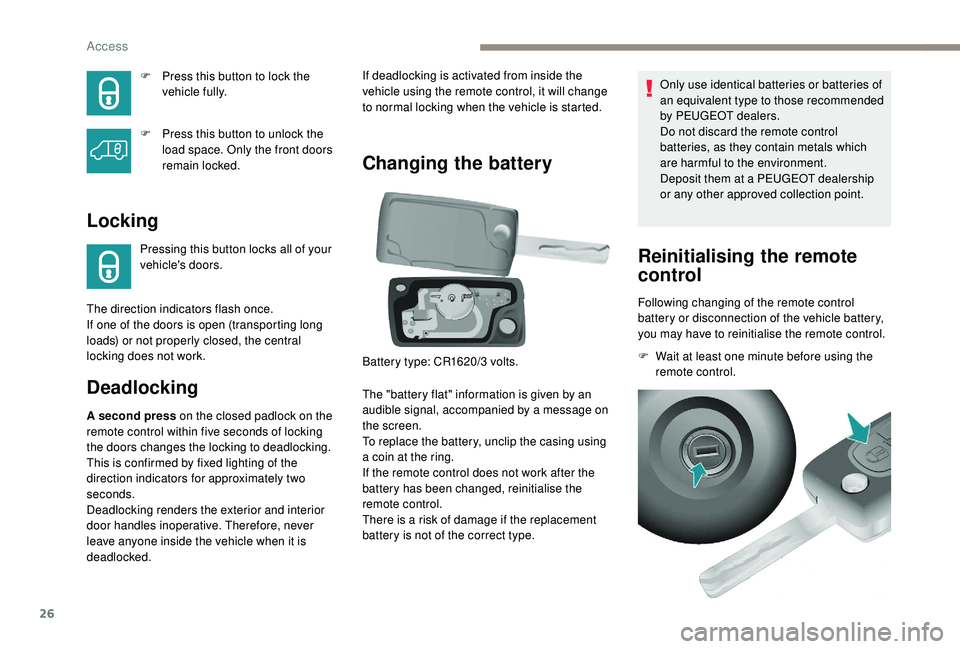
F Press this button to lock the vehicle fully.
F
P
ress this button to unlock the
load space. Only the front doors
remain locked.
Locking
Pressing this button locks all of your
vehicle's doors.
Deadlocking
A second press on the closed padlock on the
remote control within five seconds of locking
the doors changes the locking to deadlocking.
This is confirmed by fixed lighting of the
direction indicators for approximately two
seconds.
Deadlocking renders the exterior and interior
door handles inoperative. Therefore, never
leave anyone inside the vehicle when it is
deadlocked.
Changing the battery
The "battery flat" information is given by an
audible signal, accompanied by a message on
the screen.
To replace the battery, unclip the casing using
a coin at the ring.
If the remote control does not work after the
battery has been changed, reinitialise the
remote control.
There is a risk of damage if the replacement
battery is not of the correct type. Only use identical batteries or batteries of
an equivalent type to those recommended
by PEUGEOT dealers.
Do not discard the remote control
batteries, as they contain metals which
are harmful to the environment.
Deposit them at a PEUGEOT dealership
or any other approved collection point.
Reinitialising the remote
control
Following changing of the remote control
battery or disconnection of the vehicle battery,
you may have to reinitialise the remote control.
F
W
ait at least one minute before using the
remote control.
The direction indicators flash once.
If one of the doors is open (transporting long
loads) or not properly closed, the central
locking does not work. If deadlocking is activated from inside the
vehicle using the remote control, it will change
to normal locking when the vehicle is started.
Battery type: CR1620/3 volts.
Access
Page 73 of 252
35
Locking the vehicle without
alarm
F Insert the key in the driver's door lock and lock it.
Do not set the alarm when washing your
vehicle.
Failure of the remote control
If the alarm is set but the remote control is not
working:
F
U
nlock the doors with the key and open the
door. The alarm is triggered.
F
S
witch on the ignition within ten seconds.
The alarm is disarmed.
Malfunction
When the ignition is switched on, if the red LED
remains on for ten seconds there is a fault in
the siren connection.
Contact a PEUGEOT dealer to have the system
checked.
Automatic setting of the alarm
Depending on the country in which the vehicle is
sold, the alarm is set automatically approximately
2
minutes after the last door is closed.
Do not make any modifications to the
alarm system as this could cause faults.
When the alarm has been triggered ten times
in succession (when triggered for the eleventh
time) it is deactivated. Repeat the procedure for
setting the alarm.
To prevent triggering of the alarm when a door
is opened, you must press the unlocking button
on the remote control again.
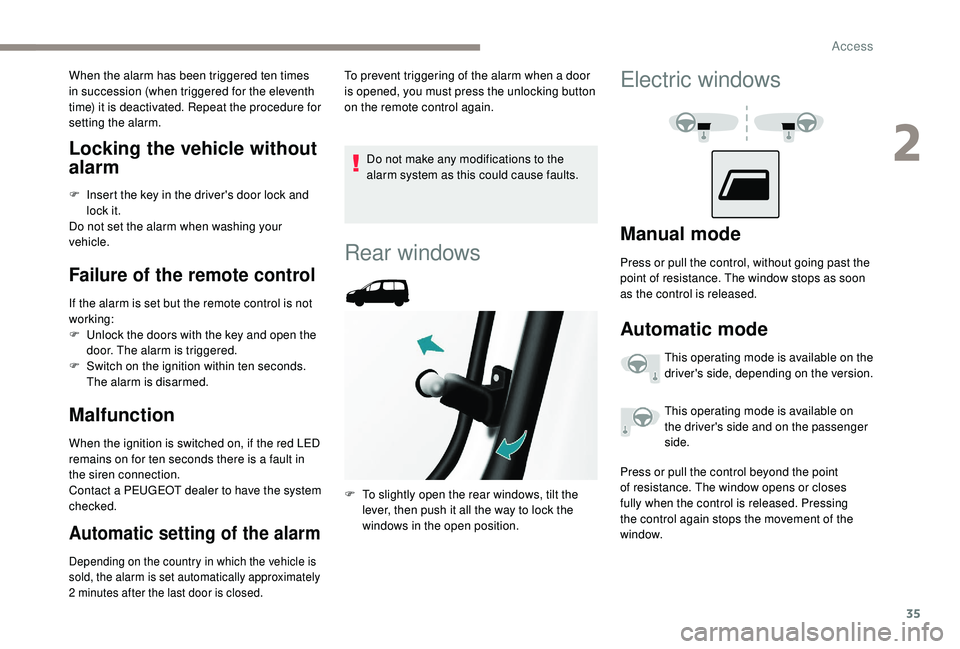
Rear windows
F To slightly open the rear windows, tilt the
lever, then push it all the way to lock the
windows in the open position.
Electric windows
Manual mode
Press or pull the control, without going past the
point of resistance. The window stops as soon
as the control is released.
Automatic mode
This operating mode is available on the
driver's side, depending on the version.
This operating mode is available on
the driver's side and on the passenger
side.
Press or pull the control beyond the point
of resistance. The window opens or closes
fully when the control is released. Pressing
the control again stops the movement of the
window.
2
Access
Page 109 of 252
71
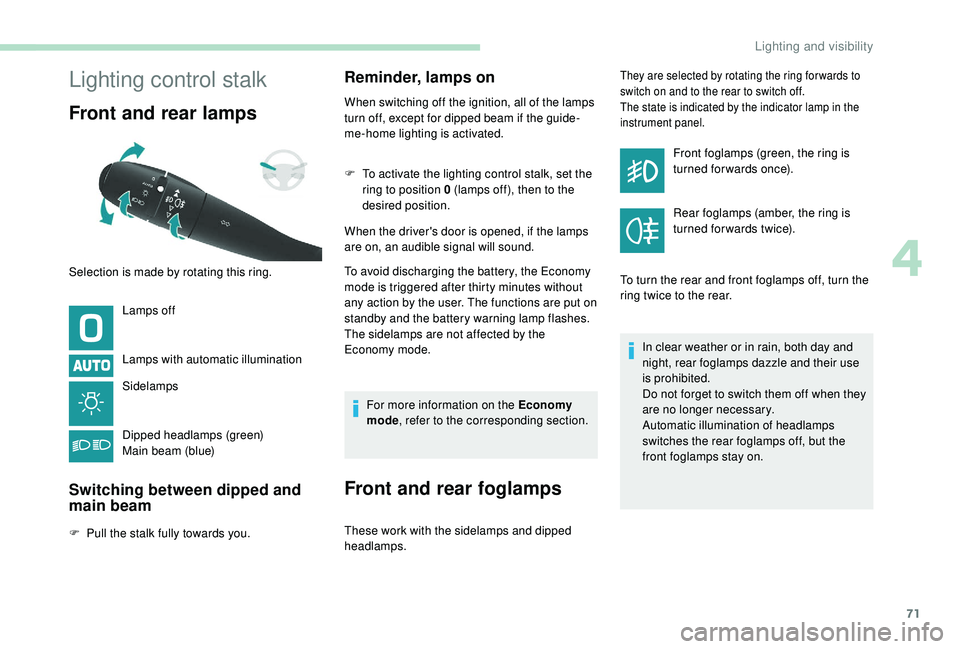
Lighting control stalk
Front and rear lamps
Lamps off
Lamps with automatic illumination
Sidelamps
Dipped headlamps (green)
Main beam (blue)
Switching between dipped and
main beam
F Pull the stalk fully towards you.
Reminder, lamps on
When switching off the ignition, all of the lamps
turn off, except for dipped beam if the guide-
me-home lighting is activated.
F
T
o activate the lighting control stalk, set the
ring to position 0 (lamps off), then to the
desired position.
When the driver's door is opened, if the lamps
are on, an audible signal will sound.
To avoid discharging the battery, the Economy
mode is triggered after thirty minutes without
any action by the user. The functions are put on
standby and the battery warning lamp flashes.
The sidelamps are not affected by the
Economy mode.
For more information on the Economy
mode , refer to the corresponding section.
Front and rear foglamps
These work with the sidelamps and dipped
headlamps.
They are selected by rotating the ring for wards to
switch on and to the rear to switch off.
The state is indicated by the indicator lamp in the
instrument panel.
Front foglamps (green, the ring is
turned forwards once).
Rear foglamps (amber, the ring is
turned for wards twice).
To turn the rear and front foglamps off, turn the
ring twice to the rear.
In clear weather or in rain, both day and
night, rear foglamps dazzle and their use
is prohibited.
Do not forget to switch them off when they
are no longer necessary.
Automatic illumination of headlamps
switches the rear foglamps off, but the
front foglamps stay on.
Selection is made by rotating this ring.
4
Lighting and visibility