Page 170 of 252
132
Instructions for fitting and before
each use
Check that the swan neck is correctly locked by
verifying the following points:
-
t
he green mark on the locking wheel is
visible.
-
t
he safety lock on the locking wheel is
facing rearward.
-
t
he safety lock is closed and the key
removed; the locking wheel can no longer
be operated,
-
t
he swan neck must no longer move in its
c a r r i e r.
When hooking up the towbar, do not forget to
connect the electrical wiring harness.
Fitting
During use
Never unlock the device when a trailer or
load carrier is fitted to the swan neck.
After use
For journeys made without a trailer or load
carrier, the swan neck must be removed
and the blanking plug inserted in the
carrier. This measure applies particularly if
the swan neck could hinder visibility of the
number plate or lighting.
Removal
Practical information
Page 191 of 252

153
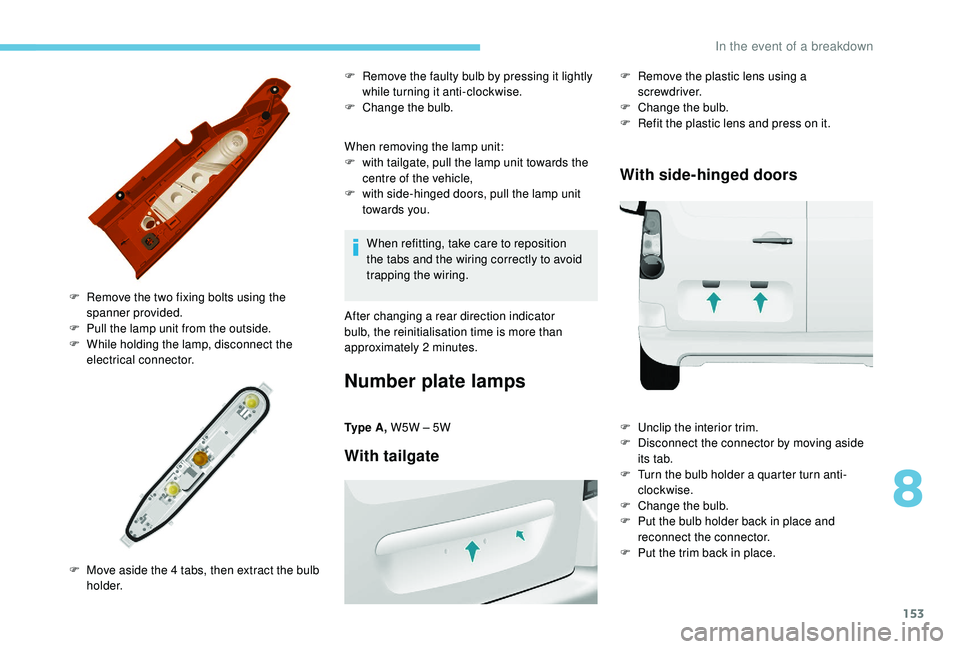
When removing the lamp unit:
F w ith tailgate, pull the lamp unit towards the
centre of the vehicle,
F
w
ith side-hinged doors, pull the lamp unit
towards you.
F
R
emove the two fixing bolts using the
spanner provided.
F
P
ull the lamp unit from the outside.
F
W
hile holding the lamp, disconnect the
electrical connector.
F
M
ove aside the 4 tabs, then extract the bulb
h o l d e r. F
R
emove the faulty bulb by pressing it lightly
while turning it anti-clockwise.
F
C
hange the bulb.
When refitting, take care to reposition
the tabs and the wiring correctly to avoid
trapping the wiring.
After changing a rear direction indicator
bulb, the reinitialisation time is more than
approximately 2
minutes.
Number plate lamps
Ty p e A , W5W – 5W
With tailgate
F Remove the plastic lens using a
screwdriver.
F
C
hange the bulb.
F
R
efit the plastic lens and press on it.
With side-hinged doors
F Unclip the interior trim.
F D isconnect the connector by moving aside
its tab.
F
T
urn the bulb holder a quarter turn anti-
clockwise.
F
C
hange the bulb.
F
P
ut the bulb holder back in place and
reconnect the connector.
F
P
ut the trim back in place.
8
In the event of a breakdown
Page 192 of 252

154
Third brake lamp
Ty p e A , W16W – 16W
F
U
nscrew the two nuts.
F
P
ush the pins.
F
I
f necessary, disconnect the connector to
remove the lamp.
F
C
hange the bulb.
Changing a fuse
The fuse boxes are located: Professional repairers: for complete
information on the fuses and relays,
consult the wiring information and
diagrams available through the dealer
network.
Removing and fitting a fuse
GoodFailed
PEUGEOT accepts no responsibility for
the cost incurred in repairing your vehicle
or for rectifying malfunctions resulting
from the installation of accessories
not supplied or not recommended by
PEUGEOT and not installed in accordance
with the specifications, in particular when
the combined power consumption of all
of the additional equipment connected
exceeds 10
milliamperes.
-
i
n the lower dashboard on the left-hand side
(behind the cover).
-
u
nder the bonnet (near the battery).
If fitted on your vehicle, an
additional fuse box is provided
for towing, the towbar and the
connections for body and platform
cab conversions. It is located on
the right-hand side behind the
load stop partition.
The information given concerns only those
fuses which can be changed by the user using
the tweezers located behind the dashboard
storage compartment on the right-hand side.
For any other work, visit a PEUGEOT dealer or
a qualified workshop. Before changing a fuse, the cause of the fault
must be found and rectified.
F
U
se the tweezers.
Always replace a faulty fuse with a fuse of
the same rating.
In the event of a breakdown