Page 3 of 252
1
.
Instrument panel 3
I ndicators 3
Warning and indicator lamps
6
D
isplays
7
Starting procedure
8
E
co-driving
10
Eco-comfort
11
Manual air conditioning and heating
1
2Charging the traction battery
1
4
Normal charging procedure
2
0
Fast charging procedure
2
2
Other information
2
4
Ancillaries battery 2 7
Fuses
30
Towing the vehicle
3
0
Motor and traction battery
3
1
Identification markings
3
2
Presentation
Instruments and controls
Eco-comfort Charging the traction battery
Supplement for electric mode Ancillaries batteryThis supplement is specific to the electric
drive mode. For any other information, refer
to the vehicle's handbook and the warranty
and maintenance guide. You can also visit
the manufacturer's website for the latest
information.
The driver must be par ticularly vigilant
when driving the electric vehicle as it
makes ver y little noise when moving.
Key
Safety warning
Additional information
Warning of safety issues for people
and equipment.
For any work on your vehicle, go to a qualified
workshop that has the technical information,
competence and equipment required, which
the Manufacturer's dealer network is able to
provide.
Contents
.
Contents
Page 4 of 252
2
Electrical system
1.Normal charging socket
1. Normal charging socket
2. 300
Volt electrical system
3. 12
Volt ancillaries battery
4. Traction battery
5. Fast charging socket
Instruments and controls
1.Instrument panel
2. Display screens
3. Drive selector
Presentation
Page 5 of 252
3
Instrument panel
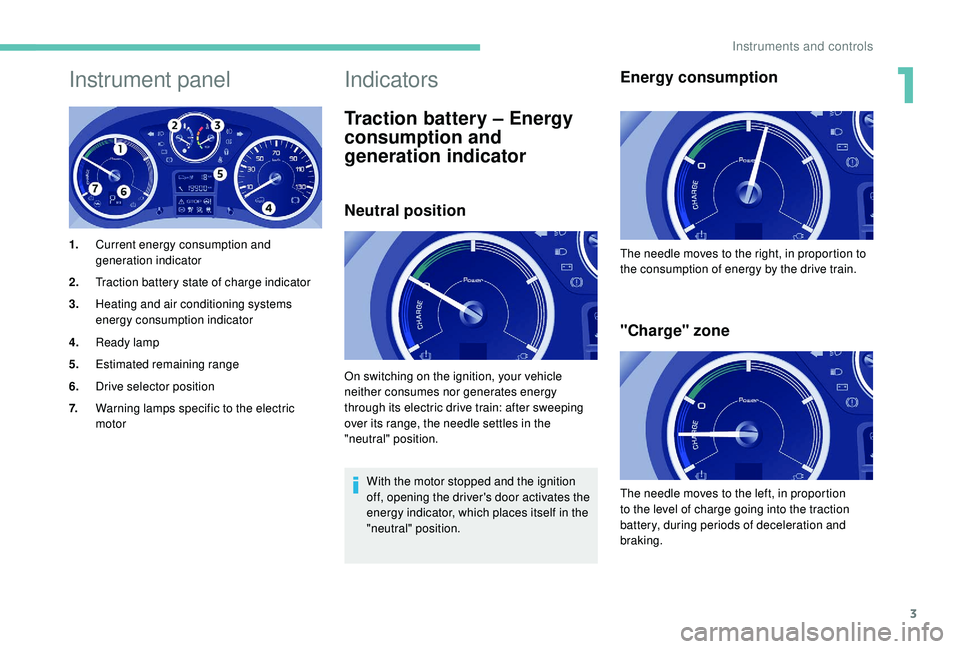
1.Current energy consumption and
generation indicator
2. Traction battery state of charge indicator
3. Heating and air conditioning systems
energy consumption indicator
4. Ready lamp
5. Estimated remaining range
6. Drive selector position
7. Warning lamps specific to the electric
motor
Indicators
Traction battery – Energy
consumption and
generation indicator
Neutral position
With the motor stopped and the ignition
off, opening the driver's door activates the
energy indicator, which places itself in the
"neutral" position.
Energy consumption
"Charge" zone
On switching on the ignition, your vehicle
neither consumes nor generates energy
through its electric drive train: after sweeping
over its range, the needle settles in the
"neutral" position. The needle moves to the right, in proportion to
the consumption of energy by the drive train.
The needle moves to the left, in proportion
to the level of charge going into the traction
battery, during periods of deceleration and
braking.
1
Instruments and controls
Page 6 of 252
4
"Optimum" zone
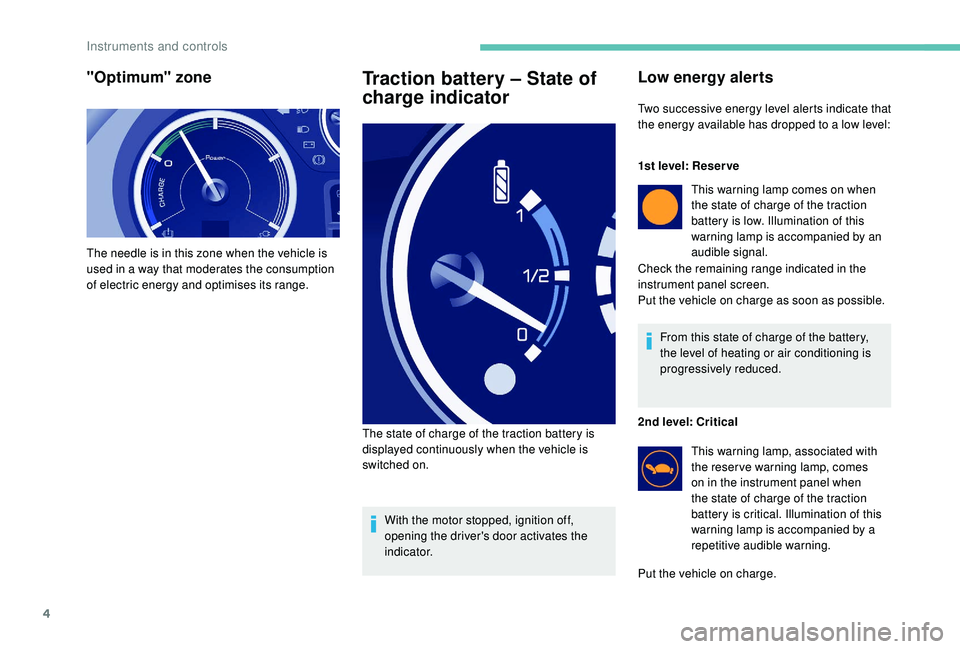
The needle is in this zone when the vehicle is
used in a way that moderates the consumption
of electric energy and optimises its range.
Traction battery – State of
charge indicator
With the motor stopped, ignition off,
opening the driver's door activates the
i n d i c a t o r.
The state of charge of the traction battery is
displayed continuously when the vehicle is
switched on.
Low energy alerts
Two successive energy level alerts indicate that
the energy available has dropped to a low level:
1st level: Reser ve
This warning lamp comes on when
the state of charge of the traction
battery is low. Illumination of this
warning lamp is accompanied by an
audible signal.
Check the remaining range indicated in the
instrument panel screen.
Put the vehicle on charge as soon as possible.
From this state of charge of the battery,
the level of heating or air conditioning is
progressively reduced.
2nd level: Critical This warning lamp, associated with
the reser ve warning lamp, comes
on in the instrument panel when
the state of charge of the traction
battery is critical. Illumination of this
warning lamp is accompanied by a
repetitive audible warning.
Put the vehicle on charge.
Instruments and controls
Page 8 of 252
6
Warning and indicator lamps
LampStateCause Actions/Comments
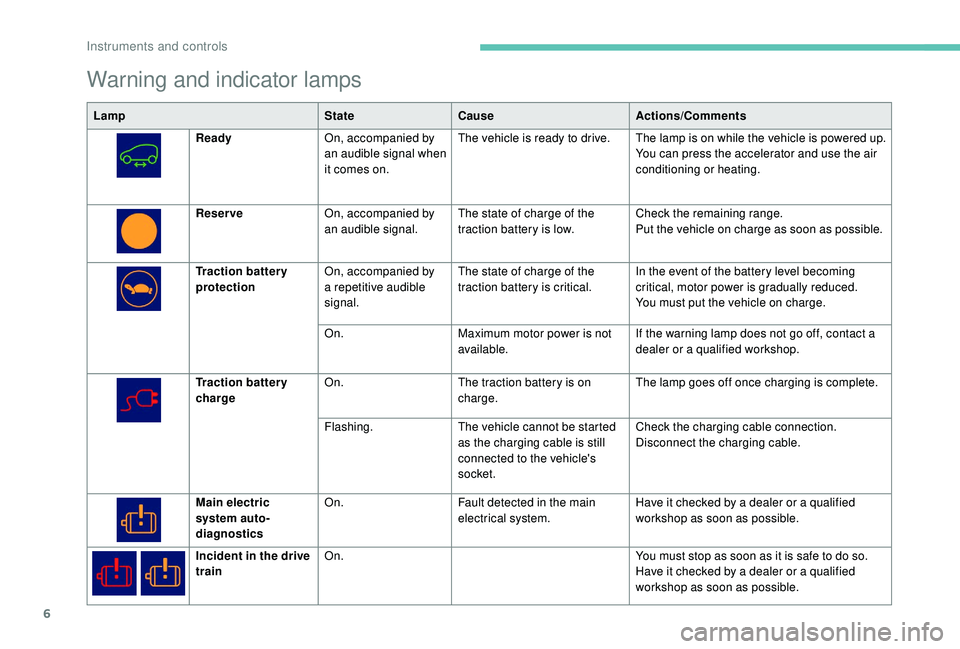
Ready On, accompanied by
an audible signal when
it comes on. The vehicle is ready to drive. The lamp is on while the vehicle is powered up.
You can press the accelerator and use the air
conditioning or heating.
Reser ve On, accompanied by
an audible signal. The state of charge of the
traction battery is low. Check the remaining range.
Put the vehicle on charge as soon as possible.
Traction battery
protection On, accompanied by
a repetitive audible
signal. The state of charge of the
traction battery is critical.
In the event of the battery level becoming
critical, motor power is gradually reduced.
You must put the vehicle on charge.
On. Maximum motor power is not
available. If the warning lamp does not go off, contact a
dealer or a qualified workshop.
Traction battery
charge On.
The traction battery is on
charge. The lamp goes off once charging is complete.
Flashing. The vehicle cannot be started
as the charging cable is still
connected to the vehicle's
socket. Check the charging cable connection.
Disconnect the charging cable.
Main electric
system auto-
diagnostics On.
Fault detected in the main
electrical system. Have it checked by a dealer or a qualified
workshop as soon as possible.
Incident in the drive
train On.
You must stop as soon as it is safe to do so.
Have it checked by a dealer or a qualified
workshop as soon as possible.
Instruments and controls
Page 13 of 252
11
Eco-comfort
Pressing the ECO button stops the
heating and air conditioning (but maintains
ventilation). The needle of the energy
consumption and generation indicator is
placed in the ECO zone. Stops the heating or air conditioning
and maintains ventilation.
Stops the heating or air conditioning
and ventilation.
Operating the temperature
control activates the heating or air
conditioning and stops ECO mode.
Control the use of your
electrical equipment
The heating and air conditioning operate using
energy supplied by the traction battery. Their
excessive use significantly reduces the range
of your vehicle. Try to optimise their use as
soon as you have reached the desired level of
comfort and check the settings at every start
in order to maximise range. Also limit the use
of demisting and defrosting and of the heated
seat.
2
Eco-comfort
Page 19 of 252
17
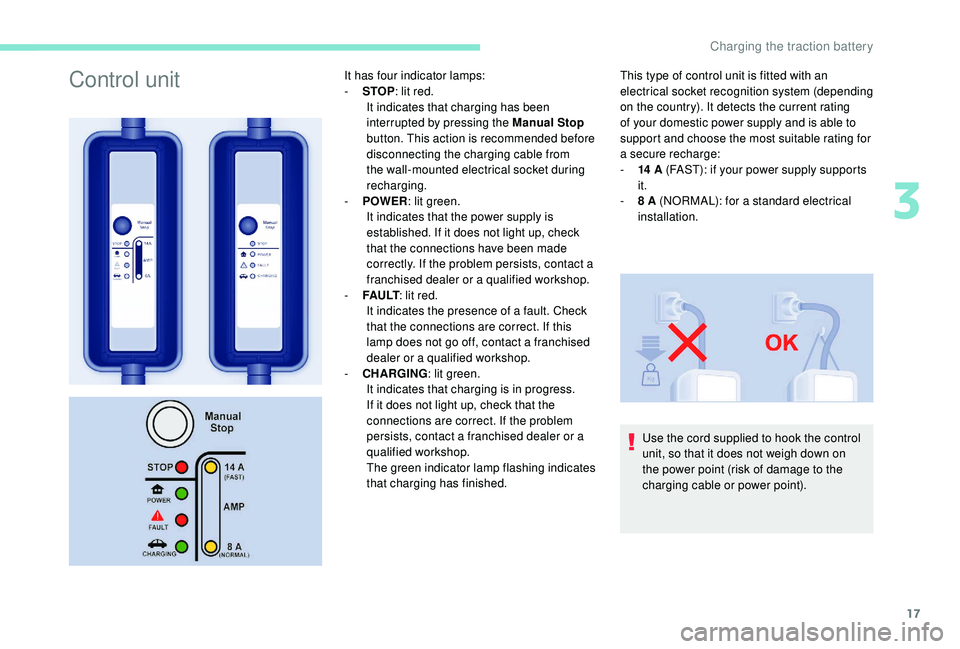
Control unitIt has four indicator lamps:
- S TOP: lit red.
It indicates that charging has been
interrupted by pressing the Manual Stop
button. This action is recommended before
disconnecting the charging cable from
the wall-mounted electrical socket during
recharging.
-
P
OWER : lit green.
It indicates that the power supply is
established. If it does not light up, check
that the connections have been made
correctly. If the problem persists, contact a
franchised dealer or a qualified workshop.
-
F
A U LT : lit red.
It indicates the presence of a fault. Check
that the connections are correct. If this
lamp does not go off, contact a franchised
dealer or a qualified workshop.
-
C
HARGING : lit green.
It indicates that charging is in progress.
If it does not light up, check that the
connections are correct. If the problem
persists, contact a franchised dealer or a
qualified workshop.
The green indicator lamp flashing indicates
that charging has finished. This type of control unit is fitted with an
electrical socket recognition system (depending
on the country). It detects the current rating
of your domestic power supply and is able to
support and choose the most suitable rating for
a secure recharge:
-
14
A (FAST): if your power supply supports
it.
-
8
A (NORMAL): for a standard electrical
installation.
Use the cord supplied to hook the control
unit, so that it does not weigh down on
the power point (risk of damage to the
charging cable or power point).
3
Charging the traction battery
Page 20 of 252
18
Do not touch the metal end of the normal
charging socket or of the charging
cable. Risk of electrocution and/or
malfunctions.
Never connect or disconnect the cable
or charging plug with wet hands (risk of
electrocution).
The charge may be interrupted at any time
by withdrawing the charging plug.
If, as an exception, you have to interrupt the
charge by disconnecting the charging cable
from the power point, it is essential to first
press the Manual Stop button on the control
unit.
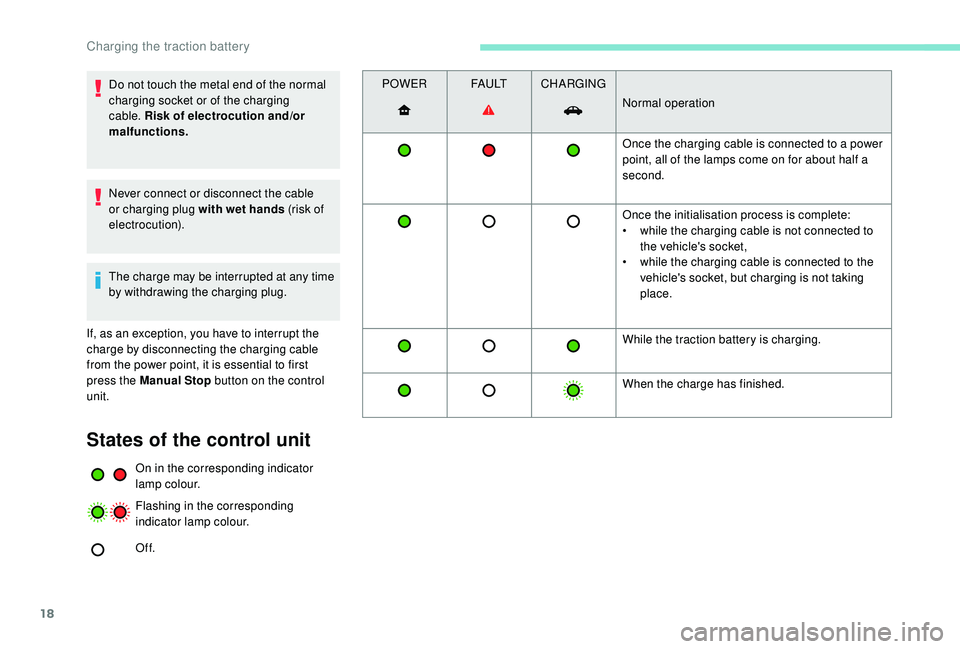
States of the control unit
On in the corresponding indicator
lamp colour.
Flashing in the corresponding
indicator lamp colour.
Of f. POWER
FA U LTCHARGING
Normal operation
Once the charging cable is connected to a power
point, all of the lamps come on for about half a
second.
Once the initialisation process is complete:
•
w
hile the charging cable is not connected to
the vehicle's socket,
•
w
hile the charging cable is connected to the
vehicle's socket, but charging is not taking
place.
While the traction battery is charging.
When the charge has finished.
Charging the traction battery