2017 PEUGEOT PARTNER TEPEE ELECTRIC door lock
[x] Cancel search: door lockPage 68 of 252
30
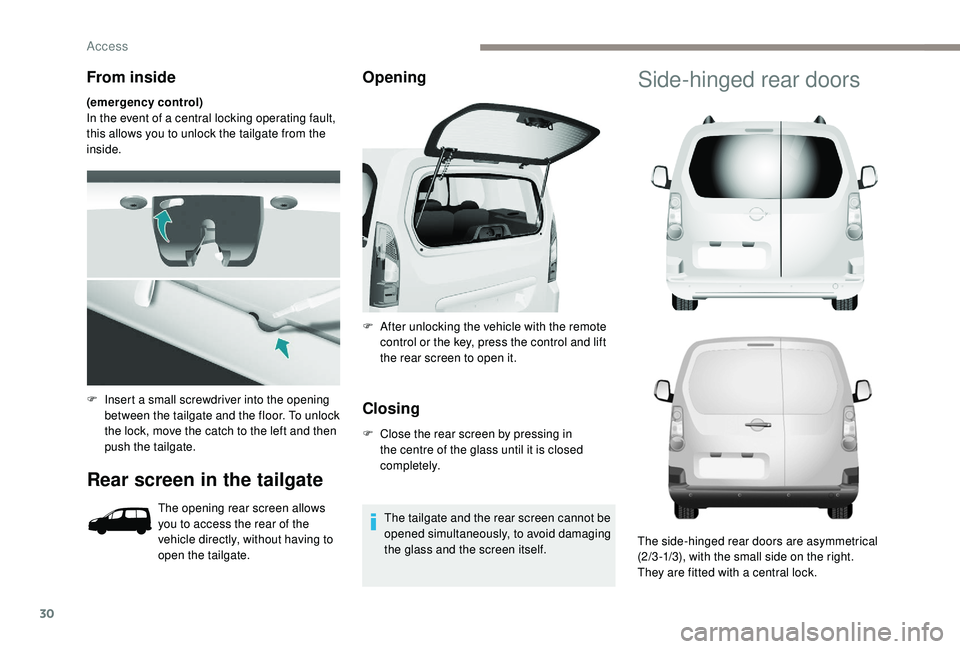
From inside
(emergency control)
In the event of a central locking operating fault,
this allows you to unlock the tailgate from the
inside.
Rear screen in the tailgate
The opening rear screen allows
you to access the rear of the
vehicle directly, without having to
open the tailgate.
Opening
Closing
F Close the rear screen by pressing in the centre of the glass until it is closed
completely.
The tailgate and the rear screen cannot be
opened simultaneously, to avoid damaging
the glass and the screen itself.
F
I
nsert a small screwdriver into the opening
between the tailgate and the floor. To unlock
the lock, move the catch to the left and then
push the tailgate. F
A
fter unlocking the vehicle with the remote
control or the key, press the control and lift
the rear screen to open it.
Side-hinged rear doors
The side-hinged rear doors are asymmetrical
(2/3 -1/3), with the small side on the right.
They are fitted with a central lock.
Access
Page 69 of 252
31
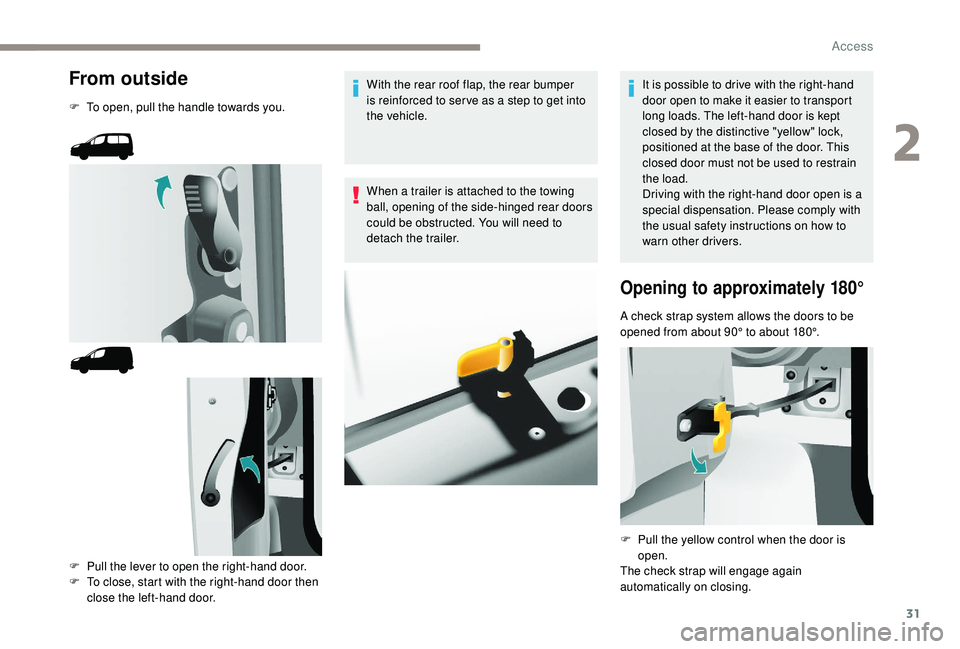
From outside
F To open, pull the handle towards you.F
P
ull the lever to open the right-hand door.
F
T
o close, start with the right-hand door then
close the left-hand door. With the rear roof flap, the rear bumper
is reinforced to ser ve as a step to get into
the vehicle.
When a trailer is attached to the towing
ball, opening of the side-hinged rear doors
could be obstructed. You will need to
detach the trailer.
It is possible to drive with the right-hand
door open to make it easier to transport
long loads. The left-hand door is kept
closed by the distinctive "yellow" lock,
positioned at the base of the door. This
closed door must not be used to restrain
the load.
Driving with the right-hand door open is a
special dispensation. Please comply with
the usual safety instructions on how to
warn other drivers.
Opening to approximately 180°
A check strap system allows the doors to be
opened from about 90° to about 180°.
F
P
ull the yellow control when the door is
open.
The check strap will engage again
automatically on closing.
2
Access
Page 70 of 252
32
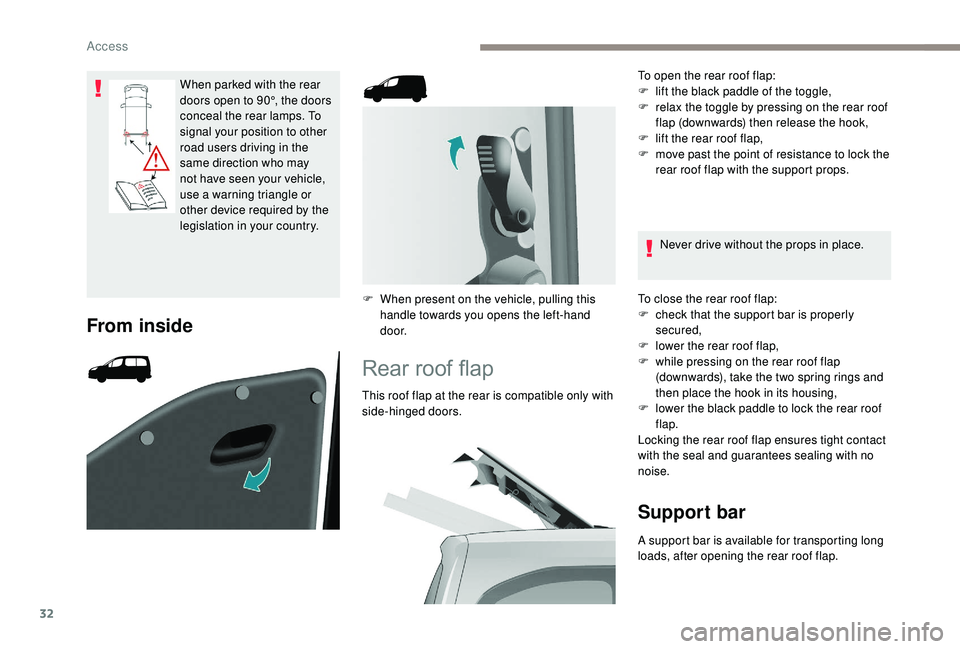
When parked with the rear
doors open to 90°, the doors
conceal the rear lamps. To
signal your position to other
road users driving in the
same direction who may
not have seen your vehicle,
use a warning triangle or
other device required by the
legislation in your country.
From inside
F When present on the vehicle, pulling this handle towards you opens the left-hand
d o o r.
Rear roof flap
This roof flap at the rear is compatible only with
side-hinged doors. To open the rear roof flap:
F
l
ift the black paddle of the toggle,
F
r
elax the toggle by pressing on the rear roof
flap (downwards) then release the hook,
F
l
ift the rear roof flap,
F
m
ove past the point of resistance to lock the
rear roof flap with the support props.
Never drive without the props in place.
To close the rear roof flap:
F
c
heck that the support bar is properly
secured,
F
l
ower the rear roof flap,
F
w
hile pressing on the rear roof flap
(downwards), take the two spring rings and
then place the hook in its housing,
F l ower the black paddle to lock the rear roof
flap.
Locking the rear roof flap ensures tight contact
with the seal and guarantees sealing with no
noise.
Support bar
A support bar is available for transporting long
loads, after opening the rear roof flap.
Access
Page 71 of 252
33
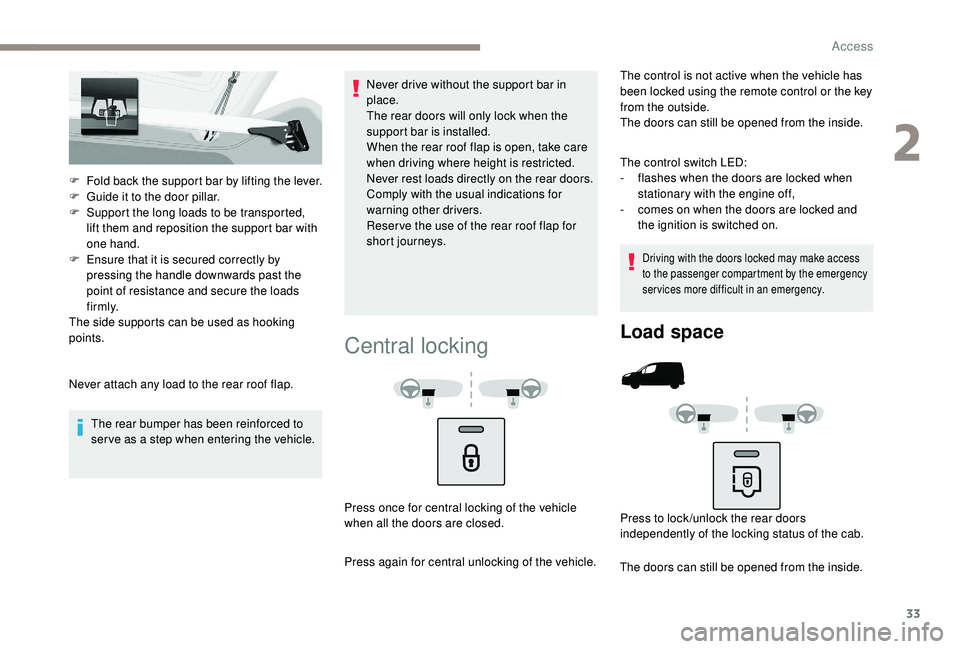
F Fold back the support bar by lifting the lever.
F G uide it to the door pillar.
F
S
upport the long loads to be transported,
lift them and reposition the support bar with
one hand.
F
E
nsure that it is secured correctly by
pressing the handle downwards past the
point of resistance and secure the loads
f i r m l y.
The side supports can be used as hooking
points.
Never attach any load to the rear roof flap.
The rear bumper has been reinforced to
serve as a step when entering the vehicle. Never drive without the support bar in
place.
The rear doors will only lock when the
support bar is installed.
When the rear roof flap is open, take care
when driving where height is restricted.
Never rest loads directly on the rear doors.
Comply with the usual indications for
warning other drivers.
Reser ve the use of the rear roof flap for
short journeys.
Central locking
The control is not active when the vehicle has
been locked using the remote control or the key
from the outside.
The doors can still be opened from the inside.
The control switch LED:
-
f
lashes when the doors are locked when
stationary with the engine off,
-
c
omes on when the doors are locked and
the ignition is switched on.
Driving with the doors locked may make access
to the passenger compartment by the emergency
services more difficult in an emergency.
Press once for central locking of the vehicle
when all the doors are closed.
Press again for central unlocking of the vehicle.
Load space
Press to lock /unlock the rear doors
independently of the locking status of the cab.
The doors can still be opened from the inside.
2
Access
Page 72 of 252
34
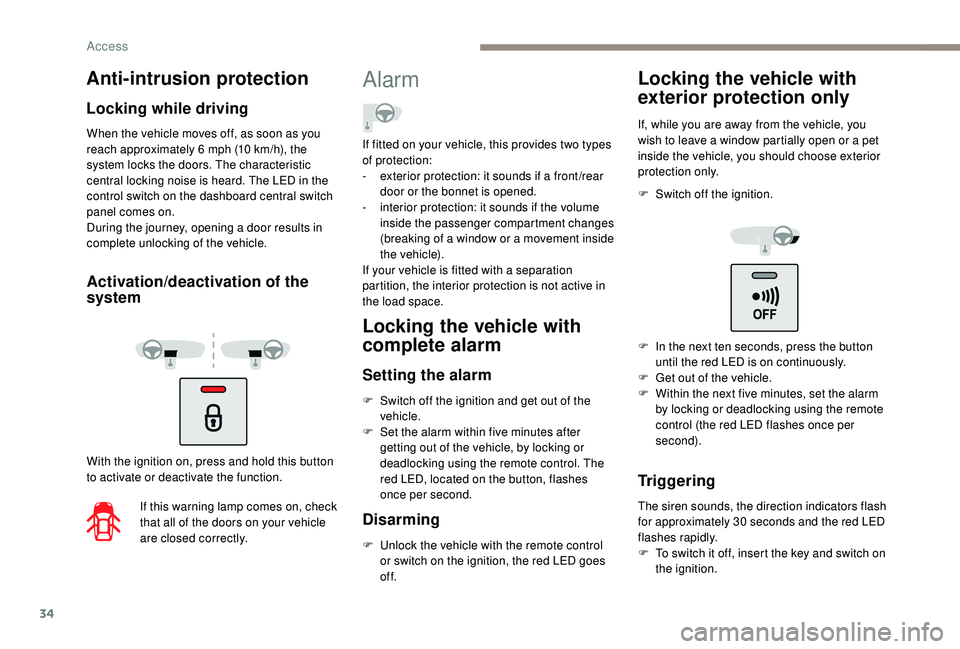
When the vehicle moves off, as soon as you
reach approximately 6 mph (10 km/h), the
system locks the doors. The characteristic
central locking noise is heard. The LED in the
control switch on the dashboard central switch
panel comes on.
During the journey, opening a door results in
complete unlocking of the vehicle.
Activation/deactivation of the
system
With the ignition on, press and hold this button
to activate or deactivate the function.
If this warning lamp comes on, check
that all of the doors on your vehicle
are closed correctly.
Alarm
Locking the vehicle with
complete alarm
Setting the alarm
F Switch off the ignition and get out of the vehicle.
F
S
et the alarm within five minutes after
getting out of the vehicle, by locking or
deadlocking using the remote control. The
red LED, located on the button, flashes
once per second.
Disarming
F Unlock the vehicle with the remote control or switch on the ignition, the red LED goes
of f.
Locking the vehicle with
exterior protection only
If, while you are away from the vehicle, you
wish to leave a window partially open or a pet
inside the vehicle, you should choose exterior
protection only.
F
S
witch off the ignition.
Triggering
The siren sounds, the direction indicators flash
for approximately 30 seconds and the red LED
flashes rapidly.
F
T
o switch it off, insert the key and switch on
the ignition.
Anti-intrusion protection
Locking while driving
If fitted on your vehicle, this provides two types
of protection:
-
e
xterior protection: it sounds if a front /rear
door or the bonnet is opened.
-
i
nterior protection: it sounds if the volume
inside the passenger compartment changes
(breaking of a window or a movement inside
the vehicle).
If your vehicle is fitted with a separation
partition, the interior protection is not active in
the load space.
F
I
n the next ten seconds, press the button
until the red LED is on continuously.
F
G
et out of the vehicle.
F
W
ithin the next five minutes, set the alarm
by locking or deadlocking using the remote
control (the red LED flashes once per
second).
Access
Page 73 of 252
35
Locking the vehicle without
alarm
F Insert the key in the driver's door lock and lock it.
Do not set the alarm when washing your
vehicle.
Failure of the remote control
If the alarm is set but the remote control is not
working:
F
U
nlock the doors with the key and open the
door. The alarm is triggered.
F
S
witch on the ignition within ten seconds.
The alarm is disarmed.
Malfunction
When the ignition is switched on, if the red LED
remains on for ten seconds there is a fault in
the siren connection.
Contact a PEUGEOT dealer to have the system
checked.
Automatic setting of the alarm
Depending on the country in which the vehicle is
sold, the alarm is set automatically approximately
2
minutes after the last door is closed.
Do not make any modifications to the
alarm system as this could cause faults.
When the alarm has been triggered ten times
in succession (when triggered for the eleventh
time) it is deactivated. Repeat the procedure for
setting the alarm.
To prevent triggering of the alarm when a door
is opened, you must press the unlocking button
on the remote control again.
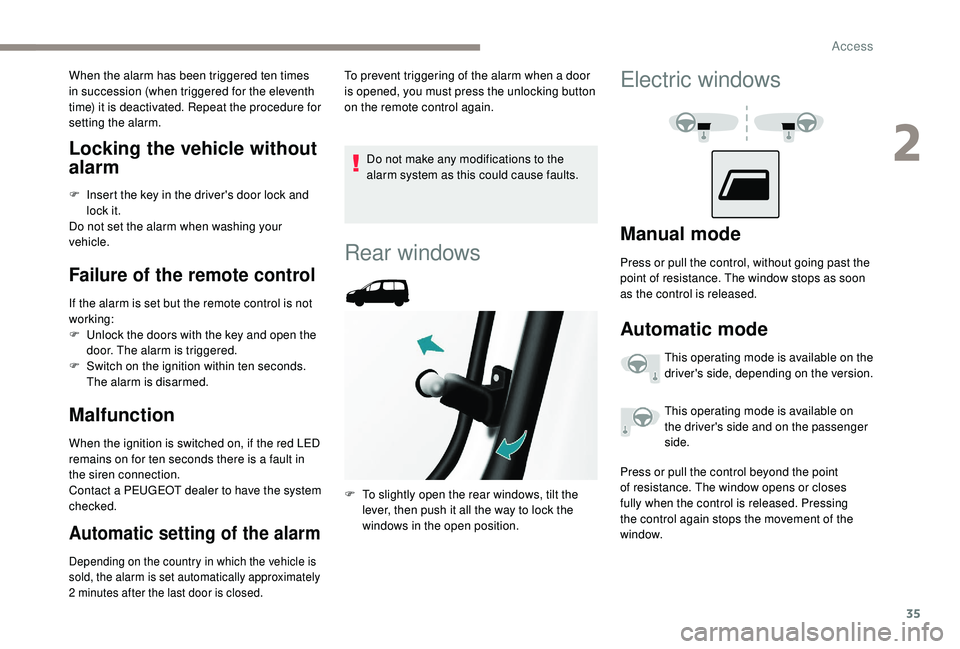
Rear windows
F To slightly open the rear windows, tilt the
lever, then push it all the way to lock the
windows in the open position.
Electric windows
Manual mode
Press or pull the control, without going past the
point of resistance. The window stops as soon
as the control is released.
Automatic mode
This operating mode is available on the
driver's side, depending on the version.
This operating mode is available on
the driver's side and on the passenger
side.
Press or pull the control beyond the point
of resistance. The window opens or closes
fully when the control is released. Pressing
the control again stops the movement of the
window.
2
Access
Page 75 of 252
37
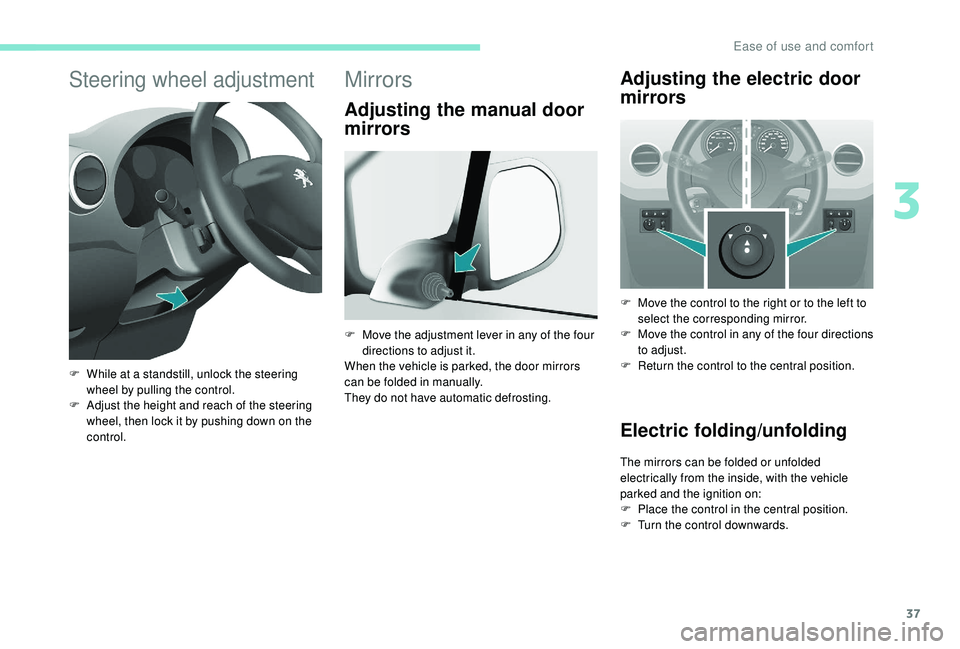
Steering wheel adjustment
F While at a standstill, unlock the steering wheel by pulling the control.
F
A
djust the height and reach of the steering
wheel, then lock it by pushing down on the
control.
Mirrors
Adjusting the manual door
mirrors Adjusting the electric door
mirrors
F Move the control to the right or to the left to
select the corresponding mirror.
F
M
ove the control in any of the four directions
to adjust.
F
R
eturn the control to the central position.
Electric folding/unfolding
The mirrors can be folded or unfolded
electrically from the inside, with the vehicle
parked and the ignition on:
F
P
lace the control in the central position.
F
T
urn the control downwards.
F
M
ove the adjustment lever in any of the four
directions to adjust it.
When the vehicle is parked, the door mirrors
can be folded in manually.
They do not have automatic defrosting.
3
Ease of use and comfort
Page 79 of 252
41
F To return the backrest to the sitting position, pull the tongue and guide the backrest until
it locks.
During operations, take care not to jam the
tongue under the seat cushion.
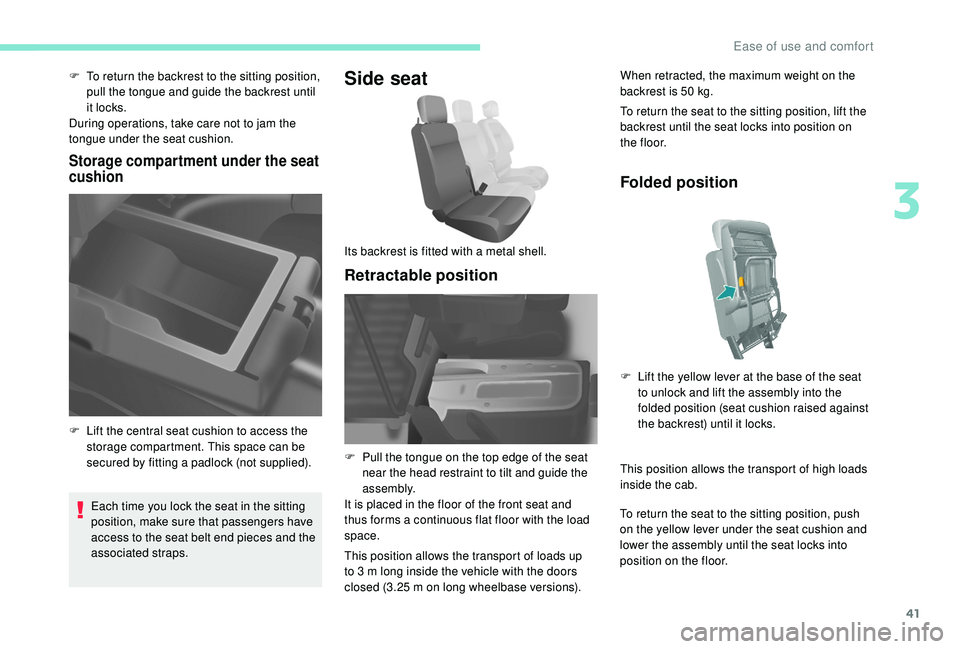
Storage compartment under the seat
cushion
Each time you lock the seat in the sitting
position, make sure that passengers have
access to the seat belt end pieces and the
associated straps.
Side seat
Retractable position
When retracted, the maximum weight on the
backrest is 50 kg.
To return the seat to the sitting position, lift the
backrest until the seat locks into position on
t h e f l o o r.
F
L
ift the central seat cushion to access the
storage compartment. This space can be
secured by fitting a padlock (not supplied). Its backrest is fitted with a metal shell.
F
P
ull the tongue on the top edge of the seat
near the head restraint to tilt and guide the
assembly.
It is placed in the floor of the front seat and
thus forms a continuous flat floor with the load
space.
This position allows the transport of loads up
to 3
m long inside the vehicle with the doors
closed (3.25
m on long wheelbase versions).
Folded position
This position allows the transport of high loads
inside the cab.
To return the seat to the sitting position, push
on the yellow lever under the seat cushion and
lower the assembly until the seat locks into
position on the floor. F
L
ift the yellow lever at the base of the seat
to unlock and lift the assembly into the
folded position (seat cushion raised against
the backrest) until it locks.
3
Ease of use and comfort