2017 PEUGEOT PARTNER TEPEE ELECTRIC remove seats
[x] Cancel search: remove seatsPage 44 of 252
6
Limit the causes of excess
consumption
Spread loads throughout the vehicle; place
the heaviest items in the bottom of the boot,
as close as possible to the rear seats.
Limit the loads carried in the vehicle and
reduce wind resistance (roof bars, roof rack,
bicycle carrier, trailer, etc.). Preferably, use a
roof box.
Remove roof bars and the roof rack after use.
At the end of winter, remove snow tyres and
refit your summer tyres.
Observe the recommendations
on maintenance
Check the tyre pressures regularly, when cold,
referring to the label in the door aperture,
driver's side.
Carry out this check in particular:
-
b
efore a long journey,
-
a
t each change of season,
-
a
fter a long period out of use.
Do not forget the spare wheel and the tyres on
any trailer or caravan. Have your vehicle ser viced regularly (engine
oil, oil filter, air filter, passenger compartment
filter, etc.) and obser ve the schedule of
operations in the manufacturer's service
schedule.
When filling the tank, do not continue after the
3
rd cut-off of the nozzle to avoid over flow.
At the wheel of your new vehicle, it is only
after the first 1,900
miles (3,000 kilometres)
that you will see the fuel consumption settle
down to a consistent average. With a BlueHDi Diesel engine, if the SCR
system is faulty, your vehicle becomes
polluting. Visit a PEUGEOT dealer or a
qualified workshop as soon as possible to
bring your vehicle’s nitrogen oxide emissions
back in line with the regulations.
Eco-driving
Page 77 of 252
39
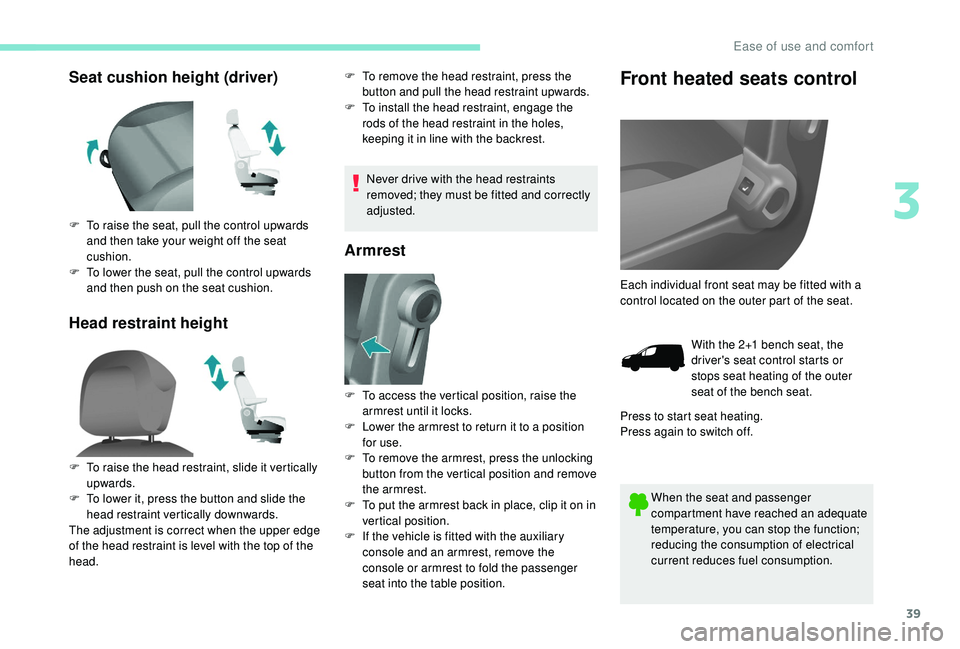
Seat cushion height (driver)
Head restraint heightF To remove the head restraint, press the button and pull the head restraint upwards.
F
T
o install the head restraint, engage the
rods of the head restraint in the holes,
keeping it in line with the backrest.
Never drive with the head restraints
removed; they must be fitted and correctly
adjusted.
Armrest
Front heated seats control
When the seat and passenger
compartment have reached an adequate
temperature, you can stop the function;
reducing the consumption of electrical
current reduces fuel consumption.
F
T
o raise the seat, pull the control upwards
and then take your weight off the seat
cushion.
F
T
o lower the seat, pull the control upwards
and then push on the seat cushion.
F
T
o raise the head restraint, slide it vertically
upwards.
F
T
o lower it, press the button and slide the
head restraint vertically downwards.
The adjustment is correct when the upper edge
of the head restraint is level with the top of the
head. F
T
o access the vertical position, raise the
armrest until it locks.
F
L
ower the armrest to return it to a position
for use.
F
T
o remove the armrest, press the unlocking
button from the vertical position and remove
the armrest.
F
T
o put the armrest back in place, clip it on in
vertical position.
F
I
f the vehicle is fitted with the auxiliary
console and an armrest, remove the
console or armrest to fold the passenger
seat into the table position. Each individual front seat may be fitted with a
control located on the outer part of the seat.
With the 2+1 bench seat, the
driver's seat control starts or
stops seat heating of the outer
seat of the bench seat.
Press to start seat heating.
Press again to switch off.
3
Ease of use and comfort
Page 80 of 252
42
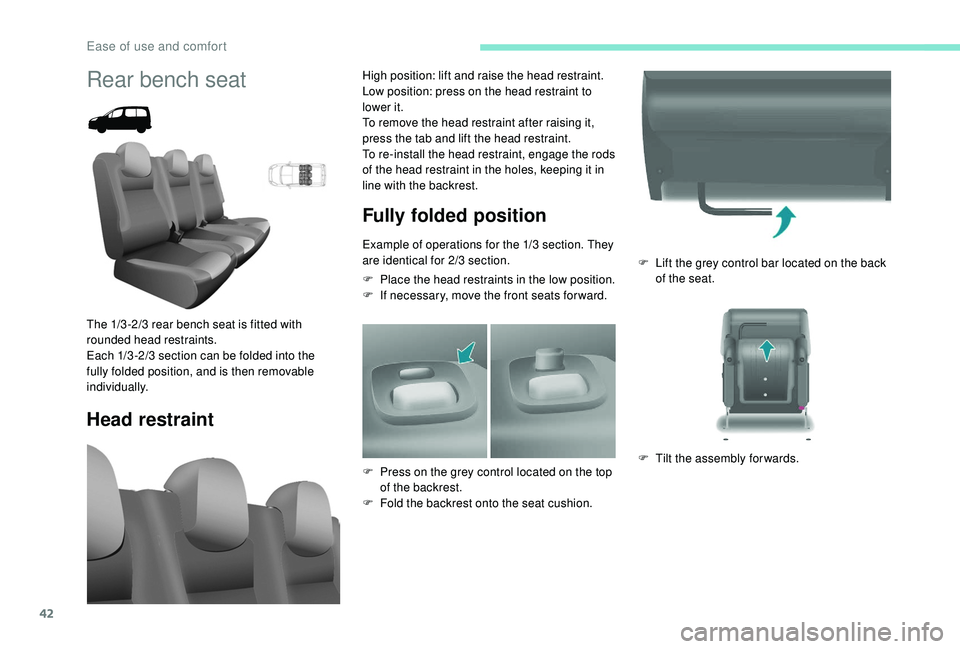
F Lift the grey control bar located on the back of the seat.
F
T
ilt the assembly forwards.
Rear bench seat
Head restraint Fully folded position
Example of operations for the 1/3 section. They
are identical for 2/3 section.
F
P
lace the head restraints in the low position.
F
I
f necessary, move the front seats for ward.
The 1/3 -2/3 rear bench seat is fitted with
rounded head restraints.
Each 1/3 -2/3 section can be folded into the
fully folded position, and is then removable
individually. High position: lift and raise the head restraint.
Low position: press on the head restraint to
lower it.
To remove the head restraint after raising it,
press the tab and lift the head restraint.
To re-install the head restraint, engage the rods
of the head restraint in the holes, keeping it in
line with the backrest.
F
P
ress on the grey control located on the top
of the backrest.
F
F
old the backrest onto the seat cushion.
Ease of use and comfort
Page 83 of 252
45
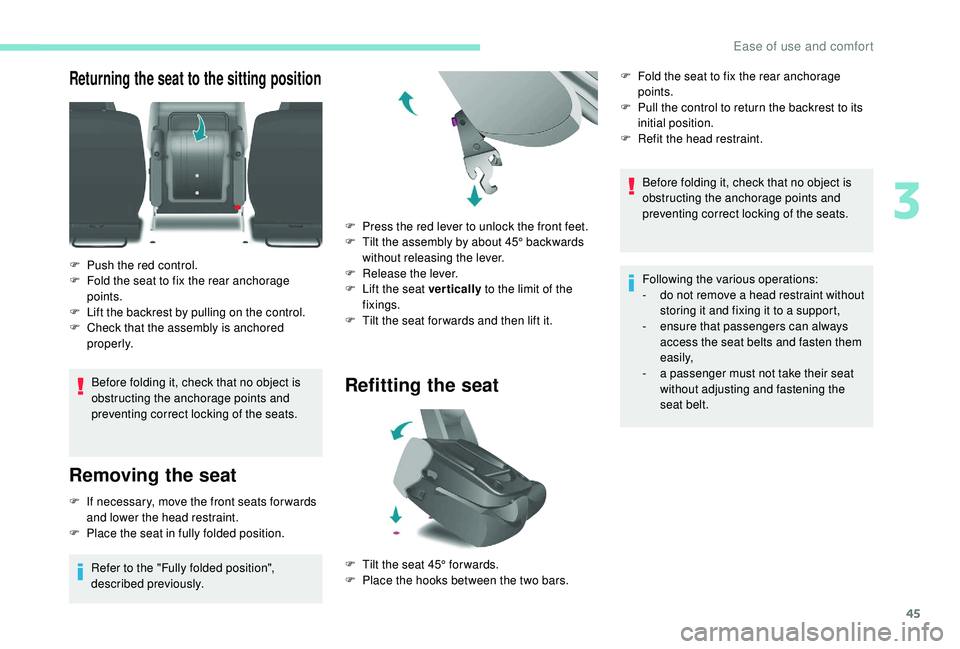
Returning the seat to the sitting position
Before folding it, check that no object is
obstructing the anchorage points and
preventing correct locking of the seats.
Removing the seat
F If necessary, move the front seats for wards and lower the head restraint.
F
P
lace the seat in fully folded position.
Refer to the "Fully folded position",
described previously. F
P
ress the red lever to unlock the front feet.
F
T
ilt the assembly by about 45° backwards
without releasing the lever.
F
R
elease the lever.
F
L
ift the seat vertically
to the limit of the
fixings.
F
T
ilt the seat for wards and then lift it.
Refitting the seat
F Push the red control.
F
F old the seat to fix the rear anchorage
points.
F
L
ift the backrest by pulling on the control.
F
C
heck that the assembly is anchored
properly.
F
T
ilt the seat 45° for wards.
F
P
lace the hooks between the two bars.Before folding it, check that no object is
obstructing the anchorage points and
preventing correct locking of the seats.
Following the various operations:
-
d
o not remove a head restraint without
storing it and fixing it to a support,
-
e
nsure that passengers can always
access the seat belts and fasten them
easily,
-
a p
assenger must not take their seat
without adjusting and fastening the
seat belt.
F
F
old the seat to fix the rear anchorage
points.
F
P
ull the control to return the backrest to its
initial position.
F
R
efit the head restraint.
3
Ease of use and comfort
Page 84 of 252
46
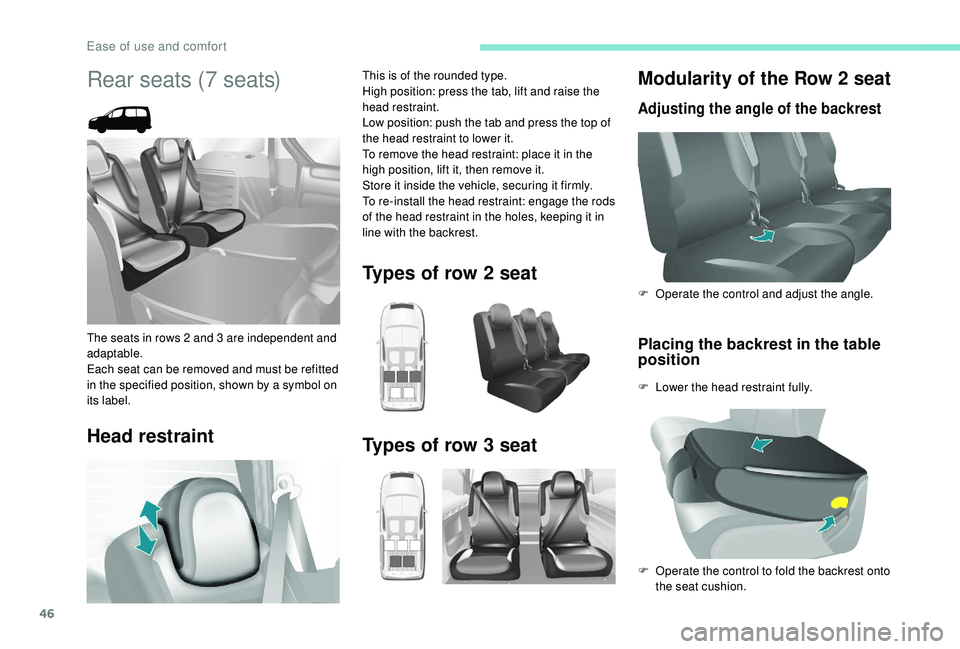
Modularity of the Row 2 seat
Adjusting the angle of the backrest
Placing the backrest in the table
position
F Lower the head restraint fully. F
O
perate the control and adjust the angle.
F
O
perate the control to fold the backrest onto
the seat cushion.
Rear seats (7 seats)
The seats in rows 2 and 3 are independent and
adaptable.
Each seat can be removed and must be refitted
in the specified position, shown by a symbol on
its label.
Head restraint
This is of the rounded type.
High position: press the tab, lift and raise the
head restraint.
Low position: push the tab and press the top of
the head restraint to lower it.
To remove the head restraint: place it in the
high position, lift it, then remove it.
Store it inside the vehicle, securing it firmly.
To re-install the head restraint: engage the rods
of the head restraint in the holes, keeping it in
line with the backrest.
Types of row 2 seat
Types of row 3 seat
Ease of use and comfort
Page 88 of 252
50
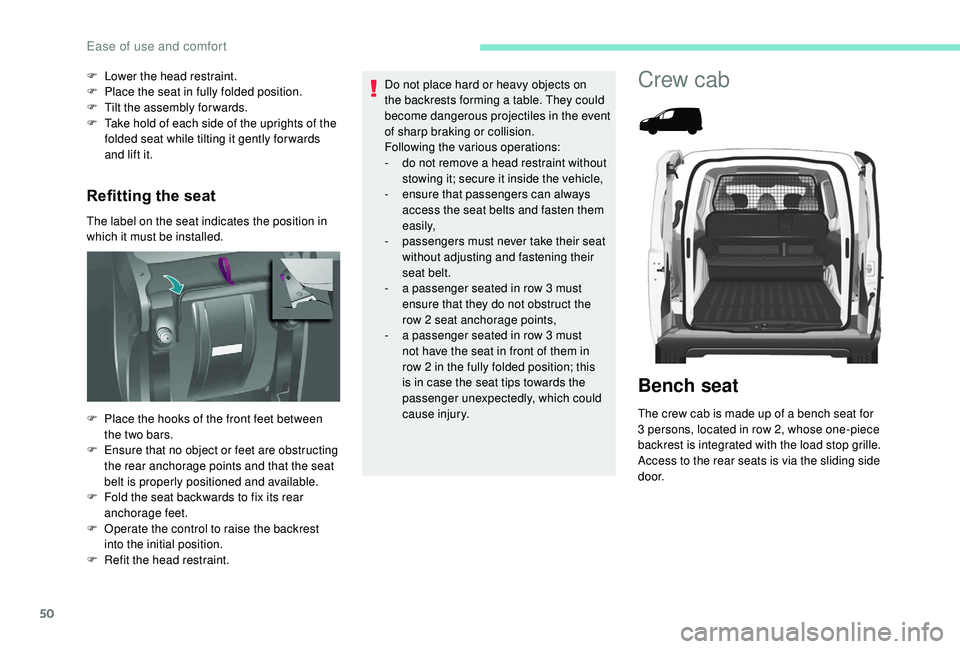
Refitting the seat
The label on the seat indicates the position in
which it must be installed. F
L
ower the head restraint.
F
P
lace the seat in fully folded position.
F
T
ilt the assembly forwards.
F
T
ake hold of each side of the uprights of the
folded seat while tilting it gently for wards
and lift it.
F
P
lace the hooks of the front feet between
the two bars.
F
E
nsure that no object or feet are obstructing
the rear anchorage points and that the seat
belt is properly positioned and available.
F
F
old the seat backwards to fix its rear
anchorage feet.
F
O
perate the control to raise the backrest
into the initial position.
F
R
efit the head restraint. Do not place hard or heavy objects on
the backrests forming a table. They could
become dangerous projectiles in the event
of sharp braking or collision.
Following the various operations:
-
d
o not remove a head restraint without
stowing it; secure it inside the vehicle,
-
e
nsure that passengers can always
access the seat belts and fasten them
easily,
-
p
assengers must never take their seat
without adjusting and fastening their
seat belt.
-
a p
assenger seated in row 3 must
ensure that they do not obstruct the
row 2 seat anchorage points,
-
a p
assenger seated in row 3 must
not have the seat in front of them in
row 2 in the fully folded position; this
is in case the seat tips towards the
passenger unexpectedly, which could
cause injury.
Crew cab
Bench seat
The crew cab is made up of a bench seat for
3 persons, located in row 2, whose one-piece
backrest is integrated with the load stop grille.
Access to the rear seats is via the sliding side
d o o r.
Ease of use and comfort
Page 90 of 252

52
Seat modularity and configurations
The various operations must be carried
out when stationary.
5-seat configuration
Head restraints and seat
belts
The three seats are equipped with seat belts
with inertia reels. The seat belts of the side
seats are secured on the panels, while the
seat belt of the central seat is secured on the
backrest of the bench seat.
Each seat has a head restraint, screwed to the
load stop grille, which can be removed.
Do not place a head restraint inside the
vehicle without stowing it or securing it to a
support.
Do not drive with rear passengers without
having the head restraints screwed in place.
There is no need to assist, guide or retain
it by the arm that remains free during the
tilting movement.
The rear seat belt fittings are not designed
to secure the load. Use only the stowing
rings on the floor.
The crew cab bench seat is not suitable
for the installation of a child seat.
Ease of use and comfort
Page 98 of 252
60
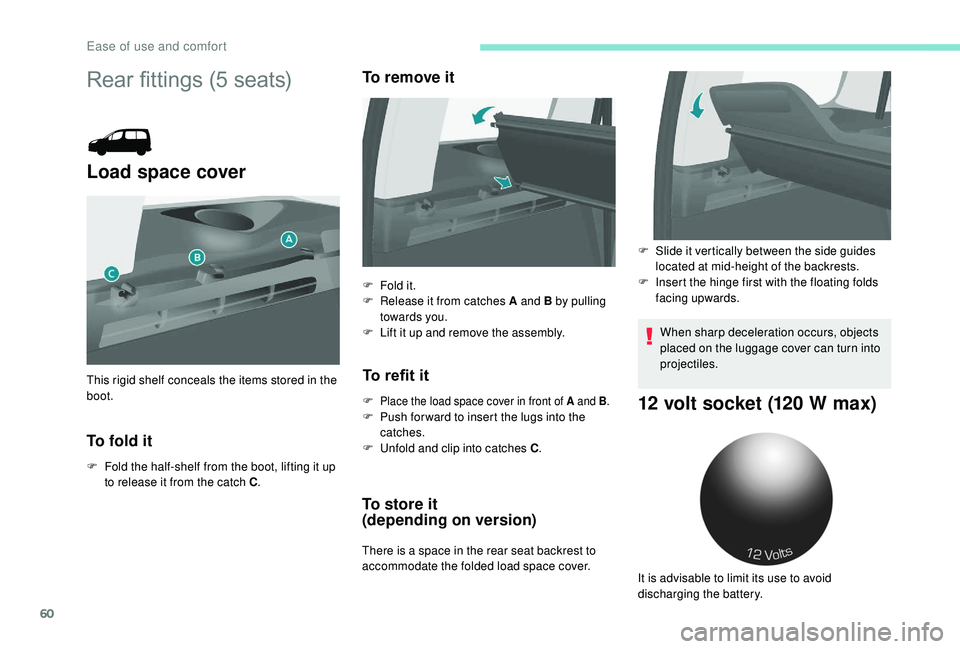
Rear fittings (5 seats)
Load space cover
To fold it
F Fold the half-shelf from the boot, lifting it up to release it from the catch C .
To remove it
To refit it
F Place the load space cover in front of A and B .F Push for ward to insert the lugs into the
catches.
F
U
nfold and clip into catches C .
To store it
(depending on version)
There is a space in the rear seat backrest to
accommodate the folded load space cover.
This rigid shelf conceals the items stored in the
boot.
F
F
old it.
F
R
elease it from catches A and B by pulling
towards you.
F
L
ift it up and remove the assembly.
When sharp deceleration occurs, objects
placed on the luggage cover can turn into
projectiles.
12 volt socket (120 W max)
F Slide it vertically between the side guides
located at mid-height of the backrests.
F
I
nsert the hinge first with the floating folds
facing upwards.
It is advisable to limit its use to avoid
discharging the battery.
Ease of use and comfort