2017 PEUGEOT PARTNER TEPEE ELECTRIC door lock
[x] Cancel search: door lockPage 87 of 252
49
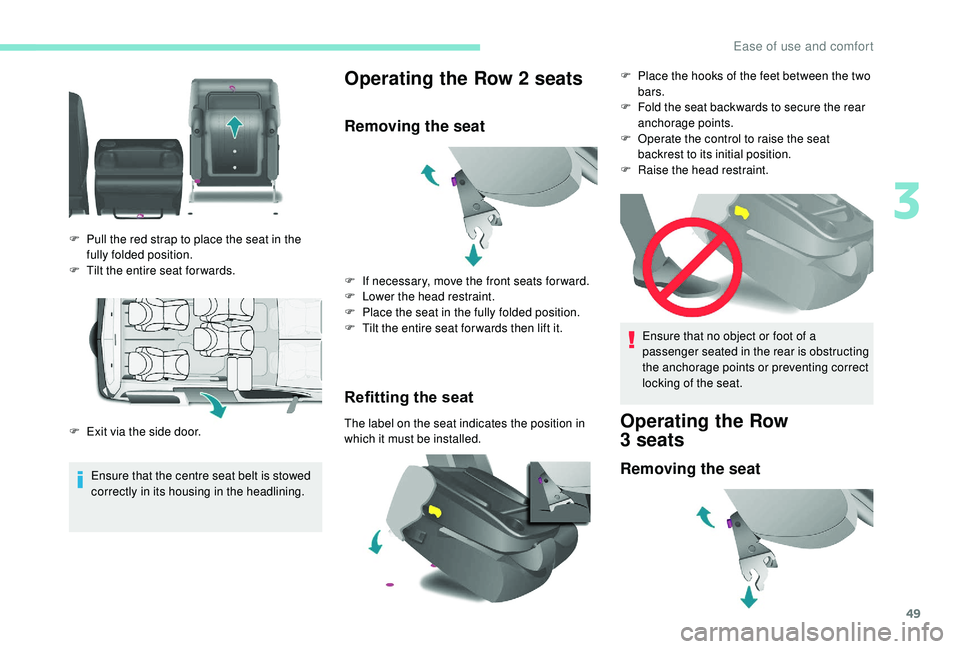
Ensure that the centre seat belt is stowed
correctly in its housing in the headlining.
Operating the Row 2 seats
Removing the seat
Refitting the seat
The label on the seat indicates the position in
which it must be installed.
F
P
ull the red strap to place the seat in the
fully folded position.
F
T
ilt the entire seat for wards.
F
E
xit via the side door. F
I
f necessary, move the front seats for ward.
F
L
ower the head restraint.
F
P
lace the seat in the fully folded position.
F
T
ilt the entire seat for wards then lift it.
Ensure that no object or foot of a
passenger seated in the rear is obstructing
the anchorage points or preventing correct
locking of the seat.Operating the Row
3 seats
Removing the seat
F Place the hooks of the feet between the two
bars.
F
F
old the seat backwards to secure the rear
anchorage points.
F
O
perate the control to raise the seat
backrest to its initial position.
F
Ra
ise the head restraint.
3
Ease of use and comfort
Page 97 of 252
59
Courtesy lamps
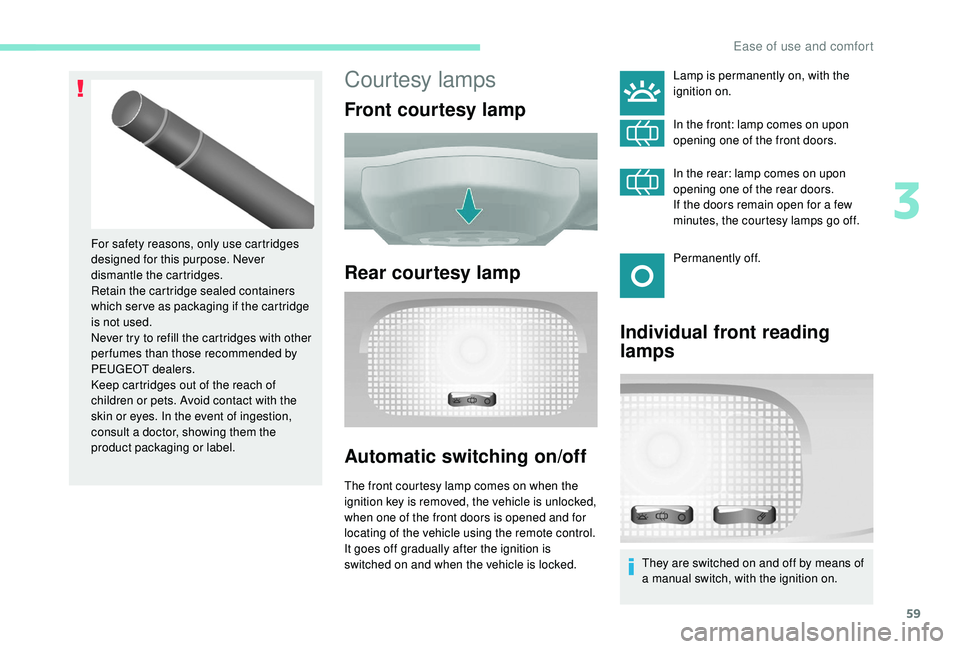
Front courtesy lamp
Rear courtesy lamp
Automatic switching on/off
The front courtesy lamp comes on when the
ignition key is removed, the vehicle is unlocked,
when one of the front doors is opened and for
locating of the vehicle using the remote control.
It goes off gradually after the ignition is
switched on and when the vehicle is locked.
For safety reasons, only use cartridges
designed for this purpose. Never
dismantle the cartridges.
Retain the cartridge sealed containers
which ser ve as packaging if the cartridge
is not used.
Never try to refill the cartridges with other
per fumes than those recommended by
PEUGEOT dealers.
Keep cartridges out of the reach of
children or pets. Avoid contact with the
skin or eyes. In the event of ingestion,
consult a doctor, showing them the
product packaging or label.
Individual front reading
lamps
Lamp is permanently on, with the
ignition on.
In the front: lamp comes on upon
opening one of the front doors.
In the rear: lamp comes on upon
opening one of the rear doors.
If the doors remain open for a few
minutes, the courtesy lamps go off.
Permanently off.
They are switched on and off by means of
a manual switch, with the ignition on.
3
Ease of use and comfort
Page 139 of 252
101
Instructions for child seats
The incorrect installation of a child seat in a
vehicle compromises the child's protection in
the event of an accident.
Ensure that there is no seat belt or seat belt
buckle under the child seat, as this could
destabilise it.
Remember to fasten the seat belts or the
child seat harnesses keeping the slack
relative to the child's body to a minimum,
even for short journeys.
When installing a child seat using the seat
belt, ensure that the seat belt is tightened
correctly on the child seat and that it secures
the child seat firmly on the seat of your
vehicle. If your passenger seat is adjustable,
move it for wards if necessary.
At the rear, always leave sufficient space
between the front seat and:
-
a r
ear ward facing child seat,
-
t
he feet of a child seated in a for ward
facing child seat.
To do this, move the front seat for wards
and, if necessary, move its backrest into the
upright position. When a child seat is installed in row 3, place
the backrests of the outer seats and the
centre seat of row 2 in the table position, or
remove these row 2 seats so that the child
seat or the child's legs do not touch the row
2 seats.
For optimal installation of the "forward facing"
child seat, check that its backrest is as close
as possible to the backrest of the vehicle
seat, if possible in contact with it.
The head restraint must be removed before
installing a child seat with a backrest on a
passenger seat.
Ensure that the head restraint is stored or
attached securely to prevent it from being
thrown around the vehicle in the event of
sharp braking.
Refit the head restraint once the child seat
has been removed.
Installing a booster (height adjuster)
The chest part of the seat belt must be
positioned on the child's shoulder without
touching the neck.
Ensure that the lap part of the seat belt
passes correctly over the child's thighs.
PEUGEOT recommends using a booster seat
with a backrest, equipped with a belt guide at
shoulder level.
As a safety precaution, do not leave:
-
a c
hild or children alone and unattended in
a vehicle,
-
a c
hild or an animal in a vehicle which
is exposed to the sun, with the windows
closed,
-
t
he keys within reach of children inside the
vehicle.
To prevent accidental opening of the doors,
use the "Child lock" system.
Take care not to open the rear windows by
more than one third.
To protect young children from the rays of the
sun, fit side blinds on the rear windows.
Children in front
The legislation on carrying children on the
front passenger seat is specific to each
country. Refer to the legislation in force in
your country.
Deactivate the passenger’s front airbag when
a rear ward facing child seat is installed on
the front passenger seat. Otherwise, the child
may be seriously injured or killed if the airbag
is deployed.
5
Safety
Page 140 of 252
102
Child lock
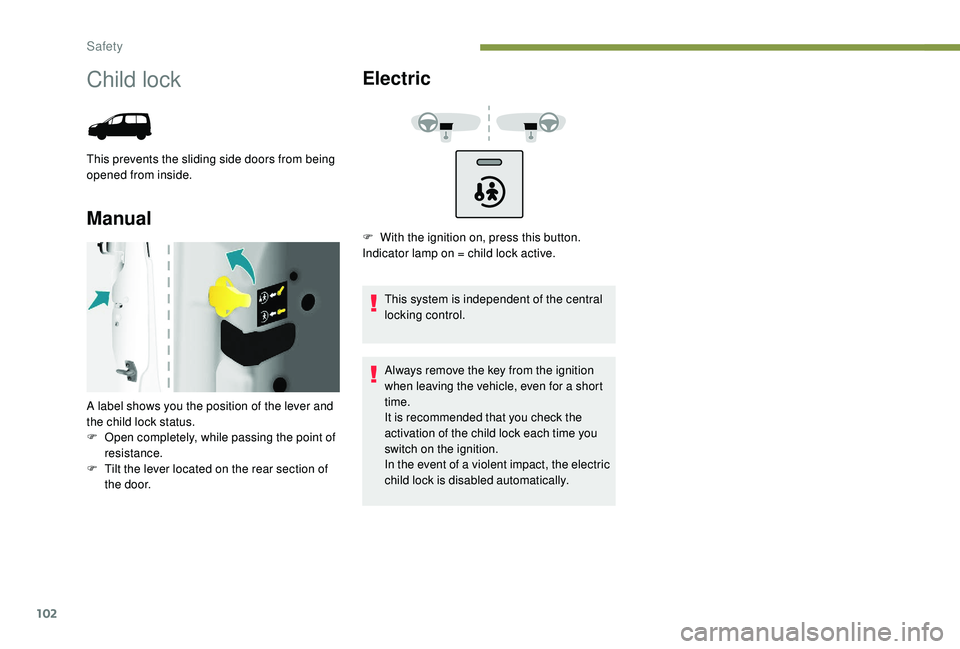
This prevents the sliding side doors from being
opened from inside.
ManualElectric
This system is independent of the central
locking control.
Always remove the key from the ignition
when leaving the vehicle, even for a short
time.
It is recommended that you check the
activation of the child lock each time you
switch on the ignition.
In the event of a violent impact, the electric
child lock is disabled automatically.
A label shows you the position of the lever and
the child lock status.
F
O
pen completely, while passing the point of
resistance.
F
T
ilt the lever located on the rear section of
the door. F
W
ith the ignition on, press this button.
Indicator lamp on = child lock active.
Safety
Page 142 of 252

104
In some cases of particularly demanding use
(when towing the maximum load on a steep
gradient in high temperatures), the engine
power is automatically limited. In such a case,
the air conditioning is automatically switched
off to increase the available engine power.F
I
f this warning lamp and the
STOP warning lamp come on,
stop the vehicle and switch off
the engine as soon as possible.
New vehicle
Do not pull a trailer before having driven at
least 620
miles (1,000 kilometres).
Braking
Towing a trailer increases the braking distance.
To avoid overheating of the brakes, the use of
engine braking is recommended.
Ty r e s
F Check the tyre pressures of the towing vehicle and of the trailer, observing the
recommended pressures.
Lighting
F Check the electrical lighting and signalling on the trailer and the headlamp beam height
of your vehicle. For more information on adjusting
the Headlamp beam
, refer to the
corresponding section.
The rear parking sensors will be
deactivated automatically to avoid the
audible signal if a genuine PEUGEOT
towbar is used.
Starting and stopping
Running and accessories position.
To unlock the steering, turn the steering wheel
gently while turning the key, without forcing. In
this position, certain accessories can be used. Starting position.
The starter is operated. the engine turns over,
release the key.
STOP position
: anti-theft.
The ignition is off. Turn the steering wheel until
the steering column locks. Remove the key.
If this warning lamp comes on, a door
or the bonnet is not closed correctly.
Please check!Diesel engines
If the temperature is high enough,
the warning lamp comes on for
less than a second, you can start
without waiting.
In cold weather, wait for this warning lamp to go
off then operate the starter (starting position)
until the engine starts.
When switching off the ignition, let the
engine run for a few seconds to allow the
turbocharger (Diesel engine) to return to
idle.
Do not press the accelerator when
switching off the ignition.
There is no need to engage a gear after
parking the vehicle.
Driving
Page 164 of 252
126
Fuel
Low fuel level
When the low fuel level is reached
this warning lamp comes on.
When it first comes on, around 8
litres remain
in the tank, according to your driving style and
your engine.
You must refuel as soon as possible to avoid
running out.
Never continue to drive until you run out of fuel,
as this could damage the emission control and
injection systems.
Filling
The fuel tank must be filled with the engine
off. When filling the fuel tank, do not continue after
the 3
rd cut-off of the nozzle. This could cause
malfunctions.
The capacity of the tank is approximately
60
litres (53 litres for BlueHDi Diesel versions).
F
A
fter filling the fuel tank, lock the cap and
close the flap.
When refilling, a mechanical
system prevents opening of
the left side door. Ensure
that nobody attempts to slide
open this door while the fuel
flap is open.
After closing the flap, the
sliding side door can become
blocked. Push the door to
close it and then open it.
When refilling, ensure that
nobody attempts to open the
sliding side door while the
fuel filler flap is open.
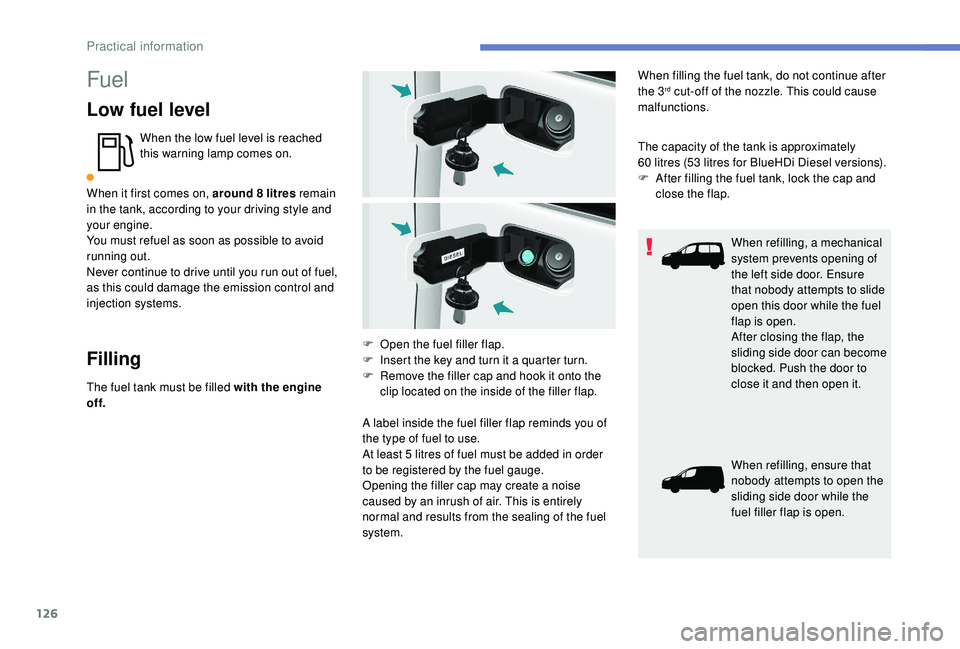
F
O
pen the fuel filler flap.
F
I
nsert the key and turn it a quarter turn.
F
R
emove the filler cap and hook it onto the
clip located on the inside of the filler flap.
A label inside the fuel filler flap reminds you of
the type of fuel to use.
At least 5
litres of fuel must be added in order
to be registered by the fuel gauge.
Opening the filler cap may create a noise
caused by an inrush of air. This is entirely
normal and results from the sealing of the fuel
system.
Practical information
Page 180 of 252
142
Procedure
Before topping up, ensure that the vehicle is
parked on a flat and level sur face.
In wintry conditions, ensure that the
temperature of the vehicle is above -11°C.
Otherwise the AdBlue
® may be frozen and
so cannot be poured into its tank. Park your
vehicle in a warmer area for a few hours to
allow the top-up to be carried out. F
O
btain an AdBlue
® container or bottle. After
first checking the use-by date, read the
instructions on the label carefully before
pouring the contents of the container or
bottle into your vehicle's AdBlue tank.
Or
F
I
nsert the AdBlue
® pump nozzle and refill
the tank until the nozzle stops automatically.
Important:
-
T
o avoid over flowing the AdBlue
® tank,
i
t is recommended:
•
T
o top up between 10 and 13
litres
using AdBlue
® containers or bottles.
Or
•
T
hat you stop after the nozzle’s first
automatic cut-out if you are refilling
at a ser vice station.
-
I
f your vehicle's AdBlue
® tank is
completely empty – which is confirmed
by the alert messages and the
impossibility of starting the engine –
you must add at least 5
litres. Impor tant: when topping up after
a breakdown due to running out
of AdBlue,
you must wait for at least
5 minutes before switching on the
ignition, opening the driver's door,
unlocking the vehicle or inser ting the
key in the switch.
Switch on the ignition, then after a
minimum of 10 seconds, start the engine.
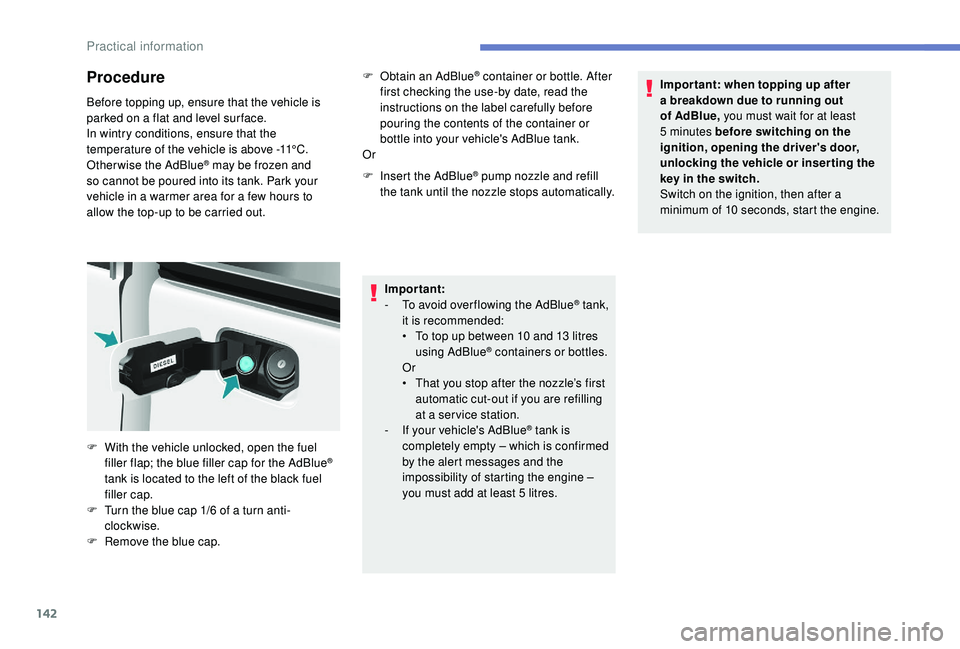
F
W
ith the vehicle unlocked, open the fuel
filler flap; the blue filler cap for the AdBlue
®
tank is located to the left of the black fuel
filler cap.
F
T
urn the blue cap 1/6 of a turn anti-
clockwise.
F
R
emove the blue cap.
Practical information
Page 191 of 252
153
When removing the lamp unit:
F w ith tailgate, pull the lamp unit towards the
centre of the vehicle,
F
w
ith side-hinged doors, pull the lamp unit
towards you.
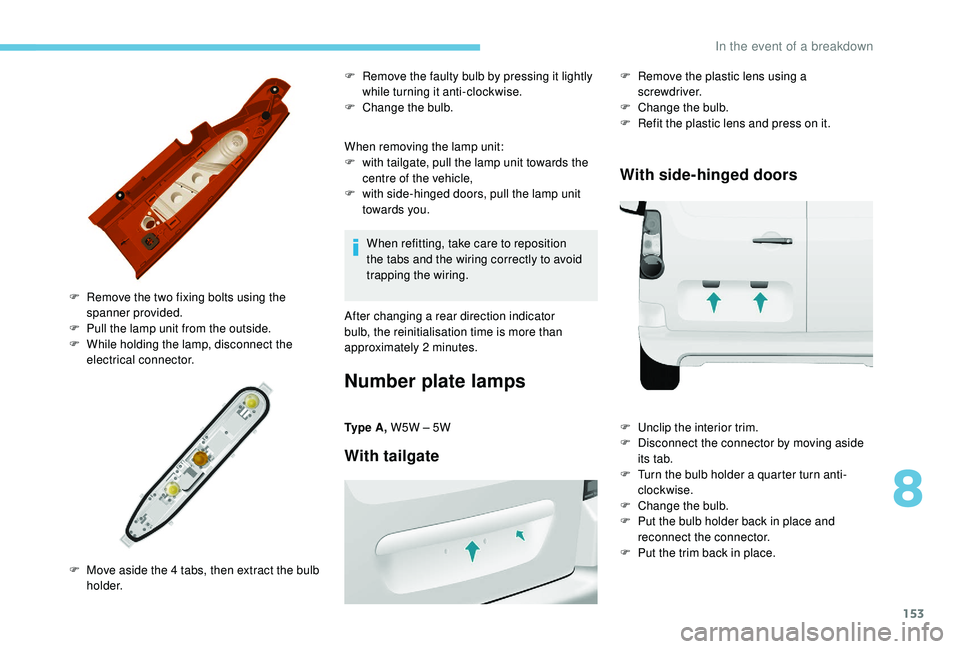
F
R
emove the two fixing bolts using the
spanner provided.
F
P
ull the lamp unit from the outside.
F
W
hile holding the lamp, disconnect the
electrical connector.
F
M
ove aside the 4 tabs, then extract the bulb
h o l d e r. F
R
emove the faulty bulb by pressing it lightly
while turning it anti-clockwise.
F
C
hange the bulb.
When refitting, take care to reposition
the tabs and the wiring correctly to avoid
trapping the wiring.
After changing a rear direction indicator
bulb, the reinitialisation time is more than
approximately 2
minutes.
Number plate lamps
Ty p e A , W5W – 5W
With tailgate
F Remove the plastic lens using a
screwdriver.
F
C
hange the bulb.
F
R
efit the plastic lens and press on it.
With side-hinged doors
F Unclip the interior trim.
F D isconnect the connector by moving aside
its tab.
F
T
urn the bulb holder a quarter turn anti-
clockwise.
F
C
hange the bulb.
F
P
ut the bulb holder back in place and
reconnect the connector.
F
P
ut the trim back in place.
8
In the event of a breakdown