2017 MERCEDES-BENZ G-Class display
[x] Cancel search: displayPage 115 of 286
Towingatrailer
XDriveint he middl eofthe engine spee drange
on uphill gradients.
XVehicle sexcept Mercedes ‑AMG vehicles:
limit the shift range to 3or 2depending on the
uphill or downhil lgradient (
Ypage 114).T his
also applie sifcruisecontrol, the spee dlim iter
or DISTRONICP LUSisa ctivated.
Mercedes ‑AM Gvehicles: shift down to shift
range 3or 2depending on the uphill or down-
hill gradient (
Ypage 114).T hisa lsoa pplies if
cruis econtrol, the spee dlim ite ro r
DISTRONICP LUSisa ctivated.
XShift the transferc asei nto low-rang edriving
position LOWR ANGE on extreme uphill gra-
dients or stee pdownhil lgradients
(
Ypage 146).
Program selecto rbutton
General notes
The programs electorbutton allows yo uto
choose between drive programs with different
drivin gcharacteristics.
On Mercedes-AMG vehicles, drive program Eis
calle ddrive program C.
The automatic transmission switches to auto-
matic drive program E(driv eprogram Cin
Mercedes-AMG vehicles) each time the engine
is started.
Onlyc hange froma utomatic drive program Cor
S to manua ldrive program Mwhen the vehicl eis
stationary.
Drive programs available forv ehicles
except Mercedes-AMG vehicles
E EconomyComfortable, economical
driving
S SportSporty drivin gstyle
MManualManua lgea rs hifting
Drive programs available for
Mercedes ‑AM Gvehicles
CControlled
EfficiencyComfortable, economical
driving
S SportSporty drivin gstyle
MManualManua lgea rs hifting
For furtheri nformationonthe automatic drive
program, see (Ypage 114).
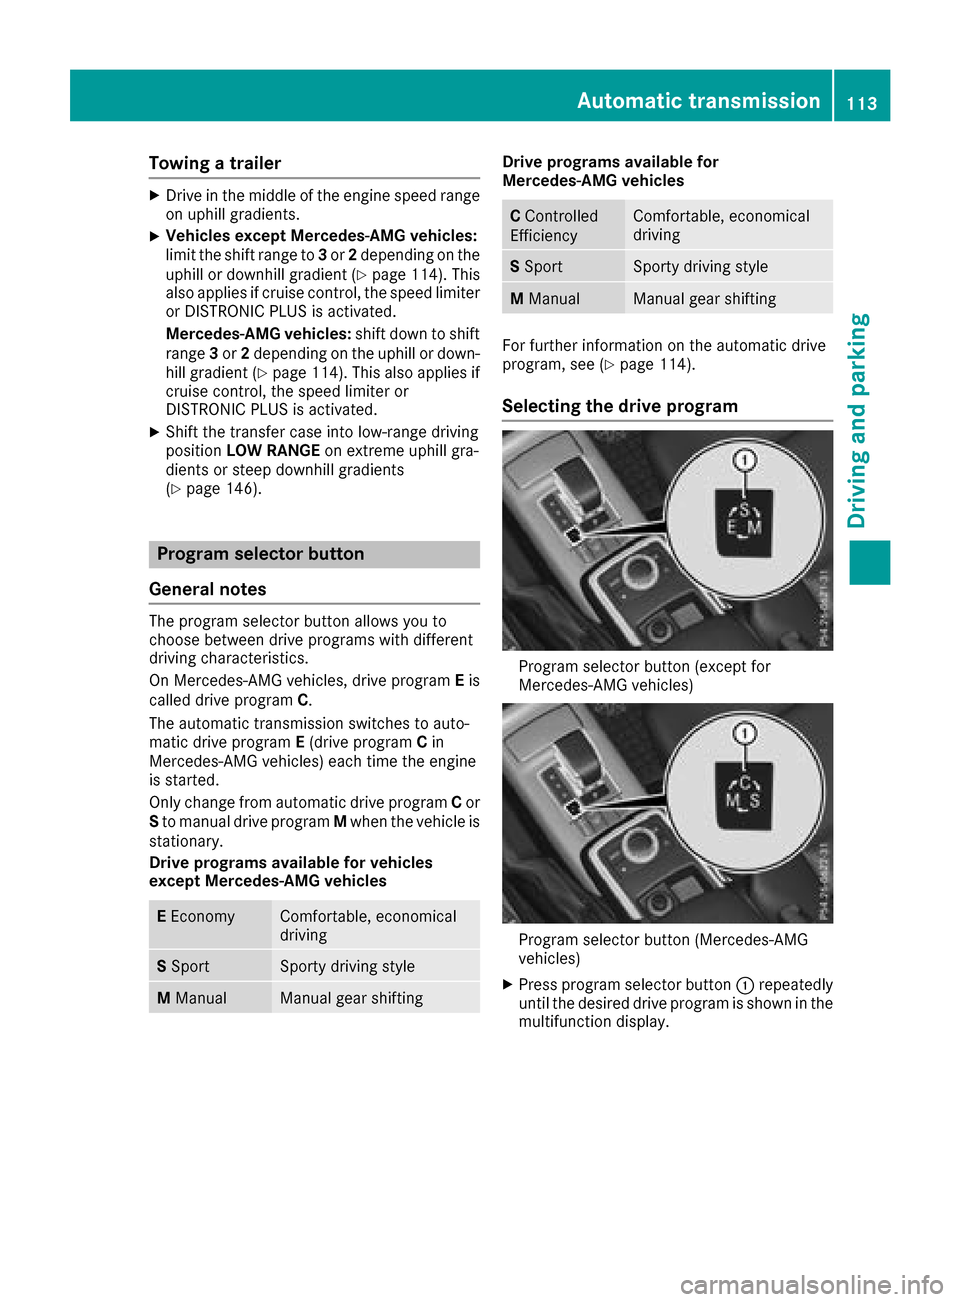
Selecting the driv eprogram
Programs electorbutton (excep tfor
Mercedes-AMG vehicles)
Programs electorbutton (Mercedes-AMG
vehicles)
XPress programs electorbutton :repeatedly
unti lthe desired drive programiss hown in the
multifunctio ndisplay .
Automati ctransmission113
Driving an dparking
Z
Page 116 of 286
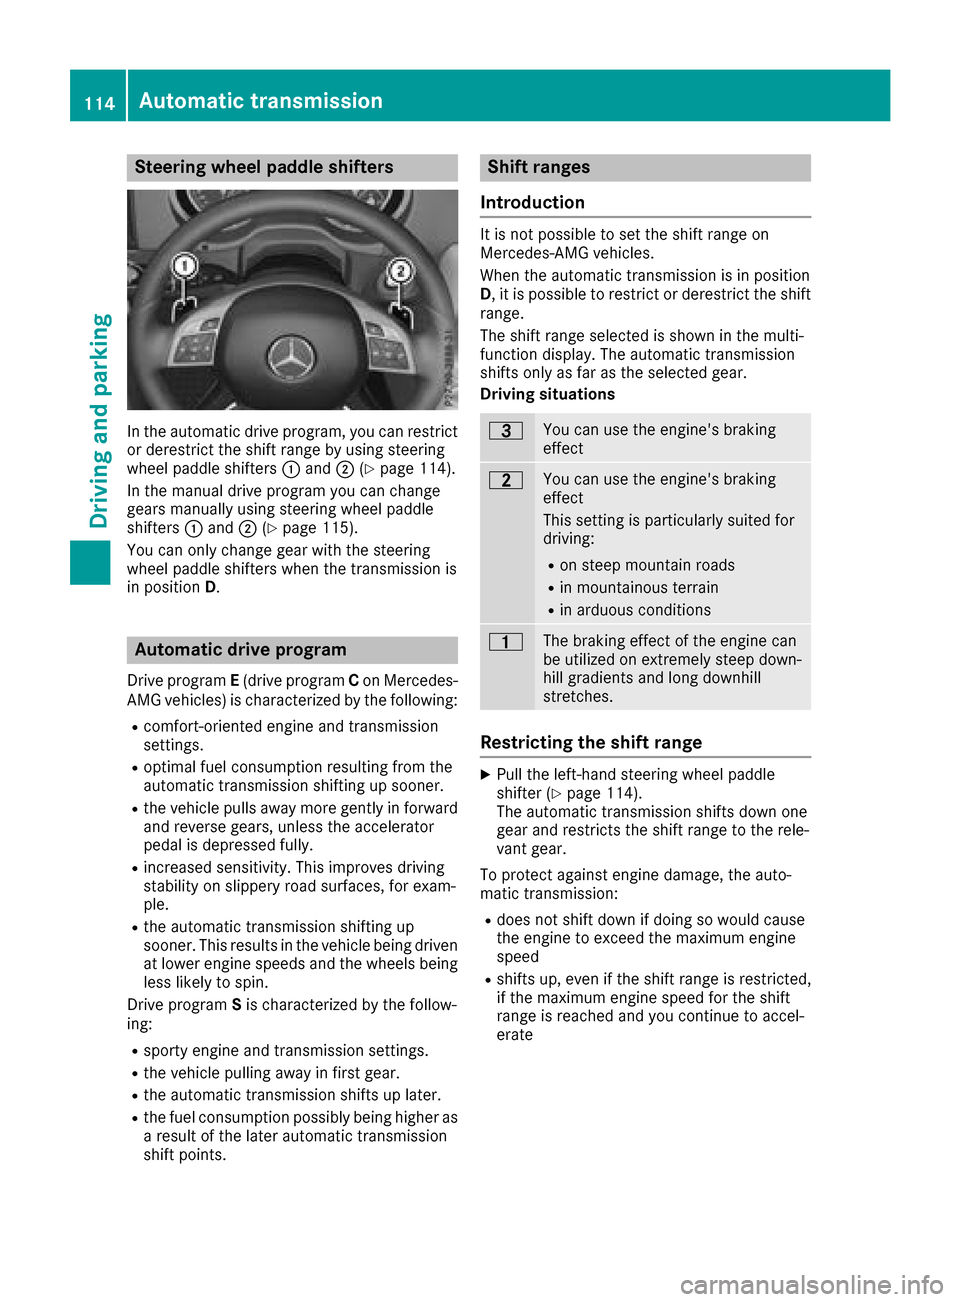
Steering wheel paddle shifters
In the automatic drive program, you can restrict
or derestrict the shift range by using steering
wheel paddle shifters:and ;(
Ypage 114).
In the manual drive program you can change
gears manually using steering wheel paddle
shifters :and ;(
Ypage 115).
You can only change gear with the steering
wheel paddle shifters when the transmission is
in position D.
Automatic drive program
Drive program E(drive program Con Mercedes-
AMG vehicles) is characterized by the following:
Rcomfort-oriented engine and transmission
settings.
Roptimal fuel consumption resulting from the
automatic transmission shifting up sooner.
Rthe vehicle pulls away more gently in forward
and reverse gears, unless the accelerator
pedal is depressed fully.
Rincreased sensitivity. This improves driving
stability on slippery road surfaces, for exam-
ple.
Rthe automatic transmission shifting up
sooner. This results in the vehicle being driven
at lower engine speeds and the wheels being
less likely to spin.
Drive program Sis characterized by the follow-
ing:
Rsporty engine and transmission settings.
Rthe vehicle pulling away in first gear.
Rthe automatic transmission shifts up later.
Rthe fuel consumption possibly being higher as
ar esult of the later automatic transmission
shift points.
Shift ranges
Introduction
It is not possible to set the shift range on
Mercedes-AMG vehicles.
When the automatic transmission is in position
D,itisp ossible to restrict or derestrict the shift
range.
The shift range selected is shown in the multi-
function display.T he automatic transmission
shifts only as far as the selected gear.
Driving situations
=You can use the engine's braking
effect
5You can use the engine's braking
effect
This settingisp articularly suited for
driving:
Ron steep mountain roads
Rin mountainous terrain
Rin arduous conditions
4The braking effect of the engine can
be utilized on extremely steep down-
hill gradients and long downhill
stretches.
Restricting the shift range
XPull the left-hand steering wheel paddle
shifter (Ypage 114).
The automatic transmission shifts down one
gear and restrictst he shift range to the rele-
vant gear.
To protect against engine damage, the auto-
matic transmission:
Rdoes not shift down if doing so would cause
the engine to exceed the maximum engine
speed
Rshifts up, even if the shift range is restricted,
if the maximum engine speed for the shift
range is reached and you continue to accel-
erate
114Automatic transmission
Driving and parking
Page 118 of 286
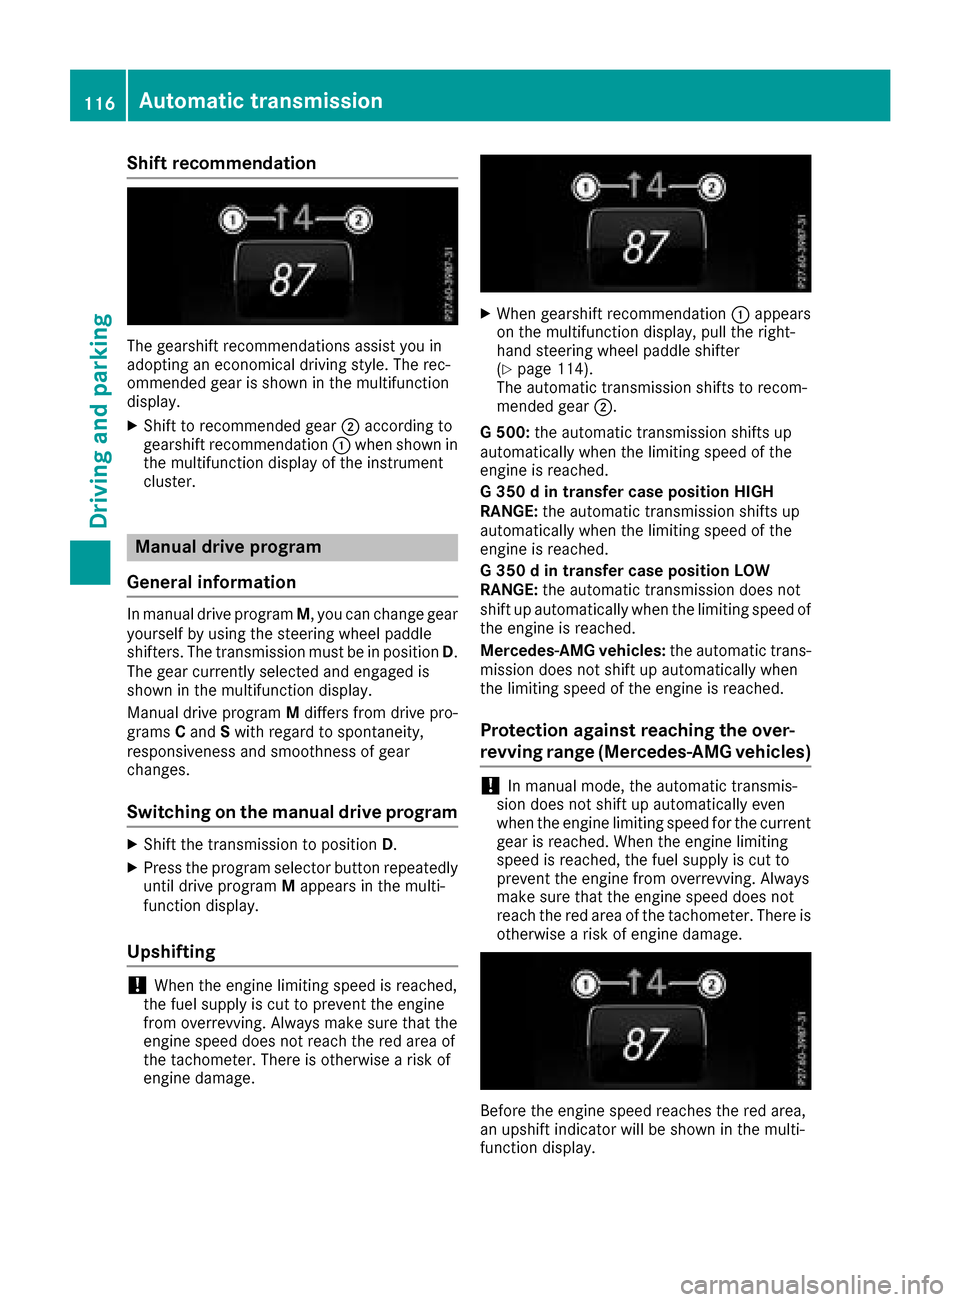
Shift recommendation
The gearshift recommendations assist you in
adopting an economical driving style. The rec-
ommended gear is shown in the multifunction
display.
XShift to recommended gear;according to
gearshift recommendation :when shown in
the multifunction display of the instrument
cluster.
Manual drive program
General information
In manual drive program M,you can change gear
yourself by using the steering wheel paddle
shifters. The transmission must be in position D.
The gear currently selected and engaged is
shown in the multifunction display.
Manual drive program Mdiffers from drive pro-
grams Cand Swith regard to spontaneity,
responsiveness and smoothness of gear
changes.
Switching on the manuald rive program
XShift the transmission to position D.
XPress the program selector button repeatedly
until drive program Mappears in the multi-
function display.
Upshifting
!When the engine limiting speed is reached,
the fuel supply is cut to prevent the engine
from overrevving. Always make sure that the
engine speed does not reach the red area of
the tachometer. There is otherwise arisk of
engine damage.
XWhen gearshift recommendation :appears
on the multifunction display,p ull the right-
hand steering wheel paddle shifter
(
Ypage 114).
The automatic transmission shifts to recom-
mended gear ;.
G5 00: the automatic transmission shifts up
automatically when the limiting speed of the
engine is reached.
G3 50dint ransfer case position HIGH
RANGE: the automatic transmission shifts up
automatically when the limiting speed of the
engine is reached.
G3 50dint ransfer case position LOW
RANGE: the automatic transmission does not
shift up automatically when the limiting speed of
the engine is reached.
Mercedes-AMG vehicles: the automatic trans-
mission does not shift up automatically when
the limiting speed of the engine is reached.
Protection against reaching the over-
revving range (Mercedes-AMG vehicles)
!In manual mode, the automatic transmis-
sion does not shift up automatically even
when the engine limiting speed for the current
gear is reached. When the engine limiting
speed is reached, the fuel supply is cut to
prevent the engine from overrevving. Always
make sure that the engine speed does not
reach the red area of the tachometer. There is
otherwise arisk of engine damage.
Before the engine speed reaches the red area,
an upshift indicator will be shown in the multi-
function display.
116Automatic transmission
Driving and parking
Page 119 of 286
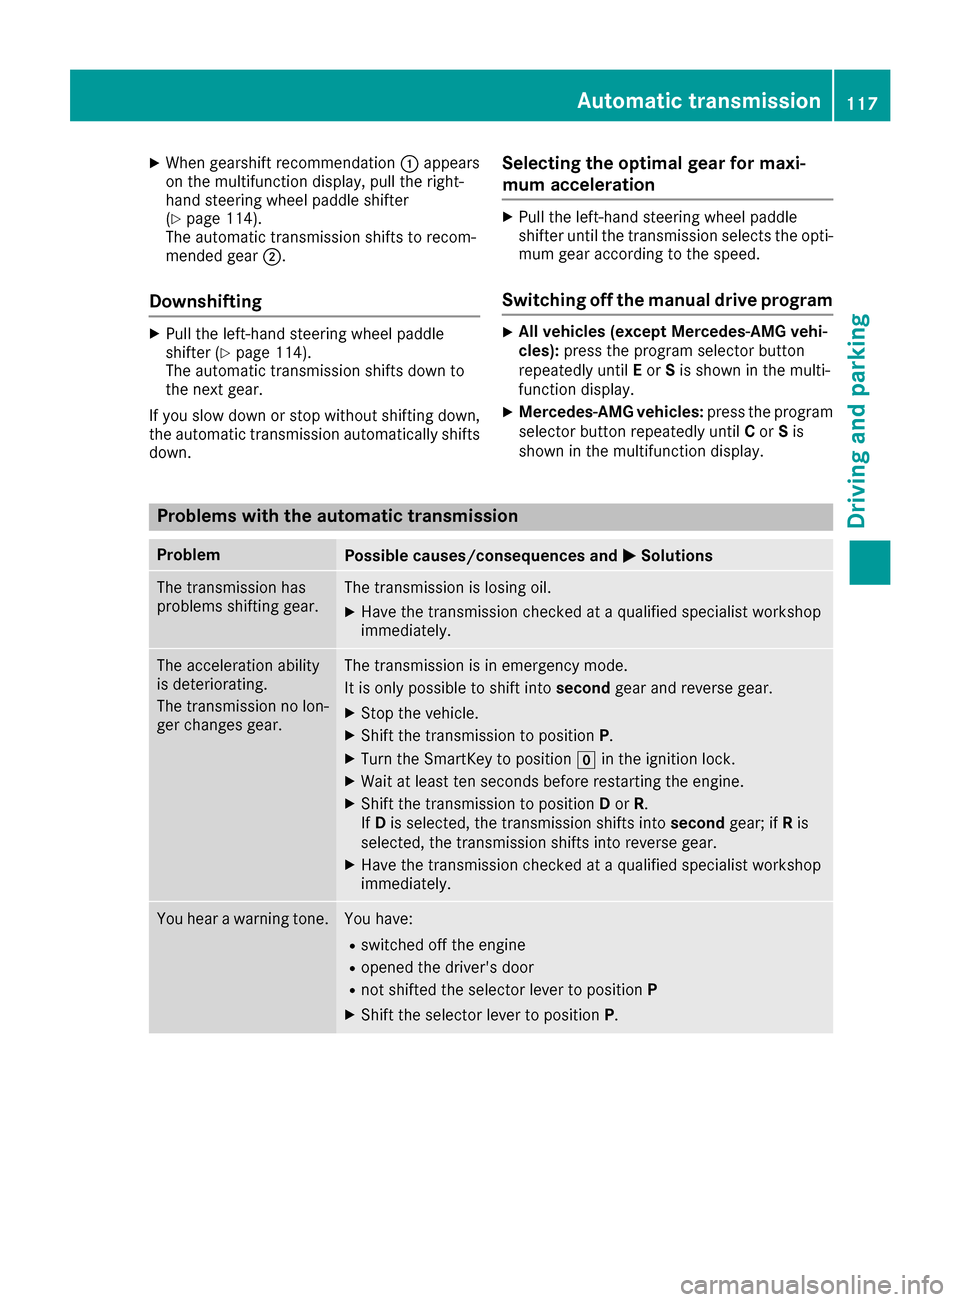
XWhen gearshift recommendation:appears
on the multifunction display, pull the right-
hand steerin gwheel paddle shifter
(
Ypage 114).
The automatic transmission shifts to recom-
mended gear ;.
Downshifting
XPull the left-hand steerin gwheel paddle
shifter (Ypage 114).
The automatic transmission shifts down to
the next gear.
If you slow down or stop without shiftin gdown,
the automatic transmission automatically shifts
down.
Selecting the optimal gear for maxi-
mum acceleration
XPull the left-hand steerin gwheel paddle
shifter until the transmission selects the opti-
mum gear accordingtot he speed.
Switching off the manual drive program
XAll vehicles (except Mercedes ‑AMG vehi-
cles): press the program selector button
repeatedly until Eor Sis shown in the multi-
function display.
XMercedes‑AMG vehicles: press the program
selector button repeatedly until Cor Sis
shown in the multifunction display.
Problems with the automatic transmission
ProblemPossible causes/consequences and MSolutions
The transmission has
problems shiftinggear.The transmission is losing oil.
XHave the transmission checked at aqualified specialist workshop
immediately.
The acceleration ability
is deteriorating.
The transmission no lon-
ger changes gear.The transmission is in emergency mode.
It is only possible to shift into secondgear and reverse gear.
XStop the vehicle.
XShift the transmission to position P.
XTurn the SmartKey to positiongin the ignition lock.
XWait at least ten seconds before restarting the engine.
XShift the transmission to position Dor R.
If D is selected, the transmission shifts into secondgear; ifRis
selected, the transmission shifts into reverse gear.
XHave the transmission checked at aqualified specialist workshop
immediately.
You hear awarning tone.You have:
Rswitched off the engine
Ropened the driver's door
Rnot shifted the selector lever to position P
XShift the selector lever to positionP.
Automatic transmission117
Driving and parking
Z
Page 120 of 286
Refueling
Important safety notes
GWARNING
Fue lish ighly flammable. If yo uhandlef uel
incorrectly, there is ariskoff ire and explo-
sion.
Yo um usta void fire ,ope nf lames ,creating
sparks and smoking. Switch off the engine
and ,ifa pplicable, the auxiliary heating before
refueling.
GWARNING
Fue lisp oisonous and hazardoustoh ealth.
There is ariskofi njury.
Yo um ustm ake sure that fue ldoe sn ot come
into contact with your skin, eyes or clothing
and that it is not swallowed. Do not inhale fuel
vapors. Keepf uelawa yfrom children.
If yo uoro thers come into contact with fuel,
observe the following:
RWash away fue lfrom skin immediately
using soapa nd water.
RIf fuelcomesi nto contact with your eyes,
immediately rins ethem thoroughly with
clean water. Seek medica lassistance with-
outd elay.
RIf fuelisswallowed, seekm edicalassis-
tance withoutd elay.Don ot induce vomit-
ing.
RImmediately change outofc lothing which
hasc ome into contact with fuel.
GWARNING
Electrostatic buildu pcan create sparks and
ignite fue lvapors. There is ariskoff ire and
explosion.
Alway stouch the vehicl ebodyb efore opening
the fue lfille rflaport ouching the fue lpum p
nozzle .Any existing electrostati cbuildup is
thereby discharged.
Do not get into the vehicl eagain during the refu-
eling process .otherwise electrostati ccharge
could buil dupagain.
!Do not us ediese ltor efuel vehicles with a
gasoline engine. Do not switch on the ignition
if yo uaccidentall yrefuel with the wrong fuel.
Otherwise, the fue lwille nter the fue lsys tem.
Even small amounts of the wrong fue lcould
resul tind amagetot he fue lsystem and the
engine. Notify aquali fied specialist workshop
and have the fue ltank and fue llin es drained
completely.
!Overfilling the fue ltank could damag ethe
fue lsystem.
!Take care not to spill any fue lonpainted
surfaces. Yo ucould otherwise damag ethe
paintwork.
!Use afilter when adding fue lfrom afue lcan.
The fue llin es and/or the fue linjection system
could otherwise be blocked by particles from
the fue lcan.
If yo uoverfil lthe fue ltank, fue lcould spray out
when the fue lpum pnozzle is removed.
If yo uoverfil lthe fue ltank, pressure may build
up in the fue ltank. Thisc ould ca
use fue
ltospray
outw hent he fue lpum pnozzle is removed.
There is ariskofi njury. The fue ltank is ful lwhen
the fue lpum pnozzle firs tswitches off. End the
refueling process.
For further information on fue land fue lquali ty
(
Ypage 276).
Refueling
General information
Paya ttention to the important safety notes
(Ypage 118).
If yo uunlock/lock the vehicl efrom the outside,
the fue lfille rflapa lsou nlocks/locks.
The position of the fue lfille rcap is displayed in
the instrument cluster 8.The arrow next to
the filling pump indicates the sid eofthe vehicle.
118Refueling
Driving and parking
Page 121 of 286

Opening the fuel filler flap
:To open the fuel filler flap
;Tire pressure table
=Instruction label for fuel type to be refueled
?To insert the fuel filler cap
XSwitchthe engine off.
iWhen the engine is running and the fuel filler
flap is open, the yellow reserve fuel warning
lamp and the =(USA only) or ;(Can-
ada only) Check Engine warning lamp may
light up.
Further information about warning and indi-
cator lamps in the instrument cluster can be
found in the Digital Operator's Manual.
XRemove the SmartKey from the ignition lock.
XTurn the fuel filler cap counterclockwise and
remove it.
XInser tthe fuel filler cap into the holder
bracket on the inside of filler flap ?.
XCompletely insert the filler neck of the fuel
pump nozzle into the tank and refuel.
XOnly fill the tank until the pump nozzle
switches off.
Do not add any more fuel after the pump stops
filling for the first time. Otherwise, fuel may leak
out.
Closing the fuel filler flap
XReplace the cap on the filler neck and turn
clockwise until it engages audibly.
XClose the fuel filler flap.
Close the fuel filler flap before lockin gthe vehi-
cle. If you are driving with the fuel filler cap open, the
8
reservef uel warning lamp flashes. Ames-
sage appears in the multifunction display
(
Ypage 179).
Fuel filler flap emergency release
The emergency release is located in the cargo
compartment ,onthe right-hand side when
viewed in the direction of travel, behind the rear
panel trim.
The vehicle walls in the area around the emer-
genc yrelease have sharp edges. There is arisk
of injury. Avoid contact with the edges on the
inside of the vehicle body.
XOpen the rear door.
XPull off edge protection ;.
XRemove rear wall trim:.
XPull emergency release =in the direction of
the arrow.
The fuel filler flap is unlocked.
XOpen the fuel filler flap (Ypage 119).
Refueling119
Driving and parking
Z
Page 126 of 286

Heavy and light loads
GWARNING
If you rest you rfoot on the brake pedalw hile
driving, the braking system can overheat. This increases the stopping distance and can even
caus ethe braking system to fail .There is a
risk of an accident.
Never use the brake pedalasaf ootrest. Never
depress the brake pedala nd the accelerator
pedalatt he same time.
!Depressing the brake pedalc onstantly
results in excessive and premature weart o
the brake pads.
If the brakes have been subjected to aheavy
load, do not stop the vehiclei mmediately. Drive
on for ashort while. This allows the airflow to
cool the brakes more quickly.
Wet roads
If driving in heavy rain for aprolonged period of
time without braking, there may be adelayed
reactio nfrom the brakes when braking for the
first time. This may als ooccur after the vehicle
has been washed.
You have to depress the brake pedalm ore
firmly.M aintainagreater distance from the
vehicleinf ront.
After driving on awet road or having the vehicle
washed, brake firmly while paying attention to
the traffic conditions. This wil lwarmupt he
brake discs, thereby drying them more quickly
and protecting them against corrosion.
Limited braking performance on salt-
treated roads
If you drive on salted roads, alayer of sal tresi-
due may form on the brake discs and brake
pads. This can result in asignificantly longer
braking distance.
RIn order to prevent any sal tbuild-up, apply the
brakes occasionall ywhile paying attention to
the traffic conditions.
RCarefully depress the brake pedala nd the
beginning and end of ajourney.
RMaintain agreater distance to the vehicle
ahead.
Servicing the brakes
!The brake flui dlevelm ay be too low,i f:
Rif the red brake warning lamp lights up in
the instrument cluste rand
Ryou hearaw arning tone while the engine is
running
Observe additiona lwarning messages in the
multifunction display.
The brake flui dlevelm ay be too low due to
brake pad wearorl eaking brake lines.
Have the brake system checked immediately. Consult aqualified specialist workshopt o
arrange this.
!If the brake warning lamp lights up in the
instrument cluste rand you hearaw arning
tone even though the parking brake has been
released ,the brake flui dlevelm ay be too low.
Observe additionalw arning messages in the
multifunction display.
The brake flui dlevelm ay be too low due to
brake pad wearorl eaking brake lines.
Have the brake system checked immediately.
This work should be carrie dout at aqualified
specialist workshop.
!Af unction or performance test should only
be carrie dout on a2-axle dynamometer. If
you wis htooperate the vehicleons uch a
dynamometer, please consul taqualified spe-
cialist workshopina dvance. You couldoth-
erwise damage the drive train or the brake
system.
!The ESP®system operates automatically.I f
the parking brake is tested on abrake dyna-
mometer (for amaximu moften seconds),t he
engine and the ignitio nmust be switched off.
Braking triggereda utomatically by ESP
®may
otherwise caus esevere damage to the brake
system.
All checks and maintenance work on the brake
system must be carrie dout at aqualified spe-
cialist workshop.
Have brake pad sinstalled and brake fluid
replaced at aqualified specialist workshop.
If the brake system has only been subject to
moderate loads, you shoul
d test the functional-
ity of you rbrakes at regular intervals.
Informatio nonBAS (Brake Assist) (
Ypage5 8).
124Driving tips
Driving and parking
Page 130 of 286

Familiarize yourself with the characteristics of
your vehicle and the gearshift operation before
driving through difficult terrain.
The following driving systems are specially
adapted to off-roadd riving:
R4ETS (Ypage 59)
ROff-roadABS (Ypage 58)
RTransfer case (Ypage 145)
RDifferentia llocks (Ypage 120)
Observe the following notes:
RStop the vehicle before yo udrive off-roada nd,
if necessary ,shift the transfe rcase to the off-
roadd riving position LOW RANGE
(
Ypage 146).
REngag ethe differential locks if necessary
(Ypage 148).
iABS, 4ETS, ESP®and BAS are deactivated
while the differential locks are engaged.T his
allow sthe front wheels to lock briefly, so that
these can dig into aloose surface .However,
please note that locke dwheels skid and can
no longer steer.
RCheck that items of luggage and loads are
stowed safely and are well secured
(
Ypage 209).
RTo avoid damaging the vehicle, make sure
there is always sufficient ground clearance.
RAlway skeep the engine running and in gear
whe ndriving on adownhil lgradient.
RAlway skeep the engine running and in gear
whe ndriving downani ncline.
RDrive slowlyand evenly, if necessary at a
walking pace.
REnsure that the wheels are in contact with the
ground at al ltimes.
RDrive with extreme care on unfamilia roff-road
routes where visibility is poor. For safety rea-
sons, get ou
tofthe vehicle firs tand survey
the off-roadr oute.
RCheck the depth of water before fording rivers
and streams.
RWatch outfor obstacles.
RAlwayskeep the doors, reard oor, sidewin-
dowsa nd the sliding sunroof closed while the
vehicle is in motion.
RSwitch off cruise control.
RDo not deviate from marke droutes.
RAdap tyou rspeed to the terrain. The rougher,
steeper or more ruts on the terrain, the slower
your speed should be.
RDo not jump with the vehicle. as this will inter-
rup tthe vehicle' spropulsion.
RAvoid hig hengine speeds .Drive at appropri-
ate engine speeds (maximu m3,000 rpm).
RDo not shift the automatic transmission to
position N.
RAlwayscheck the vehicle for damag eafteroff-
roadd riving.
Do not use the HOLD function whe ndriving off-
road, on steep uphil lordownhil lgradients or on
slippery or loose surfaces. The HOLD function
cannot holdt he vehicle on such surfaces.
You can obtain further information aboutr etro-
fitting specia lall-terrain tires from aquali fied
specialist workshop.
Checklist before driving off-road
!If the engine oil warning lamp lights up while
the vehicle is in motion, stop the vehicle in a
saf ep lace as soona spossible. Check the
engine oil level. The engine oil warning lamp
warning mus tnot be ignored.C ontinuing the
journey while the symbol is displaye dcould
lea dtoe ngine damage.
XEngin eoillevel: check the engine oil level
and ad doil if necessary.
Whend riving on steep gradients, the engine
oil level mus tbes ufficiently hig htoensure a
correct oil supply in the vehicle.
XTire-changing too lkit: check that the jack is
working and make sur eyou hav ethe lug
wrench, arobust tow cable and afolding
spade in the vehicle.
XWheels and tires: check the tire treadd epth
and tire pressure.
XCheck for damag eand remove any foreign
objects, e.g. small stones,f rom the wheels/
tires.
XReplace any missing valve caps.
XReplace dente dordamaged wheels .Also
check the spare wheel.
XRims: dentedorbent rims can result in aloss
of tire pressure and damag ethe tire bead.
Befored riving off-road, check the wheels and
replace them if necessary.
128Drivin gtips
Drivin gand parking