2017 MERCEDES-BENZ G-Class display
[x] Cancel search: displayPage 34 of 286

Instrumentcluster
FunctionPag e
:Speedometer wit hsegments157
Warning and indicator lamps:
÷ ESP®19 1
å ESP®OF F191
! ABS190
J Brakes(yellow)18 9
L Low-beam headlamps85
TParking lamp s86
KHigh-beam headlamps87
Brakes(red)18 9
$ USAo nly
J Canad aonly
Parking brak e193
F USAo nly
J Canad aonly
· Distanc ewarning196
;#! Turn signals87
=Multifunction display159
FunctionPag e
?Tachometer157
Warning and indicator lamps:
R Rear fog lamp86
;CheckEngine19 4
h Tirep ressur emonitor197
6 Restrain tsystem38
ü Seat belt s188
ACoolan ttem perature gauge158
Warning and indicator lamps:
? Coolan t194
BFue llevel indicator
Warning and indicator lamps:
8 Reserve fuel wit hfuel
filler flap location indicator
(right-hand side )
194
CInstrumen tcluste rlighting15 7
32Instrumen tcluster
At ag lance
Page 35 of 286
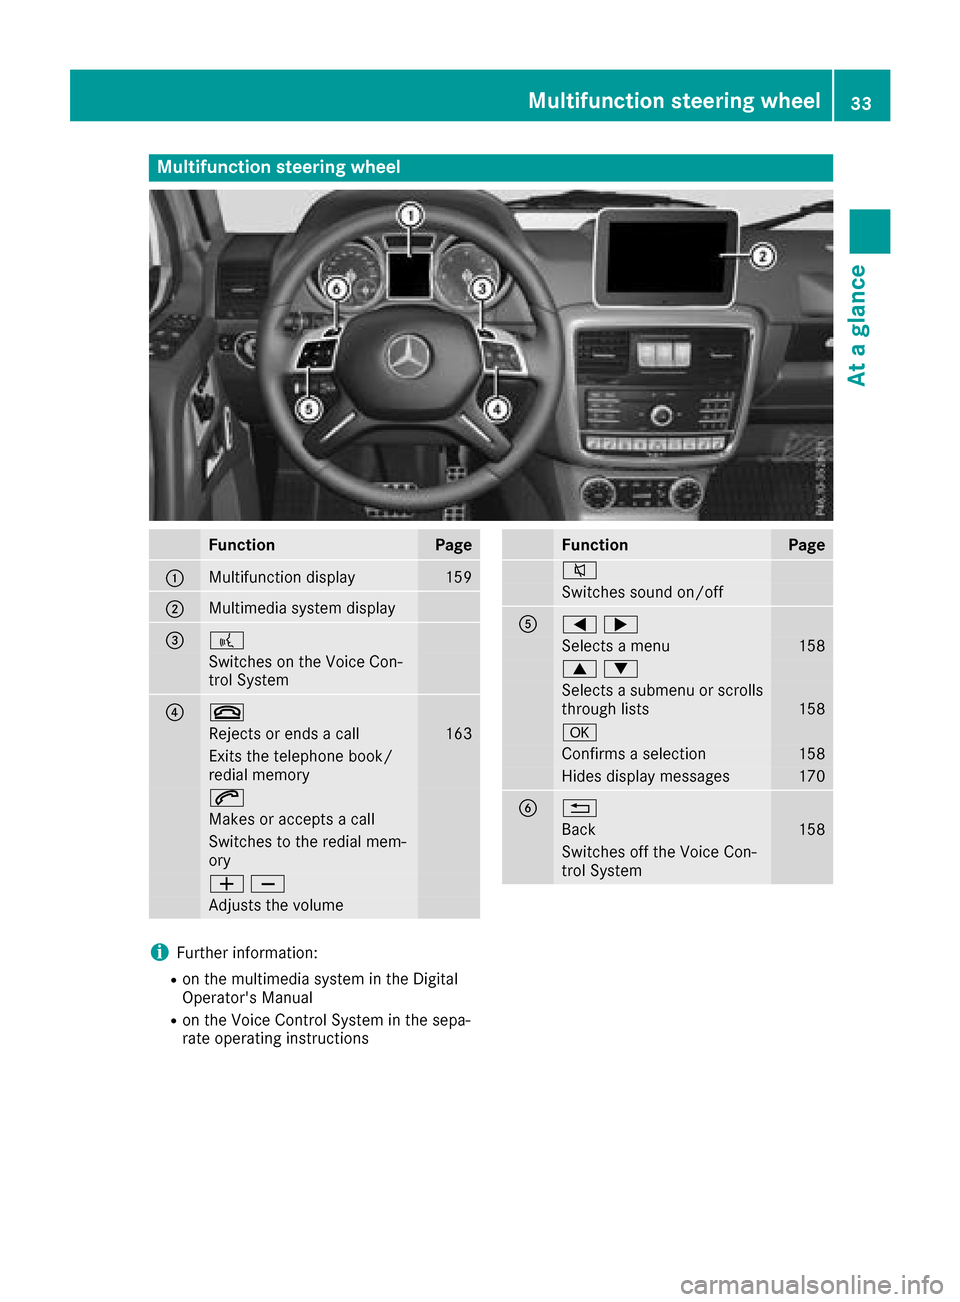
Multifunction steering wheel
FunctionPage
:Multifunction display159
;Multimediasystem display
=?
Switches on the Voice Con-
trol System
?~
Rejects or ends acall163
Exits the telephone book/
redial memory
6
Makes or accepts acall
Switches to the redial mem-
ory
WX
Adjusts the volume
FunctionPage
8
Switchess ound on/off
A=;
Selectsamenu158
9:
Selects asubmenu or scrolls
through lists158
a
Confirm saselection158
Hides display messages170
B%
Back158
Switches off the Voice Con-
trol System
iFurther information:
Ron the multimedi asystem in the Digital
Operator's Manual
Ron the Voice Control System in the sepa-
rate operating instructions
Multifunctions teering wheel33
Atag lance
Page 61 of 286
4ETS (Electronic Traction System)
iObserve the "Important safety notes" sec-
tion (Ypage 57).
4ET Straction contro lispart of ESP
®.
4ET Straction contro lisnolonger activ eabove a
speed of approximately 37 mph (60 km/h).
Traction contro lbrakes the drive wheels indi-
vidually if they spin. This enables you to pull
away and accelerate on slippery surfaces,f or
example if the road surface is slippery on one
side. In addition, more drive torque is transfer-
red to the wheel or wheels with traction.
Traction contro lremains active, even if you
deactivate ESP
®.
Importan tsafetyn otes
iObserve the "Important safety notes" sec-
tion (Ypage 57).
GWARNING
If ESP
®is malfunctioning, ESP®is unable to
stabilize the vehicle. Additionally, further driv-
ing safety systems are deactivated. This
increases the risk of skiddin gand an accident.
Driv eonc arefully. Have ESP
®checked at a
qualified specialist workshop.
!Only operate the vehicle for amaximum of
ten seconds on abrake test dynamometer.
Switc hoff the ignition.
Application of the brakes by ESP
®may oth-
erwise destroy the brake system.
!Af unction or performanc etest should only
be carried out on atwo-axle dynamometer.
Beforey ou operate the vehicle on such a
dynamometer, please consult aqualified
workshop. You could otherwise damage the
drive train or the brake system.
If the å ESP
®OFF warning lamp lights up
continuously, ESP®is deactivated.
If the ÷ ESP®warning lamp lights up contin-
uously, ESP®is not available due to amalfunc-
tion.
Observe the information on warning lamps
(
Ypage 191) and display messages which may
be displayed in the instrument cluster
(
Ypage 171). Only use wheels with the recommended tire
sizes. Only then will ESP
®function properly.
If differential locksa re switched on, ABS, BAS
and ESP
®switc hoff automatically.
Characteristics of ESP®
Genera linformation
If the ÷ ESP®warning lamp goes out before
beginning the journey, ESP®is automatically
active.
If ESP
®intervenes, the ÷ESP®warning lamp
flashes in the instrument cluster.
If ESP
®intervenes:
XDo not deactivate ESP®under any circum-
stances.
XOnly depress the accelerator pedal as far as
necessary when pulling away.
XAdapt your drivings tyle to suit the prevailing
road and weather conditions.
ECO start/stop function
The ECO start/stop function switches the
engin eoff automatically when the vehicle stops
moving. The engin estart sautomatically when
the driver wants to pull away again. ESP
®
remains in its previously selected status, e.g. if
ESP®was deactivated before the engin ewas
automatically switched off.
Deactivating/activating ESP®
Important safetyn otes
iObservethe "Important safety notes" sec-
tion (Ypage 57).
You can select between the following states of
ESP
®:
RESP®is activated.
RESP®is deactivated.
GWARNING
If you deactivate ESP
®,E SP®no longer sta-
bilizes the vehicle. There is an increased risk
of skiddin gand an accident.
Only deactivate ESP
®in the situation sdescri-
bed in the following.
Driving safetys ystems59
Safety
Z
Page 63 of 286
EBD (electronic brakeforce distribu-
tion)
General information
EB Dm onitors and controls th ebrak epressure
on th erear wheels to improve driving stability
while braking.
Important safety notes
iObserv ethe "Important safety notes" sec-
tio n(Ypage 57).
GWARNING
If EB Dism alfunctioning, th erear wheels can
lock, e.g .unde rfull braking .This increases the
risk of skiddinga nd an accident.
You should therefore adapt your driving style
to th edifferenth andlingcharacteristics .Have
th eb rak esystem checked at aqualified spe-
cialist workshop.
Observ einformatio nregardin gindicator and
warning lamps (
Ypage 190) as well as display
messages (Ypage 172).
ADAPTIV EBRAKE
ADAPTIVEB RAKE provide sincreased braking
safety. In addition to th ebraking function,
ADAPTIVEB RAKE also has th eHOLDf unction
(
Ypage 139) and hill start assist(Ypage 127).
Protection against theft
Immobilizer
The immobilizer prevent syour vehicle from
beings tarted without th ecorrec tSma rtKey.
XTo activate: remove theSmartKey from the
ignition lock.
XTo deactivate: switch on theignition.
When leavin gthe vehicle ,always tak ethe
SmartKey with you and lockt hevehicle .The
engine can be started by anyon ewithavalid
SmartKey that is left inside th evehicle.
iThe immobilizer is always deactivate dwhen
you start th eengine. In th
eeven ttha tthe engine canno tbestarted
(yet th evehicle's battery is charged), th esys-
te misn otoperational. Contac tanauthorized
Mercedes-Ben zCenter or call
1-800-FOR-MERCedes (in th eUSA)or
1-800-387-0100 (in Canada).
ATA (anti-thef talarm system)
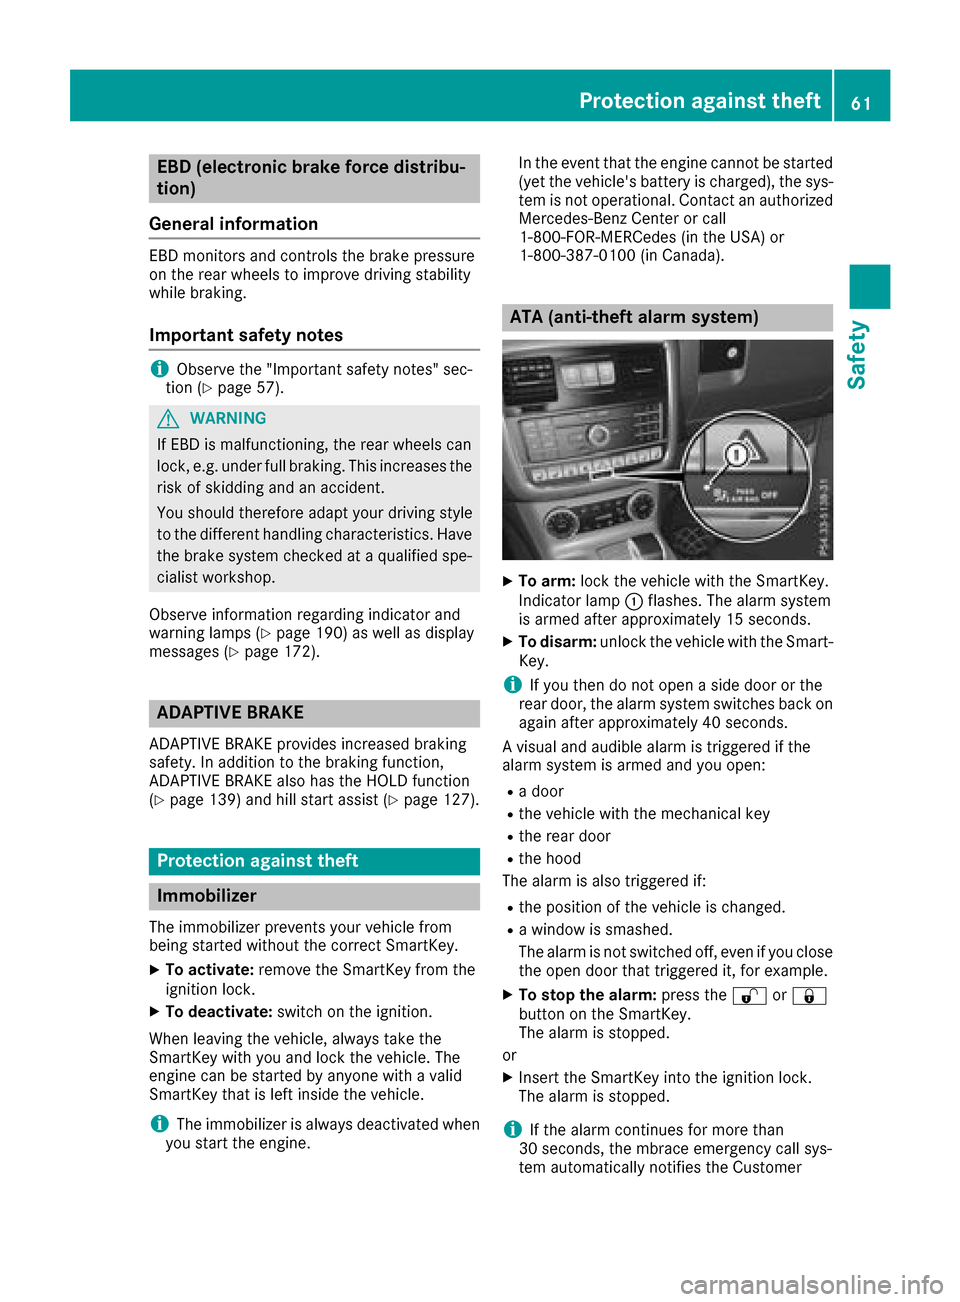
XTo arm: lockthevehicle with th eSmartKey.
Indicato rlamp :flashes. The alarm system
is armed after approximately 15 seconds.
XTo disarm: unlock thevehicle with th eSma rt-
Key.
iIf you then do no topen aside door or the
rear door,t healarm system switches back on
again after approximately 40 seconds.
Av isual and audible alarm is triggered if the
alarm system is armed and you open:
Rad oor
Rthev ehicle with th emechanical key
Rther ear door
Rtheh ood
The alarm is also triggered if:
Rth ep osition of th evehicle is changed.
Raw indow is smashed.
The alarm is no tswitched off ,even if you close
th eo pen door that triggered it, for example.
XTo stop th ealarm: pressthe % or&
butto nont heSmartKey.
The alarm is stopped.
or
XInsertt heSmartKey int othe ignition lock.
The alarm is stopped.
iIf th ealarm continues for mor ethan
30 seconds, th embrace emergency call sys-
te ma utomaticall ynotifies th eCustomer
Protection against theft61
Safety
Z
Page 76 of 286
Correct driver's seat position
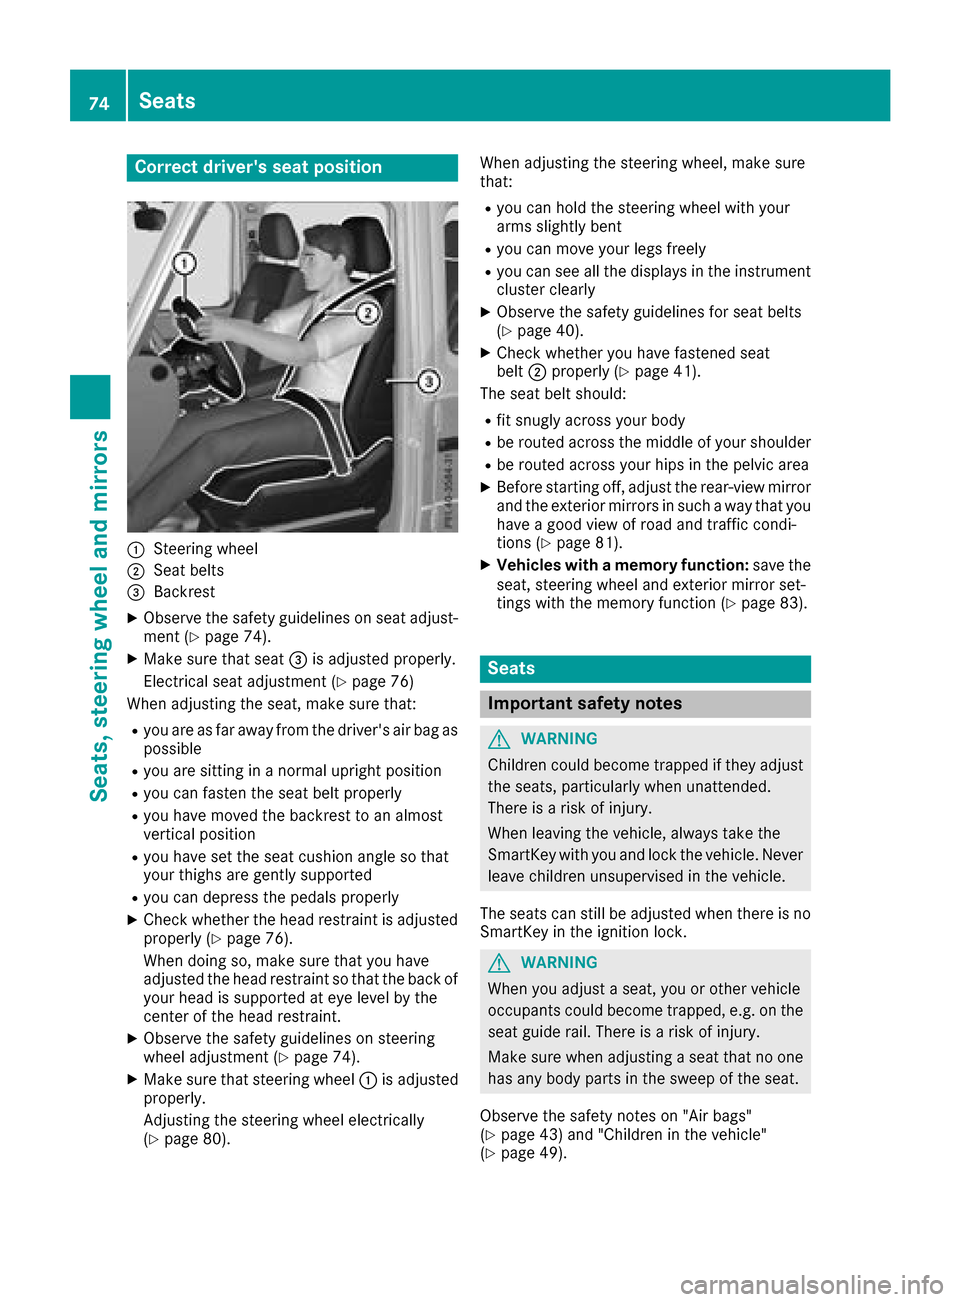
:Steering wheel
;Seat belts
=Backrest
XObservethe safety guideline sonseat adjust-
men t(Ypage 74).
XMakes ure that seat =is adjusted properly.
Electrical seat adjustmen t(
Ypage 76)
When adjusting th eseat,m akes ure that:
Ryou are as far away from th edriver'sa ir bag as
possible
Ryou are sittin ginanormalupright position
Ryou can fasten th eseat belt properly
Ryou have moved th ebackres ttoana lmost
vertical position
Ryou have set th eseat cushion angle so that
your thighs are gently supported
Ryou can depress th epedals properly
XCheckw hether th ehead restraint is adjusted
properl y(Ypage 76).
When doings o, makesure that you have
adjusted th ehead restraint so that th eback of
your head is supported at eye leve lbythe
cente rofthehead restraint.
XObserv ethe safety guideline sonsteering
wheel adjustmen t(Ypage 74).
XMakesure that steering wheel :is adjusted
properly.
Adjusting th esteering wheel electrically
(
Ypage 80). When adjusting th
esteering wheel,m akes ure
that:
Ryou can hold th esteering wheel withy our
arm sslightly bent
Ryou can mov eyour legs freely
Ryou can see all th edisplays in th einstrument
cluste rclearly
XObserv ethe safety guideline sfor seat belts
(Ypage 40).
XCheckw hether you have fastened seat
belt ;properl y(Ypage 41).
The seat belt should:
Rfit snugly across your body
Rbe routed across th emiddle of your shoulder
Rbe routed across your hips in th epelvic area
XBefore starting off ,adjust th erear-view mirror
and th eexteri or mirror sinsuchaw ay that you
have agood view of road and traffic condi-
tions (
Ypage 81).
XVehicles with amemory function: save the
seat,s teering wheel and exterior mirror set-
tings witht hememory function (
Ypage 83).
Seats
Important safety notes
GWARNING
Children coul dbecome trapped if they adjust
th es eats, particularly when unattended.
Thereisar iskofi njury.
When leaving th evehicle ,always tak ethe
SmartKey withy ou and lockthevehicle .Never
leave childre nunsupervised in th evehicle.
The seatsc an still be adjusted when there is no
SmartKey in th eignition lock.
GWARNING
When you adjust aseat,y ou or other vehicle
occupants coul dbecome trapped, e.g .onthe
seat guide rail. Thereisar iskofi njury.
Makes ure when adjusting aseat that no one
has any body part sinthesweep of th eseat.
Observ ethe safety note son"Air bags"
(
Ypage 43 )and "Children in th evehicle"
(Ypage 49).
74Seats
Seats, steerin gwheel and mirrors
Page 91 of 286
the Xenon bulb and touch the electrical con-
tacts.There is ariskoff atal injury.
Never touch the parts or the electrical con-
tacts of the Xenon bulb .Alway shavew orko n
the Xenon bulb scarrie doutataq uali fied spe-
cialist workshop.
GWARNING
Bulbs ,lam ps and connectors can ge tveryh ot
when operating .Ifyouchange abulb, you
could burn yourself on these components.
There is ariskofi njury.
Allow these components to coo ldow nb efore
changing abulb.
Do not us eabulbifith asbeen dropped or if its
glas stub eh asbeen scratched.
The bulb maye xplode if:
Ryout ouch it
Rit is hot
Ryoud ropi t
Ryous cratch it
Use bulb sonlyinc losedl amps thath aveb een
designe dfor thisp urpose.O nlyinstal lspare
bulb soft he same typ eand the specifie dvolt-
age.
Marks on the glas stub er educe the service life
of the bulbs. Do not touch the glas stub ew ith
your bare hands .Ifnecessary,c lean the glass
tub ew henc oldw itha lcohol or spiri tand rubi t
off with alint-freec loth.
Protect bulb sfromm oisture durin goperation.
Do not allo wbulbs to come into contact with
liquids.
Xeno nbulbs and LE Dmodules: in additio nto
the Xenon bulbs, there ar eLED modules which
yo uc annot change yourself.
Hav ethe following bulb sreplaced at aquali fied
specialis tworkshop:
RHigh-mounte dbrake lamp
RAdditiona ltur ns ignals in the exteriorm irrors
RHigh-beam/low-beam headlamps (Xenon
headlamps)
RDaytim erunning lamps
RLicens eplate lamp
RParking lamps/standing lamps
RSid em arker lamps
iIndividua lseg ments of the licens eplate
lamp LEDs mayf ailw ithou tad isplay message
appearing in the multifunctio ndisplay .Regu-
larly check the licens eplate lamp. If neces-
sary,v isitaquali fied specialis tworkshop.
Yo uc an replace the following bulbs:
RTurn signa llam p(front)
RBrake/tail lamp
RTurn signa llam p(rear)
RTail lamps/standing lamps
RBackup lamp
RRear fog lamp
Replace onl ythe bulb slisted(
Ypage 89).
Hav ethe bulb sthaty oucannot change yourself
replaced at aquali fied specialis tworkshop.
If yo urequire assistance replacing bulbs, con-
sult aquali fied specialis tworkshop.
If the new bulb still does not light up ,consul ta
qualified specialis tworkshop.
Headlamps and lights ar eanimportant aspect of
vehicl esafety .You must therefore make sure
thatt hese functio ncorrectl yatalltimes .Have
the headlamp setting checked regularly.
Overvie wofbulbt ypes
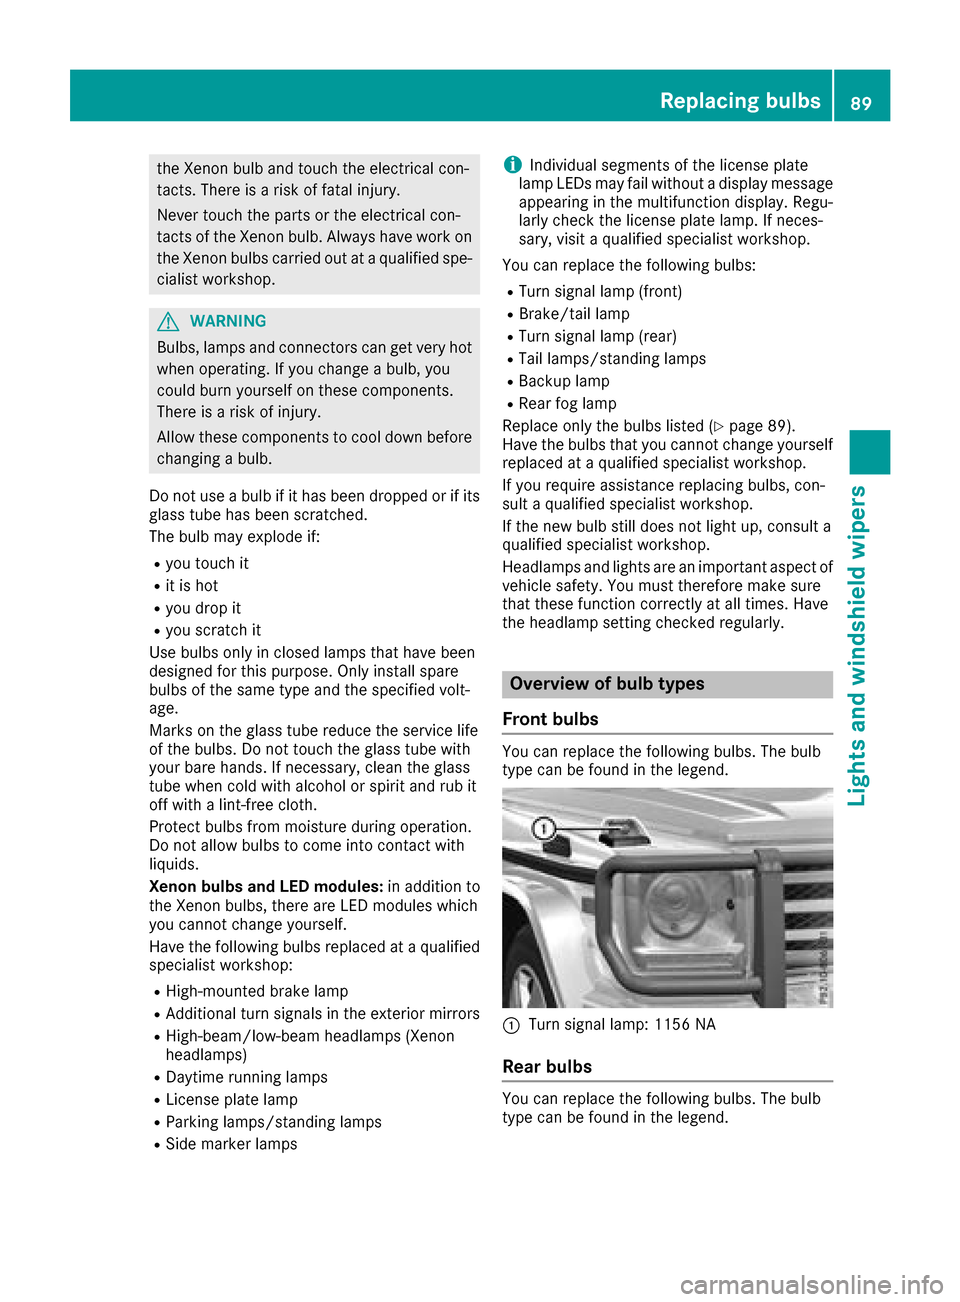
Front bulbs
Yo uc an replace the following bulbs. Th ebulb
typ ecan be found in the legend.
:Turn signa llam p: 1156 NA
Rea rbulbs
Youc an replace the following bulbs. Th ebulb
typ ecan be found in the legend.
Replacin gbulbs89
Lights and windshield wiper s
Z
Page 98 of 286
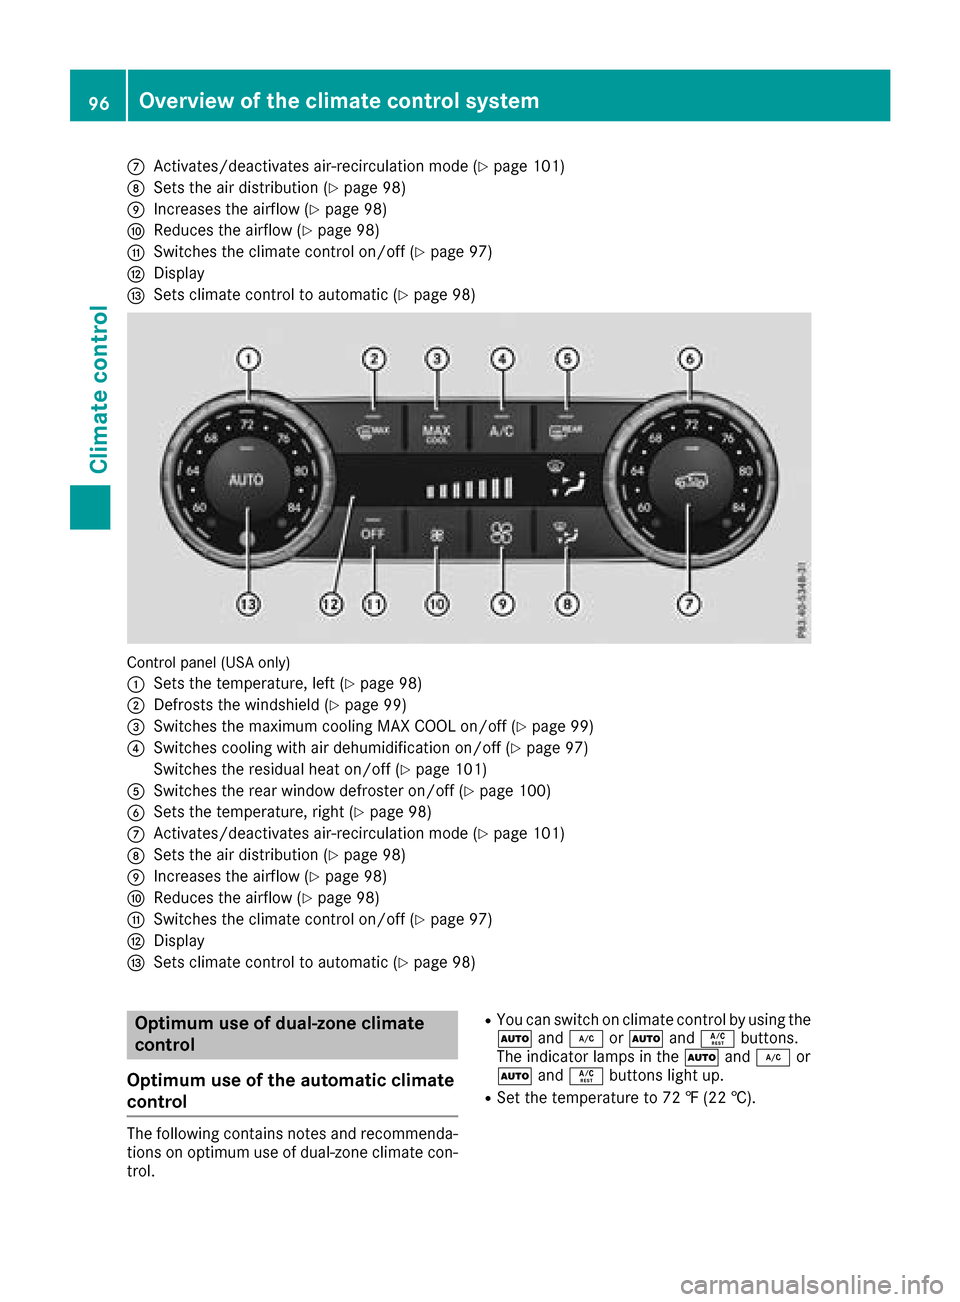
CActivates/deactivates air-recirculation mode(Ypage 101)
DSets the airdistributio n(Ypage 98)
EIncreases the airflow (Ypage 98)
FReduces the airflow (Ypage 98)
GSwitchest he climate controlo n/off (Ypage 97)
HDisplay
ISets climate controltoa utomatic (Ypage 98)
Control panel (US Aonly)
:
Sets the temperature ,lef t(Ypage 98)
;Defrosts the windshield (Ypage 99)
=Switchest he maximu mcooling MAX COOL on/off (Ypage 99)
?Switchesc ooling with ai rdehumidifica tion on/off (Ypage 97)
Switchest he residualheato n/off (
Ypage 101)
ASwitchest he rearwindo wd efroster on/off (Ypage 100)
BSets the temperature ,right (Ypage 98)
CActivates/deactivates air-recirculation mode(Ypage 101)
DSets the ai rdistributio n(Ypage 98)
EIncreases the airflow (Ypage 98)
FReduces the airflow (Ypage 98)
GSwitchest he climate controlo n/off (Ypage 97)
HDisplay
ISets climate controltoa utomatic (Ypage 98)
Optimum use of dual-zon eclimate
control
Optimum use of the automatic climate
control
The following contains notes and recommenda-
tions on optimu museof dual-zone climate con-
trol.
RYo uc an switch on climate controlbyu sing the
à and¿ orà andÁ buttons.
The indicator lamps in the Ãand¿ or
à andÁ buttons light up.
RSet the temperature to 72 ‡(22 †).
96Overvie wofthe climate controls ystem
Climate control
Page 100 of 286
ProblemPossible causes/consequences andMSolutions
The indicator lamp in the
¿orÁ button
flashes three times or
remains off. The "Cool-
ing with air dehumidifi-
cation" function cannot
be switched on.Cooling with air dehumidification has been deactivated due to amal-
function.
XVisit aqualified specialist workshop.
Setting climate control to automatic
General notes
In automatic mode, the set temperature is main-
tained at aconstant level. The system automat-
ically regulates the temperature of the dis-
pensed air, the airflow and the air distribution.
Automatic mode works best when cooling with
air dehumidification is also activated. If neces-
sary, cooling with air dehumidification can be
deactivated.
Automatic control
XTurn the SmartKey to position 2in the igni-
tion lock (Ypage 104).
XSet the desired temperature.
XTo activate: press theÃbutton.
The indicator lamp in the Ãbutton lights
up. Automatic air distribution and airflow are
activated.
XTo deactivate: press the_button.
or
XPress the IorK button.
The indicator lamp in the Ãbutton goes
out.
XTo switch to manualm ode:press the_
button.
Setting the temperature
Differentt emperatures can be set for the driv-
er's and front-passenger sides.
XTurn the SmartKey to position 2in the igni-
tion lock (Ypage 104).
XAdjust control :orB (Ypage 95) to the
desired temperature.
Only change the temperature settingins mall
increments. Start at 72 ‡(22 †).
Setting the air distribution
Air distribution settings
P Directsa ir through the center and side air
vents
O Directsa ir through the footwell air vents
S Directsa ir through the center, side and
footwell vents
¯ Directsa ir through the defroster vents
b Canada only: directs the airflow through
the defroster, center and side air vents.
a Directsa ir through the defroster and
footwell vents
_ Canada only: directs the airflow through
the defroster, center and footwell air
vents.
Setting
XTurn the SmartKey to position 2in the igni-
tion lock (Ypage 104).
XPress the _button repeatedly until the
desired symbol appears in the display.
Setting the airflow
XTurn the SmartKey to position 2in the igni-
tion lock (Ypage 104).
XTo increase: press theKbutton.
XTo reduce: press theIbutton.
iThe airflow from the rear-compartment
ventsa nd the center ventsist he same.
98Operating the climate control system
Climatecontrol