2017 MERCEDES-BENZ G-Class garage door opener
[x] Cancel search: garage door openerPage 17 of 286
Stopping ........................................ 168
Radiato rcover ................................... 226
Radio
Selecting astation ......................... 162
Radio mode
see also Digital Operator's Man-
ual.................................................. 198
Radio-wave reception/transmis-
sion in the vehicle
Declaration of conformity ................ 26
Rear benchs eat
Folding forward .............................. 208
Rear compartment
Setting the ai rvents ...................... 102
Rear door
Closing ............................................. 69
Displa ymessage ............................ 186
Important safety notes .................... 68
Opening ........................................... 68
Rear fog lamp
Displa ymessage ............................ 176
Replacing bulb s............................... 91
Switching on/off. ............................. 86
Rear seat bench
Folding into an upright position ..... 208
Rear vie wcamera
Cleaning instructions ..................... 235
Displa yinthe multimedi asystem .. 143
Function/note s............................. 143
Generaln otes ................................ 143
Switching on/off. .......................... 143
Rear windowd efroster
Problem (malfunction) ................... 100
Switching on/off. .......................... 100
Rear windoww iper
Replacing the wipe rblade ................ 93
Switching on/off. ............................. 93
Rear-vie wmirror
Dipping (automatic) ......................... 83
Refrigerant (air-conditioning sys-
tem)
Important safety notes .................. 280
Refueling
Fuelgauge ....................................... 32
Important safety notes .................. 118
Refueling process .......................... 118
see Fuel Remote control
Programming (garage door
opener) .......................................... 222
Replacing bulbs
Backu plam p.................................... 91
Brake lamp ...................................... 91
Important safety notes .................... 88
Overview of bulb types .................... 89
Rear fog lamp .................................. 91
Tail lamp .......................................... 91
Turn signal (rear) .............................. 91
Turn signals (front) ........................... 90
Reporting safety defects .................... 27
Rescue card ......................................... 28
Re
serve (fuel tank)
see Fuel
Reserve fuel
Displa ymessage ............................ 179
Warning lamp ................................. 194
Residual heat
Switching on/off. .......................... 101
Restrain tsystem
Displa ymessage ............................ 173
Introduction ..................................... 38
Warning lamp ................................. 193
Warning lamp (function) ................... 38
Reversin glamps (display mes-
sage) ................................................... 176
Roadside Assistance (breakdown) .... 25
Roo flinin gand carpets (cleaning
guidelines) ......................................... 237
Route (navigation)
see Route guidance (navigation)
Route guidance
see also Digital Operator's Man-
ual.................................................. 198
Route guidance( navigation) ............ 161
S
Safety
Childre ninthe vehicl e..................... 49
see Occupant safety
Safety system
see Driving safety systems
SD card
Inserting ........................................ 203
Inserting/removing ........................ 203
Index15
Page 38 of 286
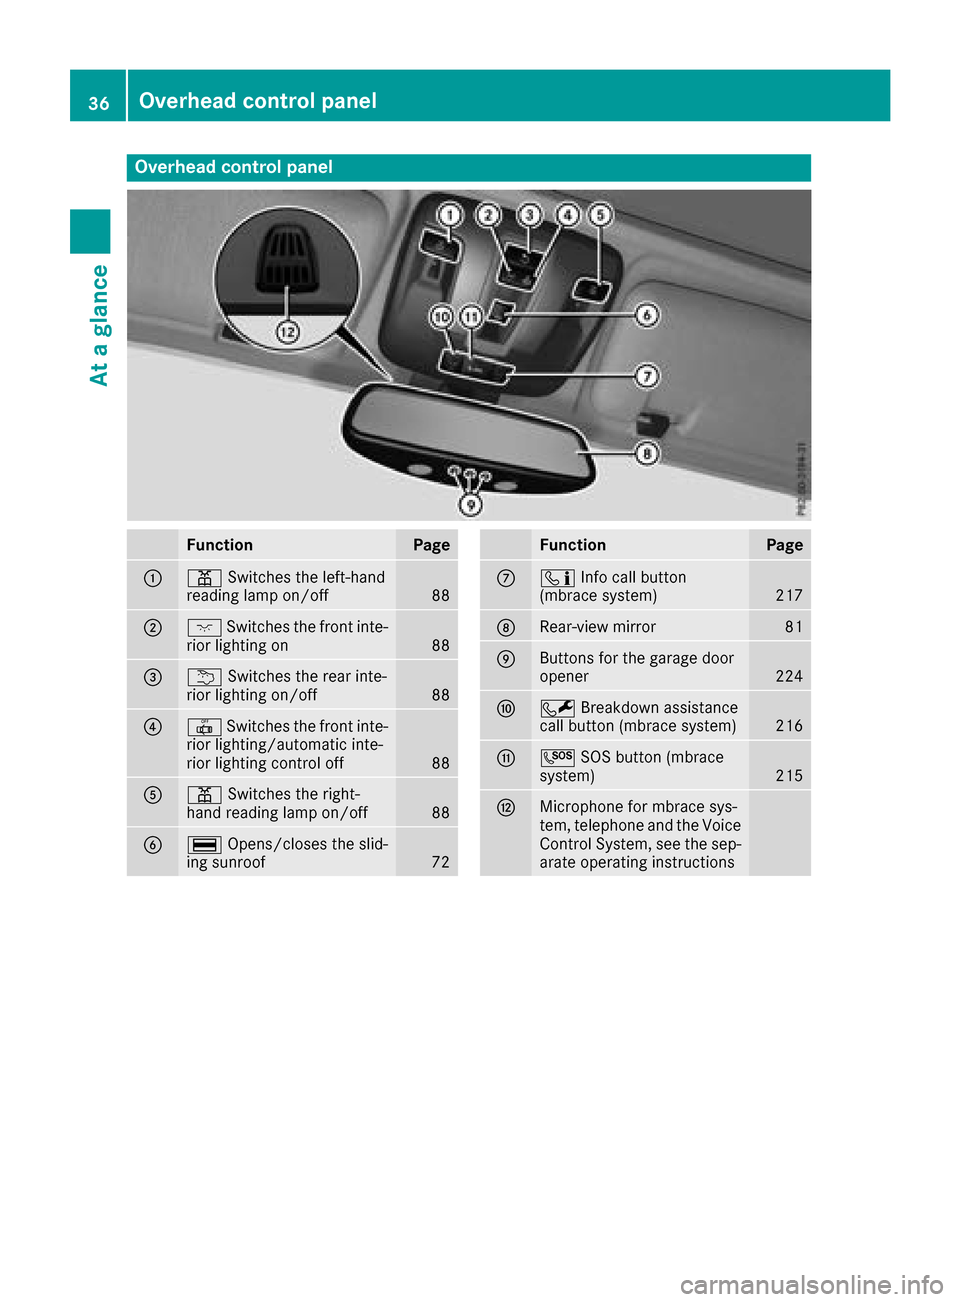
Overheadcontrol panel
FunctionPage
:p Switches the left-hand
reading lamp on/off88
;c Switches the fronti nte-
rior lighting on88
=u Switches the rear inte-
rior lighting on/off88
?| Switches the fronti nte-
rior lighting/automatic inte-
rior lighting control off
88
Ap Switches the right-
hand reading lamp on/off88
B¡ Opens/closes the slid-
ing sunroof72
FunctionPage
Cï Infoc all button
(mbrace system)217
DRear-view mirror81
EButtons for the garage door
opener224
FF Breakdown assistance
call button (mbrace system)216
GG SOS button (mbrace
system)215
HMicrophonef or mbrace sys-
tem, telephon eand the Voice
Control System ,see the sep-
arate operatin ginstructions
36Overhea dcontrol panel
Atag lance
Page 223 of 286
Information on Roadside Assistance
(Ypage 25).
Downloading routes
Downloading routes allows you to transfer and
save predefined routes in the navigation sys-
tem.
Aroute can be prepared and sent by either a
customer service representative or under "Own-
ers Online" at http://www.mbusa.com.
Each route can include up to four way points.
Once aroute has been received by the naviga-
tion system, you wills ee theDo
youwanttostart route guidance? DestinationReceived destination has been savedin "Previous destinations".message on
the multimedia system display.
The route is saved.
XTo start route guidance: selectYes.
An overview of the route is shown in the dis-
play.
If you select No
,the saved route can be called
up later in the navigation menu.
XSelect Start.
Route guidance starts.
Downloaded and saved routes can be calledu p
again.
Speed alert
You can define the uppers peed limit, which
must not be exceeded by the vehicle.
If this selected speed is exceeded by the vehicle,
am essagew illbesent to the Customer Assis-
tance Center. The Customer Assistance Center
then forward sthis information to you.
You can select the way in which you receive this
information beforehand. Possible options
include text message,e -mail or an automated
call.
The data you receive contains the following
information:
Rthe location where the speed limitw as excee-
ded
Rthe time at which the speed limitw as excee-
ded
Rthe selected speed limitw hich was exceeded
Geo fencing
Geo fencing allows you to select areasw hich the
vehicle shoul dnot enter or leave. You willb e
informed if the vehicle crosses the boundaries
of the selected areas. You can select the way in
which you receive this information beforehand.
Possible options include text message, e-mail or an automated call.
The area can be determined as either acircle or
ap olygon with amaximum of ten corners. You
can specify up to ten areass imultaneously. Dif-
ferent settings are possible for each area.
These settings can be calledupu nder "Owners
Online" at http://www.mbusa.com.
Alternatively,y ou can trigger an Info call and
notify the customer service representative that
you wish to activate geo-fencing.
Currently inactive areasc an be activated by text
message.
Triggering the vehicle alarm
With this function, you can trigger the vehicle's
panic alarm via text message. An alarm sounds
and the exterior lighting flashes. Depending on
the setting, the panic alarm lasts five or ten sec- onds. Afterwards, the alarm switches off.
Brush guard (USA only)
If the brush guard has to be removed, contact a
qualifieds pecialist workshop.
Garage door opener
General notes
You can use the HomeLink®garage door opener
integrated into the rear-view mirror to operate
up to three different gate/garage door opener
systems.
Certai ngarage door drives are incompatible
with the integrated garage door opener. If you
have difficulty programing the integrated garage
door opener, contact aMercedes-Benz Service
Center.
Features221
Stowagea nd features
Z
Page 224 of 286

Alternatively,you can cal lthe following tele-
phone assistance services:
RUSA: Mercedes-Benz Customer Assistance
Center at 1-800-FOR-MERCedes
RCanada: Customer Service at
1-800-387-0100
RHomeLink®hotline 1-800-355-3515( free of
charge)
Mor einformatio nonHomeLink
®and/or com-
patible products is also availabl eonline at
http://www.homelink.com.
Notesont he declaratio nofconformity
(
Ypage 127).
USA: FCC ID: CB2HMIHL4
Canada: IC:2 79B-HMIHL4
USA only:
Thi sd evice complies with Part 15 of the FCC
Rules. Operatio niss ubject to the following two
conditions:
1. Thi sdevice mayn ot cause harmfuli nterfer-
ence ,and
2. thisd evice must accept any interference
received, including interference thatm aycause
undesired operation.
Any unauthorized modification to thisd evice
could voidt he user'sauthority to operate the
equipment.
Canad aonly:
Thi sd evice complies with RSS-210 of Industry
Canada. Operatio niss ubject to the following
two conditions:
1. Thi sdevice mayn ot cause harmfuli nterfer-
ence ,and
2. thisd evice must accept any interference
received, including interference thatm aycause
undesired operation.
Any unauthorized modification to thisd evice
could voidt he user'sauthority to operate the
equipment.
Important safety notes
GWARNING
Whe nyou operate or programt he garage door
with the integrated garage door opener, per-
sons in the range of movement of the garage
door can become trappe dorstruck by the
garage door. There is ariskofi njury.
Whenusing the integrated garage door
opener, always make sure thatn obodyis
withint he range of movement of the garage
door.
GWARNING
Combustion engine semitp oiso nousexhaust
gases such as carbo nmonoxide. Inhaling
thes eexhaus tgases lead stopoisoning. There
is ar iskoff atalinjury.T herefore neve rleave
the engine running in enclose dspaces with-
outs ufficient ventilation.
Programming
Programming
Pa ya ttentio ntothe "Important safety notes"
(Ypage 222).
Garage door remote control Ais not included
with the integrated garage door opener.
XDelete the memory of the integrated remote
control(Ypage 224) before programming it
for the first time.
XTurn the SmartKeytop osition 2
(Ypage 104 )inthe ignition lock.
XSelect one of buttons ;to? to us etoc on-
trol the garage door drive.
XTo start programmin gmode: press and
hol done of buttons ;to? on the integrated
garage door opener.
The garage door opene risnow in program-
ming mode. After ashort time ,indicator
lamp :will start flashing. It flashesa pprox-
imatelyo nce persecond.
Indicato rlam p: flashesi mmediatelyt he
first time thatt he transmitterbutton is pro-
grammed. If thist ransmitterbutton has
already been programmed, indicator lamp :
222Features
Stowageand featur es
Page 225 of 286
will only start flashing atarateofo nceas ec-
ond after 20 second shave elapsed.
XContinue to hold th etransmitter button.
XTo progra mtheremote control: point
transmitter button Bof remote control A
towards th etransmitter buttons on th erear-
view mirror at adistanc eof2to12in(5t o
30 cm).
XKeep transmitte rbutto nB on remote control
A presse duntilindicator lamp :start sto
flas hrapid ly.
When indicator lamp :flashes rapidly: pro-
grammin gisfinished.
XReleaset ransmitte rbuttons ;,=or? on
th ei ntegrate dremotec ontroland transmitter
button Bon remotec ontrolA.
If indicator lamp :does no tflas hrapidly and
goes out after approximately 20 seconds:
repeat th eprogrammin gproces sfor th ecor-
respondin gbutto nont herear-view mirror.
When doingso, var ythe dist ancebetween
remotec ontrolA and th erear-view mirror.
The required distancebetween remotec on-
trol Aand th eintegrate dgarag edoor opener
depends on thegarag edoor drivesystem.
Several attempt smightben ecessary. You
should test every positio nfor at least
20 seconds before trying another position.
If th eg arag edoor system work swithar olling
code, you must synchronize th eremotec ontrol
integrate dintherear-
view mirror
withthe
garag edoor system receive rafter program-
ming.
You can fin dfurther informatio nonthisint he
operatin ginstructionsoft hegarag edoor sys-
tem.
Synchronizing th erolling code
Pay attentio ntothe"Im portan tsafety notes"
(Ypage 222).
If th eg arag edoor system uses arolling code,
you willalso have to synchronize th egarage
door system withthe integrate dgarag edoor
opener inther ear-view mirror .Todothisy ou will
need to use th eprogrammin gbutto nont hedoor
driv econtro lpanel. The programmin gbutton
may belocate dindifferent places dependin gon
th em anufacturer. It isusually locate donthe
door driveunit on th egarag eceilin g.
Fam iliarize yourself withthe garag edoor drive
operatin ginstructions, e.g .unde r"Program-
min gaddit ional remotec ontrols",before carry-
ing out th efollowings teps. Your vehicle must
be within reac hofthegarage
door or gateo pener drive. Makes ure that nei-
ther your vehicle no rany persons/object sare
presentw ithin th esweep of th edoor or gate.
Observ ethe safety note swhen performin gthe
rolling code synchronization (
Ypage 222).
XTurn th eSmartKey to position 2
(Ypage 104) in th eignition lock.
XGet out of th evehicle.
XPress th eprogrammin gbutto nont hedoor
driveu n
it.
You no whave 30 seconds to initiat ethe next
step.
XGet int othe vehicle.
XPress previously programmed button ;,=
or ? on th eintegrate dgarag edoor opener
repeatedly until thedoor closes.
The rolling code synchronization is then com- plete.
Notes on programmin gthe remote con-
trol
Canadian radio frequency lawsrequire a"break"
(or interruption)oft hetransmission signals
after broadcastin gfor afew seconds. Therefore,
these signals may no tlast longe nough for the
integrate dremotec ontroltorecognize th esig-
nal durin gprogramming. Comparable with
Canadian law,American garag edoor openers
also have abuilt -in "interruption".
Procee dasfollows:
Rif you livein Canada.
Rifyou have difficulties programmin gthe
garag edoor opener (regardless of wherey ou
live )when usingt heprogrammin gsteps.
XPress and hold oneofb uttons;to? on the
integrate dgarag edoor opener until th einte-
grated remotec ontrolissuccessfully set up.
XSimultaneouslyp ress transmitterbutton B
on remotec ontrolA and hold for two sec-
onds. Then let go for 2seconds, press again
and hold for 2seconds.
XRepeat th issequenc eontransmitte rbutton
B on remotec ontrolA until th efrequency
signal isestablished.
XIf th esetup procedure is successful ,indicator
lamp :flashes once slowlya nd goes out
after afew seconds.
If indicator lamp :does no tflas hs lowlya nd
then go out:r epeat theprogrammin gprocess
for th ecorres ponding butto nontherear-view
Features223
Stowage and features
Z
Page 226 of 286
mirror. When doing so, vary the distance
betweenremote control Aand the rear-view
mirror.
The required distance betweenr emote con-
trol Aand the integrated garage door opener
depends on the garage door drive system.
Several attempts might be necessary .You
should test every position for at least
20 seconds before trying another position.
The required distance betweenr emote control
A and the integrated garage door opener
depends on the garage door drive system. Sev-
eral attempts might be necessary .You should
test every position for at least 25 seconds
before trying another position.
Problems when programming
If you have problems when programming the
integrated remote control, please note the fol-
lowing:
RCheck the transmitter frequency used by
garage door drive remote control Aand
whetheritiss upported. The transmitter fre-
quency can usuall ybefound on the back of
remote control Afor the garage door drive.
The integrated remote control is compatible
with devicest hat have units which operate in
the frequency range of 280 to 390 MHz.
RReplace the batterie sinremote control A.
This increase sthe probability of remote con-
trol Asending astrong and precise signal to
the integrated remote control on the rear-
view mirror.
RWhen programming, hold remote control A
at varying distances and angle sfrom the
transmitter button that you are programming.
Try various anglesatad istance between2and
12 inches (5to 30 cm) or at the same angle
but at varying distances.
RIf another remote control Ais available for
the same garage door drive, repeatt he same
programming steps with this remote control
A.B efore performing these steps, make sure
that new batterie shave been installed in
garage door drive remote control A.
RNote that some remote controls only transmit
foralimited amount of time (the indicator
lamp on the remote control goes out). Press
button Bon remote control Aagain before
transmission ends.
RAlign the antenna cabl eofthe garage door
opener unit. This can improve signal trans-
mission.
Opening/closing the garage door
Once programmed, the integrated remote con-
trol willa ssume the function of the garage door
system's remote control. Please als oread the
operating instructions for the garage door sys-
tem.
XTurn the SmartKey to position in the ignition
lock 2(Ypage 104).
XPress one of buttons ;to? on the integra-
ted remote control in the rear-vie wmirror that
is programmed to operate the garage door.
Garage door system with fixed code: indicator
lamp :lights up continuously.
Garage door system with rolling code: indica-
tor lamp :flashes brieflya nd then lights up
for approximatelyt wo seconds. This is repea-
ted for up to 20 seconds.
The transmitter willt ransmitasignal for as
long as the transmitter button is being
pressed. The transmission willbeh alted after
am aximumof20s econds and indicator
lamp :willf lash.Press the transmitter but-
ton again if necessary.
XPress button ;,=or? again if necessary.
Clearing the memory
Make sure that you clear the memory of the
integrated garage door opener before selling the
vehicle.
XTurn the SmartKey to position 2
(Ypage 104) in the ignitionl ock.
XPress and hold transmitter buttons ;and ?
for approximately20s econds until indicator
lamp :flashes rapidly.
The memory of the integrated garage door
opener in the rear-vie wmirror is cleared.
224Features
Stowage and features