2017 MERCEDES-BENZ G-Class oil level
[x] Cancel search: oil levelPage 11 of 286
Hydroplaning ................................. 125
Icy roadsurfaces........................... 126
Important safety notes .................. 103
Limited braking efficiency on sal-
ted roads ....................................... 124
Off-roadd riving .............................. 127
Off-roadf ording ............................. 126
Pulling away on slippery surface s..1 25
Snow chains .................................. 253
Subjecting brakes to aloa d. .......... 124
The first 1500 km .......................... 103
Tire ruts ......................................... 129
Towing atraile r.............................. 151
Traveling uphill ............................... 130
Wet roads urface ........................... 124
DVD audio
Operating (on-board computer) ..... 162
DVD video
Operating (on-board computer) ..... 162
see also Digital Operator's Man-
ual.................................................. 198
E
EASY-ENTRY feature
Activating/deactivating ................. 166
Function/note s................................ 80
EASY-EXIT feature
Function/note s................................ 80
Switching on/off. .......................... 166
EBD (electronicb rake forcedistri-
bution)
Displa ymessage ............................ 172
Function/note s................................ 61
EC Os tart/stopf unction
Deactivating/activating ................. 106
Generali nformation ....................... 106
Electronic Stability Program
see ESP
®(Electronic Stability Program)
Emergency
Automati cmeasures afte ranacci-
dent ................................................. 49
Emergencyr elease
Driver's doo r.................................... 68
Vehicl e............................................. 68
EmergencyT ensioningDevices
Activation ......................................... 46 Emission
scontrol
Service and warranty information .... 24
Engine
Check Engine warning lamp ........... 194
Displa ymessage ............................ 176
ECO start/stop function ................ 106
Engine number ............................... 276
Irregula rrunning ............................ 108
Jump-starting ................................. 243
Starting problems .......................... 108
Starting the engine with the
SmartKey ....................................... 105
Switching off .................................. 121
Tow-starting (vehicle )..................... 248
Engine electronics
Problem (malfunction) ................... 108
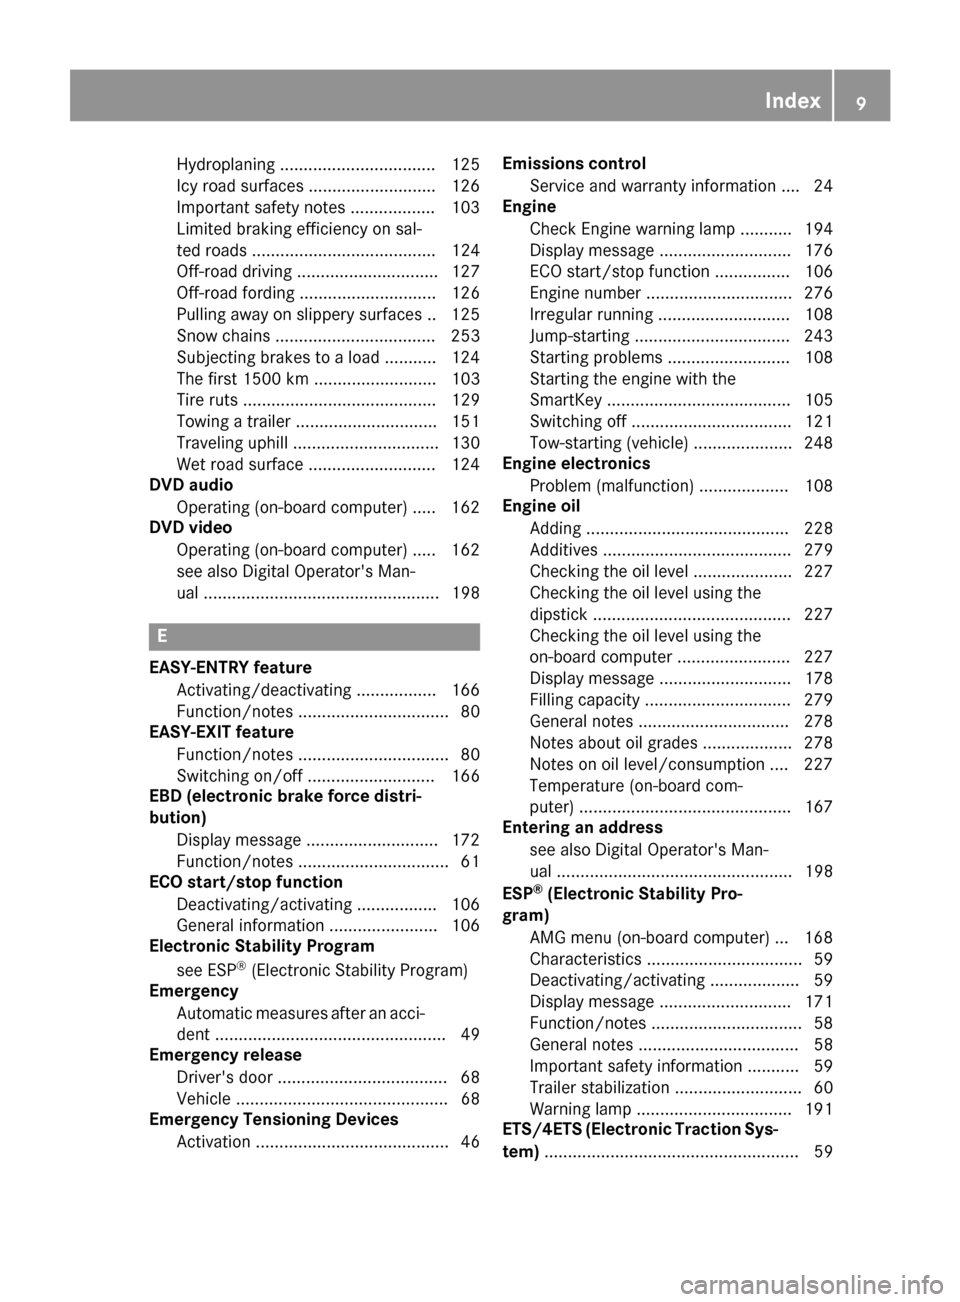
Engine oil
Adding ........................................... 228
Additives ........................................ 279
Checking the oill evel ..................... 227
Checking the oill evel using the
dipstick .......................................... 227
Checking the oill evel using the
on-board compute r........................ 227
Displa ymessage ............................ 178
Filling capacity ............................... 279
Generaln otes ................................ 278
Notesa boutoilgrade s................... 278
Notesono illevel/consumption .... 227
Temperature (on-board com-
puter) ............................................. 167
Entering an address
see also Digital Operator's Man-
u
a l. ................................................. 198
ESP
®(ElectronicS tability Pro-
gram)
AMG menu (on-board computer) ... 168
Characteristics ................................. 59
Deactivating/activating ................... 59
Displa ymessage ............................ 171
Function/note s................................ 58
Generaln otes .................................. 58
Important safety information ........... 59
Trailer stabilization ........................... 60
Warning lamp ................................. 191
ETS/4ETS (ElectronicT raction Sys-
tem) ...................................................... 59
Index9
Page 130 of 286

Familiarize yourself with the characteristics of
your vehicle and the gearshift operation before
driving through difficult terrain.
The following driving systems are specially
adapted to off-roadd riving:
R4ETS (Ypage 59)
ROff-roadABS (Ypage 58)
RTransfer case (Ypage 145)
RDifferentia llocks (Ypage 120)
Observe the following notes:
RStop the vehicle before yo udrive off-roada nd,
if necessary ,shift the transfe rcase to the off-
roadd riving position LOW RANGE
(
Ypage 146).
REngag ethe differential locks if necessary
(Ypage 148).
iABS, 4ETS, ESP®and BAS are deactivated
while the differential locks are engaged.T his
allow sthe front wheels to lock briefly, so that
these can dig into aloose surface .However,
please note that locke dwheels skid and can
no longer steer.
RCheck that items of luggage and loads are
stowed safely and are well secured
(
Ypage 209).
RTo avoid damaging the vehicle, make sure
there is always sufficient ground clearance.
RAlway skeep the engine running and in gear
whe ndriving on adownhil lgradient.
RAlway skeep the engine running and in gear
whe ndriving downani ncline.
RDrive slowlyand evenly, if necessary at a
walking pace.
REnsure that the wheels are in contact with the
ground at al ltimes.
RDrive with extreme care on unfamilia roff-road
routes where visibility is poor. For safety rea-
sons, get ou
tofthe vehicle firs tand survey
the off-roadr oute.
RCheck the depth of water before fording rivers
and streams.
RWatch outfor obstacles.
RAlwayskeep the doors, reard oor, sidewin-
dowsa nd the sliding sunroof closed while the
vehicle is in motion.
RSwitch off cruise control.
RDo not deviate from marke droutes.
RAdap tyou rspeed to the terrain. The rougher,
steeper or more ruts on the terrain, the slower
your speed should be.
RDo not jump with the vehicle. as this will inter-
rup tthe vehicle' spropulsion.
RAvoid hig hengine speeds .Drive at appropri-
ate engine speeds (maximu m3,000 rpm).
RDo not shift the automatic transmission to
position N.
RAlwayscheck the vehicle for damag eafteroff-
roadd riving.
Do not use the HOLD function whe ndriving off-
road, on steep uphil lordownhil lgradients or on
slippery or loose surfaces. The HOLD function
cannot holdt he vehicle on such surfaces.
You can obtain further information aboutr etro-
fitting specia lall-terrain tires from aquali fied
specialist workshop.
Checklist before driving off-road
!If the engine oil warning lamp lights up while
the vehicle is in motion, stop the vehicle in a
saf ep lace as soona spossible. Check the
engine oil level. The engine oil warning lamp
warning mus tnot be ignored.C ontinuing the
journey while the symbol is displaye dcould
lea dtoe ngine damage.
XEngin eoillevel: check the engine oil level
and ad doil if necessary.
Whend riving on steep gradients, the engine
oil level mus tbes ufficiently hig htoensure a
correct oil supply in the vehicle.
XTire-changing too lkit: check that the jack is
working and make sur eyou hav ethe lug
wrench, arobust tow cable and afolding
spade in the vehicle.
XWheels and tires: check the tire treadd epth
and tire pressure.
XCheck for damag eand remove any foreign
objects, e.g. small stones,f rom the wheels/
tires.
XReplace any missing valve caps.
XReplace dente dordamaged wheels .Also
check the spare wheel.
XRims: dentedorbent rims can result in aloss
of tire pressure and damag ethe tire bead.
Befored riving off-road, check the wheels and
replace them if necessary.
128Drivin gtips
Drivin gand parking
Page 166 of 286

XPress the9or: button to select the
desired name.
or
XTo startr apid scrolling: press and hold9
or : for longer than one second.
Rapid scrolling stops when you release the
button or reach the end of the list.
XIf only one telephone number is stored for
an ame: press the 6ora button to
start dialing.
or
XIf thereism ore thanone number for a
particular name:press the 6ora
button to display the numbers.
XPress the 9or: button to select the
number you want to dial.
XPress the 6ora button to start dialing.
or
XTo exit the phone book: press the~or
% button.
Redialing
The on-board computer saves the last names or
numbers dialed in the redial memory.
XPress the =or; button on the steering
wheel to select the Telmenu.
XPress the6button to switch to the redial
memory.
XPress the 9or: button to select the
desired name or number.
XPress the 6ora button to start dialing.
or
XTo exit the redial memory: press the~
or % button.
Assistance menu
Introduction
In the DriveAssistmenu, you have the follow-
ing options:
RDisplaying the assistanc egraphic
(Ypage 164)
RActivating/deactivatin gBlind Spot Assist
(Ypage 164)
Showing the distance display
XPress the =or; button on the steering
wheel to select the DriveAssistmenu.
XPress9or: to select AssistanceGraphic.
XPressa.
The DISTRONIC PLUS distanc edisplay
appears in the multifunction display.
Activating/deactivating Blind Spot
Assist
XPress the =or; button on the steering
wheel to select the DriveAssistmenu.
XPress the9or: button to select
Blind Spot Assist.
XPress a.
The currents election appears.
XTo activate/deactivate: press theabut-
ton again.
For further information about Blind Spot Assist,
see (
Ypage 137).
Service menu
In the Serv.menu, you have the following
options:
RCalling up display messages (Ypage 170)
RChecking the tire pressure electronically
(Ypage 258)
RCalling up the service due date
(Ypage 231)
RChecking the engine oil level (Ypage 227)
Settings menu
Introduction
In the Sett.menu, you have the following
options:
RChanging the instrument cluster settings
(Ypage 165)
RChanging the light settings (Ypage 165)
RChanging the vehicle settings (Ypage 166)
RChanging the conveniences ettings
(Ypage 166)
RRestoring the factor ysettings (Ypage 167)
164Menus and submenus
On-board computer and displays
Page 180 of 286
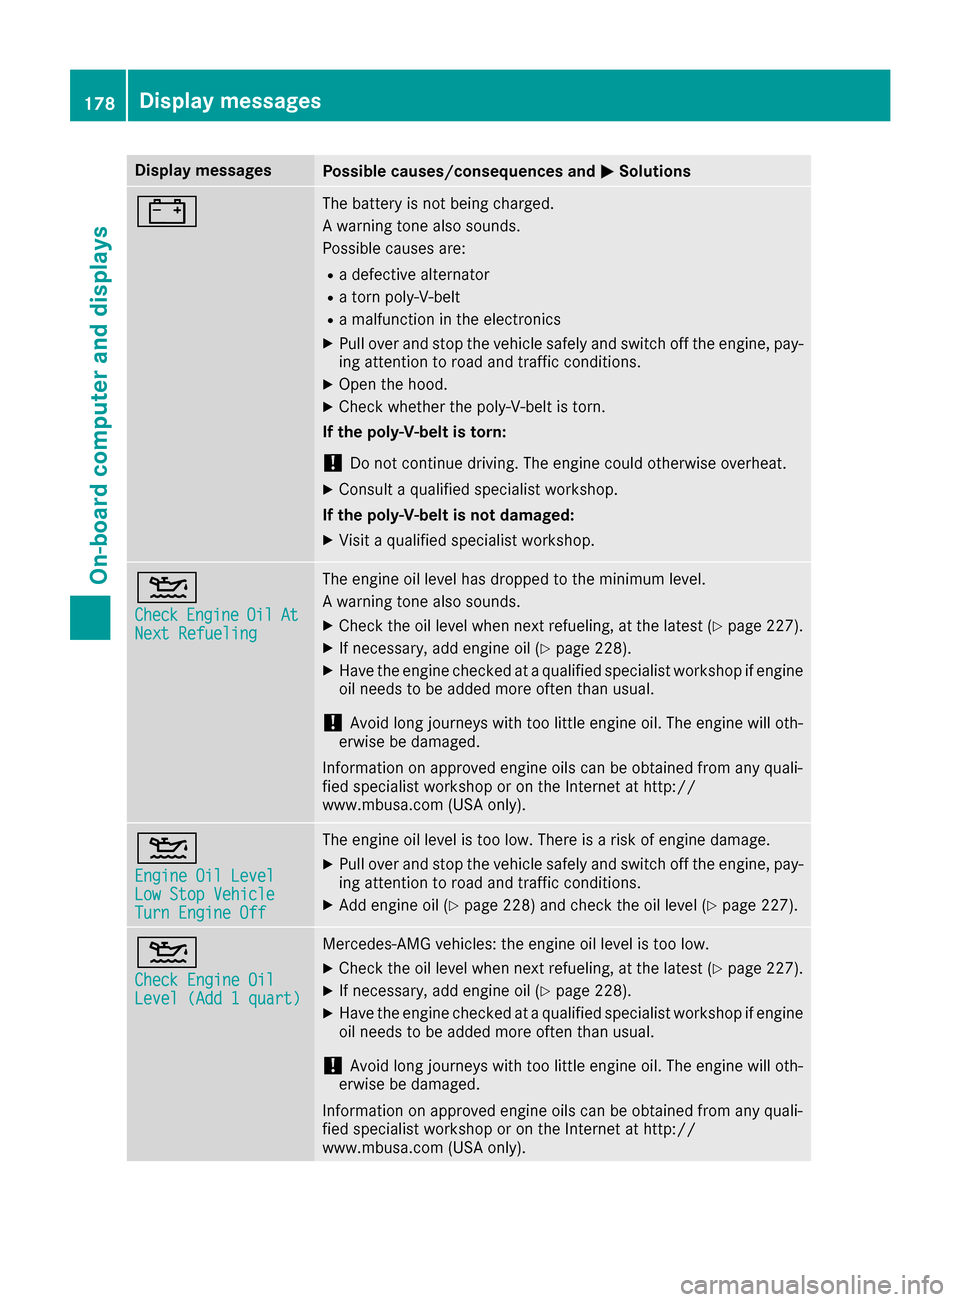
Display messagesPossible causes/consequences andMSolutions
#The battery is notbein gcharged.
Aw arning tone also sounds.
Possibl ecauses are:
Rad efective alternato r
Ratornp oly-V-belt
Ram alfunction in th eelectronics
XPull ove rand stop th evehicl esafely and switch off th eengine, pay-
ing attention to roa dand traffic conditions.
XOpe nthe hood.
XChec kwhether th epoly-V-belt is torn .
If th epoly-V-belt is torn:
!Do no tcontinue driving. The engin ecould otherwise overheat.
XConsult aqualified specialist workshop .
If th epoly-V-belt is not damaged :
XVisitaqualified specialist workshop .
4
CheckEngineOilAtNextRefueling
The engin eoil level has dropped to th eminimum level.
Aw arning tone also sounds.
XChec kthe oil level when next refueling, at th elatest (Ypage 227).
XIf necessary, add engin eoil(Ypage 228).
XHav ethe engin echecked ataq ualified specialist workshop if engin e
oil needs to be added mor eoften than usual.
!Avoid lon gjou rneys wit htoo littl eengineo il. The engin ewill oth-
erwise be damaged.
Information on approve dengineo ils can be obtained from any quali-
fie ds pecialist workshop or on th eInterne tath ttp://
www.mbusa.com (US Aonly).
4
Engine Oil LevelLow Sto pVehicl eTurnEngine Off
The engin eoil level is to olow. There is ariskofe ngined amage.
XPull ove rand stop th evehicl esafely and switch off th eengine, pay-
ing attention to roa dand traffic conditions.
XAdde ngineo il(Ypage 228) and chec kthe oil level (Ypage 227).
4
Check Engine OilLevel (Ad d1quart)
Mercedes-AMG vehicles: th eengineo il level is to olow.
XChec kthe oil level when next refueling, at th elatest (Ypage 227).
XIf necessary, add engin eoil(Ypage 228).
XHav ethe engin echecked ataq ualified specialist workshop if engin e
oil needs to be added mor eoften than usual.
!Avoid lon gjou rneys wit htoo littl eengineo il. The engin ewill oth-
erwise be damaged.
Information on approve dengineo ils can be obtained from any quali-
fie ds pecialist workshop or on th eInterne tath ttp://
www.mbusa.com (US Aonly).
178Display messages
On-boardc omputer andd isplays
Page 181 of 286
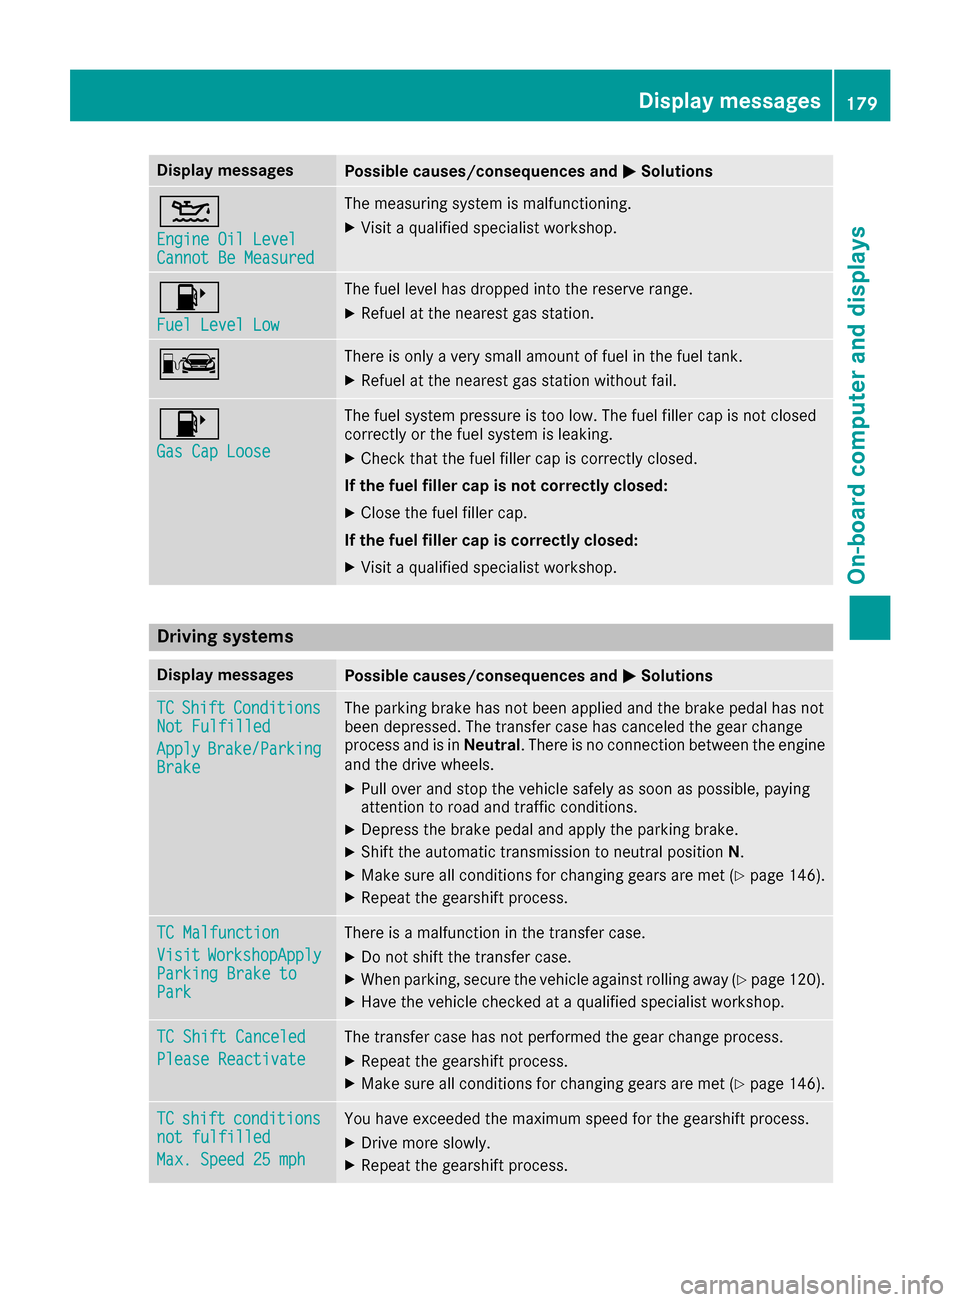
Display messagesPossible causes/consequences andMSolutions
4
Engine Oil LevelCannot Be Measured
The measuringsystem is malfunctioning .
XVisitaqualified specialist workshop .
8
FuelLevel Low
The fuel level has dropped int othe reserv erange.
XRefue lattheneares tgas station .
CThere is only averys mall amount of fuel in th efuel tank.
XRefue lattheneares tgas station without fail .
8
Gas Cap Loose
The fuel system pressur eistoolow. The fuel filler cap is no tclosed
correctl yorthefuel system is leaking .
XCheckthatthe fuel filler cap is correctl yclosed .
If th efuelfiller cap is not correctl yclosed :
XClosethe fuel filler cap .
If th efuelfiller cap is correctl yclosed :
XVisitaqualified specialist workshop .
Driving systems
Display messagesPossible causes/consequences and MSolutions
TCShiftConditionsNot Fulfilled
ApplyBrake/Parkin gBrake
The parking brak ehas no tbeen applie dand th ebrak epedal has no t
been depressed. The transfer cas ehas canceled th egear chang e
process and is in Neutral.There is no connection between th eengine
and th edrive wheels.
XPull ove rand stop th evehicl esafely as soo naspossible, payin g
attention to roa dand traffic conditions.
XDepress th ebrak epedal and apply th eparking brake.
XShift th eautomatic transmission to neutral position N.
XMak esurea ll condition sfor changing gear sare met (Ypage 146).
XRepeat th egearshift process.
TC Malfunction
VisitWorkshopAppl yParkingBrake toPark
There is amalfunction in th etransfer case.
XDo no tshift th etransfer case.
XWhe nparking ,secure th evehicl eagainst rollin gaway (Ypage 120).
XHavethe vehicl echecked ataq ualified specialist workshop .
TC Shift Canceled
Please Reactivate
The transfer casehas no tperformed th egear chang eprocess.
XRepeat th egearshift process.
XMak esurea ll condition sfor changing gear sare met (Ypage 146).
TCshiftcondition snot fulfilled
Max.Speed 25 mph
You hav eexcee ded th emaximum speed for th egearshift process.
XDrive mor eslowly.
XRepeat th egearshift process.
Display messages179
On-boardc omputer andd isplays
Z
Page 229 of 286
GWARNING
Opening the hood when the engine is over-
heated or when there is afire in the engine
compartment coul dexpose you to hot gases
or other service products. There is arisk of
injury.
Let an overheated engine cool downb efore
opening the hood. If there is afire in the
engine compartment, keep the hood closed
and contact the fire department.
Notes on the oil level
Depending on you rdriving style ,the vehicle
consumes up to 0.9 US qt (0.8 liters )ofoil per
600 mile s(1000 km). The oil consumption may
be higher than this whe nthe vehicle is new or if
you frequently drive at high engine speeds.
Depending on the engine, the oil dipstick may be
in ad ifferent location.
When checking the oil level:
Rpark the vehicle on alevels urface
Rthe engine should be switched off for approx-
imately five minutes if the engine is at normal
operating temperature
Rif the engine is not at normal operating tem-
perature, e.g. if the engine wa sonly started
briefly,w aita pproximately 30 minutes before
carrying out the measurement
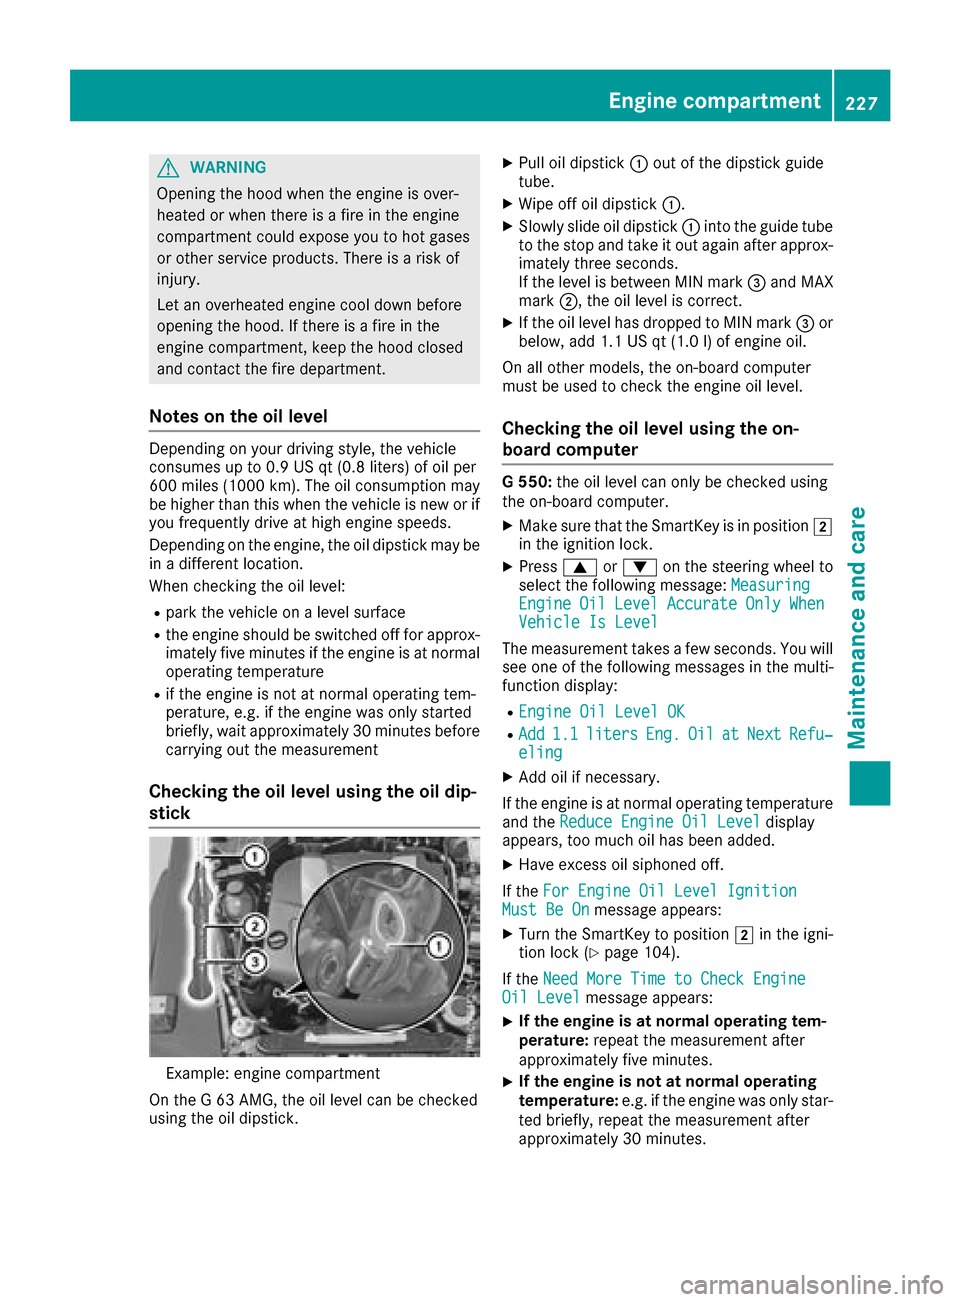
Checking the oil level usingt he oil dip-
stick
Example: engine compartment
On the G63AMG, the oil levelc an be checked
using the oil dipstick.
XPul loil dipstick :out of the dipstick guide
tube.
XWipeo ff oil dipstick :.
XSlowly slide oil dipstick :into the guide tube
to the stop and take it out again after approx-
imately three seconds.
If the levelisb etween MIN mark =and MAX
mark ;,the oil levelisc orrect.
XIf the oil levelh as dropped to MIN mark =or
below, add 1.1 US qt (1.0 l)of engine oil.
On all other models, the on-board computer
must be used to check the engine oil level.
Checking the oil level using the on-
board computer
G5 50: the oil level can only be checked using
the on-board computer.
XMake sure that the SmartKey is in position 2
in the ignition lock.
XPress 9or: on the steering wheel to
select the following message: Measuring
EngineOilLevelAccurateOnlyWhenVehicle Is Level
The measurement takesafew seconds. You will
see one of the following messages in the multi-
function display:
REngine Oil Level OK
RAdd1.1litersEng.OilatNextRefu‐eling
XAdd oil if necessary.
If the engine is at normal operating temperature and the Reduce Engine Oil Level
display
appears, too much oil has been added.
XHave excess oil siphoned off.
If the For Engine Oil Level Ignition
Must Be Onmessage appears:
XTurn the SmartKey to position 2in the igni-
tion lock (Ypage 104).
If the Need More Time to Check Engine
Oil Levelmessage appears:
XIf the engine is at norma loperating tem-
perature: repeat the measurement after
approximately five minutes.
XIf the engine is not at norma loperating
temperature: e.g. if the engine was only star-
ted briefly, repeat the measurement after
approximately 30 minutes.
Engine compartment227
Maintenance and care
Z
Page 230 of 286
If theEngine Oil Level Not Measurablewith Running Enginemessage appears:
XSwitch off the engine.
XIf the engine is at normal operating tem-
perature: waitabou tfive minutes before car-
rying out the measurement.
XIf the engine is not at normal operating
temperature: e.g. if the engine was only star-
ted briefly, wai tapproximately 30 minutes
before carrying out the measurement.
If you wish to cancel the measurement, press
the 9 or: button on the multifunction
steering wheel.
Adding engine oil
!Use only engine oils and oil filters that are
approved for vehiclesw ithaservice system. A
list of the engine oils and oil filters that have
been tested and approved in accordance with
Mercedes-Benz Specifications for Service
Products is available at any authorized
Mercedes-Benz Center.
The following cause engine failure or damage
to the exhaust system:
RUse of engine oils and oil filters that have
not been expressly approved for the service
system
RReplacement of engine oil and oil filter after
the replacement interval specifiedbyt he
service system has expired
RUse of engine oil additives
!Do not add too much oil. If the oil level is
above the "max" mark on the dipstick, too
much oil has been added. This can leadt o
damage to the engine or the catalytic con-
verter. Have excess oil siphoned off.
HEnvironmental note
When adding oil, take care not to spilla ny. If
oil enters the soil or waterways ,itisharmful to
the environment.
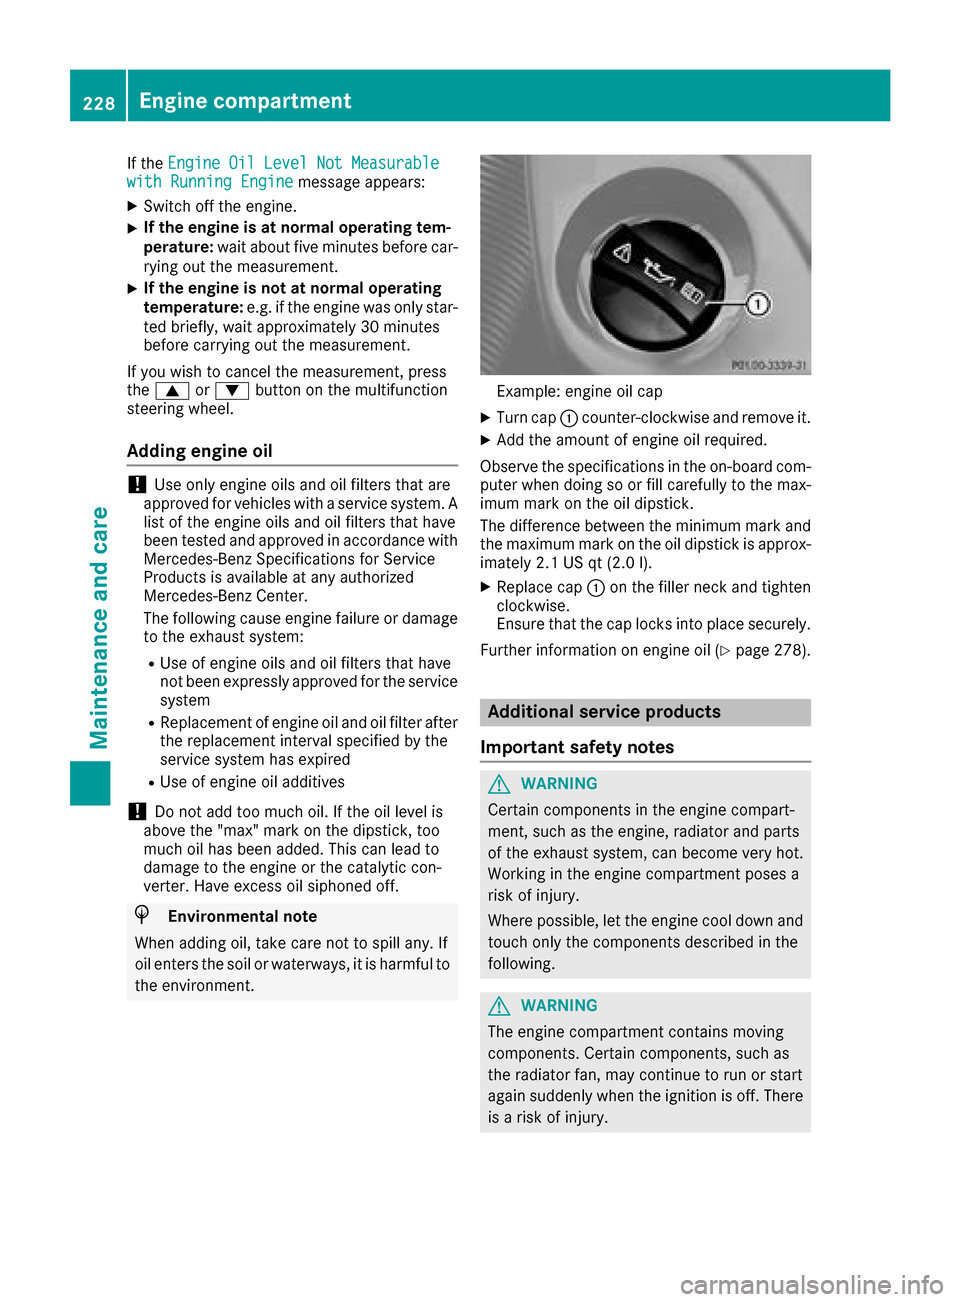
Example: engine oil cap
XTurn cap :counter-clockwise and remove it.
XAdd the amount of engine oil required.
Observe the specifications in the on-board com-
puter when doing so or fill carefully to the max-
imum mark on the oil dipstick.
The difference betweent he minimum mark and
the maximum mark on the oil dipstick is approx-
imatel y2.1 US qt (2.0 l).
XReplace cap :on the fille rneck and tighten
clockwise.
Ensur ethat the cap locks into place securely.
Further information on engine oil(
Ypage 278).
Additional servic eproducts
Important safety notes
GWARNING
Certai ncomponents in the engine compart-
ment, such as the engine, radiator and parts
of the exhaus tsystem, can become very hot.
Working in the engine compartment poses a
ris kofi njury.
Where possible ,let the engine cool dow nand
touch only the components described in the
following.
GWARNING
The engine compartment contains moving
components .Certai nc omponents ,suc ha s
the radiator fan, may continu etorun or start
agai nsudde nlyw hent he ignition is off. There
is ar iskofi njury.
228Engine compartment
Maintenancea nd care
Page 272 of 286
!On vehicles equipped withatire pressure
monitor, electronic componentsa re located
in the wheel.
Tire-mounting tools should not be used near
the valve. This could damage the electronic
components.
Only have tires changed at aqualified spe-
cialist workshop.
Alwayso bserve the instructionsa nd safety
notes under "Installing awheel" (
Ypage 270).
The wear patterns on the front and rear tires
differ, depending on the operating conditions.
Rotate the wheels before aclear wear pattern
has formed on the tires. Front tires typically
wear more on the shoulders and the rear tires in the center.
On vehicles that have the same size front and
rear wheels, you can rotate the wheels accord-
ing to the intervals in the tire manufacturer's
warranty book in your vehicle documents. If no
warranty book is available, the tires should be
rotated every 3,000 to 6,000 miles (5,000 to
10,000 km). Depending on tire wear, this may
be required earlier. Do not change the direction
of wheel rotation.
Cleant he contact surfaces of the wheel and the
brake disc thoroughly every time awheel is rota-
ted. Check the tire pressure and reactivate the
tire pressure monitor if necessary (
Ypage 259).
Direction of rotation
Tires with aspecified direction of rotation have
additional benefits, e.g. if there is arisk of hydro-
planing. You will only gain these benefits if the
correct direction of rotation is observed.
An arrow on the sidewall of the tire indicates its
correct direction of rotation.
You may mount the spare wheel against the
direction of rotation. Adhere to the time restric-
tion on use as well as the speed limitation speci-
fied on the spare wheel.
Storing wheels
Store tires that are not being used in acool, dry
and preferably dark place. Protect the tires from
oil, grease, gasoline and diesel.
Mounting awheel
Preparing the vehicle
GWARNING
When you remove the spare wheel from the
spare wheel bracket, the vehicle’s weight dis-
tribution changes. If the vehicle is already
raised, the jack could tip over. There is arisk
of injury.
Remove the spare wheel from the spare wheel
bracket before lifting the vehicle.
XStop the vehicle on solid, non-slippery and
level ground.
XApply the parking brake.
XBring the front wheels into the straight-ahead
position.
XShift the automatic transmission to position
P.
XSwitch off the engine.
XRemove the vehicle tools and jack from the
vehicle (Ypage 120).
XRemove the spare wheel from the spare wheel
bracket (Ypage 239).
XSafeguard the vehicle against rolling away.
Securing the vehicletop revent it from
rolling away
XPlace chocks or other suitablei tems under
the front and rear of the wheel that is diago-
nally opposite the wheel you wish to change.
Raising the vehicle
GWARNING
If you do not position the jack correctly at the
appropriate jacking point of the vehicle, the
jack could tip over with the vehicle raised.
There is arisk of injury.
Only position the jack at the appropriate jack-
ing point of the vehicle. The base of the jack
must be positioned vertically, directly under
the jacking point of the vehicle.
!Only position the jack at the appropriate
jacking point of the vehicle. Otherwise, you
could damage the vehicle.
270Changing awheel
Wheels and tires