2017 MERCEDES-BENZ G-Class oil level
[x] Cancel search: oil levelPage 274 of 286

Make sure that jackAis at the correct posi-
tion under axle carrier tube ?.The front or
rear axle must sit securely in the recess of
jack A.
XKeep pumping until axle carrier tube ?sits
securely in the recess of jack Aand the base
of the jack lies evenly on the ground.
Ensure that the jack is located vertically under
the jackingp oint.
XRaise the vehicle by pumping until the tire is
no more than 1.2 in (3 cm) off the ground.
Removingawheel
!Do not place wheel bolts in sand or on adirty
surface. The bolt and wheel hub threads could
otherwise be damaged when you screw them
in.
When mounting/removing wheels, and for as
long as the wheels are removed, avoid applying
any external force on the brake disks. This could impair the level of comfort when braking.
XUnscrew the wheel bolts.
XRemove the wheel.
Mounting anew wheel
GWARNING
Oiled or greased wheel bolts/wheel nuts and
damaged wheel bolt/wheel nut/wheel hub
threads can cause wheel bolts/wheel nuts to
come loose. As aresult, you could lose a
wheel while driving. There is arisk of an acci-
dent.
Never oil or grease wheel bolts/wheel nuts. In
the event of damage to the threads, contact a
qualified specialist workshop immediately.
Have the damaged wheel bolts/wheel nuts or
hub threads replaced/renewed. Do not con-
tinue driving.
GWARNING
If you tighten the wheel bolts or wheel nuts
when the vehicle is raised, the jack could tip
over. There is arisk of injury.
Only tighten the wheel bolts or wheel nuts
when the vehicle is on the ground.
!To prevent damage to the paintwork, hold
the wheel securely against the wheel hub
while screwing in the first wheel bolt.
Always pay attention to the instructions and
safety notes in the "Changing awheel" section
(
Ypage 269).
Only use wheel bolts that have been designed
for the wheel and the vehicle. For safety rea-
sons, Mercedes-Benzr ecommends that you
only use wheel bolts which have been approved
for Mercedes-Benzv ehicles and the respective
wheel.
XClean the wheel and wheel hub contact sur-
faces.
XPlace the new wheel on the wheel hub and
push it on.
XTighten the wheel bolts until they are finger-
tight.
Lowering the vehicle
GWARNING
The wheels could work loose if the wheel nuts and bolts are not tightened to the specified
tightening torque. There is arisk of accident.
Have the tightening torque immediately
checked at aqualified specialist workshop
after awheel is changed.
XSlowly open the pressure release screw on
the jack using the pump lever by approx-
imately one full turn and carefully lower the
vehicle (
Ypage 270).
XYou can put the jack aside.
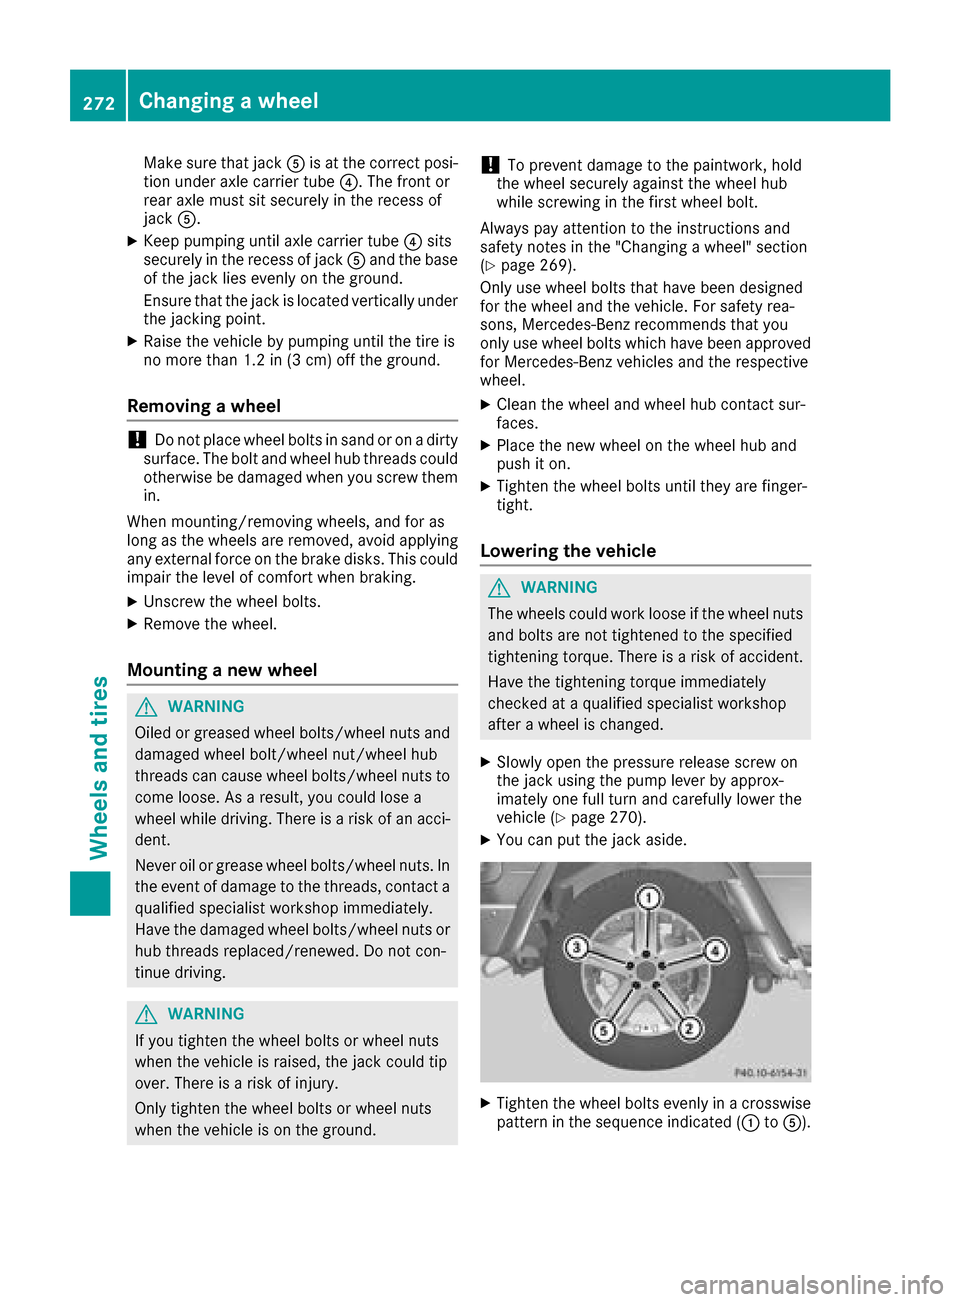
XTighten the wheel bolts evenly in acrosswise
pattern in the sequence indicated (: toA).
272Changing awheel
Wheels and tires
Page 278 of 286

from the data shownhere. The correct data
for you rvehiclec an be found on the vehicle
identificatio nplate that is mounted on your
vehicle.
Vehicle identification number (VIN)
:VIN (stamped into the chassi sonthe right-
hand side,w hen viewed in the direction of
travel)
The VIN can als obefound on the vehiclei den-
tification plate (
Ypag e275).
The VIN can als obefound at the lower edge of
the windshield (
Ypag e276).
Engine number
Example :engine compartment
:
Emissions control information plate, includ-
ing the certification of both federala nd Cali-
forniane missions standards
;Engine numbe r(stamped into the crank-
case)
Service products and filling capaci-
ties
Important safety notes
GWARNING
Service products may be poisonousa nd haz-
ardous to health. There is arisk of injury.
Comply with instructions on the use ,storage
and disposal of service products on the labels
of the respective original containers. Always
store service products sealed in their original
containers. Always keep service products out
of the reach of children.
HEnvironmental note
Disposeofs ervice products in an environ-
mentall yresponsiblem anner.
Service products include the following:
RFuels
RLubricants (e.g. engine oil,t ransmission oil)
RCoolant
RBrake fluid
RWindshieldwasher fluid
RClimate control syste mrefrigerant
Components and service products must match.
Only use products recommendedbyM ercedes-
Benz. Damag ewhich is caused by the use of
products which have not been recommendedi s
not covered by the Mercedes-Benz warranty or
goodwil lgestures. Products approved by
Mercedes-Benz are listed in this Operator's
Manual in the appropriate section.
Informatio nontested and approved products
can be obtained at aMercedes-Benz Service
Center or on the Internet at
http://bevo.mercedes-benz.com.
You can recognize service products approved by
Mercedes-Benz by the following inscription on
the containers:
RMB-Freigabe (e. g. MB-Freigabe 229.51)
RMB Approval( e. g. MB Approval2 29.51)
Other designations or recommendations indi-
cate alevelofq uality or aspecificatio nin
accordance with an MB Sheet numbe r(e.g. MB
229.5). They have not necessarily been
approved by Mercedes-Benz.
276Service products and filling capacities
Technical data
Page 282 of 286

The antifreeze/corrosion inhibitor concentra-
tion in the engine cooling system should:
Rbe at least 50%. This will protectthe engine
cooling system against freezin gdown to
approximately -35 ‡(-37 †).
Rnot exceed 55% (antifreez eprotection down
to -49 ‡[-45 †]). Otherwise, heat will not be
dissipated as effectively.
Mercedes-Benz recommends an antifreeze/
corrosion inhibitor in accordanc ewith MB Spec-
ifications for ServiceP roducts 310.1.
iWhen the vehicle is first delivered, it is filled
with acoolant mixture that ensures adequate
antifreeze and anti-corrosion protection.
iThe coolant is checked at specified intervals
at aq ualified specialist workshop.
The engine cooling system is filled with coolant
at the factor ywhich contains antifreeze/corro-
sion inhibitor that ensures protection down to
approximately -35 ‡(-37 †).
Capacity
Missing values were not availableatt ime of
going to print.
ModelCapacity
G5 50Approx.1 1.1 US qt
(10.5 l)
G63A MGApprox.1 4.6 US qt
(13.8 l)
G65A MG
Windshield/headlamp cleaning sys-
tem
Important safety notes
GWARNING
Windshield washer concentrate could ignite if it comes into contact with hot engine compo-
nentsort he exhaust system. There is arisk of
fire and injury.
Make sure that no windshield washer con-
centrate is spilled next to the filler neck.
!Do not add distilled or de-ionized water to
the washer fluid container. Otherwise, the
level sensor may be damaged.
!Only MB SummerFit and MB WinterFit
washer fluid should be mixed together. The
spray nozzles may otherwise become
blocked.
Do not use distilled or de-ionized water. Other-
wise, the level sensor may give afalse reading.
When handling washer fluid, observe the impor-
tant safety notes on service products
(
Ypage 276).
At temperatures above freezing:
XFill the washer fluid reservoir with amixture of
water and windshield washer fluid, e.g. MB
SummerFit.
Add 1part MB SummerFit to 100 parts water.
At temperatures below freezing:
XFill the washer fluid reservoir with amixture of
water and washer fluid, e.g. MB WinterFit.
For the correctm ixing ratio refer to the infor-
mation on the antifreeze reservoir.
iAdd windshield washer fluid, e.g. MB Sum-
merFit or MB WinterFit, to the washer fluid all
year round.
Climate control system refrigerant
Important safety notes
The climate control system of your vehicle is fil-
led with refrigerant R‑ 134a.
The instruction label regarding the refrigerant
type used can be found on the radiator cross
member.
!Only the refrigerant R‑134a and the PAG oil
approved by Mercedes-Benz may be used.
The approved PAG oil may not be mixed with
any other PAG oil that is not approved for
R-134a refrigerant.O therwise, the climate
control system may be damaged.
Servicew ork, such as refilling with refrigerant or
replacing component parts, may only be carried
out by aqualified specialist workshop. All appli-
cable regulations must be adhered to, SAE
standard J639 included.
Always have work on the climate control system carried out at aqualified specialist workshop.
280Service products and filling capacities
Technical data