2017 MERCEDES-BENZ G-Class reset
[x] Cancel search: resetPage 13 of 286

Google™ Local Searchsee alsoD igital Operator's Man-
ual. ................................................. 198
GTW (Gross Trailer Weight) (defini-
tion) .................................................... 268
H
Hazard warning lamps ........................ 87
Head restraints
Adjusting .........................................7 6
Adjusting (rear )................................ 77
Installing/removing (rear )................ 77
Luxur y.............................................. 76
Resetting (front) ............................... 76
see NECK-PR Oheadr estraints
see NECK-PR Oluxuryh eadr estraints
Headlamps
Cleaning system (function) .............. 86
Cleaning system (notes) ................ 280
Fogging up ....................................... 87
Protective grill e................................ 90
see Automatic headlamp mode
Heating
see Climate control
Hig hbeamf lasher ............................... 87
High-beam headlamps
Display message ............................ 176
Switching on/off .............................. 87
HOLDf unction
Activating ....................................... 139
Activation conditions ..................... 139
Deactivating ................................... 139
Function/note s............................. 139
Generaln otes ................................ 139
Home address
see also Digital Operator's Man-
ual.................................................. 198
Hood
Closing ........................................... 226
Displa ymessage ............................ 186
Important safety notes .................. 225
Opening ......................................... 225
Horn ...................................................... 31
Hydroplaning ..................................... 125
I
Ignitionlock
see Key positions
Immobilizer .......................................... 61
Indicator lamp
Replacing bulb s(rear) ...................... 91
Insect protection on the radiator .... 226
Instrument cluster
Overview .......................................... 32
Warning and indicator lamps ........... 32
Instrument clusterl ighting .............. 157
Interior lighting
Automati ccontrol ............................ 88
Delayed switch-off (on-board
computer) ...................................... 166
Overview .......................................... 88
iPod
®
see also Digital Operator's Man-
ua l.................................................. 198
J
Jack
Pump lever ..................................... 270
Storage location ............................ 238
Using ............................................. 270
Jump starting (engine) ...................... 243
K
Keyp ositions
SmartKey ....................................... 104
L
Lap time (RACETIMER) ...................... 168
LATCH-type (ISOFIX )child seat
anchors ................................................ 51
License plate lamp (display mes-
sage) ................................................... 176
Light senso r(display message) ....... 176
Lights
Activating/deactivating the inte-
riorlighting delaye dswitch-off ....... 166
Automati cheadlamp mode. ............. 86
Combination switch ......................... 87
Fogged up headlamp s...................... 87
Generaln otes .................................. 85
Index11
Page 15 of 286

Connecting another mobile
phone........................................... .203
Frequencie s................................... 27 4
Instal latio n..................................... 274
Menu (on-board computer) ............ 163
Transmissiono utput (maximum ).... 274
Modifying the programming
(SmartKey) ...........................................6 4
Mountingw heels
Lowering the vehicle. ..................... 272
Mounting anew wheel. .................. 272
Preparing the vehicle. ....................270
Raising the vehicle ......................... 270
Removing awheel .......................... 272
Securing the vehicle against roll-
ing away ........................................ 270
MP3
Operation ....................................... 162
see also Digita lOperator's Man-
ua l..................................................1 98
see separate operating instructions
Multifunctio ndisplay
Function/notes .............................1 59
Permanent display. ........................ 165
Multifunctio nsteering wheel
Operating the on-board computer .. 158
Overview .......................................... 33
Music files
see also Digita lOperator's Man-
ua l..................................................1 98
N
Navigation
Entering adestination .................... 200
Menu (on-board computer) ............ 161
see also Digita lOperator's Man-
ua l..................................................1 98
see separate operating instructions
NECK-PRO head restraints
Operation ......................................... 48
Resetting triggered .......................... 48
NECK-PRO luxury head restraints
Important safety notes .................... 48
Operation ......................................... 48
Resetting whe ntriggered ................. 49
Notes on breaking-inan ew vehi-
cle ....................................................... 103
O
Occupant safety
Air bag s...........................................4 3
Automatic measures after an acci-
dent ................................................. 49
BabySmart™ ai rbag deactivation
system ............................................. 53
Childre ninthe vehicl e..................... 49
Important safety notes. ................... 38
Introduction to the restraint sys-
tem .................................................. 38
PASSENGER AIR BAG indicator
lamps ............................................... 39
Pets in the vehicl e........................... 57
Restraint system warning lamp ........ 38
Seatb elt. ......................................... 39
Odometer ........................................... 160
Off-road
Differential locks ............................ 147
Off-road ABS .................................... 58
Off-road driving
Checklist afte rdriving off-road ...... 129
Checklist before driving off-road .... 128
Driving on sand .............................. 129
Generali nformation ....................... 127
Important safety notes .................. 127
Traveling uphill ............................... 130
Off-road fording ................................. 126
Off-road system
Permanent all-wheeld rive ............. 139
Oil
see Engine oil
On-board computer
AMG menu ..................................... 167
Assistance menu ........................... 164
Audio menu ................................... 162
Convenience submenu .................. 166
Displa ymessages .......................... 169
Factory settings submenu ............. 167
Important safety notes .................. 157
Instrument cluster submenu .......... 165
Lighting submenu .......................... 165
Menu overview .............................. 159
Message memory .......................... 170
Navigation menu ............................ 161
Operation ....................................... 158
RACETIMER ................................... 168
Index13
Page 16 of 286

Service menu ................................. 164
Settingsmenu ............................... 164
Standard display ............................ 160
Telephone menu ............................ 163
Tripm enu ...................................... 160
TV operation .................................. 163
Vehicl esubmenu ........................... 166
Video DVD operation ..................... 162
Operatin gsafety
Declaration of conformity ................ 26
Important safety notes .................... 26
Operatin gsystem
see On-board computer
Operation
Digital Operator's Manua l................ 22
Operator's Manual
Vehicl eequipment ........................... 24
Outside temperature display ........... 157
Overhead controlp anel...................... 36
Override feature
Rear sid ewindow s........................... 56
P
Paint code number ............................ 275
Paintwork (cleaning instructions) ... 233
Parking
Engaging park position .................. 110
Important safety notes .................. 120
Parking brake ................................ 121
Position of exterio rmirror, front-
passenger sid e................................. 83
Rear vie wcamera .......................... 143
Switching off the engine ................ 121
see PARKTRONIC
Parking aid
see Exterior mirrors
see PARKTRONIC
see Rear vie wcamera
Parking brake
Applying ......................................... 121
Displa ymessage ............................ 172
Emergency braking ........................ 121
Warning lamp ................................. 193
Parking lamps
Switching on/off. ............................. 86
PARKTRONIC
Deactivating/activating ................. 142 Driving system ............................... 140
Function/note
s............................. 140
Important safety notes .................. 140
Problem (malfunction) ................... 142
Range of the sensors ..................... 140
Trailer towing ................................. 142
Warning display ............................. 141
PASSENGER AI RBAG OFF
Indicato rlam p.................................. 39
Problems (malfunctions ).................. 55
Permanent all-whee ldrive
Off-road system ............................. 139
Pets in the vehicle ............................... 57
Phone book
see also Digital Operator's Man-
ual.................................................. 198
Plastict rim (cleaning instruc-
tions) .................................................. 236
Powe rsuppl y(trailer) ....................... 156
Powe rwashers .................................. 232
Program selecto rbutton .................. 113
Protectio nagainst theft
ATA (Anti-Theft Alarm system). ........ 61
Immobilizer ...................................... 61
Protectio nofthe environment
Generaln otes .................................. 23
Pulling away
Automati ctransmission ................. 105
Generaln otes ................................ 105
Trailer ............................................ 105
Q
QR code
Mercedes-Benz Guid eApp ................. 1
Rescuec ard ..................................... 28
Qualified specialist workshop ........... 27
R
RACETIME R(on-board computer,
Mercedes-AMG vehicles) .................. 168
RACETIMER
Deleting al llap s............................. 169
Displaying and starting .................. 168
Displaying the intermediate time ... 168
Resetting the current la p............... 169
Starting anew la p.......................... 168
14Index
Page 21 of 286

Summer tiresinwinter .................. 253
Temperature .................................. 263
TIN (Tire Identification Number)
(definition) ..................................... 269
Tire bead (definition) ...................... 269
Tire pressure (definition) ................ 269
Tire pressures (recommended )...... 268
Tire size (data )............................... 273
Tire size designation, load-bearing
capacity, speed rating .................... 264
Tire tread. ...................................... 252
Tire tread( definition) ..................... 269
Totall oadlim it (definition) ............. 269
Tractio n......................................... 263
Tractio n(definition) ....................... 269
Tread wear ..................................... 263
TWR (permissibl etraile rdrawbar
noseweight) (definition) ................. 269
Uniform Tire Quality Grading
Standard s...................................... 263
Uniform Tire Quality Grading
Standard s(de finition) .................... 267
Wea rindicator (definition) ............. 269
Wheel and tire combination ........... 273
Wheel rim (definition) .................... 268
see Fla ttire
Top Tether ............................................ 52
Tow-starting
Emergency engine starting ............ 248
Important safety notes .................. 246
Towin gatrailer
Axle load ,permissibl e.................... 284
Cleaning the traile rtow hitch ......... 235
Coupling up atraile r...................... 154
Decoupling atraile r....................... 155
Driving tip s.................................... 151
Important safety notes .................. 149
Installing the ball coupling ............. 152
Lights display message .................. 176
Pulling away with atraile r.............. 105
Shift rang e..................................... 113
Trailer load s................................... 284
Trailer tow hitch ............................. 284
Towin gaway
Important safety guideline s........... 246
In the event of malfunctions .......... 248
With both axle
s on the ground ....... 247 Towin
geye
Front .............................................. 247
Rear ............................................... 247
Trafficr eports
see also Digital Operator's Man-
ua l.................................................. 198
Trailer
7-pi nconnecto r............................. 156
Power supply ................................. 156
Trailer coupling
see Towing atrailer
Trailer loads
Technical data ............................... 284
Trailer loads and drawbar nose-
weights ............................................... 155
Trailer tow hitch
Ballposition ................................... 284
Trailer towing
ESP
®................................................ 60
PARKTRONIC ................................. 142
Permissibl etraile rloads and
drawbar noseweights ..................... 155
Transfer case
Generaln otes ................................ 145
Shift rang e..................................... 145
Shifting .......................................... 146
Shifting (general notes). ................. 146
Shifting (important safety notes). .. 146
Shifting to neutral .......................... 147
Switching off the off-road gear
rati o............................................... 146
Switching on the off-road gear
rati o............................................... 146
Transmission
see Automati ctransmission
Transmissio npositions .................... 112
Transporting the vehicle .................. 247
Traveling uphill
Brow of hill ..................................... 130
Trim piece s(clea ning instruc-
tions) .................................................. 236
Trip computer (on-board com-
puter) .................................................. 160
Trip odometer
Calling up ....................................... 160
Resetting (on-board computer) ...... 160
Index19
Page 29 of 286

subject to the two following two conditions: 1)
These devices may not cause harmful interfer-
ence, and 2) These devices must accept any
interference received, including interference
that may cause undesired operation. Changes
or modifications not expressly approved by the
party responsible for compliance could void the
user’s authority to operate the equipment."
Canada:"The wireless devices of this vehicle
comply with Industry Canada license-exempt
RSS standard(s). Operation is subject to the fol-
lowing two conditions: (1) These devices may
not cause interference, and (2) These devices
must accept any interference, including inter-
ference that may cause undesired operation of
the device."
Diagnostics connection
The diagnostics connection is only intended for
the connection of diagnostic equipment at a
qualified specialist workshop.
GWARNING
If you connect equipment to adiagnostics
connection in the vehicle, it may affect the
operation of vehicle systems. As aresult, the
operating safety of the vehicle could be affec-
ted. There is arisk of an accident.
Only connect equipment to adiagnostics con-
nection in the vehicle, which is approved for
your vehicle by Mercedes-Benz.
GWARNING
Objects in the driver's footwell can restrict the pedal travel or obstruct adepressed pedal.
The operating and road safety of the vehicle is
jeopardized. There is arisk of an accident.
Make sure that all objects in the vehicle are
stowed correctly, and that they cannot enter
the driver's footwell. Install the floormats
securely and as specified in order to ensure
sufficient clearance for the pedals. Do not use
loose floormats and do not place floormats on
top of one another.
!If the engine is switched off and equipment
on the diagnostics connection is used, the
starter battery may discharge. Connectinge
quipment to the diagnostics con-
nection can lead to emissions monitoring infor-
mation being reset, for example. This may lead
to the vehicle failing to meet the requirements of
the next emissions test during the main inspec-
tion.
Qualified specialist workshop
An authorized Mercedes-Benz Center is aquali-
fied specialist workshop. It has the necessary
specialist knowledge, tools and qualifications to
correctly carry out the work required on your
vehicle. This is especially the case for work rel-
evant to safety.
Observe the notes in the Maintenance Booklet.
Always have the following work carried out at an
authorized Mercedes-Benz Center:
Rwork relevant to safety
Rservice and maintenance work
Rrepair work
Ralterations, installation work and modifica-
tions
Rwork on electronic components
Correct use
If you remove any warning stickers, you or oth-
ers could fail to recognize certain dangers.
Leave warning stickers in position.
Observe the following information when driving
your vehicle:
Rthe safety notes in this manual
Rtechnical data for the vehicle
Rtraffic rules and regulations
Rlaws and safety standards pertaining to motor vehicles
Reporting safety defects
USA only:
The following text is reproduced as required of
all manufacturers under Title 49, Code of U.S.
Federal Regulations, Part 575 pursuant to the
National Traffic and Motor Vehicle Safety Act of
1966.
If you believe that your vehicle has adefect
which could cause acrash or could cause injury
or death, you should immediately inform the
Operating safety27
Introduction
Z
Page 50 of 286

independently of whether the front-
passenger seat is occupied
REmergency TensioningDevices, if the system
determines that deploymentc an offer addi-
tional protection in this situation
RWindo wcurtain air bags on the driver's and
front-passenge rside in certain situations
when the vehicle rolls over,ift he system
determines that deploymentc an offer addi-
tional protection to that provided by the seat
belt
iNot all air bags are deployed in an accident.
The differenta ir bag systems work independ-
ently of each other.
How the air bag system worksisd etermined
by the severity of the accident detected,
especially the vehicle deceleratio noraccel-
eration and the apparentt ype of accident:
RFrontal collision
RSide impact
RRollover
NECK-PRO head restraints/NECK-
PRO luxury head restraints
Important safetyn otes
GWARNING
The function of the head restraint may be
impaired if you:
Rattach object ssuch as coat hangers to the
head restraints, for example
Ruse head restraint covers
If you do so, the head restraint scannot fulfill
their intended protective function in the event of an accident .Inaddition ,object sattached
to the head restraint scould endanger other
vehicle occupants. There is an increased risk
of injury.
Do not attach any object stothe head
restraint sand do not use head restraint cov-
ers.
Method of operation
NECK-PRO head restraints/NECK-PRO luxury
head restraint soffer additional protection
against head and nec kinjuries. In the eventofa rear collision of
acertain severity, the NECK-
PRO head restraints/NECK-PRO luxury head
restraint sonthe driver's and front-passenger
seats are movedf orwards and upwards. This
provides better head support.
If the NECK-PRO head restraints/NECK-PRO
luxury head restraint shave been triggeredina n
accident ,reset the NECK-PRO head restraints/
NECK-PRO luxury head restraint sonthe driver's
seat and the front-passenge rseat
(
Ypage 48). Otherwise, the additional protec-
tion will not be available in the eventofa nother
rear-end collision. You can see that aNECK-PRO
head restraint/NECK-PRO luxury head restraint
has been triggeredifitist ilted forward and can
no longer be adjusted.
Mercedes-Ben zrecommends that you have the
functionality of the NECK-PRO head restraints/
NECK-PRO luxury head restraint schecked at a
qualified specialist workshop after arear-end
collision.
Resetting atriggered NECK-PRO head
restraint/NECK-PRO luxury head
restraint
NECK-PRO head restraints
Do not insert your finger betwee nthe cushio nof
the head restraint and the cover. Pay particular
attention while resettin gthe NECK-PRO head
restraints.
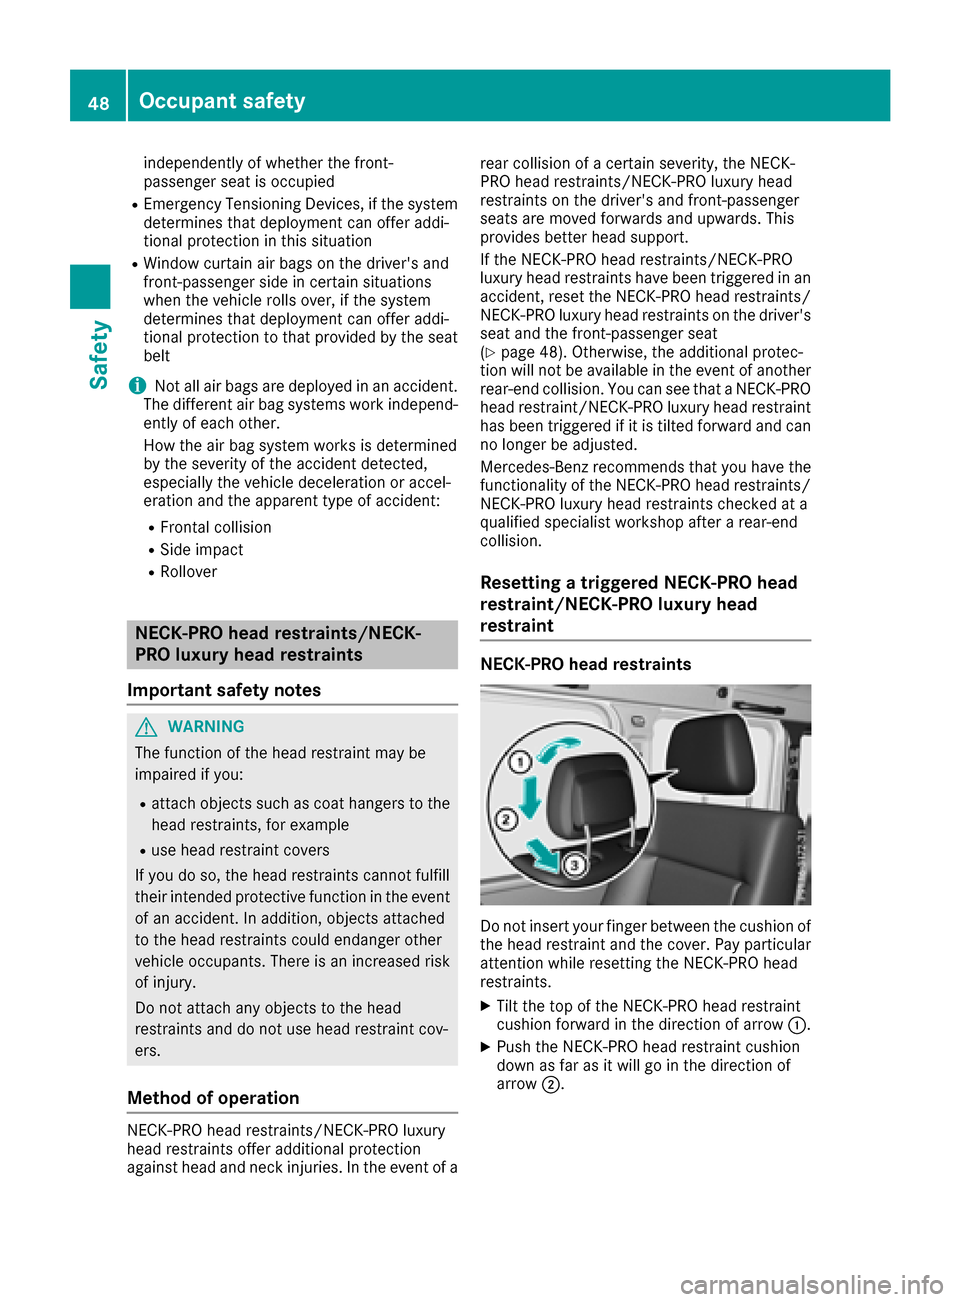
XTilt the top of the NECK-PRO head restraint
cushio nforward in the direction of arrow :.
XPush the NECK-PRO head restraint cushion
down as far as it will go in the direction of
arrow;.
48Occupant safety
Safety
Page 51 of 286

XWith your hand flat, firmly push the NECK-
PRO head restraint cushion back in the direc-tion of arrow =until it engages.
XRepeat this procedure for the secondN ECK-
PRO head restraint.
iResettin gthe NECK-PRO head restraints
requires alot of strength. If you have difficulty
resetting the NECK-PRO head restraints, have
this work carried out at aqualified specialist
workshop.
NECK-PRO luxuryh ead restraints
Do not insert your finger between the cushion of
the head restraint and the cover. Pay particular
attention while resetting the NECK-PRO luxury
head restraints.
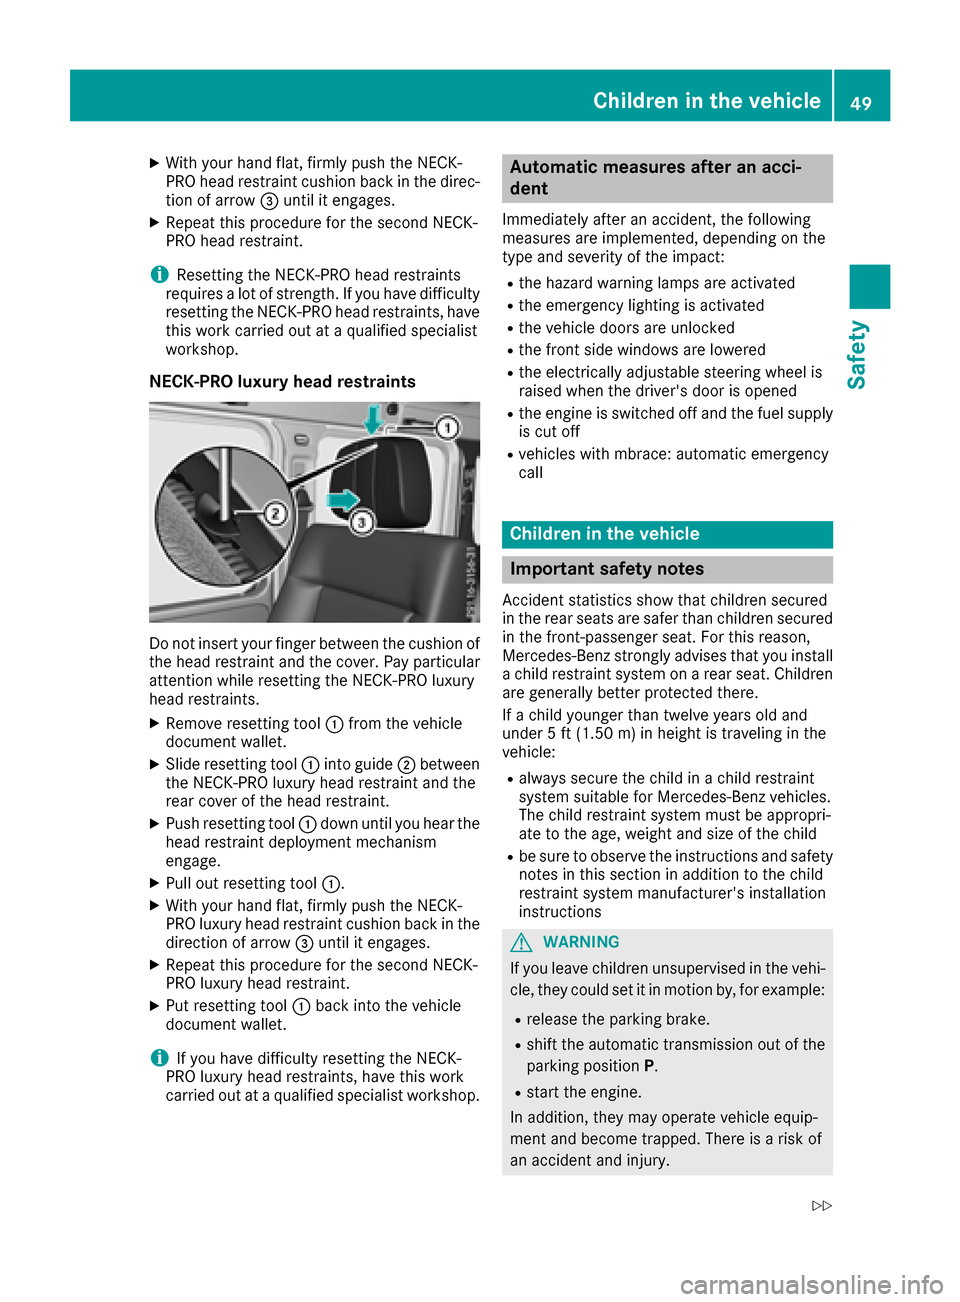
XRemove resetting tool :from the vehicle
document wallet.
XSlide resetting tool :into guide ;between
the NECK-PRO luxury head restraint and the
rear cover of the head restraint.
XPush resetting tool :down until you hear the
head restraint deployment mechanism
engage.
XPull out resetting tool :.
XWith your hand flat, firmly push the NECK-
PRO luxury head restraint cushion back in the
direction of arrow=until it engages.
XRepeat this procedure for the secondN ECK-
PRO luxury head restraint.
XPut resetting tool :back into the vehicle
document wallet.
iIf you have difficulty resetting the NECK-
PRO luxury head restraints, have this work
carried out at aqualified specialist workshop.
Automatic measures after an acci-
dent
Immediately after an accident ,the following
measures are implemented, depending on the
type and severityoft he impact:
Rthe hazard warning lamps are activated
Rthe emergency lighting is activated
Rthe vehicle doors are unlocked
Rthe frontside windows are lowered
Rthe electrically adjustable steerin gwheel is
raised when the driver's door is opened
Rthe engine is switched off and the fuel supply
is cut off
Rvehicles with mbrace: automatic emergency
call
Children in the vehicle
Important safety notes
Accident statistics show that children secured
in the rear seats are safer than children secured
in the front-passenger seat. For this reason,
Mercedes-Benz strongly advises that you install
ac hild restraint system on arear seat. Children
are generally better protected there.
If ac hild younger than twelve years old and
under 5ft(1.50m )inh eight is travelin ginthe
vehicle:
Ralwayss ecure the child in achild restraint
system suitable for Mercedes-Benz vehicles.
The child restraint system must be appropri-
ate to the age, weight and size of the child
Rbe sure to observe the instruction sand safety
notes in this section in addition to the child
restraint system manufacturer's installation
instructions
GWARNING
If you leave children unsupervised in the vehi-
cle, they could set it in motion by, for example:
Rrelease the parking brake.
Rshift the automatic transmission out of the
parking position P.
Rstart the engine.
In addition, they may operate vehicle equip-
ment and become trapped. There is arisk of
an accident and injury.
Children in the vehicle49
Safety
Z
Page 78 of 286

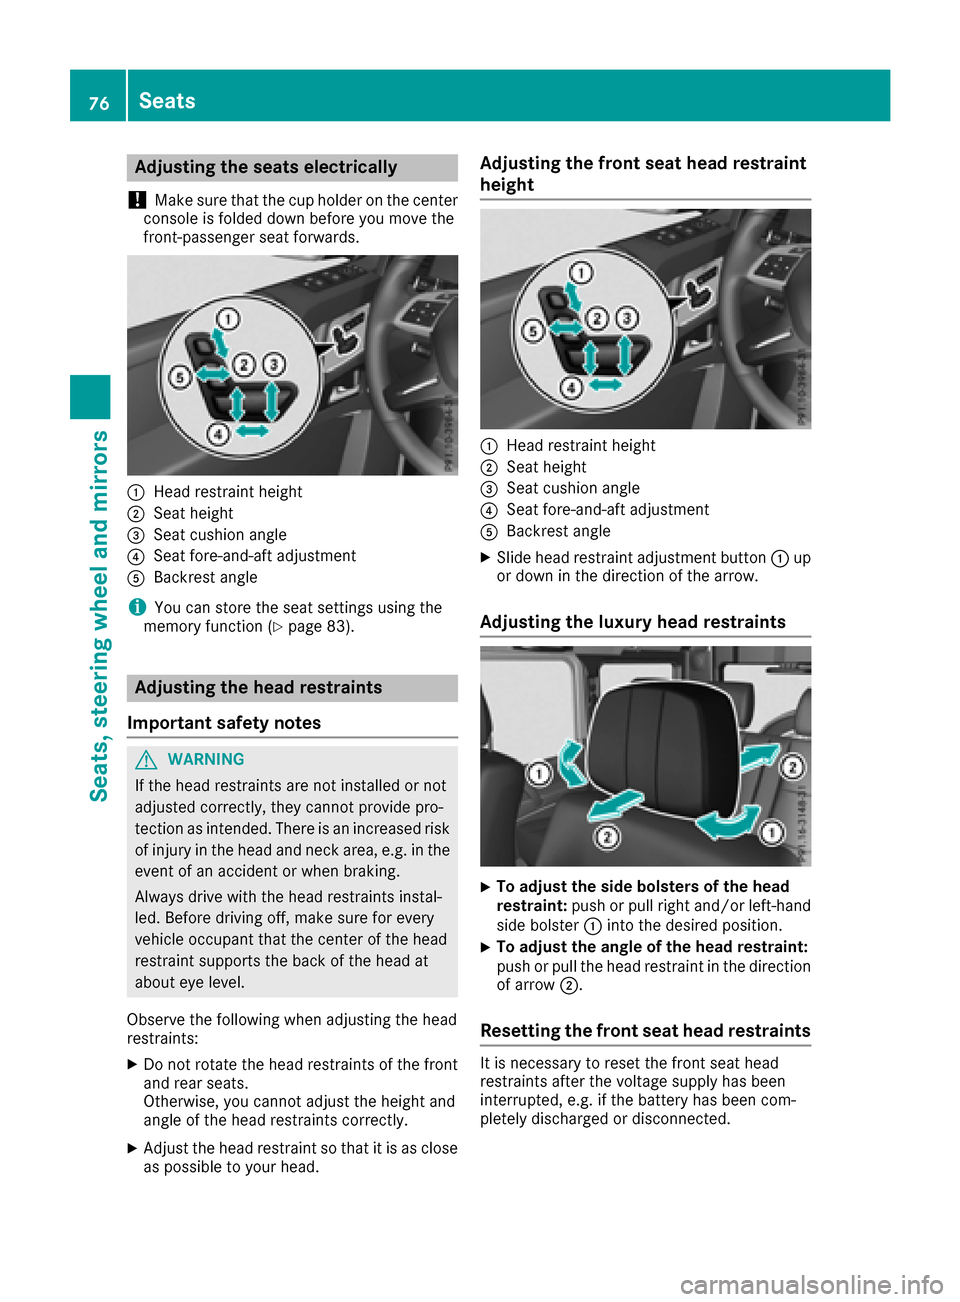
Adjusting theseats electri cally
!
Mak esuret hatthe cup holder on th ecenter
console is folded down before you mov ethe
front-passenger seat forwards.
:Hea drestrain theight
;Seat height
=Seat cushion angle
?Seat fore-and-af tadjustmen t
ABackrest angle
iYou can store th eseat setting susingthe
memory function (Ypage 83).
Adjusting th eheadr estraints
Import ant safety notes
GWARNIN G
If th ehead restraints are no tinstalled or no t
adjusted correctly, they canno tprovid epro-
tection as intended. There is an increased ris k
of injury in th ehead and neck area, e.g. in th e
event of an acciden torwhen braking .
Always drive wit hthe head restraints instal -
led. Befor edrivin goff,m akes uref or every
vehicl eoccupant that th ecenter of thehead
restrain tsupport sthe bac koft hehead at
about eye level.
Observ ethe followin gwhen adjusting th ehead
restraints :
XDo notrotate th ehead restraints of th efront
and rear seats.
Otherwise ,you canno tadjust th eheight and
angle of th ehead restraints correctly.
XAdjus tthe head restrain tsothatiti sasc lose
as possibl etoyour head .
Adjusting th efront seath eadr estraint
height
:Hea drestrain theight
;Seat height
=Seat cushion angle
?Seat fore-and-af tadjustmen t
ABackrest angle
XSlide head restrain tadjustmen tbutto n: up
or down in th edirection of th earrow.
Adjusting th eluxur yheadr estraints
XTo adjust th esideb olsters of th ehead
restraint: push or pull right and/o rleft-han d
side bolste r: intot he desired position .
XTo adjust theangle of th eheadr estraint:
push or pull th ehead restrain tinthedirection
of arrow ;.
Resetting th efront seath eadr estraints
It is necessar ytor eset th efront seat head
restraints after th evoltag esupply has been
interrupted, e.g. if th ebattery has been com-
pletely discharged or disconnected.
76Seats
Seats ,steering wheel and mirrors