2017 MERCEDES-BENZ G-Class dimensions
[x] Cancel search: dimensionsPage 22 of 286
Turn signalsDisplay message ............................ 176
Replacing bulb s(front) ..................... 90
Switching on/off .............................. 87
TV
Operating (on-boar dcomputer) ..... 163
see Separate operating instructions
Two-way radio
Frequencie s................................... 274
Installation ..................................... 274
Transmission output( maximum) .... 274
TWR (Tongue Weight Rating) (defi-
nition) ................................................. 269
Type identificatio nplate
see Vehicl eide ntificatio nplate
U
Unlocking
Emergency unlocking ....................... 68
From insid ethe vehicl e(central
unlocking button) ............................. 67
US Bd evices
Connecting to the Media Inter-
face ...............................................2 03
V
Vanity mirror
Sun visor. ....................................... 211
Vehicle
Correct use ...................................... 27
Data acquisition ............................... 28
Display message ............................ 186
Equipment ....................................... 24
Individua lsettings .......................... 164
Limited Warranty .............................2 8
Loading .......................................... 260
Locking (in an emergency) ............... 68
Locking (SmartKey) .......................... 63
Lowering ........................................ 272
Maintenance .................................... 25
Operation outsidet he USA/
Canada ............................................ 25
Parking .......................................... 120
Parking for along period. ............... 122
Pulling awa y................................... 105
Raising ........................................... 270
Securing from rolling away ............ 270 Tow-starting ................................... 248
Towing ........................................... 246
Transporting .................................. 247
Unlocking (i
nanemergency) ........... 68
Unlocking (SmartKey). ..................... 63
Vehicl edata. .................................. 281
Vehicl edata ....................................... 281
Vehicl edata (off-road driving)
Approach/departure angle ............ 283
Fording depth ................................ 283
Maximu mgradient climbing abil-
ity .................................................. 283
Vehicl edimensions ........................... 281
Vehicl eemergencyl ocking ................ 68
Vehicl eidentificatio nnumber
see VIN
Vehicl eidentificatio nplate .............. 275
Vehicl etoolkit.................................. 239
Ventilation
Setting the airflow ........................... 98
Video
Operating the DVD ......................... 162
see also Digital Operator's Man-
ual.................................................. 198
VIN
Type plate ...................................... 275W
Warning and indicator lampsABS ................................................ 190
Brakes ........................................... 189
Check Engine ................................. 194
Coolant .......................................... 194
Distance warning ........................... 196
DISTRONIC PLUS. .......................... 196
ESP
®.............................................. 191
ESP®OFF ....................................... 192
Fue ltank ........................................ 194
Generaln otes ................................ 187
Overview .......................................... 32
Parking brake ................................ 193
PASSENGER AIR BAG OFF ............... 39
Reserve fue l................................... 194
Restraint system ............................ 193
Seatb elt. ....................................... 188
Tire pressure monitor .................... 197
Warning triangle ................................ 238
20Index
Page 156 of 286
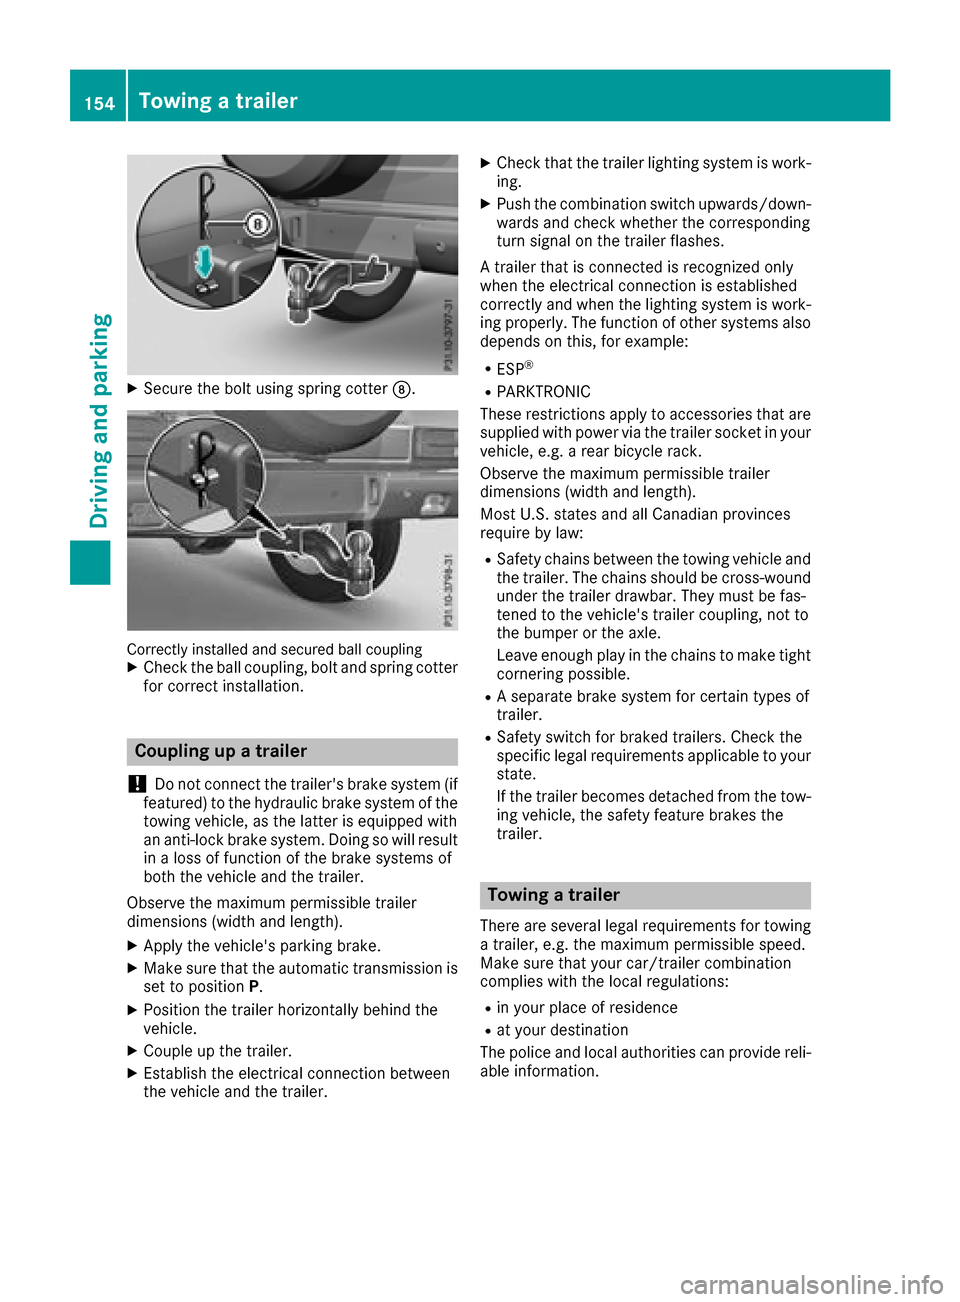
XSecure the boltusing spring cotter D.
Correctlyinstalled and secured ball couplingXCheck the ball coupling, bol tand spring cotter
for correct installation.
Coupling up atrailer
!
Do not connect the trailer's brake system (if
featured) to the hydraulic brake system of the
towing vehicle, as the latter is equipped with
an anti-lock brake system. Doing so will result
in alossoff unction of the brake systems of
both the vehicl eand the trailer.
Observe the maximum permissible trailer
dimensions (width and length).
XAppl ythe vehicle's parking brake.
XMake sure that the automatic transmissio nis
set to position P.
XPosition the traile rhorizontally behind the
vehicle.
XCouple up the trailer.
XEstablish the electrical connection between
the vehicl eand the trailer.
XCheck that the traile rlighting system is work-
ing.
XPush the combination switch upwards/down- wards and check whethert he corresponding
turn signal on the traile rflashes.
At raile rthat is connecte disrecognize donly
when the electrical connection is established
correctly and when the lighting system is work-
ing properly .The function of others ystems also
depends on this ,for example:
RESP®
RPARKTRONIC
These restrictions appl ytoaccessorie sthat are
supplie dwithp ower via the traile rsocketiny our
vehicle, e.g. arearb icycl erack.
Observe the maximum permissible trailer
dimensions (width and length).
MostU .S. state sand al lCanadia nprovinces
require by law
:
RSafety chains between the towing vehicl
eand
the trailer. The chains shoul dbecross-wound
under the traile rdrawbar. Theym ustb efas-
tened to the vehicle's traile rcoupling, not to
the bumpe rorthe axle.
Leave enough play in the chains to make tight
cornering possible.
RAs eparate brake system for certain types of
trailer.
RSafety switch for braked trailers. Check the
specifi clegal requirements applicabl etoyour
state.
If the traile rbecomes detached from the tow-
ing vehicle, the safety feature brakes the
trailer.
Towin gatrailer
There are several legalr equirements for towing
at railer, e.g. the maximum permissible speed.
Make sure that your car/traile rcombination
complies with the local regulations:
Rin your place of residence
Rat your destination
The police and local authorities can provid ereli-
able information.
154Towingat railer
Driving and parking
Page 241 of 286
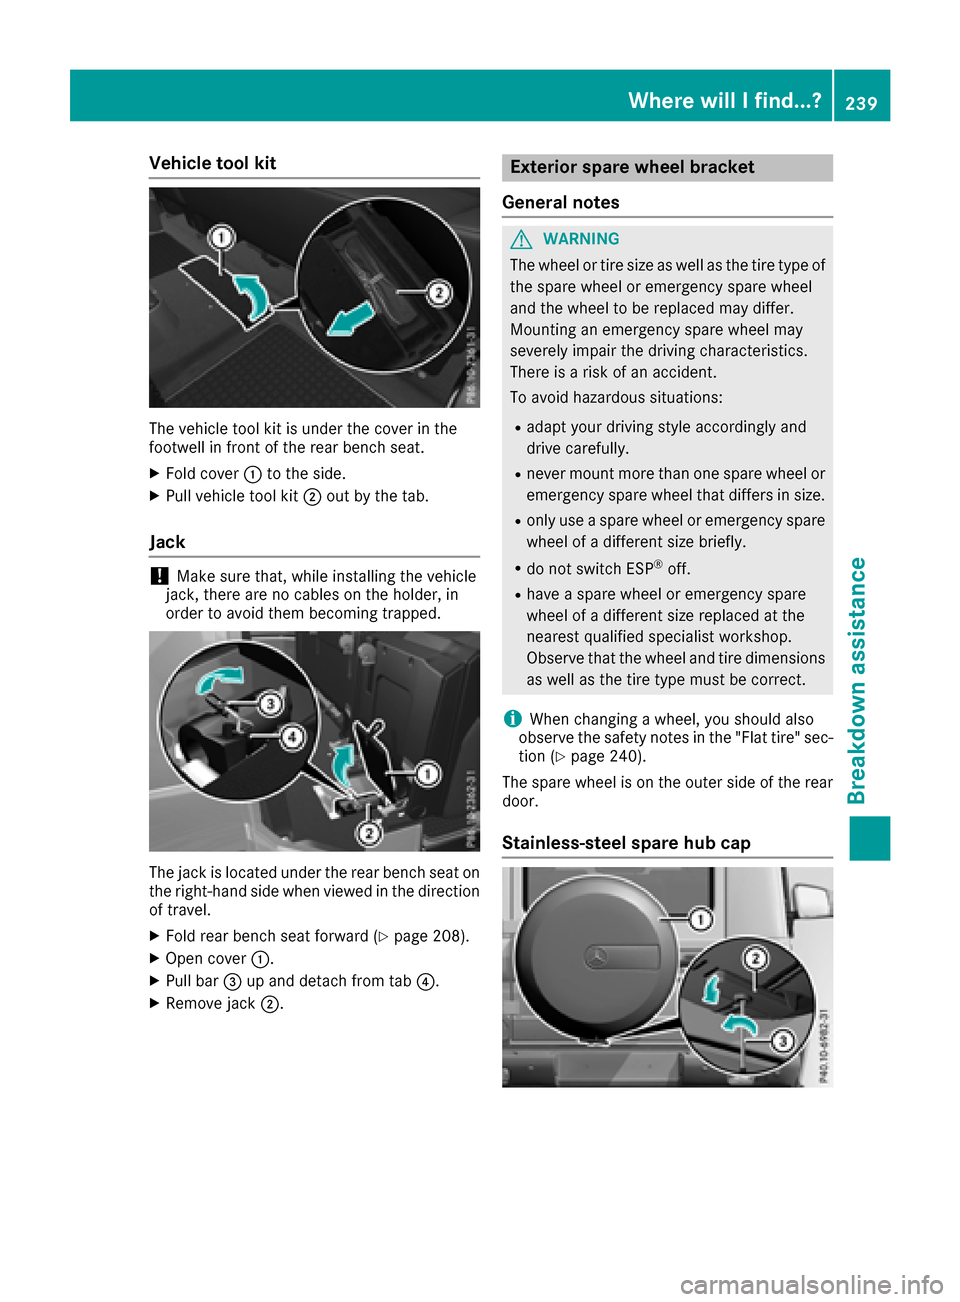
Vehicletoolkit
The vehicl etool kit is under the coverint he
footwell in front of the rearb ench seat.
XFoldc over:to the side.
XPull vehicl etool kit ;outb ythe tab.
Jack
!Make sure that, whil einstalling the vehicle
jack, ther eare no cable sonthe holder, in
order to avoid them becoming trapped.
The jack is locate dunder the rearb ench sea ton
the right-hand side when viewe dinthe direction
of travel.
XFoldr earb ench sea tforward (Ypage 208).
XOpe ncover :.
XPull bar =up and detach from tab ?.
XRemove jack;.
Exterior spare whee lbracket
General notes
GWARNING
The whee lortire size as well as the tire typ eof
the spare whee loremergency spare wheel
and the whee ltobereplaced mayd iffer.
Mounting an emergency spare whee lmay
severely impai rthe driving characteristics.
There is ariskofana ccident.
To avoid hazardouss ituations:
Radap tyou rd riving style accordinglya nd
drive carefully.
Rneve rmount more thano ne spare wheelor
emergency spare whee lthatd iffer sins ize.
Ronlyu seaspare whee loremergency spare
whee lofad ifferent size briefly.
Rdo not switch ESP®off.
Rhave aspare whee loremergency spare
whee lofad ifferent size replaced at the
nearestq ualified specialist workshop.
Observe thatt he wheeland tire dimensions
as well as the tire typ emustbec orrect.
iWhenchanging awheel ,you shoul dalso
observe the safety notes in the "Flat tire "sec-
tio n(
Ypage 240).
The spare whee lisonthe outer side of the rear
door.
Stainless-stee lspare hub cap
Where will Ifind...?239
Breakdo wn assis tance
Z
Page 255 of 286
Drivingwiths ummer tires
At temperature sbelo w45‡( +7 †), elasticity in
summe rtires is significantly lower and thus also
traction and braking power. Change the tires on
you rvehicle to M+S tires .Using summe rtires at
very cold temperatures coul dcause cracks to
form, therebyd amaging the tires permanently.
Mercedes-Benz cannot accep tresponsibility for
this type of damage.
GWARNING
Damaged tires can cause tire inflation pres-
sure loss.Asar esult, you couldlose control of
you rvehicle. There is arisk of accident.
Check the tires regularly for signs of damage
and replace any damaged tires immediately.
M+S tires
GWARNING
M+S tires with atire tread depth of less than
ã in (4 mm )are not suitabl efor use in winter
and do not provide sufficient traction. There is
ar isk of an accident.
M+S tires with atread depth of less than ãin
(4 mm) must be replaced immediately.
GWARNING
Wheela nd tire dimensions as wel lasthe type
of tire can vary between the spare wheel and
the wheel to be replaced .When the spare
wheel is mounted ,driving characteristics may
be severely affected .There is arisk of an acci-
dent.
In order to reduce risks:
Ryou should thereforea dapt yourdriving
styl eand drive carefully.
Rnever mount more than one spare wheel
that differs from the wheel to be replaced.
Ronly use aspare wheel that differs from the
wheel to be replaced for ashort time.
Rdo not deactivate ESP®.
Rhave aspare wheel that differs from the
wheel that has beenc hangedreplaced at
the nearest qualified specialist workshop.
You must observe the correct wheel and
tire dimensions as wel lasthe wheel type.
Do not exceed amaximu mspeedof50m ph
(80 km/h) if aspare wheel of adifferent size is
installed.
At temperatures below 45 ‡(+7 †), use winter
tires or all-season tires. Both type softire are
identified by the M+S marking.
Only winter tires bearing the isnowflake
symbol in addition to the M+S marking provide
the best possibleg rip in wintry road conditions.
Only these tires wil lallow driving safety systems
such as ABS and ESP
®to function optimally in
winter. Theset ires have beend eveloped specif-
ically for driving in snow.
Use M+S tires of the same make and tread on all
wheels to maintain safe handling characteris-
tics.
Always observe the maximu mpermissible
speeds pecified for the M+S tires you have
mounted.
When you have mounted the M+S tires:
XCheck the tire pressures (Ypag e257).
XRestart the tire pressure monitor
(Ypag e259).
Snowc hains
GWARNING
If you drive too fast with snow chains moun-
ted, they may snap. As aresult, you could
injure others and damage the vehicle. There is
ar isk of an accident.
Observe the maximu mpermissible speedf or
operation with snow chains.
!Information about the use of snow chain
compatibleA MG winter tires is applicable for
AMG tires. Use of snow chains is only per-
missible with these tires.
!On some tire sizes there is not enoug hspace
for snow chains. To avoi ddamage to the vehi-
cle or tires, observe the "Wheel and tire com-
binations" section unde r"Tires and wheels".
Wintero peration253
Wheels and tires
Z
Page 271 of 286
PSI (pounds per squareinch)
Astandard unit of measure for tire pressure.
Aspect ratio
Relationship between tire height and tire width
in percent.
Tire pressure
This is pressure inside the tire applying an out-
ward force to each square inch of the tire's sur-
face. The tire pressure is specified in pounds per
square inch (psi), in kilopascals (kPa) or in bar.
The tire pressure should only be corrected when
the tires are cold.
Cold tire pressure
The tires are cold:
Rif the vehicle has been parked with the tires
out of direct sunlight for at least three hours
and
Rif the vehicle has not been driven further than
1m ile (1.6 km)
Tread
The part of the tire that comes into contact with
the road.
Bead
The tire bead ensures that the tire sits securely
on the wheel. There are several steel wires in the
bead to prevent the tire from coming loose from
the wheel rim.
Sidewall
The part of the tire between the tread and the
bead.
Weight of optional extras
The combined weight of those optional extras
that weigh more than the replaced standard
parts and more than 2.3 kg (5 lbs). These
optional extras, such as high-performance
brakes, level control, aroof rack or ahigh-per-
formanceb attery, are not included in the curb
weight and the weight of the accessories.
TIN (Tire Identification Number)
This is aunique identifier which can be used by
at ire manufacturer to identify tires, for example
for aproduct recall, and thus identify the pur-
chasers. The TIN is made up of the manufactur-
er's identity code, tire size, tire type code and
the manufacturing date.
Load bearing index
The load bearing index (also load index) is acode
that contains the maximum load bearing capa-
city of atire.
Traction
Traction is the result of friction between the tires
and the road surface.
TWR (Tongue Weight Rating)
The TWR specifies the maximum permissible
weight that the ball coupling of the trailer tow
hitch can support.
Treadwear indicators
Narrow bars (tread wear bars) that are distrib-
uted over the tire tread. If the tire tread is level
with the bars, the wear limit of áin (1.6 mm)
has been reached.
Occupant distribution
The distribution of occupants in avehicle at their
designated seating positions.
Total load limit
Nominal load and luggage load plus 68 kg
(150 lbs) multiplied by the number of seats in
the vehicle.
Changing awheel
Flat tire
You can find information on what to do in the
event of aflat tire in the "Breakdown assistance"
section (
Ypage 240).
Rotating the wheels
GWARNING
Interchanging the front and rear wheels may
severely impair the driving characteristics if
the wheels or tires have different dimensions. The wheel brakes or suspension components
may also be damaged. There is arisk of acci-
dent.
Rotate front and rear wheels only if the wheels and tires are of the same dimensions.
Changing awheel269
Wheels and tires
Z
Page 286 of 286

For further information aboutthe maximum gra-
dient climbing ability,s ee (Ypage 130).
Trailertow hitch
Permissible traile rloa d, braked( at a
minimum gradient-climbin gcapabil-
ity of 12% from astandstill)
Missing value sweren ot available at time of
going to print.
Model
Mercedes-AMG
G6 5
Allo the rm odels7716 lb (3500 kg)
Maximum drawbar noseweight
!
Use adrawbar noseweight as clos easpos-
sible to the maximum permissibl enose-
weight. Do not use anoseweight of les sthan
50 kg ,otherwise the trailer may come loose.
Note that the payloada nd the rearaxlel oad
are reduce dbythe actual payload.
The drawbar loa dreduce sthe permissibl eover-
al lloa da nd reara xlel oad.
The drawbar loa dacts from above onto the ball
headont he trailer tow hitch.
The trailer drawbar noseweight is not included in
the towing weight.
Missing value sweren ot available at time of
going to print.
ModelPermissible nose- weight
Mercedes-AMG
G65
Allo the rm odels308.6 lb (140 kg)
The actual noseweight may not be higher than
the value which is given. The value can be found
on the trailer tow hitch or trailer identification
plates. The lowest weigh tapplies.
The maximum permissibl etrailer drawbar nose-
weigh tisthe maximum weigh twithw hich the
trailer drawbar can be loaded .The permissible trailer drawbar noseweight is the limit for
Mercedes-Benz-approved trailer couplings.
Ball position
Bal
lpositio nofthe ball coupling
Whenc hoosing aballc oupling, the dimensions
state dinthe illustration mus tnot be exceeded.
Gros srear axle weight rating when
towing atrailer
Missing value sweren ot available at time of
going to print.
ModelGros saxle weight
rating
Mercedes-AMG
G6 5
Allo the rm odels308.6 lb (1900 kg)
284Traile rtow hitch
Technical data