2017 MERCEDES-BENZ G-Class fuses
[x] Cancel search: fusesPage 5 of 286

Maintenance and care......................225
Engine compartment ........................... 225
Maintenance ........................................ 230
Care ..................................................... 231
Breakdown assistance .....................238
Where wil lIfind...? .............................. 238
Flat tire ................................................ 240
Battery (vehicle) .................................. 241
Jump-starting ....................................... 243
Towing and tow-starting ...................... 246
Fuses ...................................................2 48
Wheels and tires............................... 251
Important safety notes ........................ 251
Operation ............................................ 251
Winter operatio n.................................. 252
Tire pressure ....................................... 254
Loading the vehicle .............................. 260
All about wheels and tires ................... 263
Changing awheel ................................ 269
Wheela nd tire combinations ...............2 73
Technical data................................... 274
Information regarding technical data ... 274
Vehicle electronics .............................. 274
Identification plates .............................2 75
Service products and filling capaci-
ties ...................................................... 276
Vehicle data ......................................... 281
Vehicle data for off-roadd riving .......... 283
Trailer tow hitch ................................... 284
Contents3
Page 12 of 286
Exhaustsee Exhaust pipe
Exhaust check .................................. .123
Exhaus tpipe
Cleaning ......................................... 235
Exterior lighting
Cleaning ......................................... 234
see Lights
Exterior mirrors
Adjusting ......................................... 81
Dipping (automatic) ......................... 83
Folding in whe nlocking (on-board
computer) ...................................... 167
Folding in/out( automatically). ........ 82
Folding in/out (electrically) ............. 82
Outofp osition (troubleshooting )..... 82
Setting ............................................. 82
Storing settings (memory func-
tion) ................................................. 83
Storing the parking position ............. 83
F
Favorites
Overview ........................................ 200
Filler cap
see Refueling
First-aidk it......................................... 238
Flat tire
Changing awheel /mounting the
spare wheel. .................................. 269
Preparing the vehicl e..................... 240
Folding the seat backres t(rear)
forwards/back .................................. 207
Frequencies
Mobil ephone ................................. 274
Two-way radio ................................ 274
Fuel
Additives ........................................ 278
Consumption statistics .................. 160
Displaying the rang e...................... 160
Driving tip s.................................... 122
Fue lgauge ....................................... 32
Grade (gasoline )............................ 277
Important safety notes .................. 277
Premium-grade unleade dgaso-
line ................................................. 277
Problem (malfunction) ................... 120 Refueling ........................................ 118
Tank content/reserve fue
l............. 277
Fue lfille rflap
Closing ........................................... 119
Emergency release ........................ 119
Opening ......................................... 119
Fue llevel
Calling up the rang e(on-board
computer) ...................................... 160
Fue ltank
Capacity ........................................ 277
Problem (malfunction) ................... 120
Fus eallocatio nchart ........................ 249
Fus ebox
cargo compartment ....................... 250
Dashboard ..................................... 249
Front-passenger footwell ............... 249
Transmission tunne l....................... 250
Fuses
Allocation chart ............................. 249
Before changing ............................. 249
Dashboard fus ebox ....................... 249
Fus ealloc ation chart ..................... 249
Fus ebox in the carg ocompart-
ment .............................................. 250
Fus ebox in the front-passenger
footwell .......................................... 249
Fus ebox in the transmission tun-
nel ................................................. 250
Important safety notes .................. 248
G
Garaged ooro pener
Clearing the memory ..................... 224
Generaln otes ................................ 221
Important safety notes .................. 222
Opening/closing the garag edoor..2 24
Problems whe nprogramming ........2 24
Programming the remote control ... 222
Synchronizing the rolling code ....... 223
Gasoline ............................................. 277
Gear indicator (on-board com-
puter) ..................................................1 67
Genuine parts ...................................... 23
Glove box ...........................................2 05
10Index
Page 19 of 286

Convenience opening feature .......... 70
Display message ............................ 187
Door central locking/unlocking ...... .63
Important safety notes .................... 63
Loss .................................................6 6
Mechanical key ................................ 64
Overview .......................................... 63
Positions (ignition lock) ................. 104
Problem (malfunction) ..................... 66
Starting the engine ........................ 105
SMS
see also Digital Operator's Man-
ual .................................................. 198
Snow chains ...................................... 253
Socket (12 V)
Cargo compartment. ...................... 213
Front-passenger footwell ............... 212
General notes ................................ 212
Rear compartment. ........................213
Sound
Switching on/off ........................... 199
Spare fuses ........................................ 249
Spare wheel
Spare wheel bracket at the rear .... 239
Stainless-steel spare hub cap ........2 39
Special seat beltr etractor.................. 50
Specialist workshop ............................ 27
Speedometer
Digita l............................................ 160
In the Instrument cluster ................. 32
Segments ...................................... 157
Selecting the displayu nit ...............165
Standingl amps
Display message ............................ 176
Switching on/off .............................. 86
Starting the engine
Important safety notes .................. 104
Steering (display message) .............. 187
Steering wheel
Adjusting (electrically). .................... 80
Buttons (on-board computer) ......... 158
Cleaning ..................... .................... 236
Important sa
fety notes .................... 79
Paddle shifters ............................... 114
Steering wheel heating .................... 80
Storing settings (memory func-
tion) ................................................. 83 Steering wheel heating
Indicator lamp (malfunction) ............ 80
Steering wheel paddle shifters ........114
Stopwatch (RACETIMER) ................... 168
Stowage areas ................................... 205
Stowage compartment
Door stowage compartment .......... 206
Stowage compartments
Armrest (under) .............................2 06
Cu ph olders ................................... 210
Glove box ....................................... 205
Important safety information ......... 205
Stowag enet ................................... 206
Stowag epockets ........................... 206
Stowage net ....................................... 206
Summer opening
see Convenience opening feature
Summer tires
In winter ........................................ 253
Sun visor ............................................ 210
Surround lighting (on-board com-
puter) ..................................................1 65
SUV
(Sport Utility Vehicle) ....................... 26
Switchin gair-recirculation mode
on/off ................................................. 101
Switchin gonmedia mode
Via the device lis t.......................... 203
T
Tachometer ........................................ 157
Tail lamp
Replacing bulb s............................... 91
Tail lamps
Displa ymessage ............................ 176
Tank content
Fuelgauge ....................................... 32
Technical data
Capacities ...................................... 276
Drawba rloa d( maximum) ............... 284
Information .................................... 274
Trailer load s................................... 284
Vehicl edata. .................................. 281
Telephone
Accepting acall. ............................ 163
Authorizing amobilephone (con-
necting) ......................................... 202
Index17
Page 137 of 286
Activatingatthe curren tspeed/last
store dspeed
GWARNIN G
If you call up th estoreds pee dand it differs
from th ecurren tspeed, th evehicl eacceler -
ate sord ecelerates. If you do no tknowt he
store dspeed, th evehicl ecould accelerate or
brak eunexpectedly. Ther eisariskofana cci-
dent.
Pay attentio ntotheroad and traffic condi-
tions before calling up th estoreds peed. If you
do no tknowt he store dspeed, store th e
desired spee dagain .
XBriefl ypull th ecruise control leve rtow ards
you ?.
XRemove your foo tfro mt heaccelerato rpedal.
DISTRONI CPLUSisa ctivated. The first tim eit
is activated, th ecurren tspee diss tored. Oth-
erwise, it set sthe vehicl espee dtot heprevi-
ously store dvalue .
Driving with DISTRONIC PLUS
Pulling awa yand driving
XIf you want to pull awa ywith DISTRONIC
PLUS :remove your foo tfro mt hebrak epedal.
XBriefl ypull th ecruise control leve rtow ards
you ?.
or
XAccelerat ebriefly.
The vehicl epulls away and adapt sits spee dto
that of th evehicl einf ront.Ifnov ehicleis
detected in front, your vehicl eaccelerate sto
th es toreds peed.
The vehicl ecan also pull away when it is facing
an unidentified obstacle or is driving on adiffer-
en tlinef roma nother vehicle. The vehicl ethen
brakes automatically.
If DISTRONI CPLUSd oes no tdetect avehicl ein
front, th esystem operate slikeac ruise control .
If DISTRONI CPLUSd etect sthatthe vehicl ein
fron tisd riving slower, your vehicl ebrakes. In
this way, th especifie dminimum distanc eyou
have selected is maintained.
If DISTRONI CPLUSd etect safaster-moving
vehicl einfront,itincreases th edriving spee dto
th es et speed. If you depress th
ebrake, DISTRONI CPLUSis
deactivate dunless your vehicl eisstationary.
Selecting thed rive program
DISTRONI CPLUSs upport sasporty driving style
when you have selected th eS driving program
(
Ypage 114). Acceleration behind th evehicl ein
fron tortot heset spee disthenn oticeably mor e
dynamic .Ifyou h
ave selected driv
eprogram Eor
C (Mercedes-AM Gvehicles), th evehicl eaccel-
erates mor egently. This settin gisrecommen -
ded in stop-start traffic.
Changing lanes
If you chang etothepassing lane ,DISTR ONIC
PLU Ssupport syou when :
Ryou are driving faste rtha n40m ph(60 km/ h)
RDISTRONICP LUSism aintaining the distance
to av ehicl einf ront
Ryous witch on the appropriate tur nsignal
RDISTRONICP LUSd oesn ot detect adangero f
collision
If these conditions ar efulfilled ,you rv ehicl eis
accelerated .Acceleratio nwillbei nterrupte dif
changing lanes take stoo long or if the distance
between your vehicl eand the vehicl einfront
become stoo small.
When changing lanes ,DISTRONICP LUSm oni-
tors the left lane on left-hand drive vehicles and
the right lane on right-hand drive vehicles.
Stopping
GWARNING
When leaving the vehicle, eve nifitisbraked
onl ybyD ISTRONICP LUS, it could rol lawa yif:
Rthere is amalfunctio ninthe system or in
the voltag esupply.
RDISTRONICP LUSh asbeen deactivated
with the cruis econtro llev er,e .g.b yav ehi-
cle occupant or fromo utside the vehicle.
Rthe electrical system in the engine com-
partment, the battery or the fuses have
been tampered with.
Rthe battery is disconnected.
Rthe accelerator peda lhas been depressed,
e.g .byav ehicl eoccupant.
There is ariskofana ccident.
Driving system s135
Driving an dparking
Z
Page 214 of 286
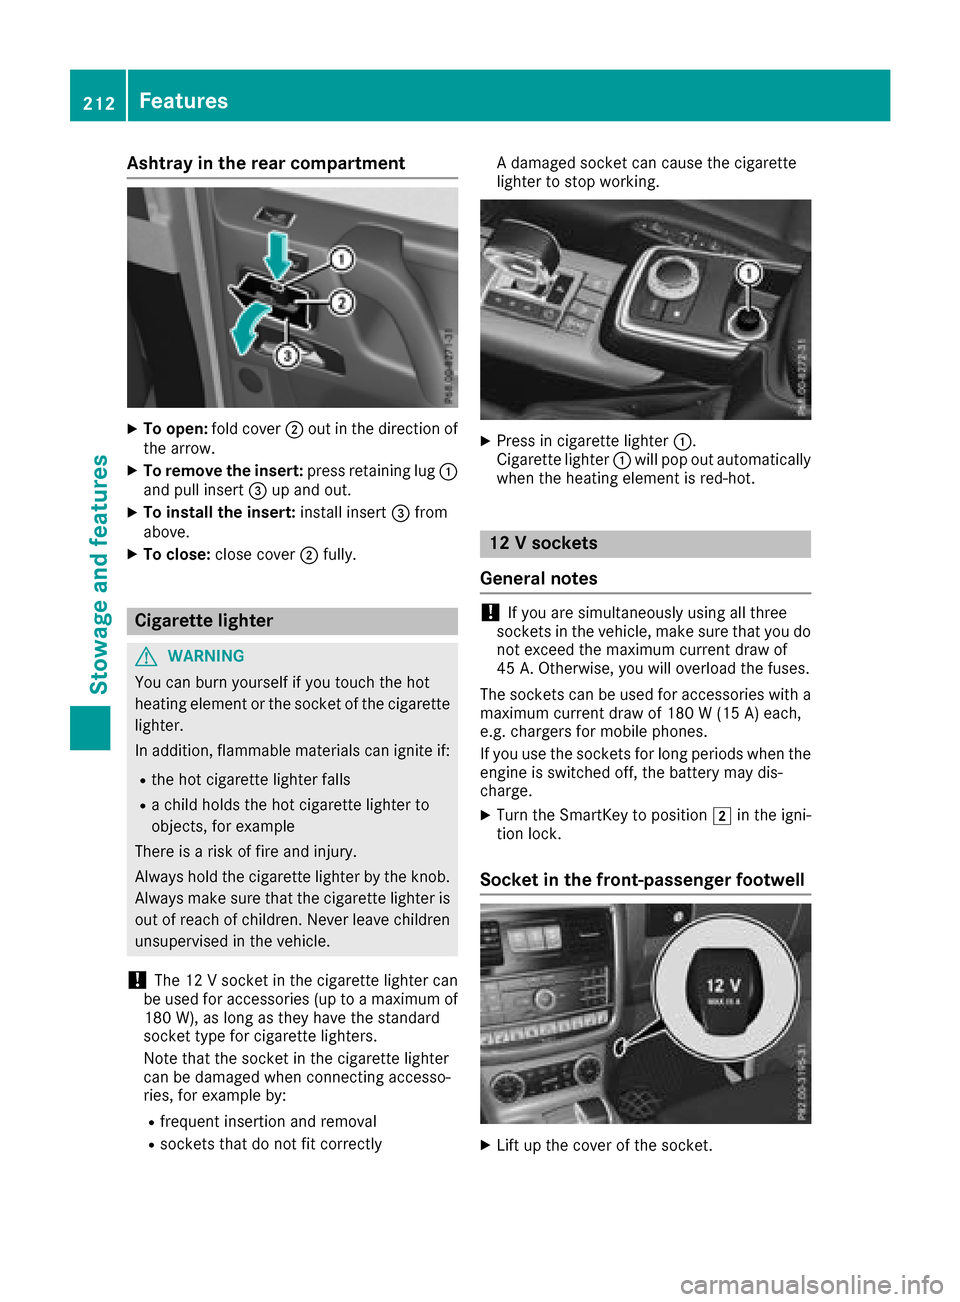
Ashtrayint herea rcom partment
XTo open :fol dc over ; out in th edirection of
th ea rrow.
XTo remove th einsert: press retaining lug :
and pull insert =up and out .
XTo install th einsert: installinsert =from
above.
XTo close: close cover ;fully.
Cigarette lighter
GWARNIN G
You can burn yourself if you touch th ehot
heating elemen torthesocke tofthecigarette
lighter.
In addition ,flammabl ematerials can ignit eif:
Rtheh ot cigarette lighte rfall s
Rac hild hold sthe hot cigarette lighte rto
objects ,for exampl e
There is ariskoff irea nd injury.
Always hold th ecigarette lighte rbytheknob.
Always mak esuret hatthe cigarette lighte ris
out of reac hofchildren .Never leav echildren
unsupervised in th evehicle.
!The 12 Vsocke tinthecigarette lighte rcan
be used for accessories (up to amaximum of
18 0W ), as lon gastheyh avet he standard
socke ttyp ef or cigarette lighters.
Not ethatthe socke tinthecigarette lighte r
can be damaged when connecting accesso-
ries, for exampl eby:
Rfrequen tinsertion and removal
Rsockets that do no tfit correctl y Ad
amaged socke tcan caus ethe cigarette
lighte rtostopw orking .
XPress in cigarette lighte r:.
Cigarette lighte r: will pop out automatically
when th eheating elemen tisred-hot .
12Vsocke ts
Gene raln otes
!If you are simultaneously usin gall three
sockets in th evehicle, mak esuret hatyou do
no te xcee dthe maximum curren tdraw of
45 A. Otherwise ,you will overload th efuses.
The sockets can be used for accessories wit ha
maximum curren tdraw of 18 0W(15 A) each,
e.g. chargers for mobile phones.
If you use th esockets for lon gperiods when th e
engin eisswitched off ,the battery may dis-
charge .
XTurn th eSmartKey to position 2in th eigni-
tion lock.
Socket in th efront-passenger footwell
XLiftupt hecover of th esocket.
212Features
Stowage and features
Page 250 of 286
The towing eyes can be used to pull the vehicle
ontoatrailer or transporter if you wish to trans-
port it.
XTurn the SmartKey to position 2in the igni-
tion lock.
XShift the transfer case to position Neutral
(Ypage 147).
XShift the automatic transmission to position
N .
As soon as the vehicle has been loaded:
XApply the parking brake.
XShift the automatic transmission to posi-
tion P.
XTurn the SmartKey to position uin the igni-
tion lock and remove it.
XSecure the vehicle.
Recovering avehicle thath as become
stuck
!
When recovering avehicle that has become
stuck ,pull it as smoothly and evenly as pos-
sible. Excessive tractive power could damage
the vehicles.
If the drive wheels have become stuck in loose
or muddy ground, pull the vehicle out with
extreme caution, especially so if the vehicle is
loaded.
Never attempt to recover astuck vehicle with a
trailer attached.
Pull out the vehicle backwards, if possible using the track sitmade when it became stuck.
Towing in the event of malfunctions
General notes
!If you are removing the propeller shaft, use
M10 nuts as spacers on the M8 bolts and
secure them with M8 nuts.
New self-locking nuts must be used when the
propeller shafts are refitted.
It is important that you observe the safety
instructions when towing away your vehicle
(
Ypage 246).
iConsult an authorized Mercedes-Benz Cen-
ter.
In the event of damage to the engine,
transmission or electrical system
XShift the transfer case to neutral
(Ypage 147).
XShift the automatic transmission to position
N .
In the event of damage to the transfer
case
Have the propeller shafts between the axles and
the transfer case removed.
In the event of damage to the front axle
Have the propeller shaft between the rear axle
and the transfer case removed.
Then have the vehicle towed away with the front
axle raised.
In the event of damage to the rear axle
Have the propeller shaft between the front axle
and the transfer case removed.
Then have the vehicle towed with the rear axle
raised and wheel rollers under the front axle.
Tow-starting (emergency engine
starting)
!
Vehicles with automatic transmission must
not be tow-started. You could otherwise dam-
age the automatic transmission.
You can find information on "Jump-starting"
under (
Ypage 243).
Fuses
Important safety notes
GWARNING
If you manipulate or bridge afaulty fuse or if
you replace it with afuse with ahigher amper-
age, the electric cables could be overloaded.
This could result in afire. There is arisk of an
accident and injury.
Always replace faulty fuses with the specified
new fuses having the correcta mperage.
248Fuses
Breakdown assistance
Page 251 of 286
The fuses in your vehicle serve to close down
faulty circuits.Ifafuse blows, all the compo-
nentsont he circuit and their functions stop
operating.
Blown fuses must be replaced with fuses of the
same rating, which you can recognize by the
color and value. The fuse ratings are listed in the fuse allocation chart (
Ypage 249).
If an ewly inserted fuse also blows, have the
cause traced and rectified at aqualified special-
ist workshop, e.g. an authorized Mercedes-Benz
Center.
!Only use fuses that have been approved for
Mercedes-Benz vehicles and which have the
correctf use rating for the system concerned.
Otherwise, components or systems could be
damaged.
!Make sure that no moisture can enter the
fuse box when the cover is open.
!When closing the cover, make sure that it is
lying correctly on the fuse box. Moisture seep-
ing in or dirt could otherwise impair the oper-
ation of the fuses.
Before changing afuse
Pay attention to the important safety notes
(Ypage 248).
XSwitch off the engine.
XSwitch off all electrical consumers.
XRemove the SmartKey from the ignition lock.
All indicator lamps in the instrument cluster
must be off.
XSecure the vehicle against rolling away
(Ypage 120).
The fuses are located in various fuse boxes:
RMain fuse box on the driver's side of the dash-
board
RFuse box in the front-passenger footwell
RFuse box in the transmission tunnel
RFuse box in the cargo compartment
The fuse allocation chart and the spare fuses are
in the fuse box on the dashboard on the front-
passenger side (
Ypage 249).
The fuse extractor is in the vehicle tool kit
(
Ypage 120).
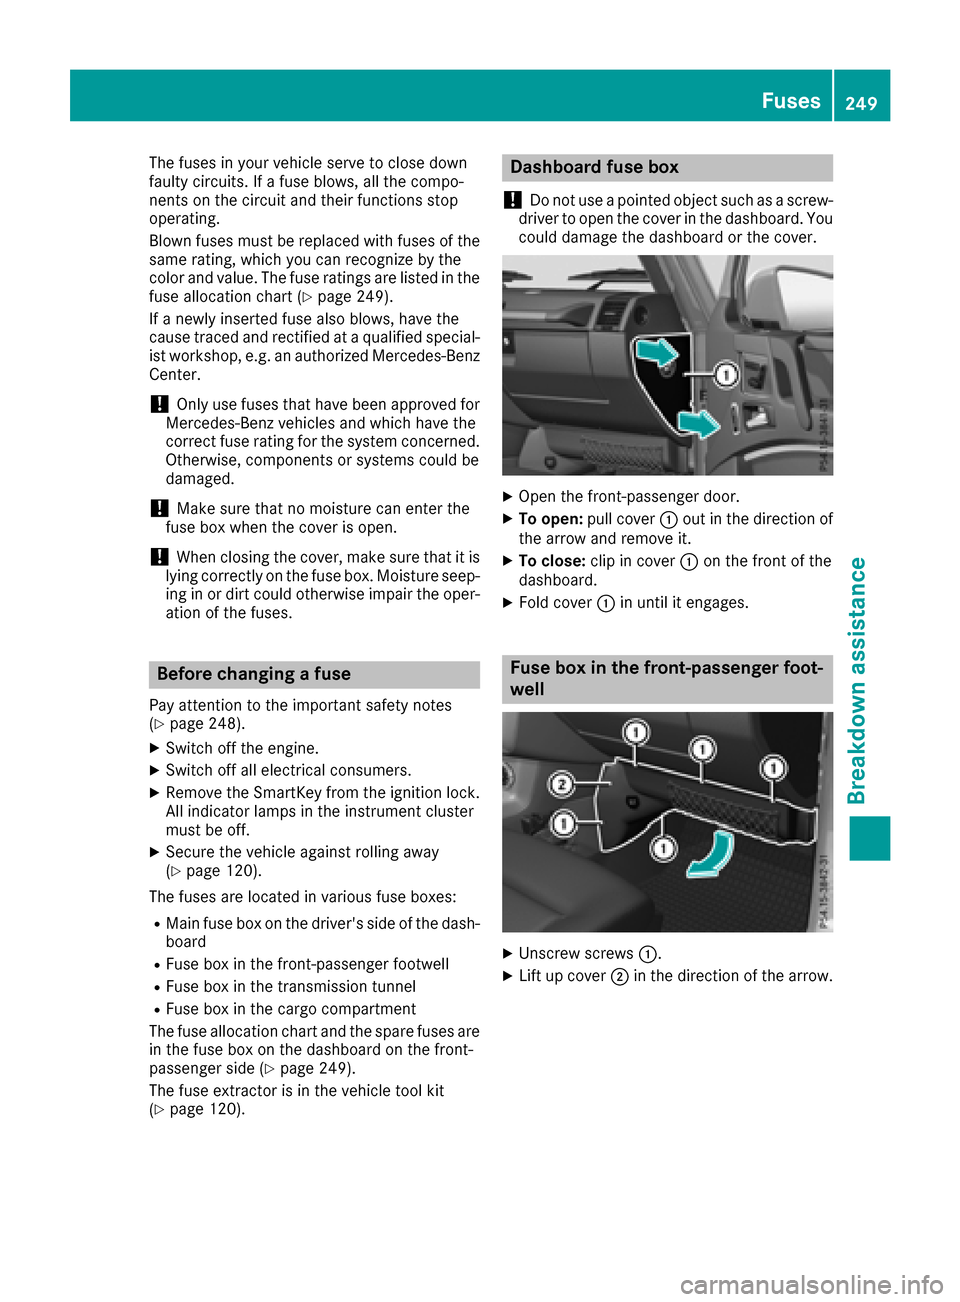
Dashboard fuse box
!
Do not use apointed object such as ascrew-
driver to open the cover in the dashboard. You
could damage the dashboard or the cover.
XOpen the front-passenger door.
XTo open: pull cover :out in the direction of
the arrow and remove it.
XTo close: clip in cover :on the front of the
dashboard.
XFold cover :in until it engages.
Fuse box in the front-passenger foot-
well
XUnscrew screws :.
XLift up cover;in the direction of the arrow.
Fuses249
Breakdown assistance
Z
Page 252 of 286
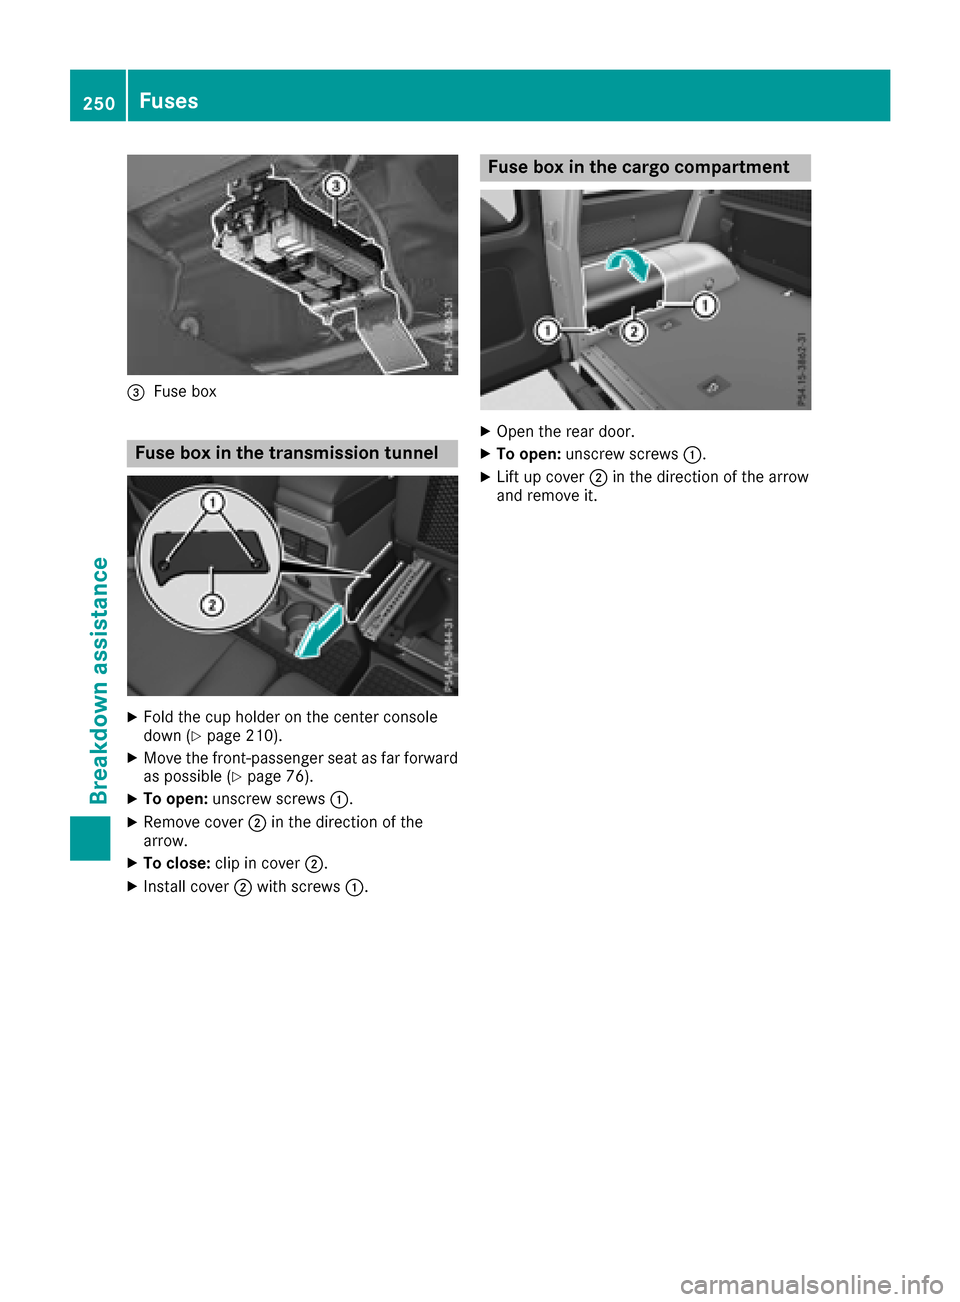
=Fuse box
Fuseboxin the transmissiont unnel
XFold the cup holder on the center console
down(Ypage 210).
XMove the front-passenger seata sfar forward
as possible (Ypage 76).
XTo open: unscrewscrews :.
XRemove cover ;in the directio nofthe
arrow.
XTo close: clipinc over;.
XInstal lcover ;with screws :.
Fuseboxin the carg ocom partment
XOpent he reard oor.
XTo open: unscrewscrews :.
XLift up cover ;in the directio nofthe arrow
and remove it.
250Fuses
Breakdow nassistance