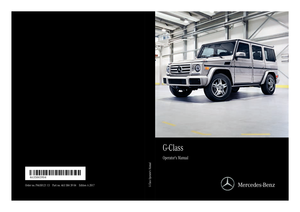
Page 257 of 286
.
The Tire and Loading Informatio nplacard")
Tire and LoadingInfor matio nplacard
:Recommended tire pressures
The Tire and Loading Informatio nplacard is on
the B-pillar on the driver's side (
Ypage 260).
The Tire and Loading Informatio nplacard con-
tains the recommende dtire pressures for cold
tires. The recommende dtire pressures ar evalid
for the maximum permissibl eloa da nd up to the
maximum permissibl evehicl espeed.
Tire pressure table
The tire pressure table is on the insid eofthe fuel
fille rflap. It shows the tire pressure for al ltires
permitted at the factory for thisv ehicle; see
illustratio n(example).
The tire pressure table contains the recommen-
de dt ire pressure for col dtiresu nder various
operating conditions, i.e .differin gloa da nd
spee dconditions of the vehicle.
If at ire size precedes atire pressure, the tire
pressure informatio nfollowing is onl yvalid for
thatt ire size. The load conditions "partially
laden" and "fully laden" ar edefine dint he table
for different numbers of occupants and amounts of luggage.T he actual numbe rofseats mayd if-
fer. Some tire pressure table
sshowo nlyt he rim
diameters instea dofthe full tire size, e.g. R18.
The rim diamete rispartoft he tire size and can
be found on the tire sidewall (
Ypage 264).
If the tire pressures have been set to the lower
values for lighte rloads and/or lowe rroad
speeds ,the pressures shoul dbereset to the
highe rvalues :
Rif youwanttod rive with an increased load
and/or
Rif yo uwanttod rive at highe rroa ds peeds
The tire pressures for increased load sand/or
highe rroa ds peeds, shown in the tire pressure
table ,mayhave anegative effect on driving
comfort.
If the tire pressure is not set correctly, thisc an
lead to an excessive buil dupofheata nd asud-
de nlossofp ressure.
For mor
einformati
on, contactaquali fied spe-
cialist workshop.
Important notes on tire pressure
GWARNING
If the tire pressure drops repeatedly ,the
wheel, valve or tire maybed amaged.Tire
pressure thati stoo lo wmayresul tina tire
blow-out. There is ariskofana ccident.
RCheck the tire for foreign objects.
RCheck whether the whee lislosin gairor the
valve is leaking.
If yo uareunabl etorectify the damage,c on-
tact aquali fied specialis tworkshop.
GWARNING
If yo ufit unsuitable accessories onto tire
valves, the tire valve smaybe overloaded and
malfunction, which can cause tire pressure
loss. Due to their design, retrofitted tire pres- sure monitors kee pthe tire valve open. This
can also resul tintire pressure loss. There is a
ris kofana ccident.
Onlys crewt he standard valve cap or other
valve cap sapproved by Mercedes-Benz for
your vehicl eonto the tire valve.
Use asuitabl epressure gaug etocheck the tire
pressure. The outer appearance of atire does
Tire pressure255
Wheel sand tires
Z
Page 258 of 286

not permitany reliableconclusio nabout the tire
pressure. On vehicles equipped with the elec-
tronict ire pressure monitor, the tire pressure
can be checked in the on-board computer.
The tire temperature and pressure increase
when the vehicl eisinmotion. Thi sisdependent
on the driving speed and the load.
Therefore, yo ushoul donlyc orrect tire pres-
sures when the tire sare cold.
The tire sare cold:
Rif the vehicl ehasbeen parked withou tdirect
sunlight on the tire sfor at leas tthreeh ours
and
Rif the vehicl ehasnot been driven further than
1m ile( 1.6 km)
The tire temperature changes depending on the outsid etemperature ,the vehicl espeed and the
tire load .Ifthe tire temperature changes by
18 ‡(10 †), the tire pressure changes by
approximately10k Pa (0.1 bar/1.5 psi). Take
thisi nto account when checking the pressure of
warm tires. Onlyc orrect the tire pressure if it is
too lo wfor the current operating conditions. If
yo uc heck the tire pressure when the tire sare
warm, the resulting value will be highe rthani f
the tire swerec old. Thi sisnormal. Do not
reduce the tire pressure to the value specified
for coldt ires. The tire pressure woul dotherwise
be too low.
Observe the recommende dtire pressures for
coldt ires:
Ron the Tire and Loading Informatio nplacard
on the B-pillar on the driver's side
Rin the tire pressure table in the fue lfille rflap
(Ypage 119)
Underinflated or overinflated tires
Underinflated tires
GWARNING
Tires with pressure thati stoo lo wcan over-
hea tand burst as aconsequence .Inaddition,
they also suffer from excessive and/or irreg-
ular wear, which can severely impai rthe brak-
ing propertie sand the driving characteristics.
There is ariskofana ccident.
Avoidt ire pressures thata re too lowinallthe
tires, including the spare wheel. Underinflated tire
smay:
Roverheat, leading to tire defects
Radversel yaffect handling
Rwear excessivelya nd/or unevenly
Rhave an adverseeffect on fuelconsumption
Overinflated tires
GWARNING
Tires with excessivelyh ighp ressure can burst
because they are damaged more easily by
roadd ebris, potholes etc. In addition, they
also suffer from irregula rwear, which can
severely impai rthe braking propertie sand the
driving characteristics. There is ariskofa n
accident.
Avoi dtire pressures thata re too high in allthe
tires, including the spare wheel.
Overinflated tire smay:
Rincreas ethe braking distance
Radversel yaffect handling
Rwear excessivelya nd/or unevenly
Rhave an adverseeffect on ridecomfort
Rbe more likelytob ecome damaged
Maximum tire pressures
:Example :maximu mp ermissibl etire pres-
sure
Never exceed the maximu mpermissibl etire
inflation pressure. Alway sobserve the recom-
mended tire pressure for your vehicl ewhen
adjusting the tire pressure (
Ypage 268).
iThe actual value sfor tire sare vehicle-spe-
cifi cand mayd eviate from the value sinthe
illustration.
256Tire pressure
Wheel sand tires
Page 259 of 286
.
Information on air pressure for th etires on your
vehicle can be found:
Ron th evehicles Tire and Loa")
Checking thetirep ressures
Important safety notes
Observ ethe note sont irep ressure
(Ypage 254).
Information on air pressure for th etires on your
vehicle can be found:
Ron th evehicle's Tire and Loading Information
placard on th eB-pillar
Rin th etirep ressure table in th efuel fille rflap
(Ypage 119)
Runde r"Tire pressure "(Ypage 254)
Checking tir epressures manually
To determine and set th ecorrec ttirep ressure,
procee dasfollows:
XRemove th evalvec ap of th etiret hatistob e
checked.
XPress th etirep ressure gage securely onto the
valve.
XRead th etirep ressure and compare it to the
recommended value on th eTire and Loading
Information placard or th etirep ressure table
(
Ypage 254).
XIf th etirep ressure is to olow, increas ethe tire
pressure to th erecommended value.
XIf th etirep ressure is to ohigh,r elease air. To
do so, pres sdown th emetal pin in th evalve,
usingt hetip of apen for example .Then check
th et irep ressure again usingt hetirep ressure
checker.
XScrew th evalvec ap onto th evalve.
XRepeat these steps for th eother tires.
Tir ep ressure monitor
General notes
If at irep ressure monito risinstalled, th evehi-
cle's wheelsh ave sensorsthatm onito rthe tire
pressure sinall four tires. The tir epressure mon-
ito rw arn syou if th epressure drops in oneo r
mor eoft hetires. The tir epressure monito ronly
functionsift hecorrespondings ensorsare
installed in all wheels.
Information on tir epressure sisdisplayed in the
multifunction display. The curren ttirep ressure
of each wheel is shown in the Serv.
menuafter
driving for afew minutes.
Information on th emessage display can be
foun dint he"Checkin gthe tirep ressure elec-
tronically" sectio n(
Ypage 258).
Important safety notes
GWARNING
Eac htire, includingt hespare( if provided),
should be checked at least once amonth
when col dand inflate dtothepressure rec-
ommended by th evehicle manufacturer on
th eT ire and Loading Information placard on
th ed river'sd oor B-pillar or th etirep ressure
label on th einside of th efuel fille rflap. If your
vehicle has tires of adifferent sizet hant he
sizei ndicated on th eTire and Loading Infor-
mation placard or th etirep ressure label, you
should determine th eproper tir epressure for
those tires.
As an added safety feature, your vehicle has
been equipped withat irep ressure monitoring
system (TPMS) that illuminate salow tir epres-
sure telltale when oneorm oreofy our tires
are significantly underinflated. Accordingly,
when th elow tir epressure telltale illuminates,
you should stop and check your tires as soon
as possible, and inflate them to th eproper
pressure .Drivin gonas ignificantly underin-
flated tir ecauses th etiretoo verheat and can
lead to tir efailure. Underinflation also
reduces fuel efficienc yand tir etread life ,and
may affect th evehicle's handlinga nd stop-
pinga bility.
Pleasen otet hatthe TPMS is no tasubstitute
for proper tir emaintenance, and it is th edriv-
er'sr esponsibility to maintain correc ttire
pressure ,evenifu nderinflation has not
reached thel evelt otrigger illuminat
ionoft he
TPMS low tir epressure telltale.
USAo nly:
Tir ep ressure257
Wheels and tires
Z
Page 260 of 286

Your vehicle has also been equipped with a
TPMS malfunction indicator to indicate if the
systemisn ot operating properly. The TPMS
malfunction indicator is combined with the
low tir epressure telltale. When the system
detects amalfunction, the warnin glamp will
flash for approximately aminut eand then
remain continuously illuminated. This
sequence will be repeated every tim ethe vehi-
cle is started as long as the malfunction
exists.
When the malfunction indicator is illuminated,
the syste mmay not be able to detec torsignal
low tir epressure as intended .TPMS malfunc-
tion smay occur for avarietyofr easons,
including the mountin gofincompatible
replacementora lternatetires or wheels on
the vehicle that prevent the TPMS from func-
tioning properly. Always chec kthe TPMS mal-
function telltale afte rreplacing one or more
tires or wheels on your vehicle to ensur ethat
the replacementora lternatetires and wheels
allow the TPMS to continue to function prop-
erly.
It is the driver's responsibility to set the tire
pressure to that recommended for cold tires
which is suitable for the operating situation
(
Ypage 254). Notet hat the correcttirep ressure
for the current operating situation must firstb e
taught-in to the tir epressure monitor .Ifasub-
stantial loss of pressure occurs, the warning
threshold for the warnin gmessageisa ligned to
the taught-in reference values. Restar tthe tire
pressure monitor afte radjusting the pressure of
the cold tires (
Ypage 259). The current pres-
sures are saved as new reference values. As a
result,aw arningmessagew ill appear if the tire
pressure drops significan tly.
The t
ir ep ressure monitor does not warn you of
an incorrectly set tir epressure. Observe the
notes on the recommended tir epressure
(
Ypage 254).
The tir epressure monitor is not able to warn you
of as udden loss of pressure, e.g. if the tir eis
penetrate dbyaforeign object .Inthe eventofa
sudden loss of pressure, bringt he vehicle to a
halt by braking carefully. Avoid abrupt steering
movements.
The tir epressure monitor has ayellow h
warnin glamp on the instrumentc luster for indi-cating
apressure loss or malfunction. The way
that the warnin glamp flashes or lightsupi ndi-
cates whether atirep ressure is too low or
whether the tir epressure monitor is malfunc-
tioning:
Rif the h warnin glamp is lit continuously,
the tir epressure in one or more tires is sig-
nificantly too low. The tir epressure monitor is
not malfunctioning.
Rif the h warnin glamp flashes for around a
minut eand the nremainsl it constantly, the
tir ep ressure monitor is malfunctioning.
In addition to the hwarnin glamp, amessage
appears in the multifunction display. Observe
the information on display messages
(
Ypage 183).
It may tak euptoten minutes for amalfunction
of the tir epressure monitor to be indicated. The
malfunction is indicated firstbyt heh tire
pressure warnin glamp flashingf or approx-
imately one minut eand the nremaining lit. If the
malfunction has been rectified, the htire
pressure warnin glamp goes out afte rdrivingf or
af ew minutes.
The tir epressure values indicated by the on-
board computer may differf rom those meas-
ured at agas st
ation with apressure gauge. The
tir ep ressures shown by the on-board computer
refertot hose measured at sea level. At high
altitudes, the tir epressure values indicated by a
pressure gauge are higher than those shown by
the on-board computer .Inthis case, do not
reduce the tir epressures.
The operation of the tir epressure monitor can
be affected by interference from radio transmit-
tin ge quipment( e.g. radio headphones, two-way
radios) that may be being operated in or near the
vehicle.
Checking th etirep ressuree lectroni-
cally
XMake sure that the SmartKey is in position 2
in the ignition lock.
XPress the =or; button on the steering
wheel to selectt heServ.menu.
XPress the 9or: button to select
Tire Pressure.
XPress the abutton.
The multifunction display shows the current
tir ep ressure of each wheel.
If the vehicle has been parked for over
20 minutes, the Tire pressure will be
258Tirep ressure
Wheels and tires
Page 261 of 286

displayed after drivingafew minutesmessage appears.
After ateach-in process, the tire pressure mon-
itor automaticallyd etects new wheels or new
sensors. As long as aclear allocation of the tire
pressure value to the individual wheels is not
possible,t heTire
PressureMonitorActivedisplaym essage is shown instead of the tire
pressure display. The tire pressures are already
being monitored.
If as pare wheel is mounted, the system may
continue to show the tire pressure of the wheel
that has been removed for afew minutes. If this
occurs, note that the value displayed for the
position where the spare wheel is installed is not
the same as the current tire pressure of the
spare wheel.
Tire pressure monitor warning mes-
sages
If the tire pressure monitor detects apressure
loss in one or more tires, awarning message is
shown in the multifunction display. The yellow
h tire pressure warning lamp then lights up.
RIf the Correct Tire Pressuremessage
appears in the multifunction display, the tire
pressure in at least one tire is too low. The tire
pressure must be corrected at the next oppor-
tunity.
RIf the Check Tiresmessage appears in the
multifunction display, the tire pressure in at
least one tire has dropped significantly. The
tires must be checked.
RIf the Caution -Tire Malfunc.message
appears in the multifunction display, the tire
pressure in at least one tire has dropped sud-
denly. The tires must be checked.
Be sure to observe the instructionsa nd safety
notes in the displaym essages in the "Tires" sec-
tion (
Ypage 183).
If the wheel positions on the vehicle are rotated, the tire pressures may be displayed for the
wrong positions for ashort time. This is rectified
after afew minutes of driving, and the tire pres-
sures are displayed for the correct positions.
Restarting the tire pressure monitor
When you restart the tire pressure monitor, all
existing warning messages are deleted and the
h warning lamp goes out. The monitor uses
the currently set tire pressures as the reference
valuesf or monitoring. In most cases, the tire pressure monitor will automaticallyd
etect the
new reference valuesa fter you have changed
the tire pressure. However, you can also set ref-
erence valuesm anuallyasdescribed here. The
tire pressure monitor then monitors the new tire
pressure values.
XSet the tire pressure to the value recommen-
ded for the corresponding driving situation on
the Tire and Loading Information placard on
the B-pillar on the driver's side.
You can find more tire pressures for various
operating conditions in the tire pressure table
inside the filler flap.
Observe the information on tire pressure
when doing so (
Ypage 254).
XMake sure that the tire pressure is correct on
all four wheels.
XMake sure that the SmartKey is in position 2
in the ignition lock.
XPress the =or; button on the steering
wheel to select the Serv.menu.
XPress the9or: button to select
Tire Pressure.
XPress the abutton.
The multifunction displays hows the current
tire pressure for each tire or the Tire pres‐
surewillbedisplayedafterdrivingafew minutesmessage appears.
XPress the :button.
The UseCurrentPressuresasNewRef‐erenceValuesmessage appears in the mul-
tifunction display.
If you wish to confirm the restart:
XPress the abutton.
The TirePress.MonitorRestartedmes-
sage appears in the multifunction display.
After driving for afew minutes, the system
checks whether the current tire pressures are within the specified range. The new tire pres-
sures are then accepted as reference values
and monitored.
If you wish to cancelt he restart:
XPress the%button.
The tire pressure valuess tored at the last
restart will continue to be monitored.
Tire pressure259
Wheels and tires
Z
Page 262 of 286

CountryRadio type approval number
USAFCC ID: MRXGG4
FCC ID: MRXMC34MA4
CanadaIC: 2546A-GG4
Loadingthe vehicle
Instructionl abelsfor tiresa nd l")
Radio type approval for the tire pres-
sure monitor(NEW)
CountryRadio type approval number
USAFCC ID: MRXGG4
FCC ID: MRXMC34MA4
CanadaIC: 2546A-GG4
Loadingthe vehicle
Instructionl abelsfor tiresa nd loads
GWARNING
Overloaded tire scan overheat, causing a
blowout. Overloaded tire scan also impai rthe
steering and driving characteristics and lead
to brake failure. There is ariskofa ccident.
Observe the load rating of the tires. The load
rating mus tbeatl easthalf of the GAW Rof
your vehicle. Nevero verload the tiresby
exceeding the maximum load.
Twoi nstruction label sonyourvehicl eshowt he
maximum possible load.
(1) The Tire and Loading Information placard is on the B-pillar on the driver'ss ide. The Tire
and Loading Information placard shows the
maximum permissible number of occu-
pants and the maximum permissible vehicle
load .Italsoc ontains detail softhe tire sizes
and corresponding pressures for tires
mounted at the factory.
(2) The vehicl eide ntification plate is on the B-
pillar on the driver'ss ide. The vehicleide n-
tification plate informs yo uofthe gross
vehicl eweigh trating. It is mad eupofthe
vehicl eweigh t, allvehicl eoccupants, the
fue land the cargo. Yo ucan also find infor-
mation aboutt he maximum gross axle
weight rating on the front and reara xle.
The maximum gross axl eweigh trating is
the maximum weight that can be carrie dby
one axl e(front or reara xle).Donot exceed
the maximum gross vehicl eweigh tort
he
ma
ximum gross axl eweigh trating for the
front or reara xle.
:B-pillar, driver'ss ide
Maximum permissibleg ross mass
XSpecification for maximum permissible
load:is listed on the Tire and Loading Infor-
mation placard: "The combine dweigh tof
occupants and carg oshoul dnevere xceed
XXX kilograms or XXX lbs."
The gross weight of al lvehicl eoccupants, cargo,
luggage and traile rload/n oseweight (i fappli ca-
ble) mus tnot excee dthe specified value.
iThe specifications shown on the Tire and
Loading Information placard in the illustration are examples. The maximum permissible load
is vehicle-specific and may deviate from the
data shown here. The maximum permissible
load that applie sfor your vehicl ecan be found
on your vehicle's Tire and Loading Informa-
tion placard.
260Loadingt he vehicle
Wheelsand tires
Page 263 of 286

Numberofseats
Maximum numbe rofseats : indicates the
maximum numbe rofoccupants allowe dto
travel in the vehicle. This information can be
found on the Tire and Loading Informatio nplac-
ard.
iTh es pecifications shown on the Tire and
Loading Informatio nplacard in the illustration
ar ee xamples .The numbe rofseats is vehicle-
specifica nd can differf romthe details shown.
Th en umbe rofseats in your vehicl ecan be
found on the Tire and Loading Information
placard.
Determining the correc tloa dl im it
Step-by-ste pinstructions
Thef ollowing steps have been developed as
required of al lmanufacturers under Title 49, Code of U.S. Federa
lRegulat ions, Part 575 pur-
suant to the "Nationa lTraffica nd Motor Vehicle
Safety Act of 1966".
XSte p1:Locate the statement "The combined
weight of occupants and cargo shoul dnever
exceed XXX kg or XXX lbs." on your vehicle’s
Tire and Loading Informatio nplacard.
XSte p2:Determine the combined weight of
the driver and passengers tha twillber iding in
your vehicle.
XSte p3:Subtract the combined weight of the
driver and passengers fromX XX kilograms or
XXX lbs.
XSte p4:Th er esulting figure equals the avail-
able amount of cargo and luggag eloa dc apa-
city .Example: if the "XXX" amount equals
1400 lb sand there will be five 150 lb spas-
sengers in your vehicle, the amount of avail-
able cargo and luggag eloa dc apacity is
650 lb s(140 0-7 50 (5 x150) = 650 lbs).
XStep 5: Determine the combined weight of
luggage and cargo being loaded on the vehi-
cle. Thatw eight may not safely exceed the
available cargo and luggage loadc apacity cal-
culated in step 4.
Example :steps 1to3
The following tabl eshowse xamples on how to calculate total and cargo loadc apacities with varying
seating configurations and numbe rand size of occupants. The following examples use amaximum
loadof1 ,500 lbs (680 kg). This is for illustration purposes only. Make sure you are using the
actua lloa dlimitf or you rvehicle stated on you rvehicle's Tire and Loading Information placard
(
Ypag e260).
The greater the combined weight of the occupants, the lower the maximu mluggage load.
Observe the additiona linformation whe ntowing atrailer (
Ypag e151).
Step 1
Example 1Example 2Example 3
Combinedm aximum
weight of occupants
and load (data from the
Tire and Loading Infor-
mation placard)1500 lbs (680 kg)1500 lbs (680 kg)1500 lbs (680 kg)
Loading the vehicle261
Wheels and tires
Z
Page 264 of 286
531
Distribution of the
occupantsFront:2
Rear: 3Front:1
Rear: 2Front:1
Weight of the occu-
pantsOccupant 1: 150")
Step 2
Example 1Example 2Example 3
Number of people in
the vehicle (driver and
occupants)531
Distribution of the
occupantsFront:2
Rear: 3Front:1
Rear: 2Front:1
Weight of the occu-
pantsOccupant 1: 150 lbs
(68 kg)
Occupant 2: 180 lbs
(82 kg)
Occupant 3: 160 lbs
(73 kg)
Occupant 4: 140 lbs
(63 kg)
Occupant 5: 120 lbs
(54 kg)Occupant 1: 200 lbs
(91 kg)
Occupant 2: 190 lbs
(86 kg)
Occupant 3: 150 lbs
(68 kg)Occupant 1: 150 lbs
(68 kg)
Gross weight of all
occupants750 lbs (340 kg)540 lbs (245 kg)150 lbs (68 kg)
Step 3
Example 1Example 2Example 3
Permissible load (maxi-
mum gross vehicle
weight rating from the
Tire and Loading Infor-
mation placard minus
the gross weight of all
occupants)1500 lbs (680 kg)Ò
750 lbs (340 kg) =
750 lbs (340 kg)1500 lbs (680 kg) Ò
540 lbs (245 kg)
=960 lbs (435 kg)1500 lbs (680 kg) Ò
150 lbs (68 kg) =
1350 lbs (612 kg)
Vehicle identification plate
Even if you have calculated the total load care-
fully, you should still make sure that the gross
vehicle weight rating and the gross axle weight
rating are not exceeded. Details can be found on
the vehicle identification plate on the B-pillar on
the driver's side of the vehicle (
Ypage 260).
Gross vehicle weight rating: the gross weight
of the vehicle, all passengers, load and trailer
load/noseweight (if applicable) must not
exceed the gross vehicle weight rating.
Gross Axle Weight Rating (GAWR): the maxi-
mum permissible load that can be carried by one
axle (front or rear axle).
To ensure that your vehicle does not exceed the
maximum permissible values (gross vehicle weight and maximum gross axle weight rating),
have your loaded vehicle (including driver, occu-
pants, load and full trailer load if applicable)
weighed on
asuitable vehicle weighbridge.
262Loading the vehicle
Wheels and tires
 1
1 2
2 3
3 4
4 5
5 6
6 7
7 8
8 9
9 10
10 11
11 12
12 13
13 14
14 15
15 16
16 17
17 18
18 19
19 20
20 21
21 22
22 23
23 24
24 25
25 26
26 27
27 28
28 29
29 30
30 31
31 32
32 33
33 34
34 35
35 36
36 37
37 38
38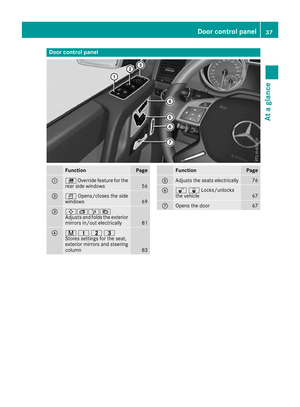 39
39 40
40 41
41 42
42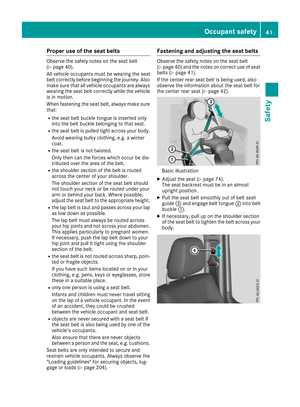 43
43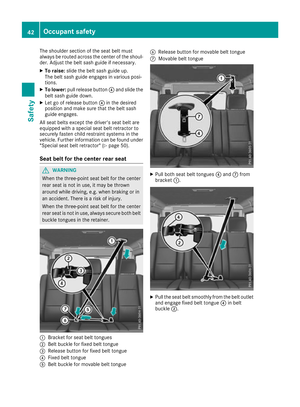 44
44 45
45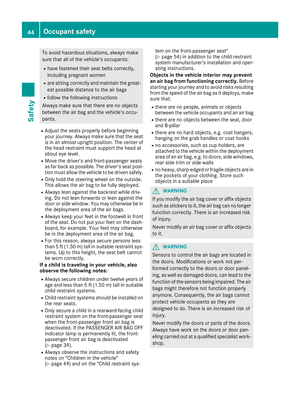 46
46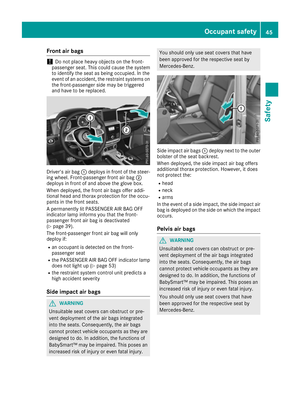 47
47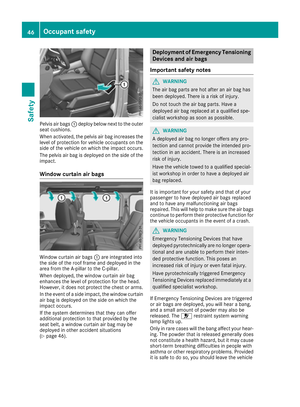 48
48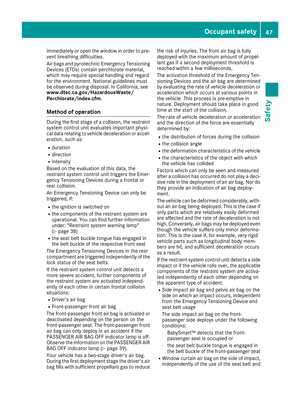 49
49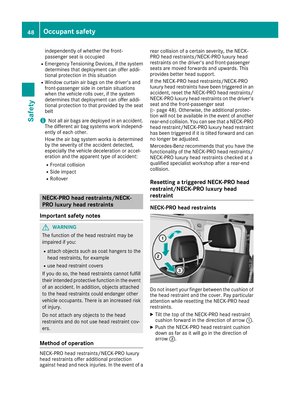 50
50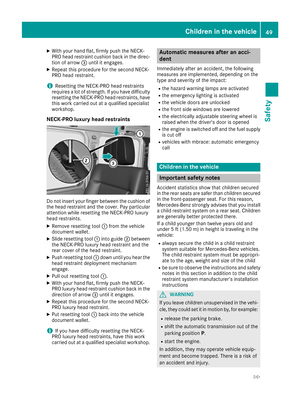 51
51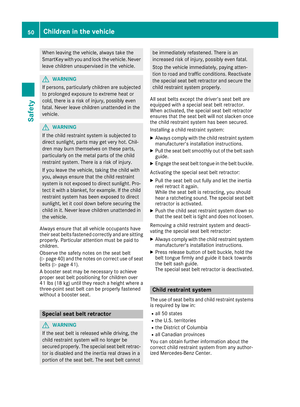 52
52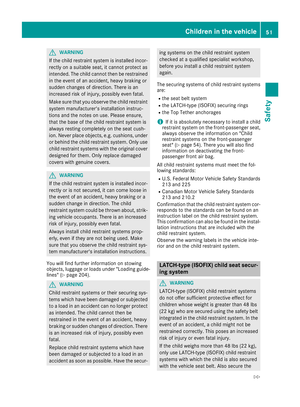 53
53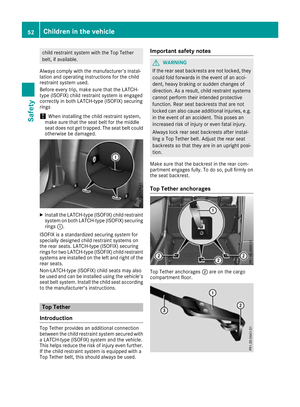 54
54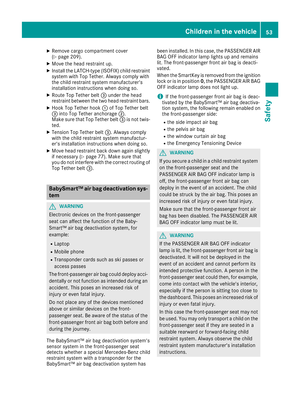 55
55 56
56 57
57 58
58 59
59 60
60 61
61 62
62 63
63 64
64 65
65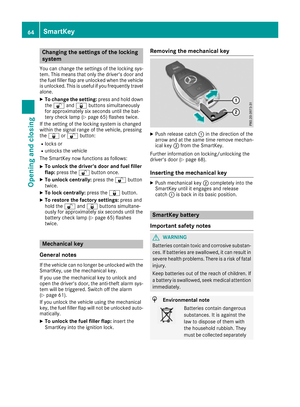 66
66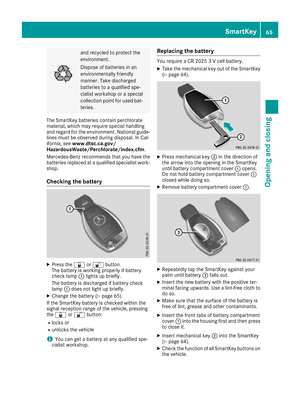 67
67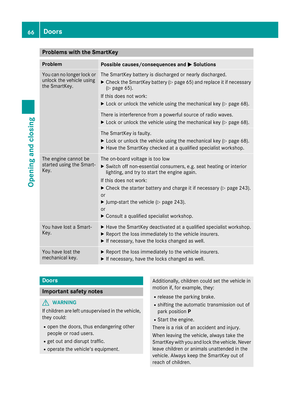 68
68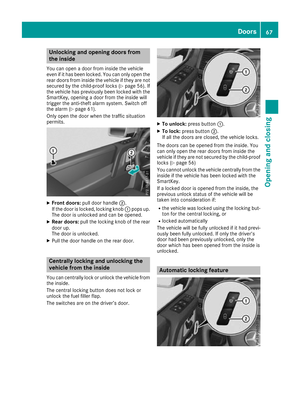 69
69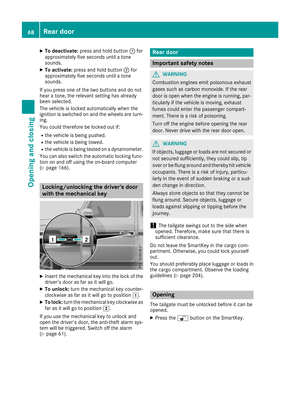 70
70 71
71 72
72 73
73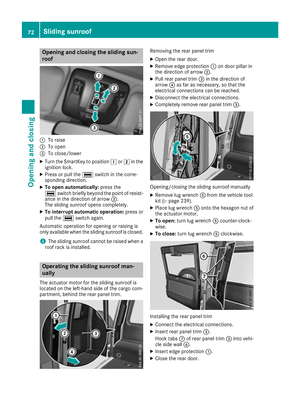 74
74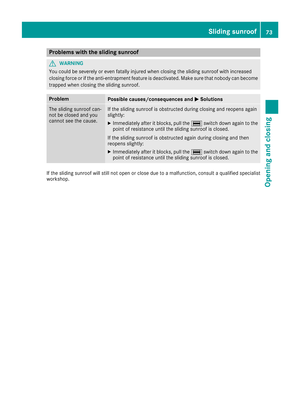 75
75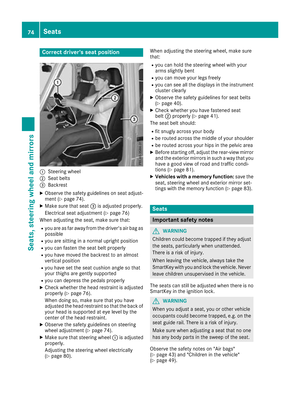 76
76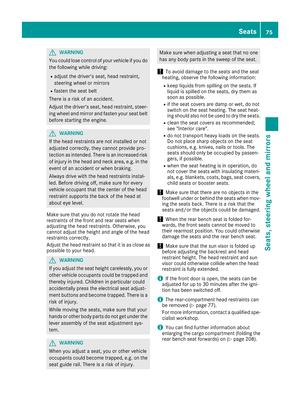 77
77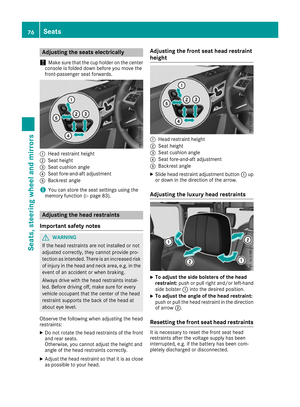 78
78 79
79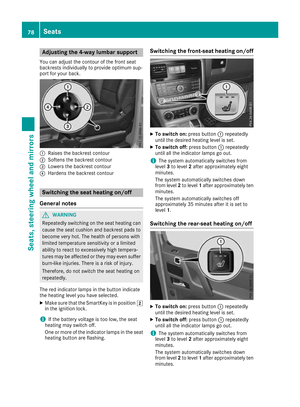 80
80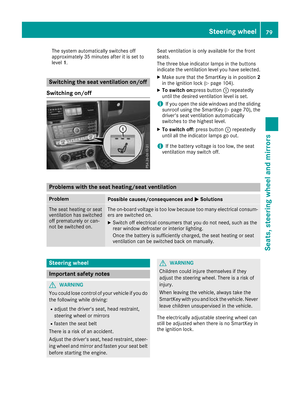 81
81 82
82 83
83 84
84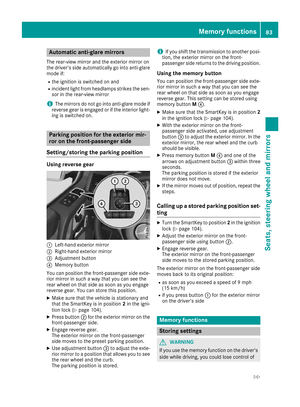 85
85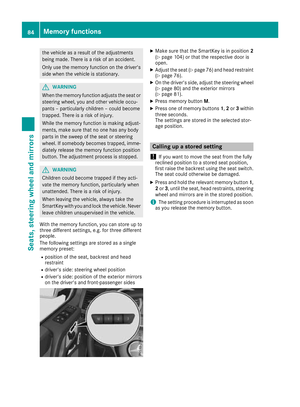 86
86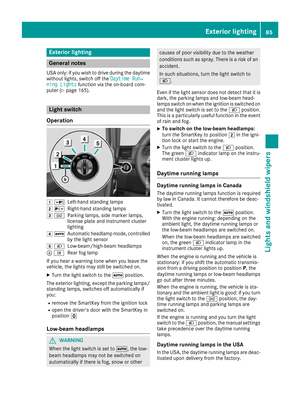 87
87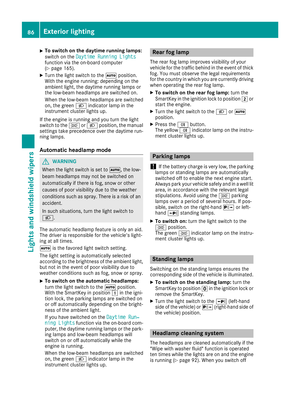 88
88 89
89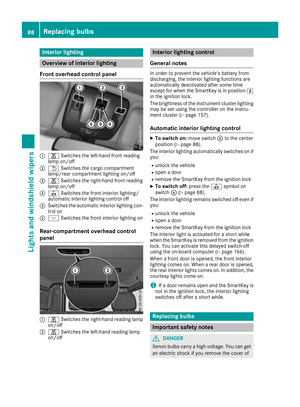 90
90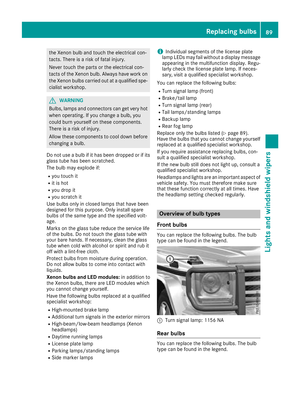 91
91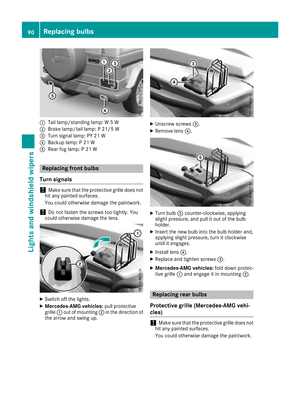 92
92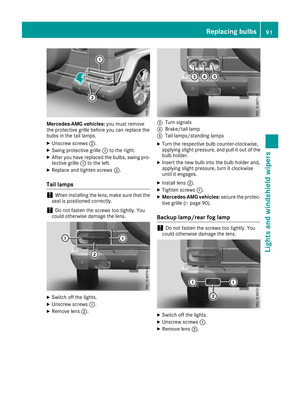 93
93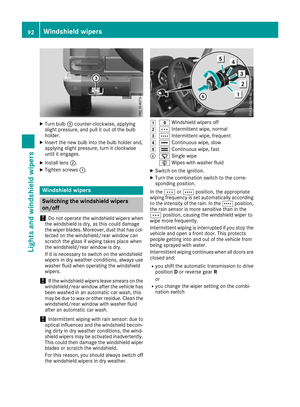 94
94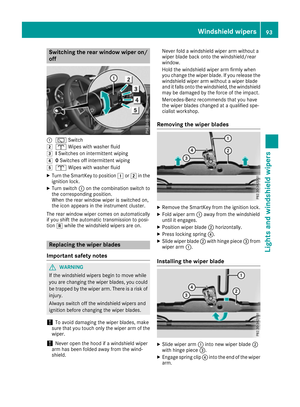 95
95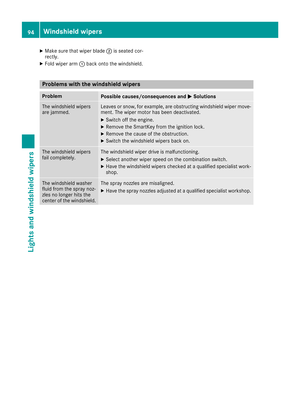 96
96 97
97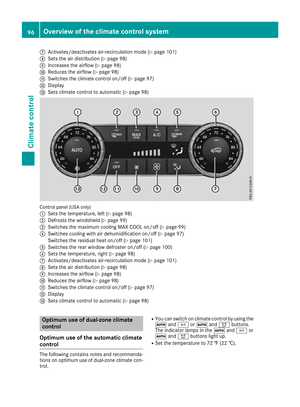 98
98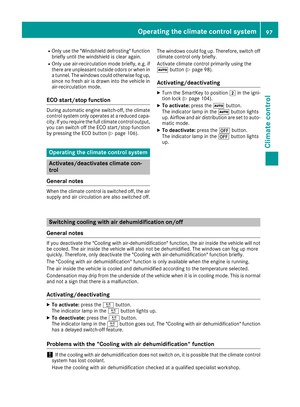 99
99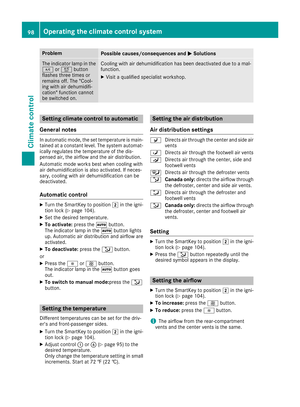 100
100 101
101 102
102 103
103 104
104 105
105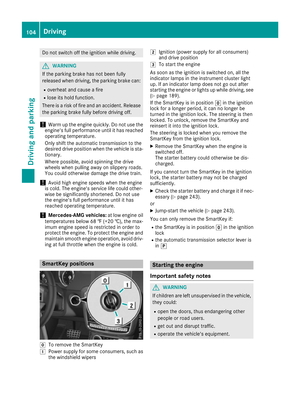 106
106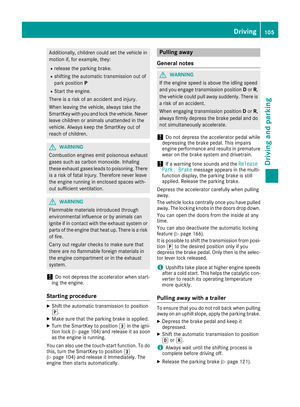 107
107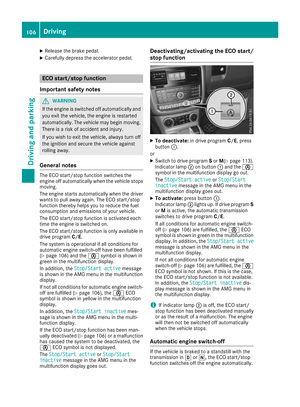 108
108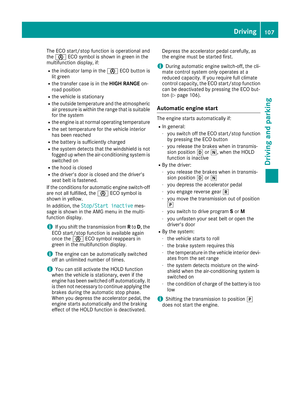 109
109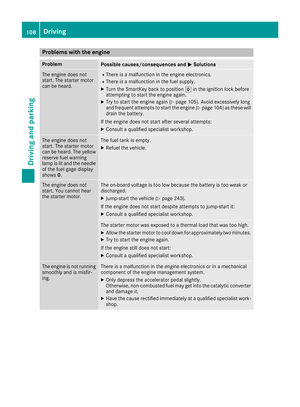 110
110 111
111 112
112 113
113 114
114 115
115 116
116 117
117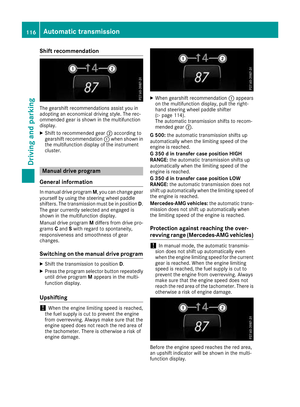 118
118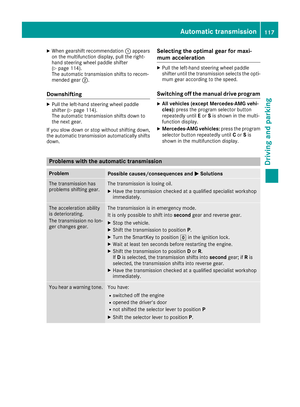 119
119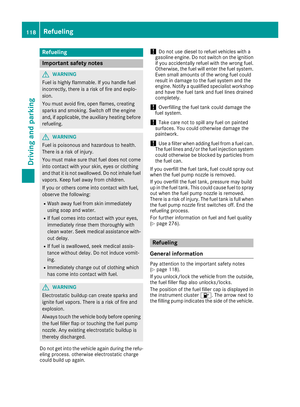 120
120 121
121 122
122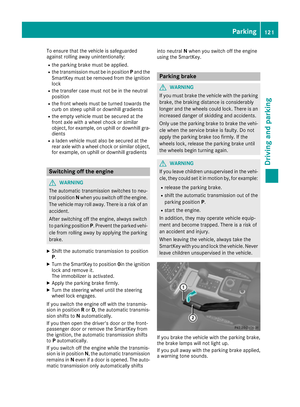 123
123 124
124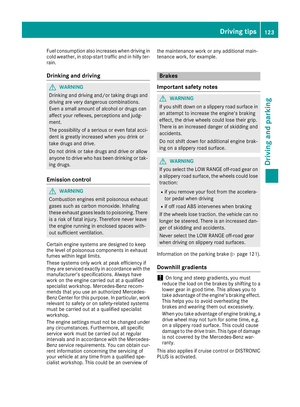 125
125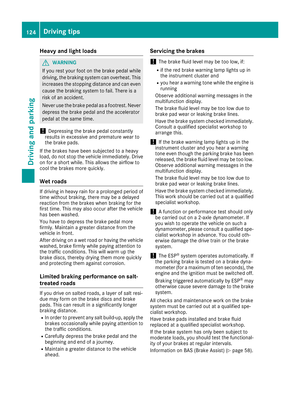 126
126 127
127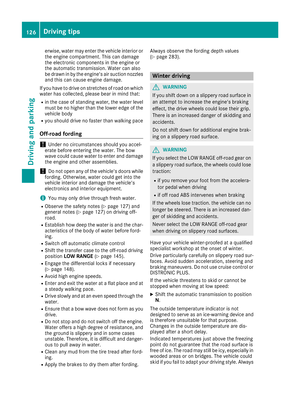 128
128 129
129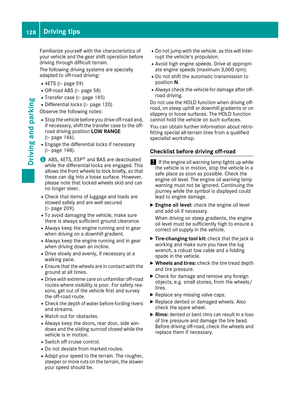 130
130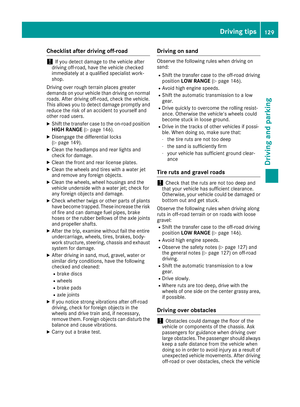 131
131 132
132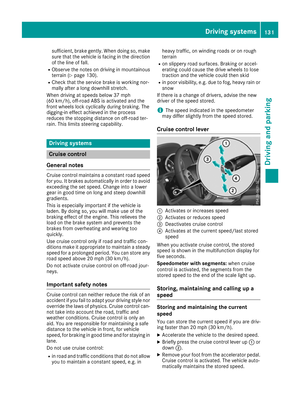 133
133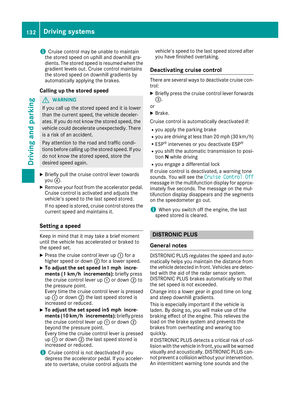 134
134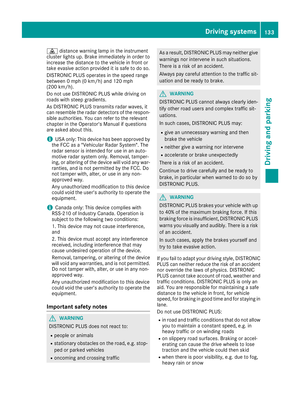 135
135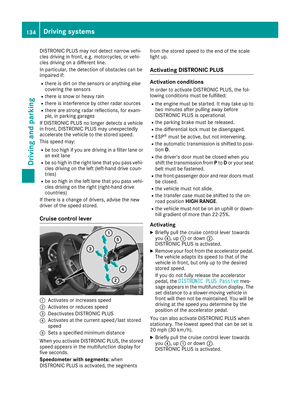 136
136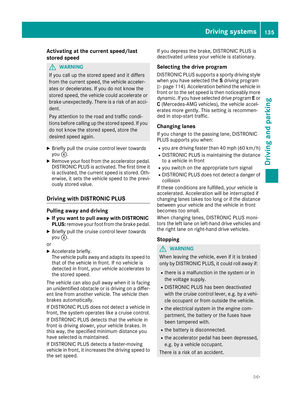 137
137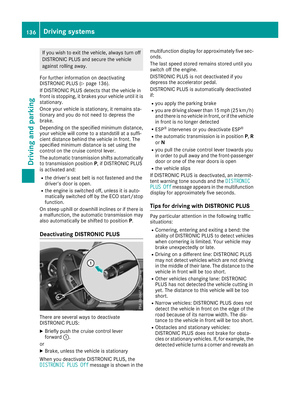 138
138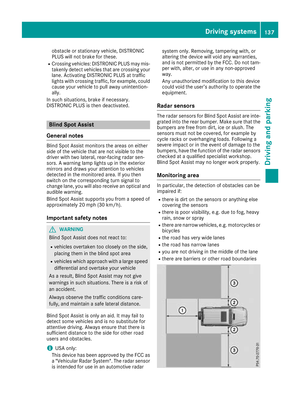 139
139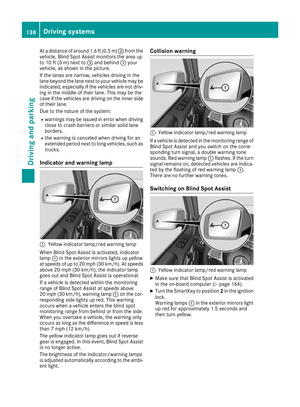 140
140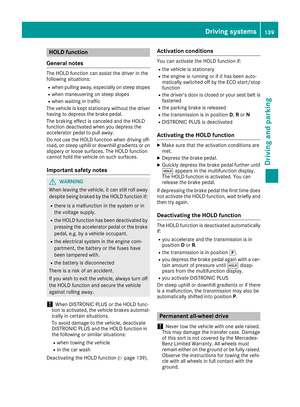 141
141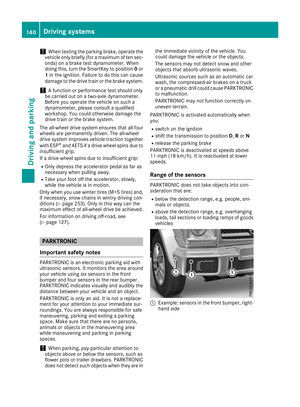 142
142 143
143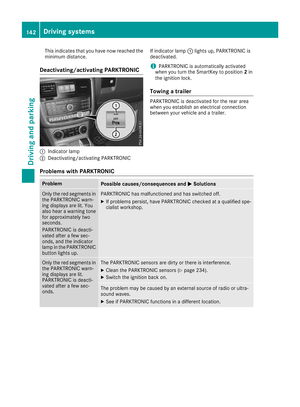 144
144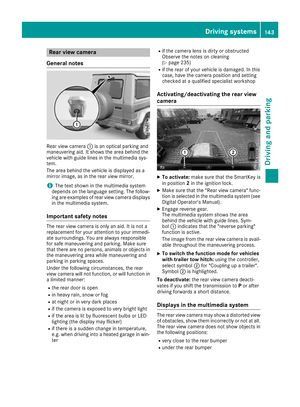 145
145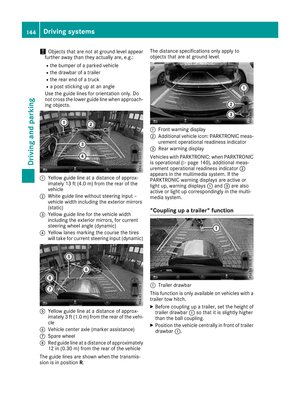 146
146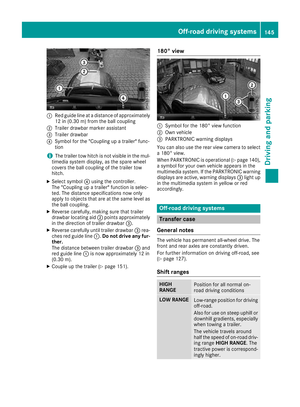 147
147 148
148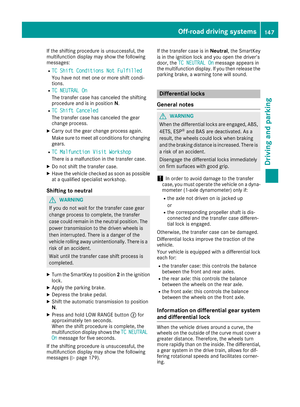 149
149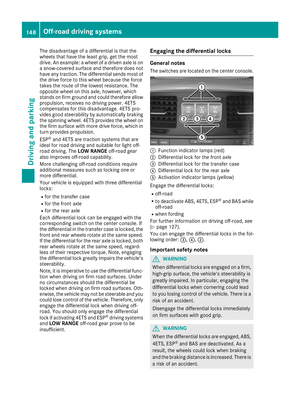 150
150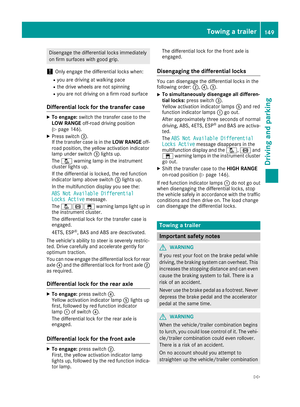 151
151 152
152 153
153 154
154 155
155 156
156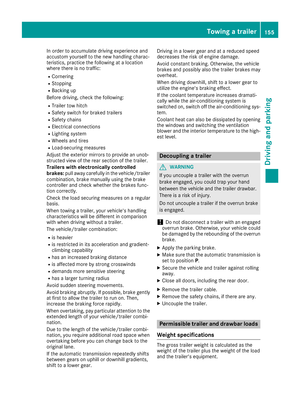 157
157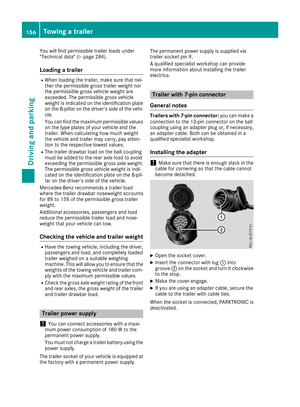 158
158 159
159 160
160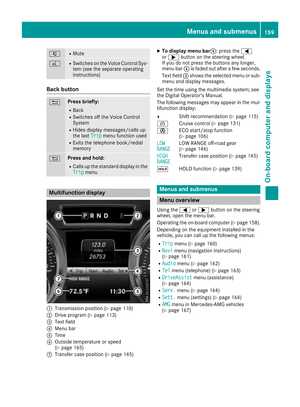 161
161 162
162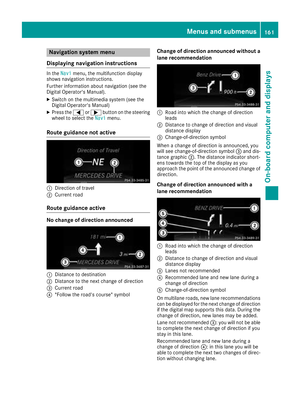 163
163 164
164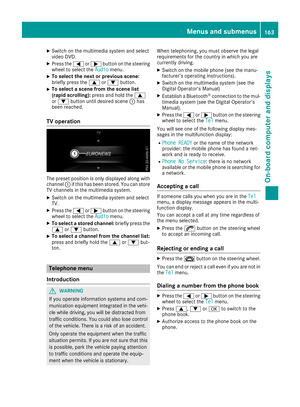 165
165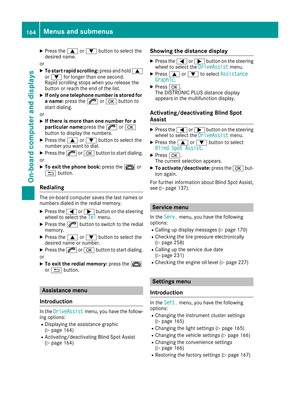 166
166 167
167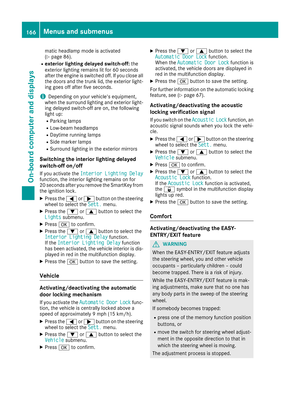 168
168 169
169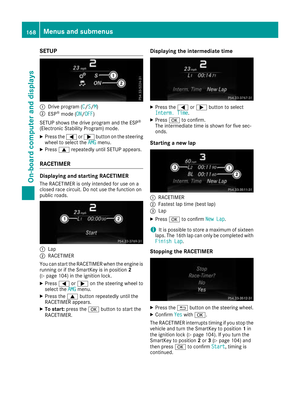 170
170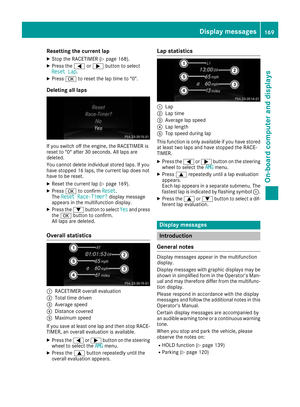 171
171 172
172 173
173 174
174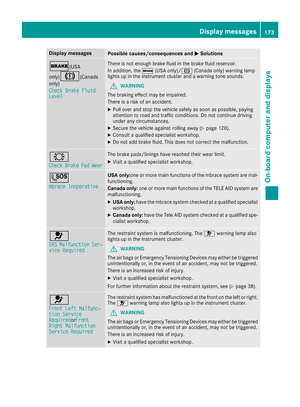 175
175 176
176 177
177 178
178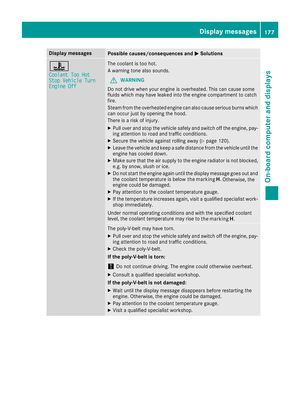 179
179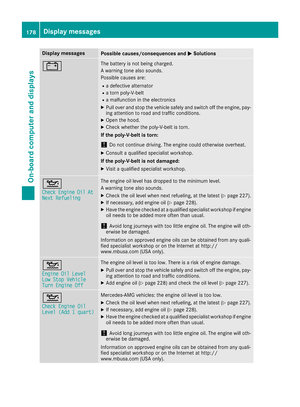 180
180 181
181 182
182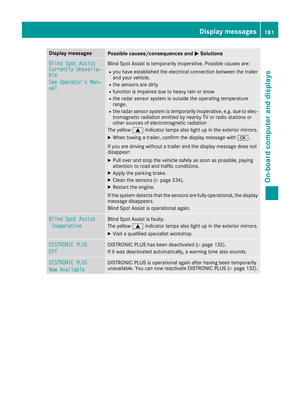 183
183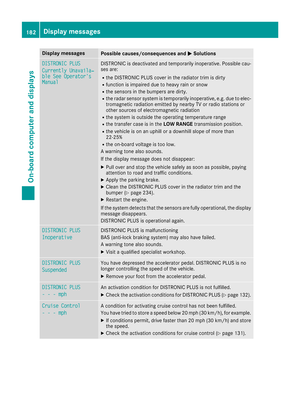 184
184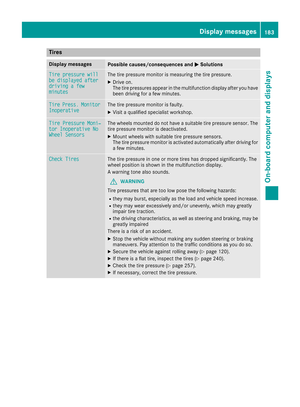 185
185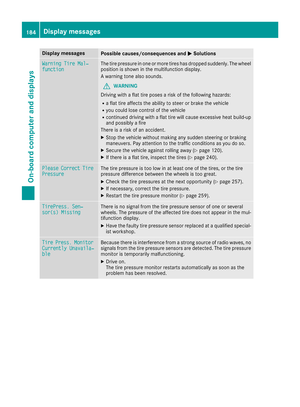 186
186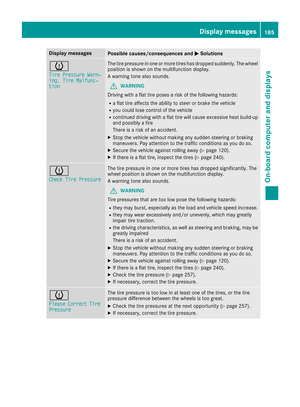 187
187 188
188 189
189 190
190 191
191 192
192 193
193 194
194 195
195 196
196 197
197 198
198 199
199 200
200 201
201 202
202 203
203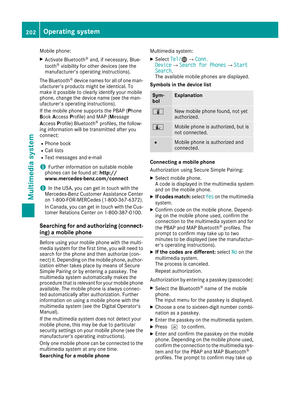 204
204 205
205 206
206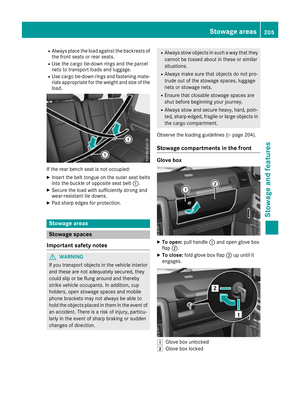 207
207 208
208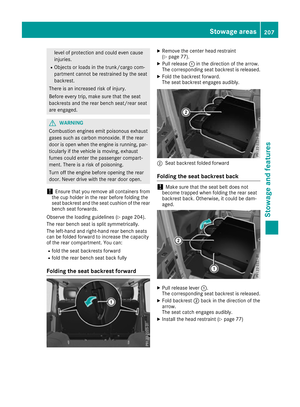 209
209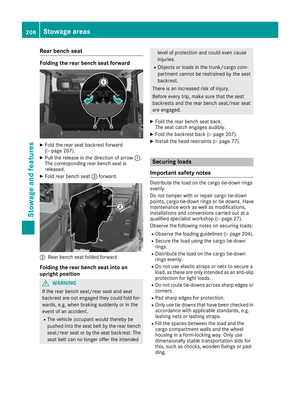 210
210 211
211 212
212 213
213 214
214 215
215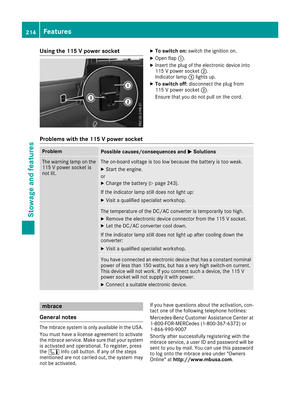 216
216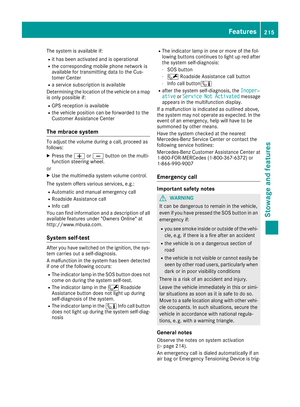 217
217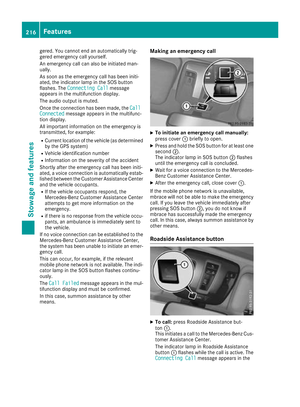 218
218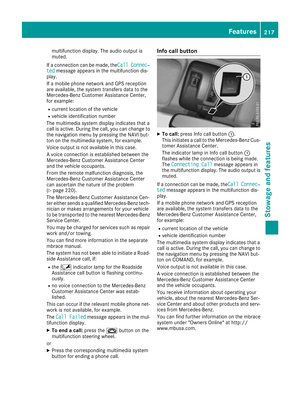 219
219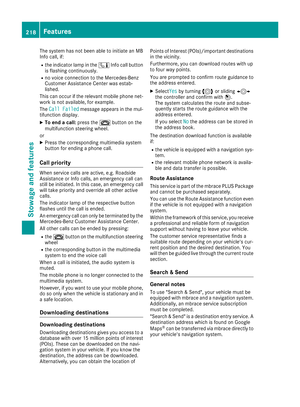 220
220 221
221 222
222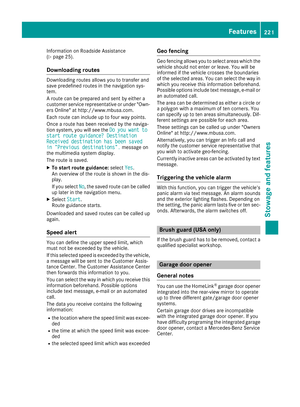 223
223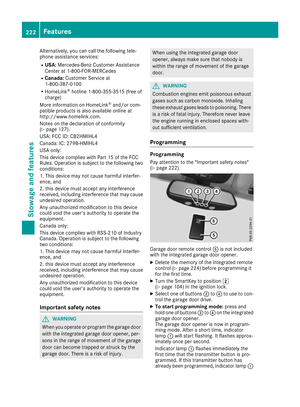 224
224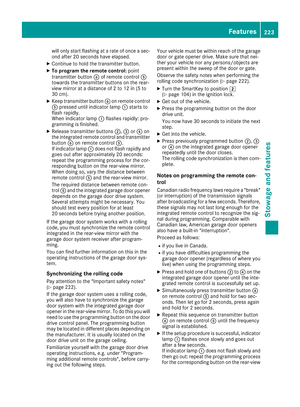 225
225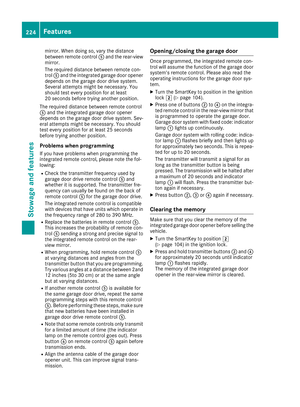 226
226 227
227 228
228 229
229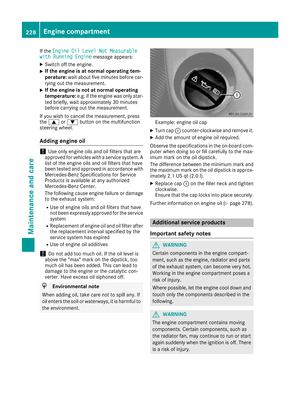 230
230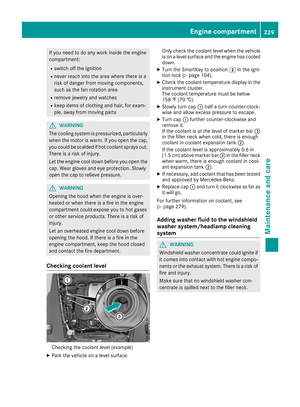 231
231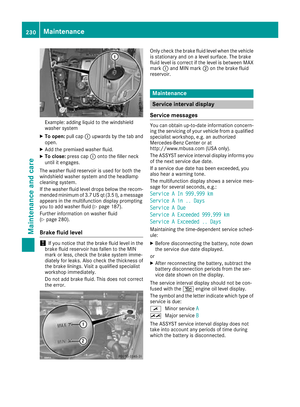 232
232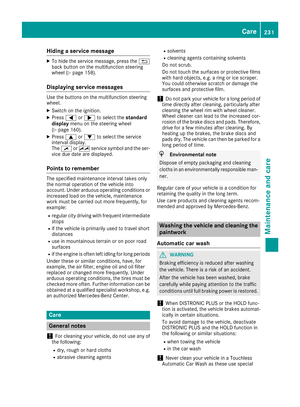 233
233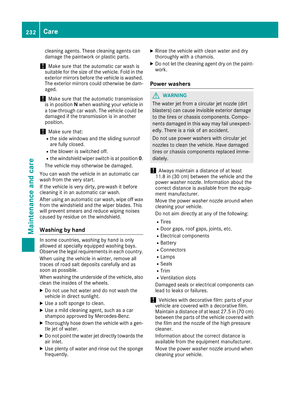 234
234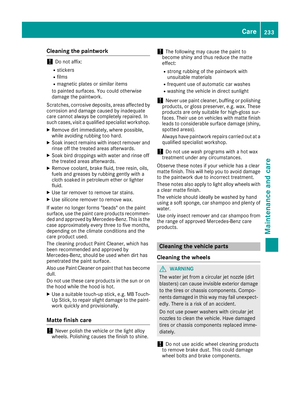 235
235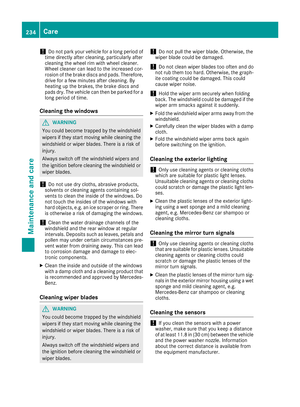 236
236 237
237 238
238 239
239 240
240 241
241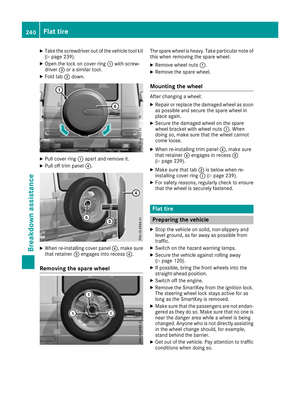 242
242 243
243 244
244 245
245 246
246 247
247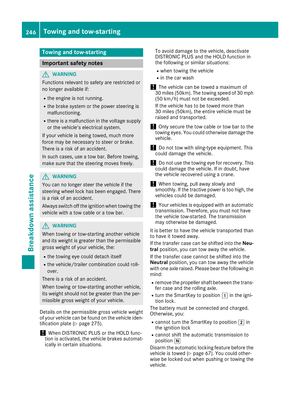 248
248 249
249 250
250 251
251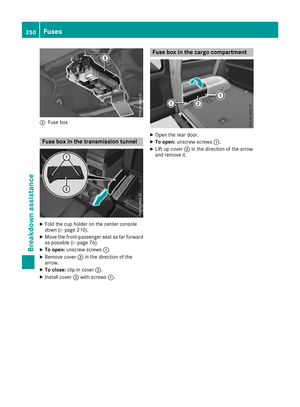 252
252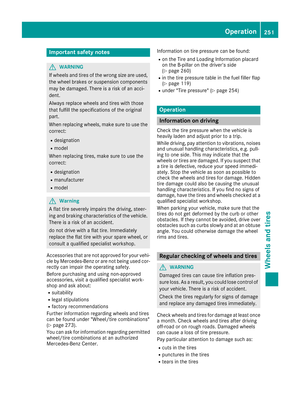 253
253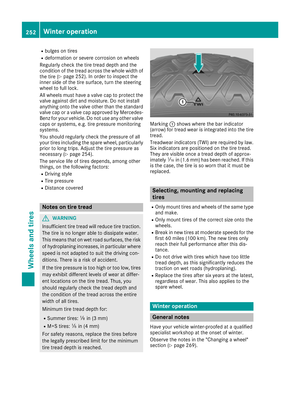 254
254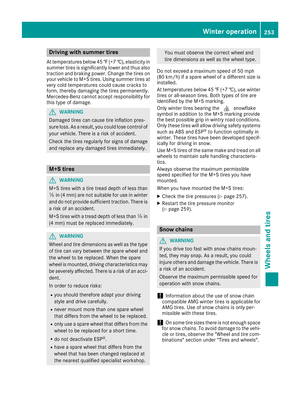 255
255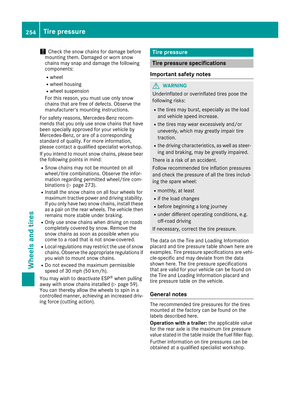 256
256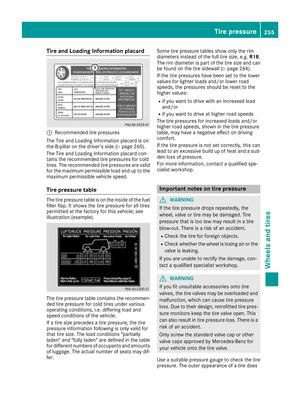 257
257 258
258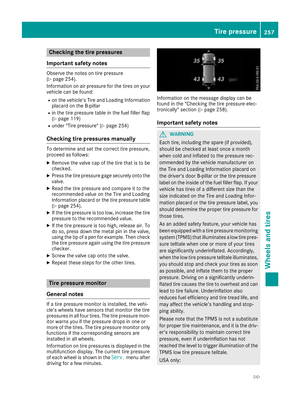 259
259 260
260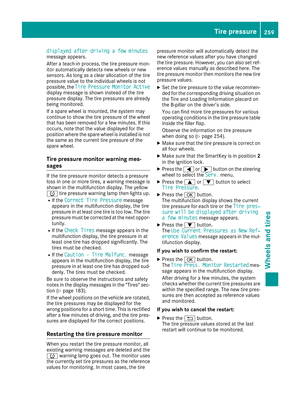 261
261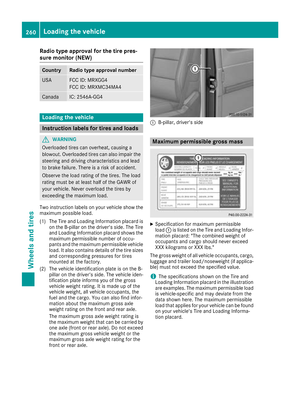 262
262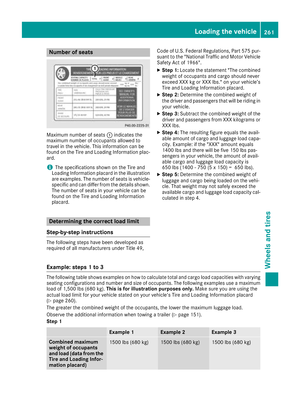 263
263 264
264 265
265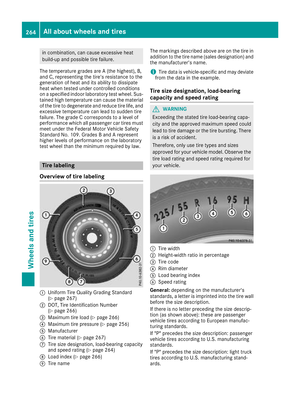 266
266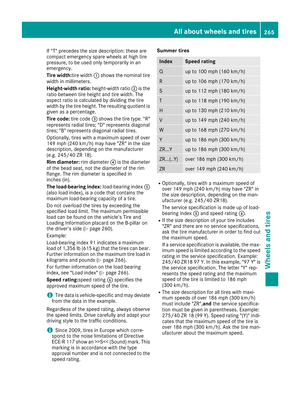 267
267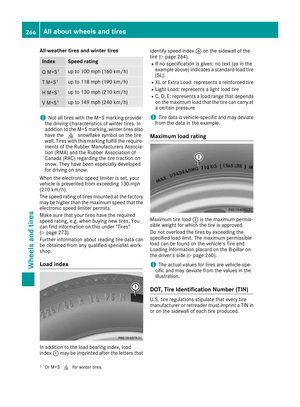 268
268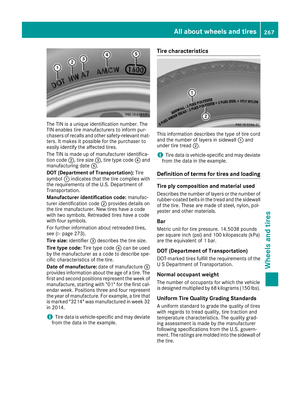 269
269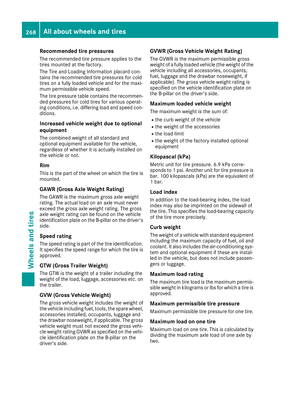 270
270 271
271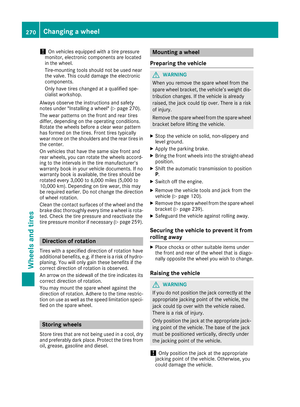 272
272 273
273 274
274 275
275 276
276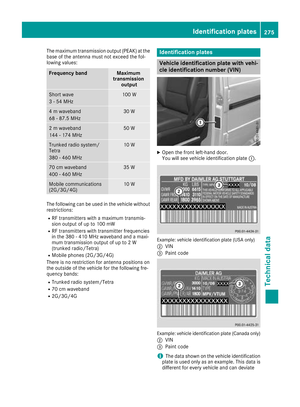 277
277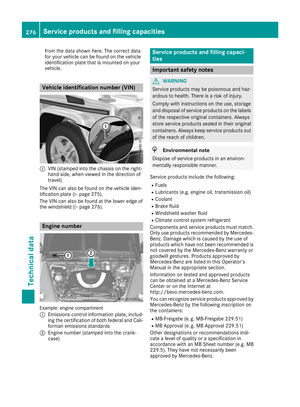 278
278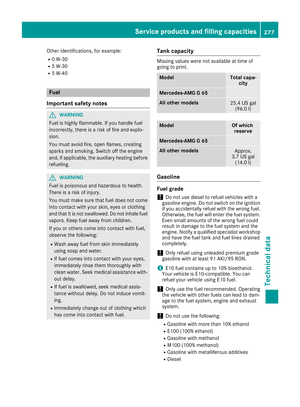 279
279 280
280 281
281 282
282 283
283 284
284 285
285