2017 MERCEDES-BENZ G-Class wiper blades
[x] Cancel search: wiper bladesPage 23 of 286

Warranty.............................................. 24
Washer fluid
Display message ............................ 187
Weather display (COMAND)
see als oDigita lOperator's Man-
ua l.................................................. 198
Wheel and tire combinations
Tires. .............................................. 273
Wheel bol ttightening torque ........... 272
Wheels
Changing awheel .......................... 269
Checking ........................................ 251
Cleaning ......................................... 233
Important safety notes .................. 251
Informatio nondriving .................... 251
Interchanging/changing ................ 269
Mounting anew wheel ...................2 72
Mounting awheel .......................... 270
Removing awheel .......................... 272
Snow chains .................................. 253
Storing ...........................................2 70
Tightening torque. .......................... 272
Wheels ize/tire size ....................... 273
Windowc urtain air bag
Display message ............................ 174
Operation ......................................... 46
Windows
see Side windows
Windshield
Defrosting ........................................ 99
Windshiel dheating .............................9 9
Windshield washe rfluid
see Windshieldw asher system
Windshield washe rsystem
Adding washer flui d....................... 229
Notes. ............................................ 280
Windshiel dwipers
Problem (malfunction) ..................... 94
Rear window wipe r.......................... 93
Replacing the wipe rblade s.............. 93
Switching on/off. ............................. 92
Winter driving
Important safety notes .................. 252
Slippery roads urfaces ................... 126
Snow chains .................................. 253
Winter operation
Overview ........................................ 252
Radiato rcover. .............................. 226 Summer tire
s................................. 253
Winter tires
M+S tire s....................................... 253
Wipe rblades
Cleaning ......................................... 234
Important safety notes .................... 93
Replacing ......................................... 93
Wo
oden trim (cleaning instruc-
tions) .................................................. 236
Index21
Page 94 of 286

XTurn bulb=counter-clockwise, applying
slight pressure, and pull it out of the bulb
holder.
XInsert the new bulb into the bulb holder and,
applying slight pressure, turn it clockwise
until it engages.
XInstall lens ;.
XTighten screws :.
Windshield wipers
Switching the windshield wipers
on/off
!
Do not operate the windshield wipers when
the windshield is dry, as this could damage
the wiper blades. Moreover, dust that has col-
lected on the windshield/rear window can
scratc hthe glass if wiping takes place when
the windshield/rear window is dry.
If it is necessary to switch on the windshield
wipers in dry weather conditions, alwaysu se
washer fluid when operating the windshield
wipers.
!If the windshield wipers leave smears on the
windshield/rear window after the vehicle has
been washed in an automatic car wash, this
may be due to wax or other residue. Clean the
windshield/rear window with washer fluid
after an automatic car wash.
!Intermittent wiping with rain sensor: due to
optical influences and the windshield becom-
ing dirty in dry weather conditions, the wind-
shield wipers may be activated inadvertently.
This could then damage the windshield wiper
blades or scratc hthe windshield.
For this reason, you should alwayss witch off
the windshield wipers in dry weather.
1$ Windshield wipers off
2ÄIntermittent wipe, normal
3ÅIntermittent wipe, frequent
4°Continuous wipe, slow
5¯Continuous wipe, fast
BíSingle wipe
î Wipes with washer fluid
XSwitch on the ignition.
XTurn the combination switch to the corre-
sponding position.
In the ÄorÅ position, the appropriate
wiping frequency is set automatically according
to the intensity of the rain. In the Åposition,
the rain sensor is more sensitiv ethan in the
Ä position, causing the windshield wiper to
wipe more frequently.
Intermittent wiping is interrupted if you stop the vehicle and open afront door. This protects
people getting into and out of the vehicle from
being sprayed with water.
Intermittent wiping continues when all doors are
closed and:
Ryou shift the automatic transmission to drive
position Dor reverse gear R
or
Ryou change the wiper setting on the combi-
nation switch
92Windshield wipers
Lights and windshield wipers
Page 95 of 286

Switching the rear window wiper on/
off
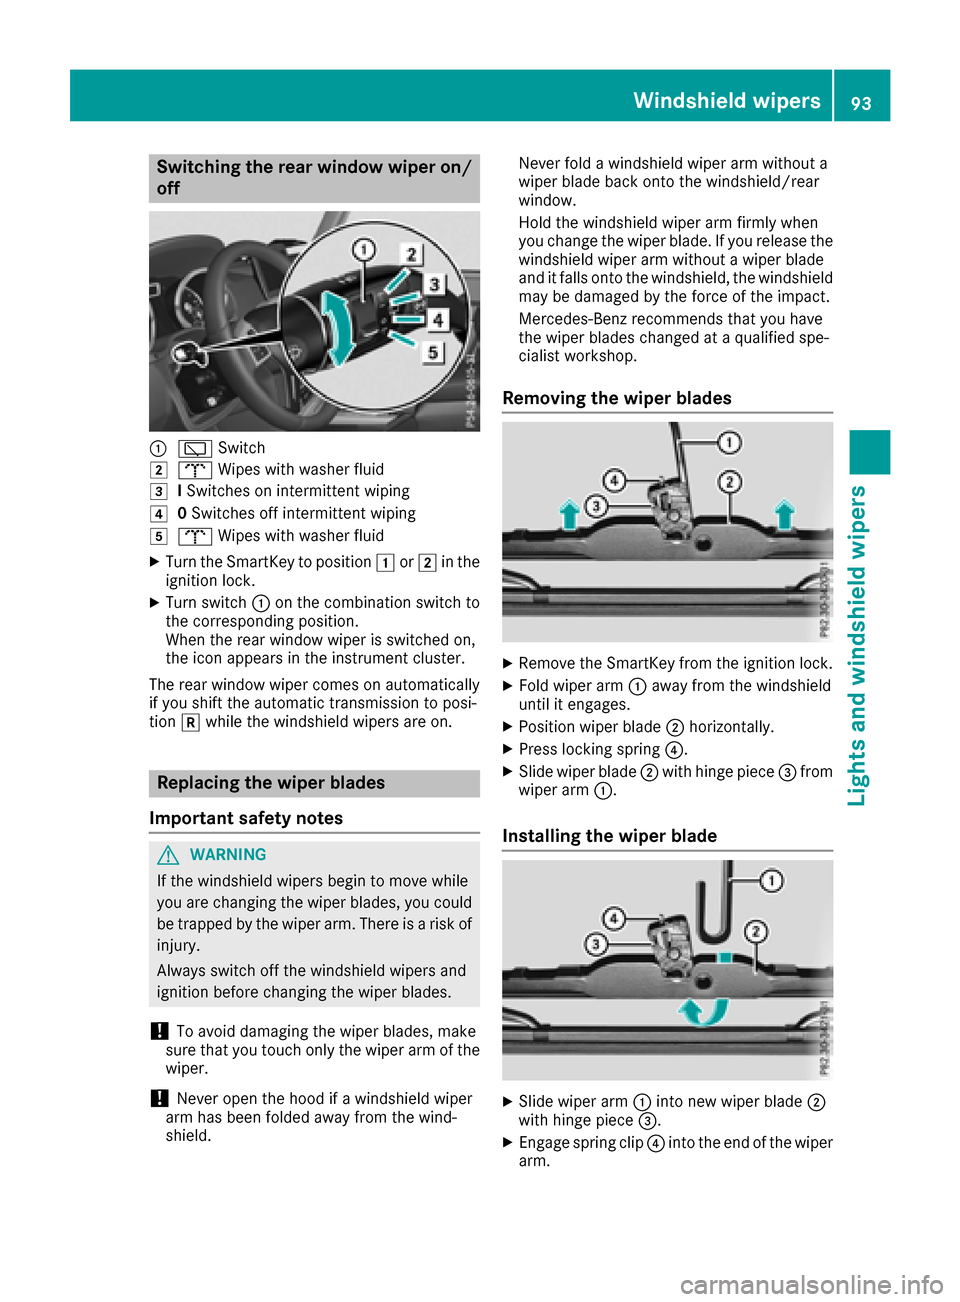
:èSwitch
2bWipes with washer fluid
3ISwitches on intermittent wiping
40 Switches off intermittent wiping
5b Wipes with washer fluid
XTurn the SmartKey to position 1or2 in the
ignition lock.
XTurn switch :on the combination switch to
the correspondingp osition.
When the rear window wiper is switched on,
the icon appears in the instrumentc luster.
The rear window wiper comes on automatically
if you shift the automatic transmission to posi-
tion kwhile the windshield wipers are on.
Replacing the wiper blades
Important safety notes
GWARNING
If the windshield wipers begin to move while
you are changing the wiper blades, you could be trapped by the wiper arm. There is arisk of
injury.
Always switch off the windshield wipers and
ignition before changing the wiper blades.
!To avoid damaging the wiper blades, make
sure that you touch only the wiper arm of the
wiper.
!Never open the hood if awindshield wiper
arm has been folded away from the wind-
shield. Never fold
awindshield wiper arm without a
wiper blade back onto the windshield/rear
window.
Hold the windshield wiper arm firmly when
you change the wiper blade. If you release the
windshield wiper arm without awiper blade
and it falls onto the windshield, the windshield
may be damaged by the force of the impact.
Mercedes-Benz recommends that you have
the wiper blades changed at aqualified spe-
cialist workshop.
Removing the wiper blades
XRemove the SmartKey from the ignition lock.
XFold wiper arm :away from the windshield
until it engages.
XPosition wiper blade ;horizontally.
XPress locking spring ?.
XSlide wiper blade;with hinge piece =from
wiper arm :.
Installing the wiper blade
XSlide wiper arm :into new wiper blade ;
with hinge piece =.
XEngage spring clip ?into the end of the wiper
arm.
Windshield wipers93
Lights and windshieldw ipers
Z
Page 234 of 286

cleaning agents. These cleaning agents can
damagethe paintwork or plasti cparts.
!Make sure that the automatic car wash is
suitablef or the size of the vehicle .Fold in the
exterior mirrors before the vehicle is washed.
The exterior mirrors could otherwise be dam-
aged.
!Make sure that the automatic transmission
is in position Nwhe nwashing your vehicle in
at ow-through car wash. The vehicle could be
damaged if the transmission is in another
position.
!Make sure that:
Rthe sid ewindow sand the sliding sunroof
are fully closed.
Rthe blower is switched off.
Rthe windshield wiper switch is at position 0.
The vehicle may otherwise be damaged.
You can wash the vehicle in an automatic car
wash from the very start.
If the vehicle is very dirty, pre-wash it before
cleaning it in an automatic car wash.
After using an automatic car wash, wipe off wax
from the windshield and the wiper blades. This
will prevent smears and reduce wiping noises
caused by residueont he windshield.
Washing by hand
In some countries,washing by hand is only
allowed at speciall yequipped washing bays.
Observe the legalr equirements in each country.
Whenu sing the vehicle in winter, remove all
trace sofroads altd eposits carefully and as
soona spossible.
Whenw ashing the underside of the vehicle ,also
clean the insides of the wheels.
XDo not us ehot water and do not wash the
vehicle in direct sunlight.
XUse asoft sponge to clean.
XUse amildc leaning agent, such as acar
shampooa pproved by Mercedes-Benz.
XThoroughlyh osedownthe vehicle with agen-
tle jet of water.
XDo not point the water jet directlyt owards the
ai ri nlet.
XUse plenty of water and rinse outt he sponge
frequently.
XRinse the vehicle with clean water and dry
thoroughly with achamois.
XDo not le tthe cleaning agent dry on the paint-
work.
Powe rwashers
GWARNING
The water jet from acircula rjet nozzle (dirt
blasters) can cause invisible exterior damage
to the tire sorchassisc omponents. Compo-
nents damaged in this wa ymay fai lunexpect-
edly. There is ariskofana ccident.
Do not us epower washers with circula rjet
nozzle stoclean the vehicle .Have damaged
tire sorc hassisc omponents replaced imme-
diately.
!Alway smaintainad istance of at least
11.8 in (30 cm )between the vehicle and the
power washern ozzle.Information aboutt he
correct distance is available from the equip-
ment manufacturer.
Move the power washern ozzle around when
cleaning your vehicle.
Do not ai mdirectlyata ny of the following:
RTires
RDoor gaps, roof gaps, joints, etc.
RElectrical components
RBattery
RConnectors
RLamps
RSeals
RTrim
RVentilation slots
Damaged seals or electrical components can
lead to leaks or failures.
!Vehicles with decorative film: parts of your
vehicle are covered with adecorative film.
Maintain adistance of at least 27.5 in (70 cm)
between the parts of the vehicle covered with
the fil mand the nozzle of the hig hpressure
cleaner.
Information aboutt he correct distance is
available from the equipment manufacturer.
Move the power washern ozzle around when
cleaning your vehicle.
232Care
Maintenancea nd care
Page 236 of 286

!Do not park your vehicle foralong period of
time directly after cleaning, particularlya fter
cleaning the wheel rim with wheel cleaner.
Wheel cleaner can lead to the increased cor-
rosion of the brake discs and pads. Therefore,
drive for afew minutes after cleaning. By
heating up the brakes, the brake discs and
pads dry. The vehicle can then be parked for a
long period of time.
Cleaning the windows
GWARNING
You could become trapped by the windshield wipers if they start moving while cleaning the
windshieldorw iper blades. There is arisk of
injury.
Alwayss witch off the windshieldw ipers and
the ignition before cleaning the windshieldo r
wiper blades.
!Do not use dry cloths, abrasive products,
solvents or cleaning agents containing sol-
vents to clean the inside of the windows. Do
not touch the insides of the windows with
hard objects, e.g. an ice scraper or ring. There
is otherwise arisk of damaging the windows.
!Cleant he water drainage channels of the
windshielda nd the rear window at regular
intervals. Deposits such as leaves, petals and pollen may under certain circumstances pre-
vent water from draining away. This can lead
to corrosion damage and damage to elec-
tronic components.
XCleant he inside and outside of the windows
with adamp cloth and acleaning product that
is recommended and approved by Mercedes-
Benz.
Cleaning wiper blades
GWARNING
You could become trapped by the windshield wipers if they start moving while cleaning the
windshieldorw iper blades. There is arisk of
injury.
Alwayss witch off the windshieldw ipers and
the ignition before cleaning the windshieldo r
wiper blades.
!Do not pull the wiper blade.O therwise, the
wiper blade could be damaged.
!Do not clean wiper bladest oo often and do
not rub them too hard. Otherwise, the graph-
ite coating could be damaged. This could
cause wiper noise.
!Hold the wiper arm securely when folding
back. The windshieldc ould be damagedifthe
wiper arm smacks against it suddenly.
XFold the windshieldw iper arms awayfrom the
windshield.
XCarefully clean the wiper bladesw ithadamp
cloth.
XFold the windshieldw iper arms back again
before switching on the ignition.
Cleaning the exterior lighting
!Only use cleaning agents or cleaning cloths
which are suitablef or plastic light lenses.
Unsuitable cleaning agents or cleaning cloths
could scratch or damage the plastic light len- ses.
XCleant he plastic lenses of the exterior light-
ing using awet sponge and amild cleaning
agent, e.g. Mercedes-Benz car shampoo or
cleaning cloths.
Cleaning the mirror turns ignals
!Only use cleaning agents or cleaning cloths
that are suitablef or plastic lenses. Unsuitable
cleaning agents or cleaning cloths could
scratch or damage the plastic lenses of the
mirror turn signals.
XCleant he plastic lenses of the mirror turn sig-
nals in the exterior mirror housing using awet
sponge and mild cleaning agent, e.g.
Mercedes-Benz car shampoo or cleaning
cloths.
Cleaning the sensors
!If you clean the sensors with apower
washer, make sure that you keep adistance
of at least 11.8 in (30 cm) between the vehicle
and the power washer nozzle. Information
aboutt he correct distance is available from
the equipment manufacturer.
234Care
Maintenance and care