2017 MERCEDES-BENZ G-Class remove seats
[x] Cancel search: remove seatsPage 25 of 286

Protecting the environment
General notes
HEnvironmental note
Daimler's declared policy is one of compre-
hensive environmental protection.
The objectives are for the natural resources
that form the basis of our existence on this
planet to be used sparingly and in amanner
that takes the requirements of both nature
and humanity into account.
You too can help to protect the environment
by operating your vehicle in an environmen-
tally responsible manner.
Fuel consumption and the rate of engine,
transmission, brake and tire wear are affected by these factors:
Roperating conditionsofy our vehicle
Ryour personal driving style
You can influence both factors. You should
bear the following in mind:
Operating conditions:
Ravoid short trips as these increase fuel con-
sumption.
Ralways make sure that the tire pressures
are correct.
Rdo not carry any unnecessary weight.
Rremove roof racks once you no longer need
them.
Rar egularly serviced vehicle will contribute
to environmental protection. You should
therefore adhere to the service intervals.
Ralways have service work carried out at a
qualified specialist workshop.
Personal driving style:
Rdo not depress the accelerator pedal when
startin gthe engine.
Rdo not warm up the engine when the vehicle
is stationary.
Rdrive carefully and maintain asafe distance
from the vehicle in front.
Ravoid frequent, sudden acceleration and
braking.
Rchange gear in good time and use each gear
only up to Ôof its maximum engine speed.
Rswitch off the engine in stationary traffic.
Rkeep an eye on the vehicle's fuel consump-
tion.
Environmental concerns and recom-
mendations
Wherever the Operator's Manual requires you to
dispose of materials, first try to regenerate or re-
use them. Observe the relevant environmental
rules and regulations when disposing of materi-
als. In this way you will help to protect the envi-
ronment.
Genuine Mercedes-Benz parts
HEnvironmental note
Daimler AG also suppliesr econditioned major
assemblies and parts which are of the same
quality as new parts. They are covered by the
same Limited Warranty entitlements as new
parts.
!Air bags and Emergency Tensioning Devi-
ces, as well as control units and sensors for
these restraint systems, may be installed in
the following areas of your vehicle:
Rdoors
Rdoor pillars
Rdoor sills
Rseats
Rcockpit
Rinstrumentc luster
Rcenter console
Do not install accessories such as audio sys-
tems in these areas. Do not carry out repairs or welding. You could impair the operating
efficiency of the restraint systems.
Have aftermarket accessories installed at a
qualified specialist workshop.
You could jeopardize the operating safety of
your vehicle if you use parts, tires and wheels as
well as accessories relevant to safety which
have not been approved by Mercedes-Benz. This
could lead to malfunction sinsafety-relevant
Genuine Mercedes-Benz parts23
Introduction
Z
Page 51 of 286
XWith your hand flat, firmly push the NECK-
PRO head restraint cushion back in the direc-tion of arrow =until it engages.
XRepeat this procedure for the secondN ECK-
PRO head restraint.
iResettin gthe NECK-PRO head restraints
requires alot of strength. If you have difficulty
resetting the NECK-PRO head restraints, have
this work carried out at aqualified specialist
workshop.
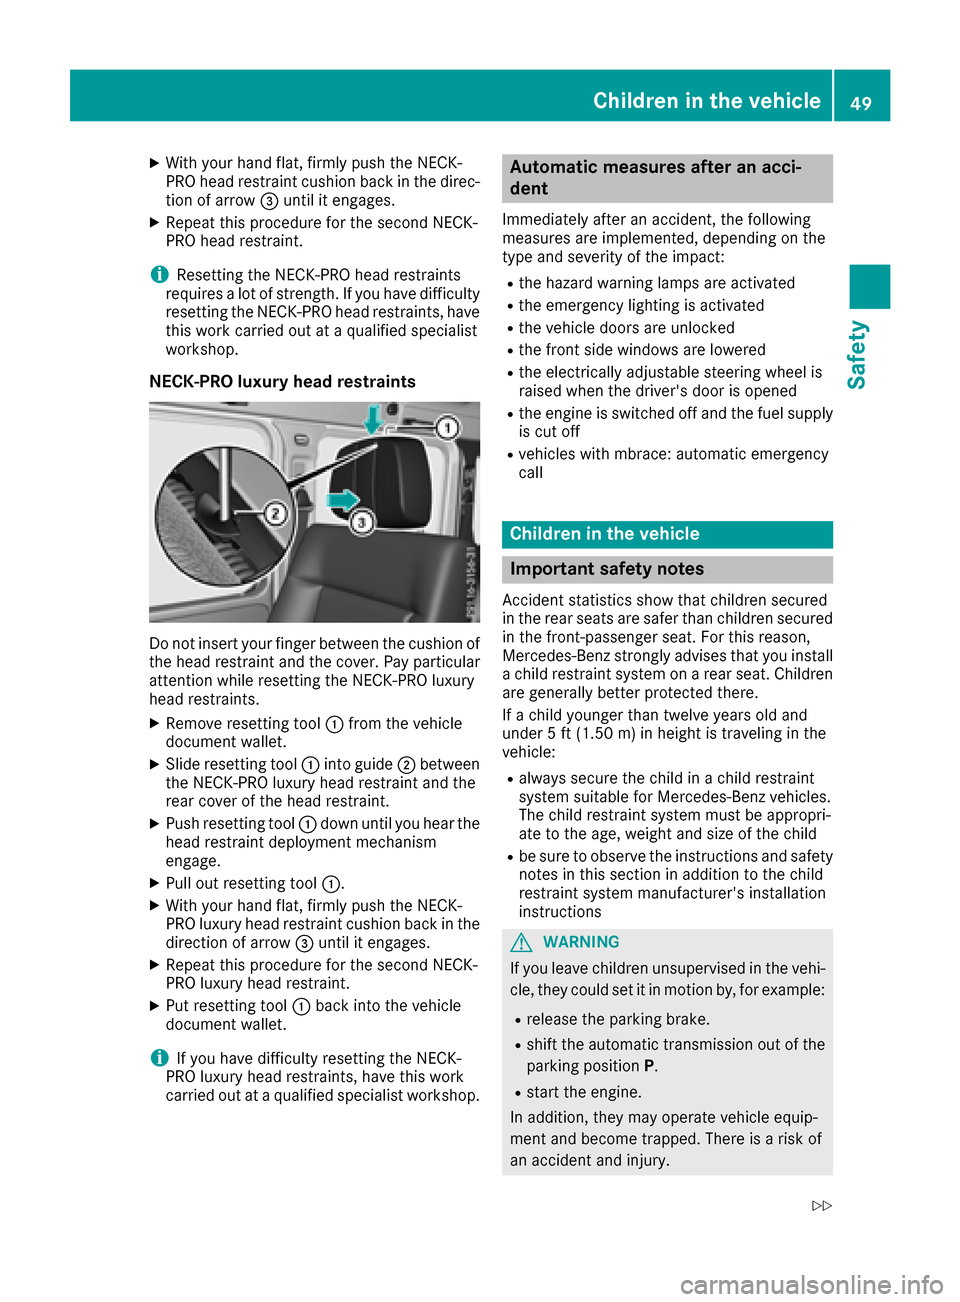
NECK-PRO luxuryh ead restraints
Do not insert your finger between the cushion of
the head restraint and the cover. Pay particular
attention while resetting the NECK-PRO luxury
head restraints.
XRemove resetting tool :from the vehicle
document wallet.
XSlide resetting tool :into guide ;between
the NECK-PRO luxury head restraint and the
rear cover of the head restraint.
XPush resetting tool :down until you hear the
head restraint deployment mechanism
engage.
XPull out resetting tool :.
XWith your hand flat, firmly push the NECK-
PRO luxury head restraint cushion back in the
direction of arrow=until it engages.
XRepeat this procedure for the secondN ECK-
PRO luxury head restraint.
XPut resetting tool :back into the vehicle
document wallet.
iIf you have difficulty resetting the NECK-
PRO luxury head restraints, have this work
carried out at aqualified specialist workshop.
Automatic measures after an acci-
dent
Immediately after an accident ,the following
measures are implemented, depending on the
type and severityoft he impact:
Rthe hazard warning lamps are activated
Rthe emergency lighting is activated
Rthe vehicle doors are unlocked
Rthe frontside windows are lowered
Rthe electrically adjustable steerin gwheel is
raised when the driver's door is opened
Rthe engine is switched off and the fuel supply
is cut off
Rvehicles with mbrace: automatic emergency
call
Children in the vehicle
Important safety notes
Accident statistics show that children secured
in the rear seats are safer than children secured
in the front-passenger seat. For this reason,
Mercedes-Benz strongly advises that you install
ac hild restraint system on arear seat. Children
are generally better protected there.
If ac hild younger than twelve years old and
under 5ft(1.50m )inh eight is travelin ginthe
vehicle:
Ralwayss ecure the child in achild restraint
system suitable for Mercedes-Benz vehicles.
The child restraint system must be appropri-
ate to the age, weight and size of the child
Rbe sure to observe the instruction sand safety
notes in this section in addition to the child
restraint system manufacturer's installation
instructions
GWARNING
If you leave children unsupervised in the vehi-
cle, they could set it in motion by, for example:
Rrelease the parking brake.
Rshift the automatic transmission out of the
parking position P.
Rstart the engine.
In addition, they may operate vehicle equip-
ment and become trapped. There is arisk of
an accident and injury.
Children in the vehicle49
Safety
Z
Page 77 of 286
GWARNING
You coul dlose control of you rvehicleify ou do
the following while driving:
Radjust the driver's seat, headr estraint,
steering wheelorm irrors
Rfasten the seat belt
There is arisk of an accident.
Adjust the driver's seat, headr estraint, steer-
ing wheela nd mirror and fasten you rseat belt
before starting the engine.
GWARNING
If the headr estraints are not installed or not
adjusted correctly, they cannot providep ro-
tection as intended. There is an increased risk
of injury in the heada nd neck area,e.g. in the
event of an accident or when braking.
Always drive with the headr estraints instal-
led.B efore driving off, make sure for every
vehicleo ccupant that the center of the head
restraint supports the back of the heada t
about eye level.
Make sure that you do not rotate the head
restraints of the front and rear seats when
adjusting the headr estraints. Otherwise, you
cannot adjust the height and angle of the head
restraints correctly.
Adjust the headr estraint so that it is as close as
possible to you rhead.
GWARNING
If you adjust the seat height carelessly, you or
other vehicleo ccupants couldbetrappe dand
thereby injured .Childreninp articular could
accidentally press the electricals eat adjust-
ment buttons and become trapped. There is a
risk of injury.
Whilem oving the seats, make sure that your
hands or other body parts do not get under the
levera ssembly of the seat adjustment sys-
tem.
GWARNING
When you adjust aseat, you or other vehicle
occupants coul dbecome trapped, e.g. on the
seat guide rail .There is arisk of injury.
Make sure when adjusting aseat that no one
has any body parts in the sweepoft he seat.
!To avoiddamage to the seats and the seat
heating, observe the following information:
Rkeep liquid sfrom spilling on the seats. If
liquid is spilled on the seats, dry them as
soon as possible.
Rif the seat covers are damp or wet, do not
switch on the seat heating. The seat heat-
ing should als onot be used to dry the seats.
Rcleant he seat covers as recommended;
see "Interio rcare".
Rdo not transport heav yloads on the seats.
Do not place sharp objects on the seat
cushions, e.g. knives, nail sortools. The
seats should only be occupied by passen-
gers, if possible.
Rwhen the seat heating is in operation, do
not cover the seats with insulating materi-
als ,e.g. blankets, coats, bags, seat covers,
child seats or booster seats.
!Make sure that there are no objects in the
footwellu nder or behind the seats when mov-
ing the seats back. There is arisk that the
seats and/or the objects coul dbedamaged.
!When the rear bench seat is foldedf or-
wards, the front seats cannot be moved to
their rearmost position. You coul dotherwise
damage the seats and the rear bench seat.
!Make sure that the sun visor is foldedu p
before adjusting the backrest and head
restraint height. The head restraint and sun
visor coul dotherwise collide when the head
restraint is full yextended.
iIf the front door is open, the seats can be
adjusted for up to 30 minutes after the igni-
tion has been switched off.
iThe rear-compartment head restraints can
be removed (Ypage7 7).
For more information, contact aqualified spe-
cialist workshop.
iYou can find further information about
enlarging the cargo compartment (folding the
rear bench seat forwards) on (
Ypage2 08).
Seats75
Seats, steering wheel and mirrors
Z
Page 79 of 286
XMake sure that the cup holder on the center
console is folded down (Ypage 210).
XMove the seat as far forward as possible andthe head restraint in as far as possible.
Rear seat head restraints
Important safety notes
GWARNING
If the head restraintsa re not installed or not
adjusted correctly, they cannot provide pro-
tection as intended. There is an increased risk
of injury in the head and neck area, e.g. in the event of an accident or when braking.
Always drive with the head restraintsi nstal-
led. Before driving off, make sure for every
vehicle occupant that the center of the head
restraint supports the back of the head at
about eye level.
Observe the following when adjusting the head
restraints:
XDo not rotate the head restraintsoft he front
and rear seats.
Otherwise, you cannot adjust the height and
angle of the head restraintsc orrectly.
XAdjust the head restraint so that it is as close
as possible to your head.
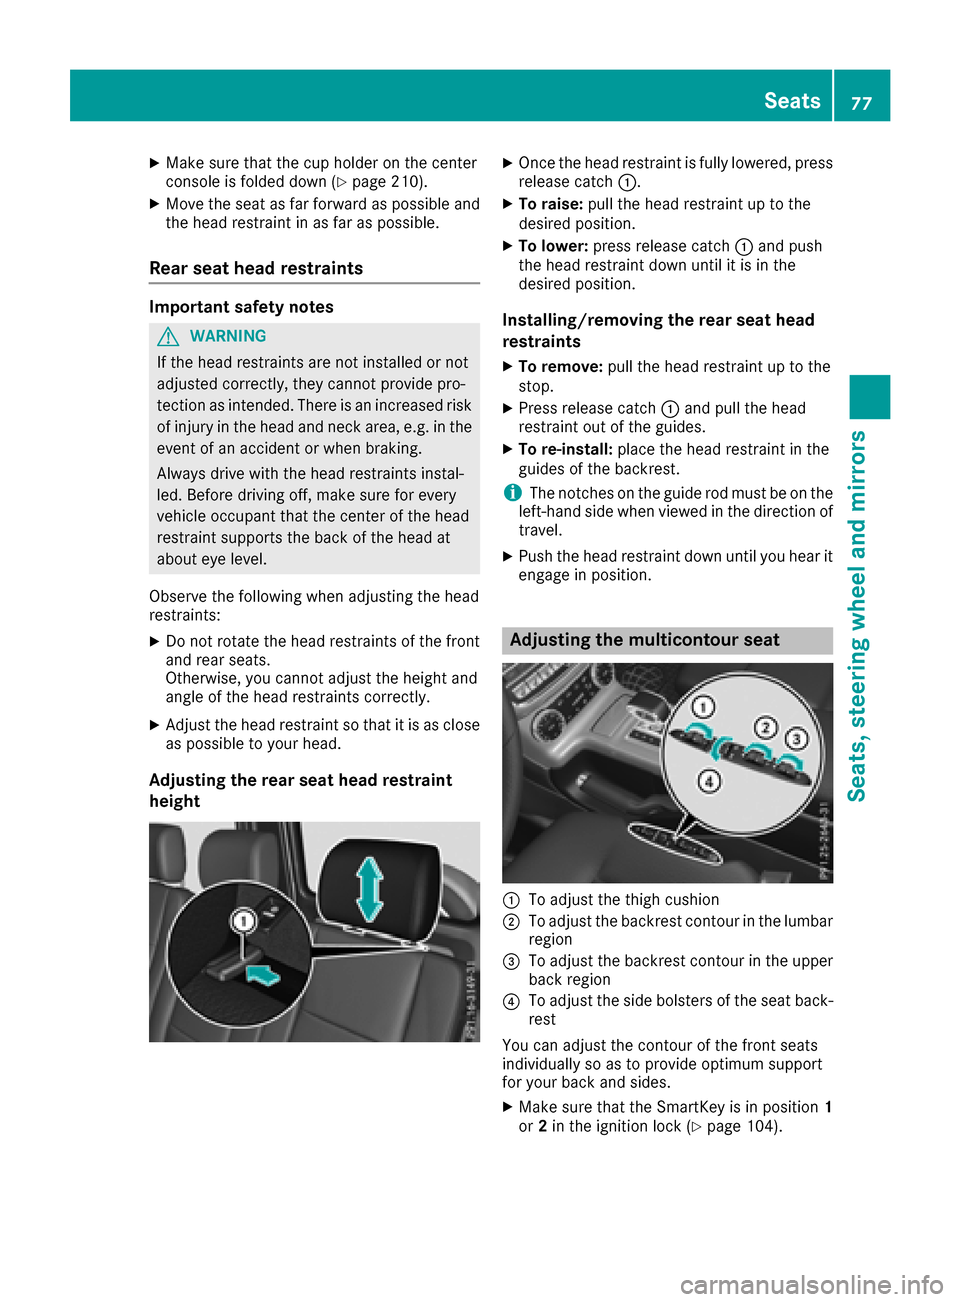
Adjusting the rear seat head restraint
height
XOnce the head restraint is fully lowered, press
release catch:.
XTo raise:pull the head restraint up to the
desired position.
XTo lower: press release catch :and push
the head restraint down until it is in the
desired position.
Installing/removing the rear seat head
restraints
XTo remove: pull the head restraint up to the
stop.
XPress release catch :and pull the head
restraint out of the guides.
XTo re-install: place the head restraint in the
guides of the backrest.
iThe notches on the guide rod must be on the
left-hand side when viewed in the direction of
travel.
XPush the head restraint down until you hear it
engage in position.
Adjusting the multicontour seat
:To adjust the thigh cushion
;To adjust the backrest contour in the lumbar
region
=To adjust the backrest contour in the upper
back region
?To adjust the side bolsters of the seat back-
rest
You can adjust the contour of the front seats
individually so as to provide optimum support
for your back and sides.
XMake sure that the SmartKey is in position 1
or 2in the ignition lock (Ypage 104).
Seats77
Seats, steering wheela nd mirrors
Z
Page 82 of 286
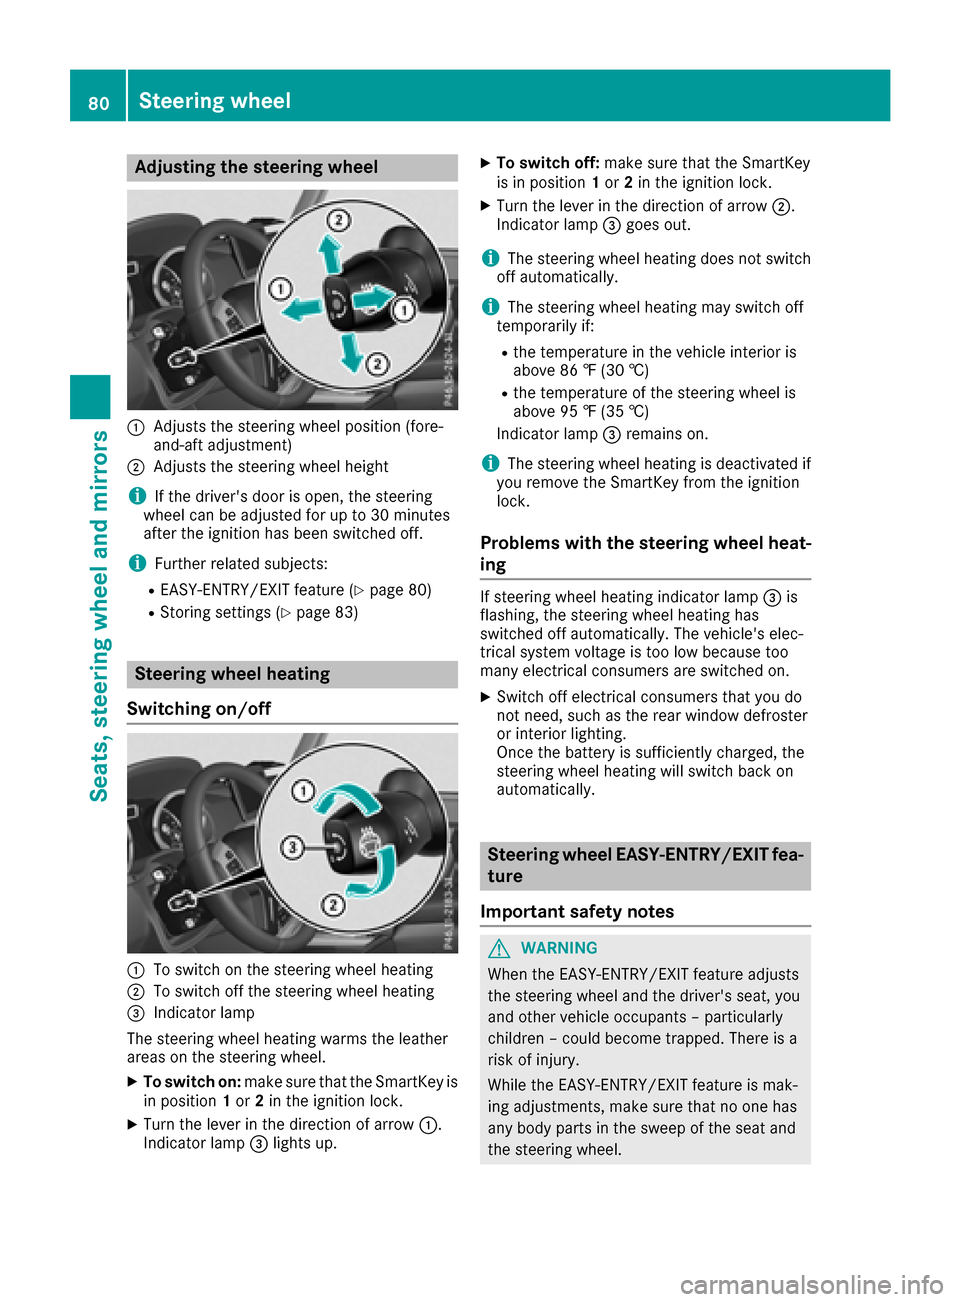
Adjusting thesteering wheel
:Adjusts th esteering whee lposition (fore-
and-af tadjustment)
;Adjusts th esteering whee lheight
iIf th edriver's door is open ,the steering
whee lcan be adjusted for up to 30 minute s
after th eignition has been switched off .
iFurther relatedsubjects :
REASY-ENTRY/EXIT feature (Ypage 80)
RStoring settings(Ypage 83)
Steering wheel heating
Switchin gon/off
:To switch on th esteering whee lheating
;To switch off th esteering whee lheating
=Indicato rlamp
The steering whee lheating warm sthe leather
areas on th esteering wheel.
XTo switch on: makesuret ha tthe SmartKey is
in position 1or 2in th eignition lock.
XTurn th elever in th edirection of arrow :.
Indicato rlamp =lights up.
XTo switch off :mak esuret hatthe SmartKey
is in position 1or 2in th eignition lock.
XTurn th elever in th edirection of arrow ;.
Indicato rlamp =goes out .
iThe steering whee lheating does no tswitch
off automatically.
iThe steering whee lheating may switch off
temporarily if:
Rth et em perature in th evehicl einterior is
abov e86‡ (30 †)
Rthet em perature of th esteering whee lis
abov e95‡ (35 †)
Indicato rlamp =remain son.
iThe steering whee lheating is deactivated if
you remove th eSmartKey from th eignition
lock.
Problemsw ith thesteering wheel heat-
ing
If steering whee lheating indicator lamp =is
flashing, th esteering whee lheating has
switched off automatically. The vehicle's elec -
trical system voltag eistoolow because to o
man yelectrical consumer sare switched on .
XSwitchoff electrical consumer sthaty ou do
no tn eed, suc hastherear window defroste r
or interior lighting .
Once th ebattery is sufficientl ycharged, th e
steering whee lheating will switch bac kon
automatically.
Steering wheel EASY-ENTRY/EX ITfea-
tu re
Import ant safety notes
GWARNIN G
When th eEASY-ENTRY/EXIT feature adjust s
th es teering whee land th edriver's seat ,you
and other vehicl eoccupant s–particularly
children –could become trapped .There is a
ris kofi njury.
Whil ethe EASY-ENTRY/EXIT feature is mak -
ing adjustments ,makes uret hatnoo nehas
any body part sintheswee poft heseat and
th es teering wheel.
80Steering wheel
Seats ,steering wheel and mirrors
Page 83 of 286
If somebodybecomes trapped:
Rpress one of the memory function position
buttons, or
Rpress one of the memory function memory
buttons, or
Rmove the switch for steering wheel adjust-
ment in the opposite direction to that in
which the steering wheel is moving
The adjustment process is stopped.
GWARNING
If you drive off whilet he EASY-ENTRY/EXIT
feature is making adjustments, you could lose
control of the vehicle.T here isarisk of an
accident.
Alway swaitu ntil the adjustment process is
complete before driving off.
!Do not activate the EASY-ENTRY/EXIT fea-
ture, if the seat backrest is reclined too far
backwards. This can damage the front or rear
seats. You must first move the backrest to a
vertical position.
The EASY-ENTRY/EXIT feature makes getting in
and out of you rvehicle easier.
You can activate and deactivate the EASY-
ENTRY/EXIT feature in the on-board computer
(
Ypage 166).
Position of the steering whee lwhen the
EASY-ENTRY/EXIT feature is active
The steering wheel moves upwards and towards
the dashboard if:
Ryou remove the SmartKey from the ignition
lock or
Ryou open the driver's door and the SmartKey
is in position 0or 1in the ignition lock
iThe steering wheel only moves upwards and
towards the dashboard if it has not already
reached the uppers teering limiter.
Position of the steering whee lfor driv-
ing
The steering wheel is moved to the last selected positionw hen:
Rthe driver's door is closed
Ryou insert the SmartKey into the ignition lock
The last positionoft he steering column is stored
when you switch off the ignition or when you
store the setting with the memory function
(
Ypage 83).
Mirrors
Rear-view mirror
XAdjust the rear-view mirror in such away that
you have agood view of road and traffic con-
ditions behind you.
Exteriorm irrors
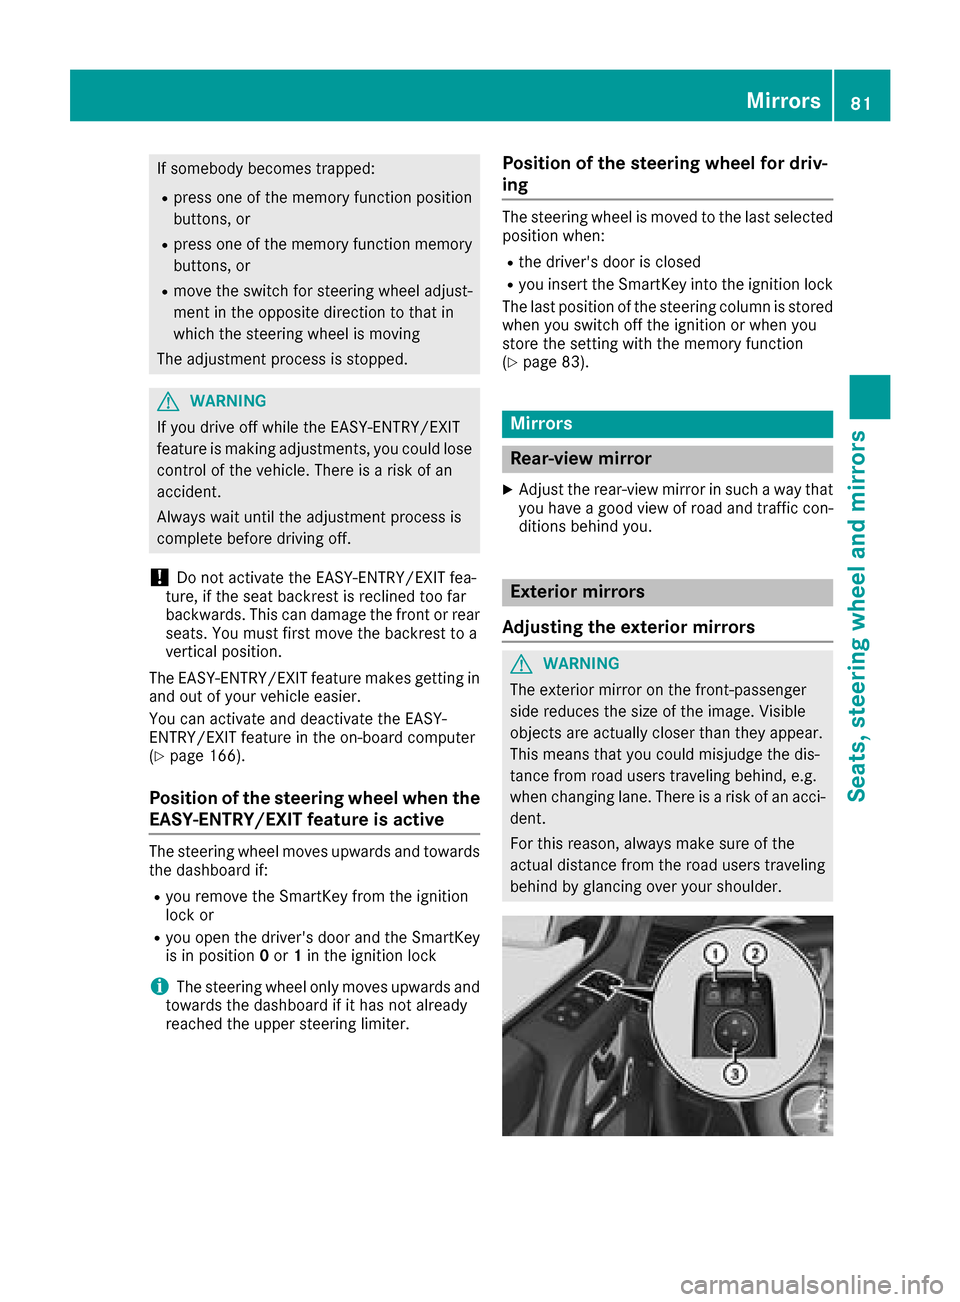
Adjusting the exterio rmirrors
GWARNING
The exterior mirror on the front-passenger
side reduces the size of the image.V isible
objects are actually closer than they appear.
This means that you could misjudge the dis-
tance from road users traveling behind, e.g.
when changing lane. There is arisk of an acci-
dent.
For this reason, always make sure of the
actual distance from the road users traveling
behind by glancing over you rshoulder.
Mirrors81
Seats, steeringw heel and mirrors
Z
Page 209 of 286
level of protection and could even cause
injuries.
RObjectsorloads in the trunk/cargo com-
partmentc annot be restraine dbythe seat
backrest.
There is an increased risk of injury.
Before everyt rip, make sure that the seat
backrestsa nd the rear benc hseat/rear seat
are engaged.
GWARNING
Combustion engines emit poisonous exhaust
gases such as carbo nmonoxide .Ifthe rear
door is open when the engin eisrunning, par-
ticularly if the vehicle is moving, exhaust
fumes could enter the passenger compart-
ment. There is arisk of poisoning.
Turn off the engin ebeforeo pening the rear
door. Never drive with the rear door open.
!Ensure that you remove all containers from
the cup holder in the rear beforef oldingthe
seat backrest and the seat cushio nofthe rear
benc hseat forwards.
Observe the loading guideline s(
Ypage 204).
The rear benc hseat is split symmetrically.
The left-han dand right-han drear benc hseats
can be folded forward to increase the capacity
of the rear compartment. You can:
Rfold the seat backrestsf orward
Rfold the rear benchseat back fully
Folding th eseat backrest forward
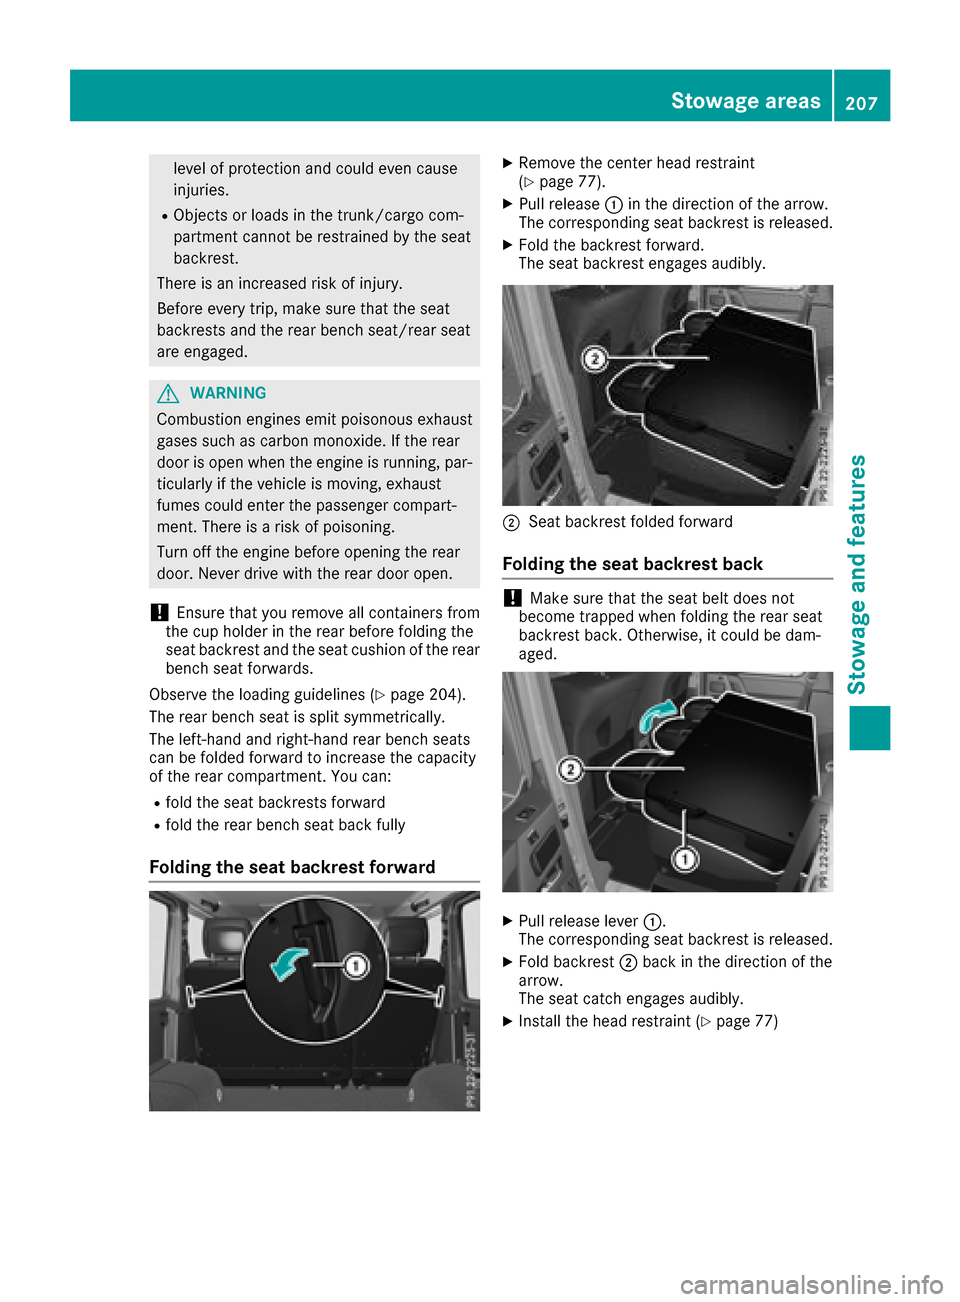
XRemove the center head restraint
(Ypage 77).
XPull release :in the direction of the arrow.
The correspondin gseat backrest is released.
XFold the backrest forward.
The seat backrest engages audibly.
;Seat backrest folded forward
Folding th eseat backrest back
!Make sure that the seat belt does not
becom etrapped when foldingt he rear seat
backrest back .Otherwise, it could be dam-
aged.
XPull release lever :.
The correspondin gseat backrest is released.
XFold backrest ;back in the direction of the
arrow.
The seat catch engages audibly.
XInstall the head restraint (Ypage 77)
Stowage areas207
Stowage and features
Z
Page 243 of 286
XClose thedriver' sdoor.
XPlacet hewarning triang leas uitable dist ance
away (Ypage 238). Observ elegal require-
ments.
Battery (vehicle)
Important safety notes
Spe cial tools and expertk nowledg eare required
when working on th ebattery, e.g .removal and
installation. You should therefor ehave all work
involving th ebattery carried out at aqualified
specialist workshop.
GWARNING
Workc arried out incorrect lyon th ebattery
can lead, for example ,toashort circuit and
thus damag ethe veh icle electronics .This can
lead to function restrictionsa pplyingto
safety-relevan tsystems ,e.g th elighting sys-
tem, th eABS (anti-lockb raking system) or the
ESP
®(Electron ic Stabilit yProgram). The oper-
atin gsafety of your veh iclemay berestricted.
You could lose control of th evehicle ,for
example:
Rwhen braking
Rin thee vent of abrupt steering maneuvers
and/or when th evehicle 's speedisn ot
adapted to th eroad conditions
Thereisar iskofana cciden t.
In thee vent of ashort circuit or asimilar inci-
dent, contact aqualified specialist workshop
immediately. Do no tdrivea ny further. You
should have all work involving th ebattery car-
ried out at aqualified specialist workshop.
For further informatio nabout AB Sand ESP
®,
see (Ypage 57) and (Ypage 59).
GWAR NING
Electrostat icbuild-up can lead to th ecreation
of sparks ,whichc ouldignite th ehighly explo-
siveg ases of abattery. Thereisar iskofa n
explos ion.
Before handlin gthe battery, touch th evehicle
body to remove any existing electrostatic
build- up. The highly flammable gas mixtur
eforms when
chargin gthe battery as wellas when jump-start-
ing.
Always mak esure that neither you no rthe bat-
tery is electrostatic allycharge d.Ab uild-up of
electrostatic charge can becaused, for exam-
ple:
Rby wearin gclothing made from synthetic
fibe rs
Rdue to friction between clothing and seats
Rif you push or pull th ebattery across th ecar-
pet or other synthetic materials
Rif you rub th ebattery withac loth
GWARNING
During th echargin gprocess, abattery produ-
ces hydrogen gas. If ashort circuit occur sor
sparks are created, th ehydrogen gas can
ignite .Thereisar iskofane xplosion.
RMakes ure that th epositiv etermi nal of a
connected battery does no tcom eintoc on-
tac twithv ehicle parts.
RNever placem etal objectsortoolson abat-
tery.
RIt is important that you observ ethe descri-
bed order of th ebattery terminal swhen
connecting and disconnecting abattery.
RWhen jump-starting, mak esure that the
battery poles withidentical polarity are
connected.
RIt is particularly important to observ ethe
describe dorder when connecting and dis-
connecting th ejumper cables.
RNever connect or disconnect th ebattery
terminal swhile th eengineisr unning.
GWARNING
Battery acid iscaustic .Thereisar iskofi njury.
Avoid contact withskin, eyes or clothing .Do
no tinhale any battery gases.Don otlean over
th eb attery. Keep ch ildren away from batter-
ies. Wash away battery acid immediately with
plenty of clean wate rand seek medical atten-
tion.
Battery (vehicle)241
Breakdown assistance
Z