2017 FORD F450 SUPER DUTY instrument panel
[x] Cancel search: instrument panelPage 8 of 642

Changing the Engine Air Filter - 6.7LDiesel............................................................357
Changing the Engine-Mounted andDiesel Fuel Conditioner Module FuelFilters - 6.7L Diesel..................................359
Vehicle Care
General Information...................................364
Cleaning Products.......................................364
Cleaning the Exterior..................................365
Waxing.............................................................366
Cleaning the Engine...................................366
Cleaning the Exhaust - 6.7L Diesel........367
Cleaning the Windows and WiperBlades..........................................................367
Cleaning the Interior...................................368
Cleaning the Instrument Panel andInstrument Cluster Lens.......................368
Cleaning Leather Seats.............................369
Repairing Minor Paint Damage..............370
Cleaning the Wheels..................................370
Vehicle Storage..............................................371
Wheels and Tires
General Information...................................374
Tire Care...........................................................377
Using Snow Chains.....................................394
Tire Pressure Monitoring System..........394
Changing a Road Wheel...........................402
Technical Specifications............................413
Capacities and Specific-ations
Engine Specifications - 6.2L.....................415
Engine Specifications - 6.7L Diesel........415
Engine Specifications - 6.8L....................416
Motorcraft Parts - 6.2L...............................417
Motorcraft Parts - 6.7L Diesel..................418
Motorcraft Parts - 6.8L..............................419
Vehicle Identification Number...............420
Vehicle Certification Label........................421
Transmission Code Designation.............421
Capacities and Specifications - 6.2L....422
Capacities and Specifications - 6.7LDiesel............................................................427
Capacities and Specifications -6.8L...............................................................434
Audio System
General Information....................................441
Audio Unit - Vehicles With: AM/FM/CD..................................................................442
Audio Unit - Vehicles With: AM/FM/CD/SYNC............................................................443
Audio Unit - Vehicles With: AM/FM/CD/Touchscreen Display..............................447
Digital Radio..................................................448
Satellite Radio...............................................451
USB Port.........................................................454
SYNC™
General Information...................................455
Using Voice Recognition...........................457
Using SYNC™ With Your Phone...........459
SYNC™ Applications and Services.......471
Using SYNC™ With Your MediaPlayer...........................................................476
SYNC™ Troubleshooting.........................485
SYNC™ 3
General Information...................................493
Home Screen................................................504
Using Voice Recognition...........................505
Entertainment................................................512
Climate............................................................522
Phone...............................................................524
Navigation......................................................530
Apps.................................................................538
Settings............................................................541
SYNC™ 3 Troubleshooting......................553
5
Super Duty (TFE) Canada/United States of America, enUSA, Edition date: 201710, Second Printing
Table of Contents
Page 48 of 642

DRIVER AND PASSENGER
AIRBAGS
WARNINGS
Never place your arm over the airbagmodule as a deploying airbag canresult in serious arm fractures orother injuries.
Airbags can kill or injure a child in achild restraint. Never place arear-facing child restraint in front ofan active airbag. If you must use aforward-facing child restraint in the frontseat, move the seat upon which the childseat is installed all the way back.
The driver and front passenger airbagsdeploy during significant frontal and nearfrontal crashes.
The driver and passenger front airbagsystem consists of:
•Driver and passenger airbag modules.
· Crash sensors and monitoringsystem with readiness indicator.See Crash Sensors and AirbagIndicator (page 52).
Passenger Airbag On and OffSwitch (If Equipped)
WARNINGS
Even with advanced restraintssystems, properly restrain children12 and under in a rear seatingposition. Failure to follow this couldseriously increase the risk of injury or death.
The front passenger airbag is notdesigned to offer protection to anoccupant in the center seatingposition.
Your vehicle may have an airbagdeactivation switch. Before driving,always look at the switch to makesure it is in the appropriate position. Failureto put the switch in the proper position canincrease the risk of serious injury or deathin a crash.
High-series vehicles (if equipped)
The front passenger airbag on and offswitch has indicators that illuminate,indicating that the front passenger frontalairbag is either on or off. The indicator lampis near the center of the instrument panel.
Note:The passenger airbag status indicatorOFF and ON lamps illuminate for a shortperiod of time when you switch the ignitionon to confirm it is functional.
45
Super Duty (TFE) Canada/United States of America, enUSA, Edition date: 201710, Second Printing
Supplementary Restraints SystemE151127 E67017 E181984
Page 49 of 642

Passenger airbagPassenger airbag statusindicatorSwitch position
DisabledOFF: LitOff
ON: Unlit
EnabledOFF: UnlitOn
ON: Lit
Low-series vehicles (if equipped)
The front passenger airbag on and offswitch has an indicator that illuminatesand stays lit to remind you that the frontpassenger frontal airbag is off. Theindicator lamp is near the center of theinstrument panel.
Note:The indicator lamp illuminates for ashort period of time when you switch theignition on to confirm it is functional.
Turning the Passenger Airbag Off
WARNINGS
If the light does not illuminate whenthe passenger airbag switch is offand you switch the ignition on, havethe passenger airbag switch servicedimmediately by a qualified technician.
To avoid switching on the airbag,always remove the ignition key withthe switch in the off position.
WARNINGS
If your vehicle has rear seats, alwaystransport children who are 12 andyounger in the rear seat. Always useseatbelts and child restraints properly. Donot place a child in a rear facing infant seatin the front seat unless your vehicle isequipped with an airbag on and off switchand the passenger airbag is turned off. Thisis because the back of the infant seat istoo close to the inflating airbag and therisk of a fatal injury to the infant when theairbag inflates is substantial.
The passenger airbag on and off switch isin the glovebox.
46
Super Duty (TFE) Canada/United States of America, enUSA, Edition date: 201710, Second Printing
Supplementary Restraints SystemE229376 E181522
Page 63 of 642
The label on your transmitter details thestarting procedure.
To remote start your vehicle:
1. Press the lock button.
2. Press the remote start button twice.The exterior lamps flash twice.
The horn sounds if the system fails to start,unless quiet start is on. Quiet start runs theblower fan at a slower speed to reducenoise. You can switch it on or off in theinformation display. See GeneralInformation (page 111).
Note:If you do not follow this sequence,your vehicle does not start remotely, thedirection indicators do not flash twice andthe horn does not sound.
Note:If you remote start your vehicle withan integrated keyhead transmitter, you mustswitch on the ignition before driving yourvehicle. If you remote start your vehicle withan intelligent access transmitter, you mustpress the push button ignition switch on theinstrument panel once while applying thebrake pedal before driving your vehicle.
The power windows do not work duringremote start and the radio does not turnon automatically.
The parking lamps remain on and yourvehicle runs for 5, 10 or 15 minutesdepending on the setting.
Extending the Engine Running Time
To extend the engine running time durationof your vehicle during remote start, repeatsteps 1 and 2 while the engine is running.If the duration is set to 10 minutes, theduration extends by another 10 minutes.For example, if your vehicle had beenrunning from the first remote start for 5minutes, your vehicle continues to run nowfor a total of 20 minutes. You can extendthe remote start up to a maximum of 35minutes.
Wait at least five seconds before remotestarting after the engine stops running.
Turning Your Vehicle Off After RemoteStarting
Press the button once. Theparking lamps turn off.
You may have to be closer to thevehicle than when starting due to groundreflection and the added noise of therunning vehicle.
You can turn the remote start system onor off using the information display. SeeGeneral Information (page 111).
REPLACING A LOST KEY OR
REMOTE CONTROL
Replacement keys or remote controls canbe purchased from an authorized dealer.Authorized dealers can program remotecontrols for your vehicle. See PassiveAnti-Theft System (page 74).
60
Super Duty (TFE) Canada/United States of America, enUSA, Edition date: 201710, Second Printing
Keys and Remote ControlsE138625
Page 86 of 642
ADJUSTING THE PEDALS
Note:Never use the controls when your feetare on the accelerator or brake pedals,especially when the vehicle is moving.
Note:Adjust the pedals only when yourvehicle is in park (P).
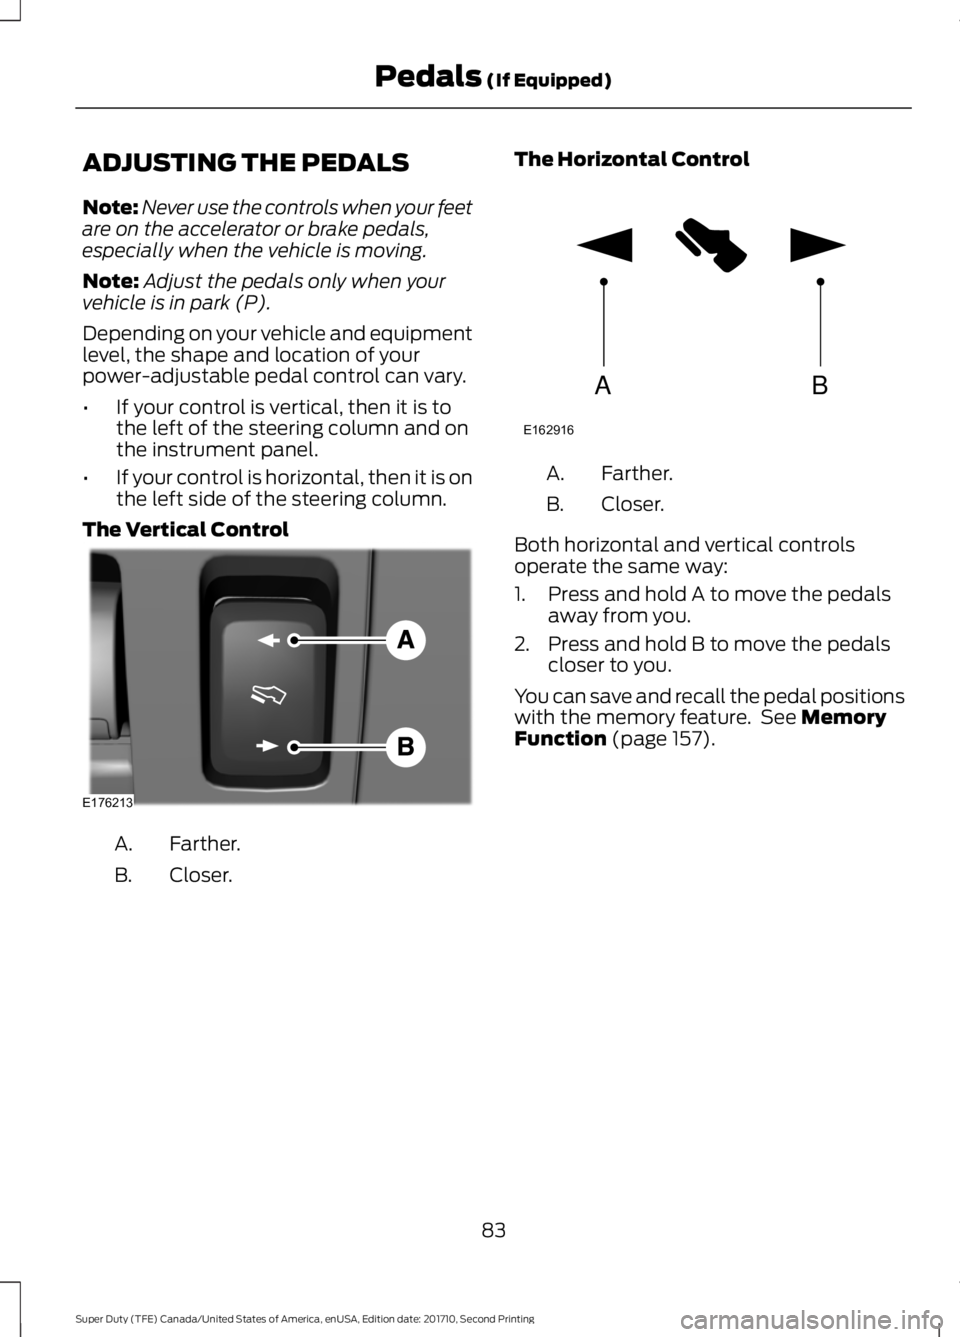
Depending on your vehicle and equipmentlevel, the shape and location of yourpower-adjustable pedal control can vary.
•If your control is vertical, then it is tothe left of the steering column and onthe instrument panel.
•If your control is horizontal, then it is onthe left side of the steering column.
The Vertical Control
Farther.A.
Closer.B.
The Horizontal Control
Farther.A.
Closer.B.
Both horizontal and vertical controlsoperate the same way:
1. Press and hold A to move the pedalsaway from you.
2. Press and hold B to move the pedalscloser to you.
You can save and recall the pedal positionswith the memory feature. See MemoryFunction (page 157).
83
Super Duty (TFE) Canada/United States of America, enUSA, Edition date: 201710, Second Printing
Pedals (If Equipped)E176213 AB
E162916
Page 89 of 642
GENERAL INFORMATION
Condensation in the Exterior FrontLamps and Rear Lamps
Exterior front lamps and rear lamps havevents to accommodate normal changesin air pressure.
Condensation can be a natural by-productof this design. When moist air enters thelamp assembly through the vents, there isa possibility that condensation can occurwhen the temperature is cold. Whennormal condensation occurs, a fine mistcan form on the interior of the lens. Thefine mist eventually clears and exitsthrough the vents during normal operation.
Clearing time may take as long as 48 hoursunder dry weather conditions.
Examples of acceptable condensation are:
•The presence of a fine mist (no streaks,drip marks or large droplets).
•A fine mist covers less than 50% of thelens.
Examples of unacceptable condensationare:
•A water puddle inside the lamp.
•Streaks, drip marks or large dropletspresent on the interior of the lens.
If you see any unacceptable condensation,have your vehicle checked by an authorizeddealer.
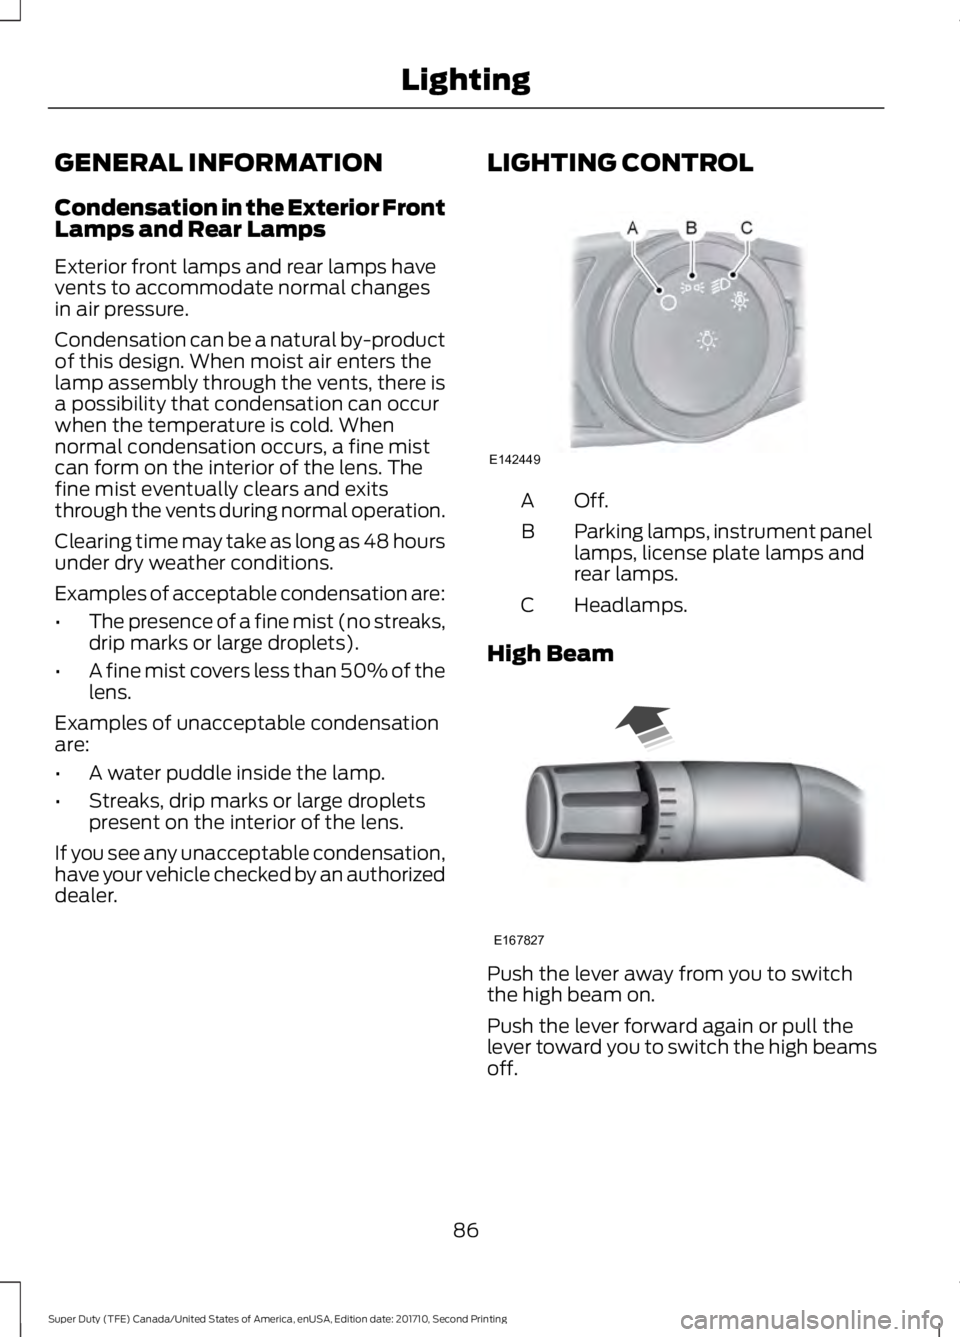
LIGHTING CONTROL
Off.A
Parking lamps, instrument panellamps, license plate lamps andrear lamps.
B
Headlamps.C
High Beam
Push the lever away from you to switchthe high beam on.
Push the lever forward again or pull thelever toward you to switch the high beamsoff.
86
Super Duty (TFE) Canada/United States of America, enUSA, Edition date: 201710, Second Printing
LightingE142449 E167827
Page 101 of 642
To adjust your mirrors, make sure youswitch your vehicle on (with the ignition inaccessory mode or the engine running) andthen press the adjustment control toposition the mirrors.
Note:Moving the mirrors 10 or more timeswithin one minute, or repeated folding,unfolding and telescoping of the mirrorswhile holding the control down during fulltravel, may disable the system to protectthe motors from overheating. Waitapproximately three minutes with thevehicle running, and up to 10 minutes withthe vehicle off, for the system to reset andfor function to return to normal.
Loose Mirror
If your power-folding mirrors are manuallyfolded, they may not work properly evenafter you re-position them. You need toreset them if:
•The mirrors vibrate when you drive.
•The mirrors feel loose.
•The mirrors do not stay in the folded orunfolded position.
•One of the mirrors is not in its normaldriving position.
To reset the power-fold feature, use thepower-folding mirror control to fold andunfold the mirrors. You may hear a loudnoise as you reset the power-foldingmirrors. This sound is normal. Repeat thisprocess as needed each time the mirrorsare manually folded.
Heated Exterior Mirrors (If Equipped)
See Heated Windows and Mirrors (page150).
Memory Mirrors (If Equipped)
You can save and recall the mirrorpositions through the memory function.See Memory Function (page 157).
Direction Indicator Mirrors (If Equipped)
While the vehicle is running, theforward-facing portion of the appropriatemirror housing blinks when you switch onthe direction indicator.
Puddle Lamps (If Equipped)
The lamps on the bottom part of the mirrorhousing light when you use yourtransmitter to unlock the doors or whenyou open a door.
Clearance Lamps (If Equipped)
The lower, outer part of the mirror housingslight when you switch the headlamps orparking lamps on.
Spot Lamps (If Equipped)
The area lights are on the forward-facingportion of the mirror housing. You canswitch them on and off by using thecontrols located on the instrument panel.See Lighting (page 86).
Trailer Towing Camera System (If
Equipped)
See Rear View Camera (page 232).
Blind Spot Information System (If
Equipped)
See Blind Spot Information System(page 249).
INTERIOR MIRROR
WARNING
Do not adjust the mirror when yourvehicle is moving.
98
Super Duty (TFE) Canada/United States of America, enUSA, Edition date: 201710, Second Printing
Windows and Mirrors
Page 148 of 642
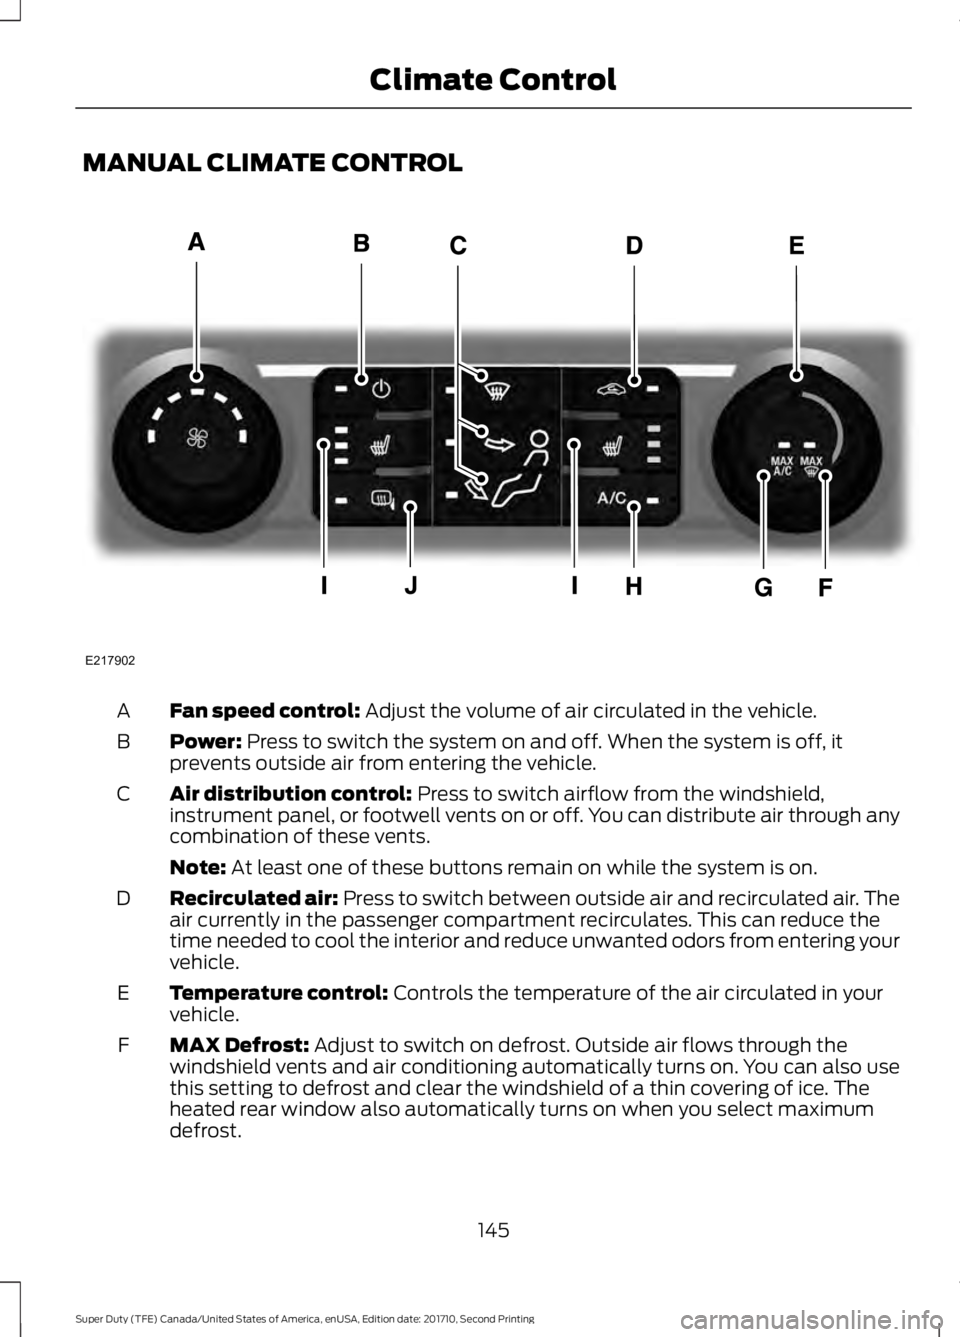
MANUAL CLIMATE CONTROL
Fan speed control: Adjust the volume of air circulated in the vehicle.A
Power: Press to switch the system on and off. When the system is off, itprevents outside air from entering the vehicle.B
Air distribution control: Press to switch airflow from the windshield,instrument panel, or footwell vents on or off. You can distribute air through anycombination of these vents.
C
Note: At least one of these buttons remain on while the system is on.
Recirculated air: Press to switch between outside air and recirculated air. Theair currently in the passenger compartment recirculates. This can reduce thetime needed to cool the interior and reduce unwanted odors from entering yourvehicle.
D
Temperature control: Controls the temperature of the air circulated in yourvehicle.E
MAX Defrost: Adjust to switch on defrost. Outside air flows through thewindshield vents and air conditioning automatically turns on. You can also usethis setting to defrost and clear the windshield of a thin covering of ice. Theheated rear window also automatically turns on when you select maximumdefrost.
F
145
Super Duty (TFE) Canada/United States of America, enUSA, Edition date: 201710, Second Printing
Climate ControlE217902