2017 FORD F450 SUPER DUTY instrument panel
[x] Cancel search: instrument panelPage 149 of 642
Note: To prevent window fogging, you cannot select recirculated air whenmaximum defrost is on.
MAX A/C: Adjust for maximum cooling. Recirculated air flows through theinstrument panel vents, air conditioning automatically turns on, and fanautomatically adjusts to the highest speed.
G
A/C: Press to switch the air conditioning on or off. Air conditioning cools yourvehicle using outside air. To improve the time to reach a comfortabletemperature in hot weather, drive with the windows open until you feel cold airthrough the air vents.
H
Note: In certain conditions (for example, maximum defrost), the air conditioningmay continue to operate even though the air conditioning is switched off.
Heated seats: Press to switch the heated seats on and off. See Heated Seats(page 160).I
Heated exterior mirrors: Press to switch the heated exterior mirrors on andoff.J
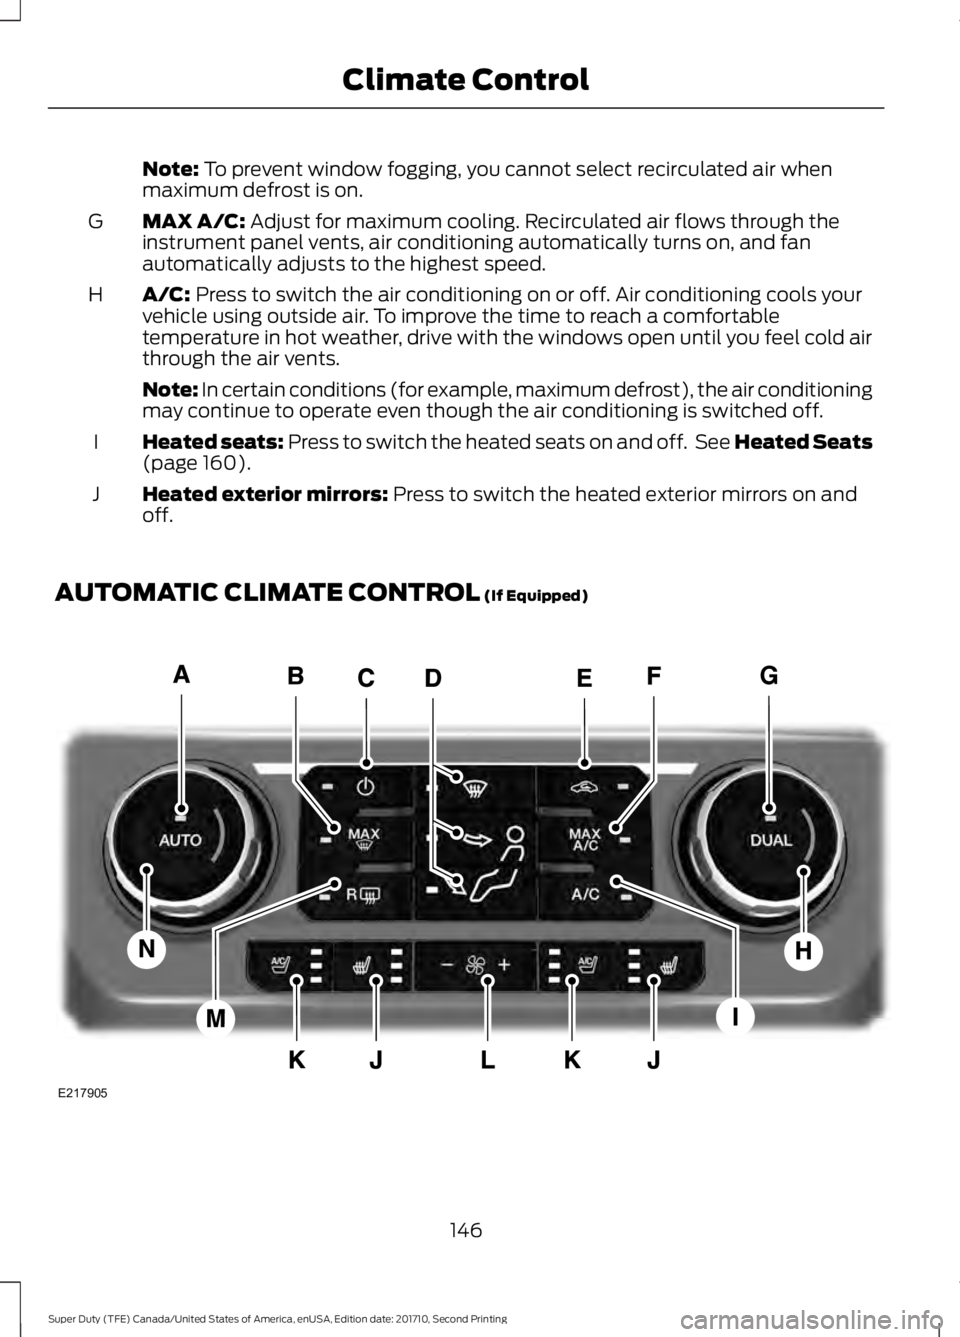
AUTOMATIC CLIMATE CONTROL (If Equipped)
146
Super Duty (TFE) Canada/United States of America, enUSA, Edition date: 201710, Second Printing
Climate ControlE217905
Page 150 of 642
AUTO: Press to switch on automatic operation. Adjust to select the desiredtemperature. Fan speed, air distribution, air conditioning operation, and outsideor recirculated air are automatically adjusted to heat or cool the vehicle tomaintain the desired temperature. You can also switch off dual zone mode bypressing and holding for more than two seconds.
A
MAX Defrost: Press to switch on defrost. Outside air flows through thewindshield vents, air conditioning automatically turns on, and fan automaticallyadjusts to the highest speed. You can also use this setting to defrost and clearthe windshield of a thin covering of ice. The heated rear window alsoautomatically turns on when you select maximum defrost.
B
Note: To prevent window fogging, you cannot select recirculated air whenmaximum defrost is on.
Power: Press to switch the system on and off. When the system is off, itprevents outside air from entering the vehicle.C
Air distribution control: Press to switch airflow from the windshield,instrument panel, or footwell vents on or off. You can distribute air through anycombination of these vents.
D
Recirculated air: Press to switch between outside air and recirculated air. Theair currently in the passenger compartment recirculates. This can reduce thetime needed to cool the interior and reduce unwanted odors from entering yourvehicle.
E
Note: Recirculated air may also turn on and off automatically in instrumentpanel or instrument panel and floor airflow modes during hot weather to improvecooling efficiency.
MAX A/C: Press for maximum cooling. Recirculated air flows through theinstrument panel vents, air conditioning automatically turns on, and the fanautomatically adjusts to the highest speed.
F
DUAL: Press to switch separate passenger side temperature control off andon. When dual zone is off, passenger temperature settings remain the same asthe driver settings.
G
Passenger temperature control: Adjust the temperature setting on thepassenger side.H
A/C: Press to switch the air conditioning on or off. Air conditioning cools yourvehicle using outside air. To improve the time to reach a comfortabletemperature in hot weather, drive with the windows open until you feel cold airthrough the air vents.
I
Note: In certain conditions (for example, maximum defrost), the air conditioningmay continue to operate even though the air conditioning is switched off.
Heated seats: Press to switch the heated seats on and off. See Heated Seats(page 160).J
147
Super Duty (TFE) Canada/United States of America, enUSA, Edition date: 201710, Second Printing
Climate Control
Page 151 of 642
Climate controlled seats: Press to switch the climate controlled seats onand off. See Climate Controlled Seats (page 161).K
Fan speed control: Adjust the volume of air circulated in the vehicle.L
Heated rear window: Press to switch the heated rear window on and off. SeeHeated Windows and Mirrors (page 150).M
Driver temperature control: Adjust the temperature setting on the driver side.N
HINTS ON CONTROLLING THE
INTERIOR CLIMATE
General Hints
WARNING
Prolonged use of recirculated air maycause the windows to fog up. If thewindows fog up, follow the settingsfor demisting the windshield.
Note:You may feel a small amount of airfrom the footwell air vents regardless of theair distribution setting.
Note:To reduce humidity build-up insideyour vehicle, do not drive with the systemswitched off or with recirculated air alwaysswitched on.
Note:Do not place objects under the frontseats as this may interfere with the airflowto the rear seats.
Note:Remove any snow, ice or leaves fromthe air intake area at the base of thewindshield.
Note:To improve the time to reach acomfortable temperature in hot weather,drive with the windows open until you feelcold air through the air vents.
Manual Climate Control
Note:To reduce fogging of the windshieldduring humid weather, adjust the airdistribution control to the windshield airvents position.
Automatic Climate Control
Note: Adjusting the settings when yourvehicle interior is extremely hot or cold isnot necessary. The system automaticallyadjusts to heat or cool the interior to yourselected temperature as quickly as possible.For the system to function efficiently, theinstrument panel and side air vents shouldbe fully open.
Note:If you select AUTO during coldtemperatures, the system directs airflow tothe windshield and side window vents. Inaddition, the fan may run at a slower speeduntil the engine warms up.
Note:If you select AUTO during hottemperatures, or the inside of the vehicle ishot, the system automatically usesrecirculated air to maximize interior cooling.When the interior reaches the selectedtemperature, the system automaticallyswitches to using outside air.
148
Super Duty (TFE) Canada/United States of America, enUSA, Edition date: 201710, Second Printing
Climate Control
Page 153 of 642
Recommended Settings for Cooling
Vehicle with automatic climate controlVehicle with manual climate control
Press the AUTO button.Adjust the fan speed to the centersetting.1
Adjust the temperature control to thedesired setting. Use 72°F (22°C) as astarting point, then adjust the setting asnecessary.
Adjust the temperature control to themidway point of the cold settings.2
Select the instrument panel air ventsusing the air distribution buttons.3
Side Window Defogging in Cold Weather
Vehicle with automatic climate controlVehicle with manual climate control
Press the defrost button.Select the windshield air vents using theair distribution buttons.1
Adjust the temperature control to thedesired setting. Use 72°F (22°C) as astarting point, then adjust the setting asnecessary.
Press the A/C button if the indicator isoff.2
Adjust the temperature control to thedesired setting.3
Adjust the fan speed to the highestsetting.4
HEATED WINDOWS AND
MIRRORS
Heated Rear Window
Note:Make sure the engine is runningbefore operating the heated windows.
Press the button to clear theheated rear window of thin iceand fog. The heated rearwindow automatically turns off after ashort period of time.
Note: Do not use razor blades or othersharp objects to clean or remove decalsfrom the inside of the heated rear window.The vehicle warranty does not coverdamage caused to the heated rear windowgrid lines.
Heated Exterior Mirrors
When you switch the heated rear windowon, the heated exterior mirrorsautomatically turn on.
Note:Do not remove ice from the mirrorswith a scraper or adjust the mirror glasswhen it is frozen in place.
150
Super Duty (TFE) Canada/United States of America, enUSA, Edition date: 201710, Second Printing
Climate ControlE184884
Page 171 of 642
12 Volt DC Power Point
WARNINGS
Do not plug optional electricalaccessories into the cigar lightersocket. Incorrect use of the cigarlighter can cause damage not covered bythe vehicle warranty, and can result in fireor serious injury.
Do not use a power point foroperating a cigar lighter. Incorrectuse of the power points can causedamage not covered by the vehiclewarranty, and can result in fire or seriousinjury.
Note:When you switch the ignition on, youcan use the socket to power 12 voltappliances with a maximum current ratingof 20 amps.
Note:Do not plug in any device thatsupplies power to the vehicle through thepower points, this may result in damage tovehicle systems.
Note:Do not hang any accessory from theaccessory plug.
Note:Do not use the power point over thevehicle capacity of 12 volt DC 240 watts ora fuse may blow.
Note:Always keep the power point capsclosed when not in use.
Do not insert objects other than anaccessory plug into the power point. Thiswill damage the power point and blow thefuse.
Run the vehicle for full capacity use of thepower point.
To prevent the battery from running out ofcharge:
•Do not use the power point longer thannecessary when the vehicle is notrunning.
•Do not leave devices plugged inovernight or when you park your vehiclefor extended periods.
Locations
Power points may be in the followinglocations:
•On the instrument panel.
•Inside the center console.
•On the rear of the center console.
•Inside the front under-seat storagecompartment.
Note:Timed power points remain on for 30minutes if the vehicle is in accessory mode.If you switch the vehicle off, the timedpower points remain on for 75 minutes.
110 Volt - 400 Watt Capacity ACPower Outlet
WARNING
Do not keep electrical devicesplugged in the power point wheneverthe device is not in use. Do not useany extension cord with the 110 volt ACpower point, since it will defeat the safetyprotection design. Doing so may cause thepower point to overload due to poweringmultiple devices that can reach beyondthe 400 watt load limit and could result infire or serious injury.
168
Super Duty (TFE) Canada/United States of America, enUSA, Edition date: 201710, Second Printing
Auxiliary Power Points
Page 214 of 642
For proper operation, make sure that eachhub is fully engaged and that both hublocks are set to the same position (bothset to LOCK or both set to AUTO). Toengage LOCK, turn the hub lockscompletely clockwise; to engage AUTO,turn the hub locks completelycounterclockwise.
The ESOF 4WD system:
•provides 4x4 High engagement anddisengagement while the vehicle ismoving.
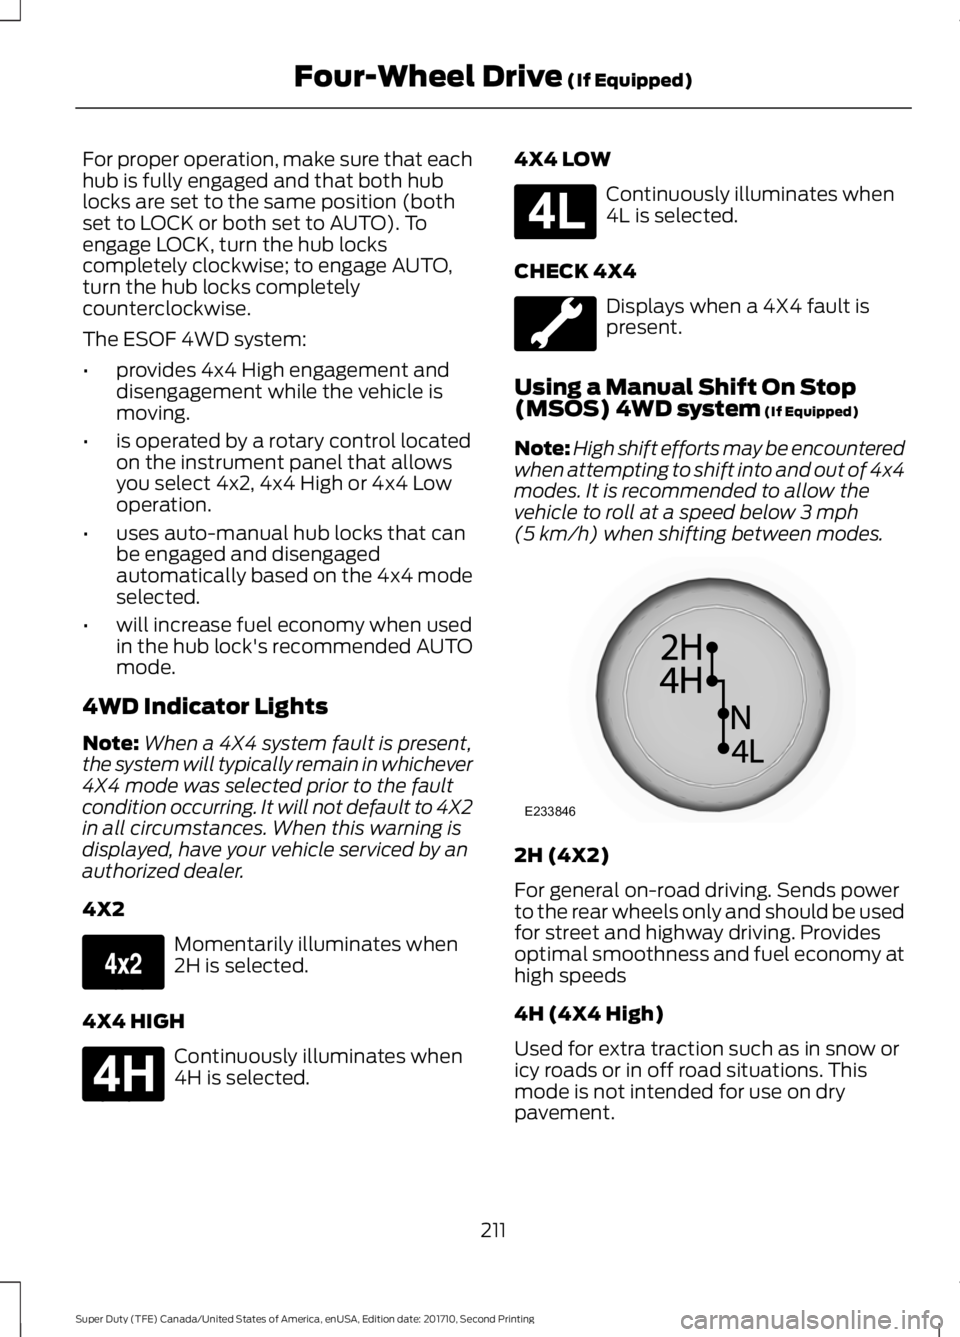
•is operated by a rotary control locatedon the instrument panel that allowsyou select 4x2, 4x4 High or 4x4 Lowoperation.
•uses auto-manual hub locks that canbe engaged and disengagedautomatically based on the 4x4 modeselected.
•will increase fuel economy when usedin the hub lock's recommended AUTOmode.
4WD Indicator Lights
Note:When a 4X4 system fault is present,the system will typically remain in whichever4X4 mode was selected prior to the faultcondition occurring. It will not default to 4X2in all circumstances. When this warning isdisplayed, have your vehicle serviced by anauthorized dealer.
4X2
Momentarily illuminates when2H is selected.
4X4 HIGH
Continuously illuminates when4H is selected.
4X4 LOW
Continuously illuminates when4L is selected.
CHECK 4X4
Displays when a 4X4 fault ispresent.
Using a Manual Shift On Stop(MSOS) 4WD system (If Equipped)
Note:High shift efforts may be encounteredwhen attempting to shift into and out of 4x4modes. It is recommended to allow thevehicle to roll at a speed below 3 mph(5 km/h) when shifting between modes.
2H (4X2)
For general on-road driving. Sends powerto the rear wheels only and should be usedfor street and highway driving. Providesoptimal smoothness and fuel economy athigh speeds
4H (4X4 High)
Used for extra traction such as in snow oricy roads or in off road situations. Thismode is not intended for use on drypavement.
211
Super Duty (TFE) Canada/United States of America, enUSA, Edition date: 201710, Second Printing
Four-Wheel Drive (If Equipped)E163173 E181779 E181780 E233846
Page 226 of 642

Apply the parking brake whenever yourvehicle is parked. Press the pedaldownward to set the parking brake. Thebrake warning lamp in the instrumentcluster will illuminate and remainsilluminated until the parking brake isreleased.
To release, pull the brake release leverlocated at the lower left side of theinstrument panel.
If you are parking your vehicle on a gradeor with a trailer, press and hold the brakepedal down, then set the parking brake.There may be a little vehicle movement asthe parking brake sets to hold the vehicle'sweight. This is normal and should be noreason for concern. If needed, press andhold the service brake pedal down, thentry reapplying the parking brake. Chock thewheels if required. If the parking brakecannot hold the weight of the vehicle, theparking brake may need to be serviced orthe vehicle may be overloaded.
HILL START ASSIST
WARNINGS
The system does not replace theparking brake. When you leave yourvehicle, always apply the parkingbrake and shift the transmission into park(P) (automatic transmission) or first gear(1) (manual transmission).
You must remain in your vehicle onceyou have activated the system.
During all times, you are responsiblefor controlling your vehicle,supervising the system andintervening, if required.
If the engine is revved excessively, orif a malfunction is detected, thesystem will be deactivated.
The system makes it easier to pull awaywhen your vehicle is on a slope without theneed to use the parking brake.
When the system is active, your vehicle willremain stationary on the slope for two tothree seconds after you release the brakepedal. This allows you time to move yourfoot from the brake to the acceleratorpedal. The brakes release automaticallywhen the engine has sufficient torque toprevent your vehicle from rolling down thegrade. This is an advantage when pullingaway on a slope, for example from a carpark ramp, traffic lights or when reversinguphill into a parking space.
The system will activate automatically onany slope that will cause significant vehiclerollback. For vehicles with a manualtransmission, you can switch this featureoff using the information display. SeeInformation Displays (page 111). Thesystem will remain on or off depending onhow it was last set.
Note:There is no warning lamp to indicatethe system is either on or off.
Note:If your vehicle is equipped with AutoHold, Hill Start Assist will not be availablewhile Auto Hold is active.
Using Hill Start Assist
1. Bring your vehicle to a completestandstill. Keep the brake pedalpressed and select an uphill gear (forexample, first (1) when facing uphill orreverse (R) when facing downhill).
2. If the sensors detect that your vehicleis on a slope, the system will activateautomatically.
3. When you remove your foot from thebrake pedal, your vehicle will remainon the slope without rolling away forabout two or three seconds. This holdtime will automatically be extended ifyou are in the process of driving off.
223
Super Duty (TFE) Canada/United States of America, enUSA, Edition date: 201710, Second Printing
Brakes
Page 228 of 642
PRINCIPLE OF OPERATION
The traction control system helps avoiddrive wheel spin and loss of traction.
If your vehicle begins to slide, the systemapplies the brakes to individual wheelsand, when needed, reduces engine powerat the same time. If the wheels spin whenaccelerating on slippery or loose surfaces,the system reduces engine power in orderto increase traction.
USING TRACTION CONTROL
WARNING
The stability and traction controllight illuminates steadily if thesystem detects a failure. Make sureyou did not manually disable the tractioncontrol system using the informationdisplay controls or the switch. If thestability control and traction control lightis still illuminating steadily, have thesystem serviced by an authorized dealerimmediately. Operating your vehicle withthe traction control disabled could lead toan increased risk of loss of vehicle control,vehicle rollover, personal injury and death.
The system automatically turns on eachtime you switch the ignition on.
If your vehicle is stuck in mud or snow,switching traction control off may bebeneficial as this allows the wheels to spin.
Note:When you switch traction control off,stability control remains fully active.
Note:For additional information on thetraction and stability control systems. SeeUsing Stability Control (page 227).
Switching the System Off
When you switch the system off or on, amessage appears in the informationdisplay showing system status.
Use the traction and stability controlswitch on the instrument panel to switchthe system off or on.
The switch illuminates when tractioncontrol is off.
When you place your vehicle intofour-wheel drive low mode the tractioncontrol disables. Traction control resumesfull operation when you put your vehicleback into two-wheel drive mode.
System Indicator Lights andMessages
The stability and traction controllight:
•Temporarily illuminates on enginestart-up.
•Flashes when a driving conditionactivates either of the systems.
•Illuminates if a problem occurs in eitherof the systems.
The stability and traction controloff light temporarily illuminateson engine start-up and stays onwhen you switch the traction controlsystem off.
225
Super Duty (TFE) Canada/United States of America, enUSA, Edition date: 201710, Second Printing
Traction ControlE166706 E225465 E225466