2017 FORD F450 SUPER DUTY instrument panel
[x] Cancel search: instrument panelPage 230 of 642
Roll Stability Control
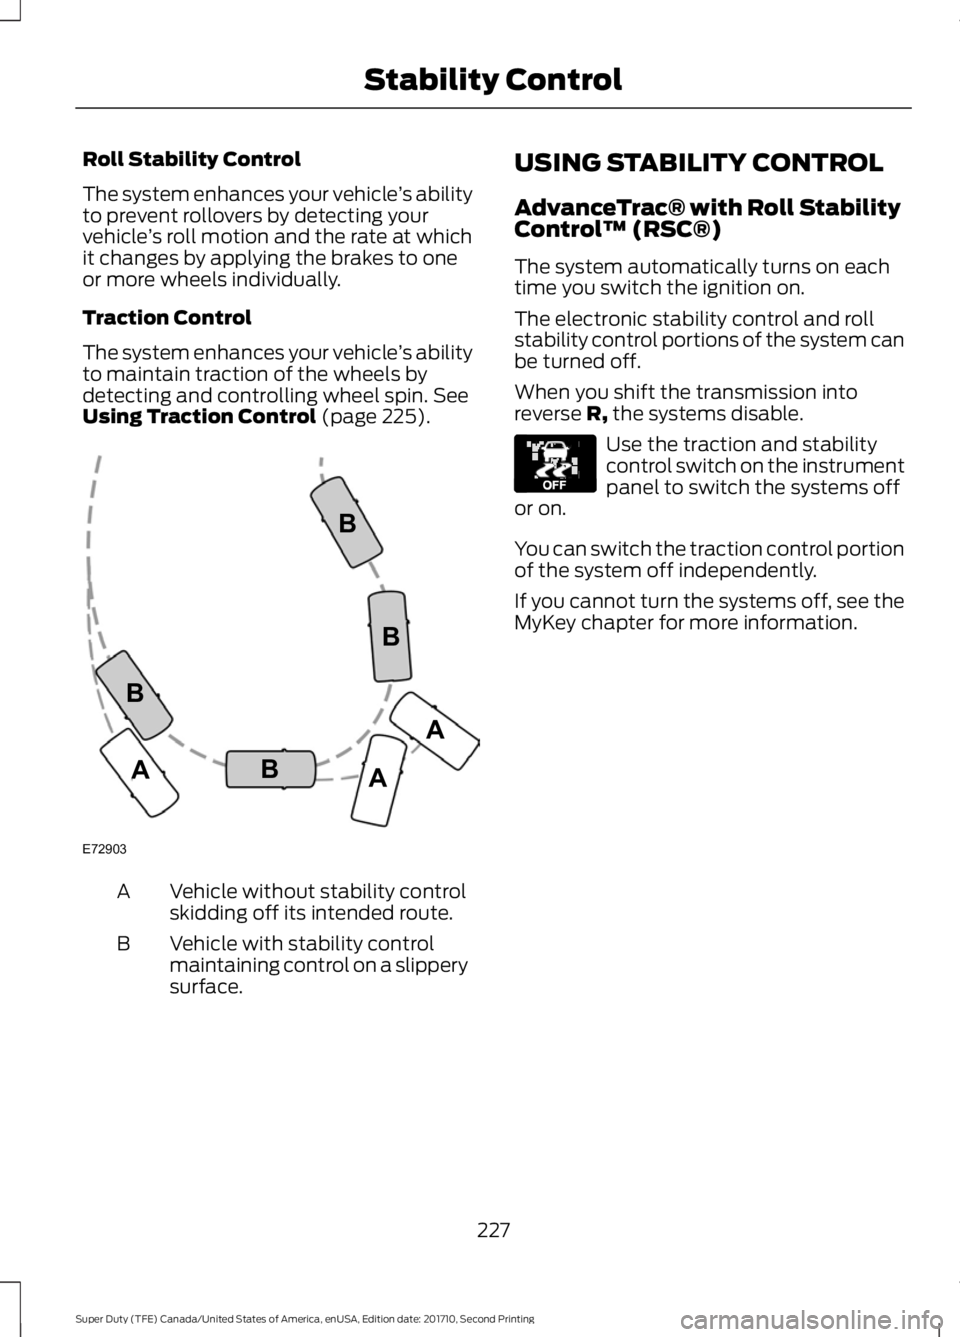
The system enhances your vehicle’s abilityto prevent rollovers by detecting yourvehicle’s roll motion and the rate at whichit changes by applying the brakes to oneor more wheels individually.
Traction Control
The system enhances your vehicle’s abilityto maintain traction of the wheels bydetecting and controlling wheel spin. SeeUsing Traction Control (page 225).
Vehicle without stability controlskidding off its intended route.A
Vehicle with stability controlmaintaining control on a slipperysurface.
B
USING STABILITY CONTROL
AdvanceTrac® with Roll StabilityControl™ (RSC®)
The system automatically turns on eachtime you switch the ignition on.
The electronic stability control and rollstability control portions of the system canbe turned off.
When you shift the transmission intoreverse R, the systems disable.
Use the traction and stabilitycontrol switch on the instrumentpanel to switch the systems offor on.
You can switch the traction control portionof the system off independently.
If you cannot turn the systems off, see theMyKey chapter for more information.
227
Super Duty (TFE) Canada/United States of America, enUSA, Edition date: 201710, Second Printing
Stability ControlE72903A
AA
B
BB
B E130458
Page 232 of 642
PRINCIPLE OF OPERATION
WARNINGS
Hill descent control cannot controldescent in all surface conditions andcircumstances, such as ice orextremely steep grades. Hill descentcontrol is a driver assist system and cannotsubstitute for good judgment by the driver.Failure to do so may result in loss of vehiclecontrol, crash or serious injury.
Hill descent control does not providehill hold at zero miles per hour (0kilometers per hour). When stopped,the parking brake must be applied or thevehicle must be placed in P (Park) or itmay roll away.
Hill descent control allows the driver to setand maintain vehicle speed whiledescending steep grades in various surfaceconditions.
Hill descent control can maintain vehiclespeeds on downhill grades between 2 mph(3 km/h) and 12 mph (20 km/h). Above 20mph (32 km/h), the system remainsarmed, but descent speed cannot be setor maintained.
Hill descent control requires a coolingdown interval after a period of sustaineduse. The amount of time that the featurecan remain active before cooling varieswith conditions. The system will provide awarning in the message center and a chimewill sound when the system is about todisengage for cooling. At this time,manually apply the brakes as needed tomaintain descent speed.
USING HILL DESCENT
CONTROL
Press and release the hilldescent button located on theinstrument panel. A light in thecluster will illuminate and a chime willsound when this feature is activated.
To increase descent speed, press theaccelerator pedal until the desired speedis reached. To decrease descent speed,press the brake pedal until the desiredspeed is reached.
Whether accelerating or decelerating, oncethe desired descent speed is reached,remove your feet from the pedals and thechosen vehicle speed will be maintained.
Note:Noise from the ABS pump motor maybe observed during hill descent controloperation. This is a normal characteristic ofthe ABS and should be no reason forconcern.
Hill descent modes
•At speeds below 20 mph (32 km/h):When the Hill Descent Control switchis pressed and Hill Descent Control isactive, the Hill Descent Control telltalewill flash.
•At speeds below 20 mph (32 km/h):When the Hill Descent Control switchis pressed and conditions are notcorrect for hill descent activation, theHill Descent Control system will beenabled, the Hill Descent Controltelltale will be solid and a message willdisplay in the information display.
•At speeds above 20 mph (32 km/h):When the Hill Descent Control switchis pressed, the Hill Descent Controlsystem will be enabled, the telltale inthe cluster will not be illuminated anda message will be displayed in theinformation display.
229
Super Duty (TFE) Canada/United States of America, enUSA, Edition date: 201710, Second Printing
Terrain Control (If Equipped)E163957
Page 238 of 642
When shifting the transmission out ofreverse (R) and into any gear other thanpark (P), the camera image remains in thedisplay until:
•Your vehicle speed sufficientlyincreases.
•You shift your vehicle into park (P).
•You apply the parking brake on vehicleswith a manual transmission.
360 DEGREE CAMERA (If Equipped)
WARNINGS
The 360 degree camera system stillrequires the driver to use it inconjunction with looking out of thewindows, and checking the interior andexterior mirrors for maximum coverage.
Objects that are close to eithercorner of the bumper or under thebumper, might not be seen on thescreen due to the limited coverage of thecamera system.
Use caution when turning camerafeatures on or off when thetransmission is not in park (P). Makesure your vehicle is not moving.
Note:The 360 degree camera system turnsoff when your vehicle is in motion at lowspeed, except when in reverse (R).
The 360 degree camera system consistsof front, side and rear cameras. Thesystem:
•Allows you to see what is directly infront or behind your vehicle.
•Provides cross traffic view in front andbehind your vehicle.
•Allows you to see a top-down view ofthe area outside your vehicle, includingthe blind spots.
•Provides visibility around your vehicleto you in parking maneuvers such as:
•Centering in a parking space.
•Obstacles near vehicle.
•Parallel parking.
Camera Views
The camera button is located onthe instrument panel and allowsyou to toggle through differentcamera views.
When in park (P), neutral (N) or drive (D),only images from the front cameras aredisplayed. Press the camera button todisplay the front camera image on thedisplay screen.
When in reverse (R), only images from therear cameras are displayed. When you shiftinto reverse (R), the rear view cameraimage automatically shows on the displayscreen.
Advanced Camera Views (If Equipped)
Additional camera views may beavailable for vehicles withspecific features. Press the smallcamera icon shown on the top left cornerof the display screen to open the cameraview menu.
235
Super Duty (TFE) Canada/United States of America, enUSA, Edition date: 201710, Second Printing
Parking AidsE205884 E233726
Page 301 of 642
This program is separate from the NewVehicle Limited Warranty, but the coverageis concurrent with the powertrain coverageperiod of your vehicle.
Canadian customers who require roadsideassistance, call 1-800-665-2006.
Vehicles Sold in Canada: UsingRoadside Assistance
Complete the roadside assistanceidentification card and place it in yourwallet for quick reference.
In Canada, this card is found in theWarranty Guide in the glove compartmentof your vehicle.
Vehicles Sold in Canada: RoadsideAssistance Program Coverage
The service is available 24 hours a day,seven days a week.
Canadian roadside coverage and benefitsmay differ from the U.S. coverage.
For complete program coverage detailsyou may contact your dealer, you can callus in Canada at 1-800-665-2006, or visitour website at www.ford.ca.
HAZARD FLASHERS
Note:The hazard flashers operate whenthe ignition is in any position, or if the key isnot in the ignition. If used when the vehicleis not running, the battery loses charge. Asa result, there may be insufficient power torestart your vehicle.
The flasher control is on theinstrument panel. Use yourhazard flashers when yourvehicle is creating a safety hazard for othermotorists.
•Press the flasher control and all frontand rear direction indicators flash.
•Press the button again to switch themoff.
FUEL SHUTOFF - 6.2L/6.8L
Note:If your vehicle is involved in a crash,have a qualified technician check the fuelsystem.
Note: When you try to restart your vehicleafter a fuel shutoff, the vehicle makes surethat various systems are safe to restart.Once the vehicle determines the systemsare safe, then the vehicle allows you torestart.
Note: In the event that your vehicle doesnot restart after your third attempt, contacta qualified technician.
The fuel pump shutoff stops the flow offuel to the engine in the event of amoderate to severe crash. Not everyimpact causes a shutoff.
If your vehicle has a key system:
1. Switch off the vehicle.
2. Switch on the vehicle.
3. Repeat steps 1 and 2 to re-enable thefuel pump.
FUEL SHUTOFF - 6.7L DIESEL
WARNING
Failure to inspect and, if necessary,repair fuel leaks after a collision mayincrease the risk of fire and seriousinjury. Ford Motor Company recommendsthat the fuel system be inspected by anauthorized dealer after any collision.
298
Super Duty (TFE) Canada/United States of America, enUSA, Edition date: 201710, Second Printing
Roadside Emergencies
Page 302 of 642
Note:When you try to restart your vehicleafter a fuel shutoff, your vehicle makes surethat various systems are safe to restart.Once your vehicle determines that thesystems are safe, then your vehicle willallow you to restart.
In the event of a moderate to severecollision, your vehicle is equipped with afuel pump shut-off feature that stops theflow of fuel to the engine. Not every impactwill cause a shutoff.
After an accident, if the engine cranks butdoes not start, this switch may have beenactivated.
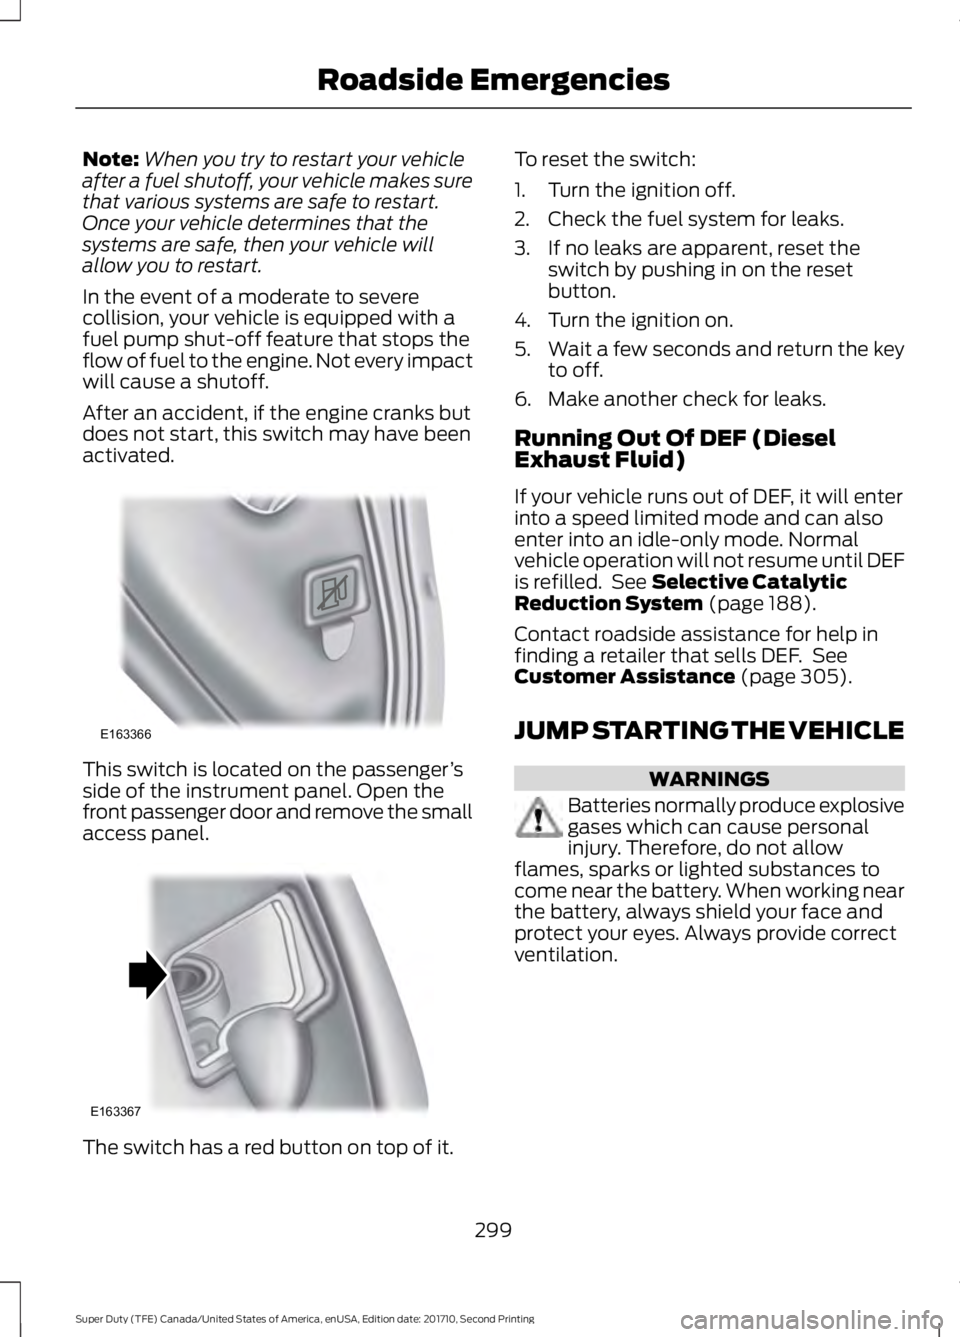
This switch is located on the passenger’sside of the instrument panel. Open thefront passenger door and remove the smallaccess panel.
The switch has a red button on top of it.
To reset the switch:
1. Turn the ignition off.
2. Check the fuel system for leaks.
3. If no leaks are apparent, reset theswitch by pushing in on the resetbutton.
4. Turn the ignition on.
5.Wait a few seconds and return the keyto off.
6. Make another check for leaks.
Running Out Of DEF (DieselExhaust Fluid)
If your vehicle runs out of DEF, it will enterinto a speed limited mode and can alsoenter into an idle-only mode. Normalvehicle operation will not resume until DEFis refilled. See Selective CatalyticReduction System (page 188).
Contact roadside assistance for help infinding a retailer that sells DEF. SeeCustomer Assistance (page 305).
JUMP STARTING THE VEHICLE
WARNINGS
Batteries normally produce explosivegases which can cause personalinjury. Therefore, do not allowflames, sparks or lighted substances tocome near the battery. When working nearthe battery, always shield your face andprotect your eyes. Always provide correctventilation.
299
Super Duty (TFE) Canada/United States of America, enUSA, Edition date: 201710, Second Printing
Roadside EmergenciesE163366 E163367
Page 318 of 642
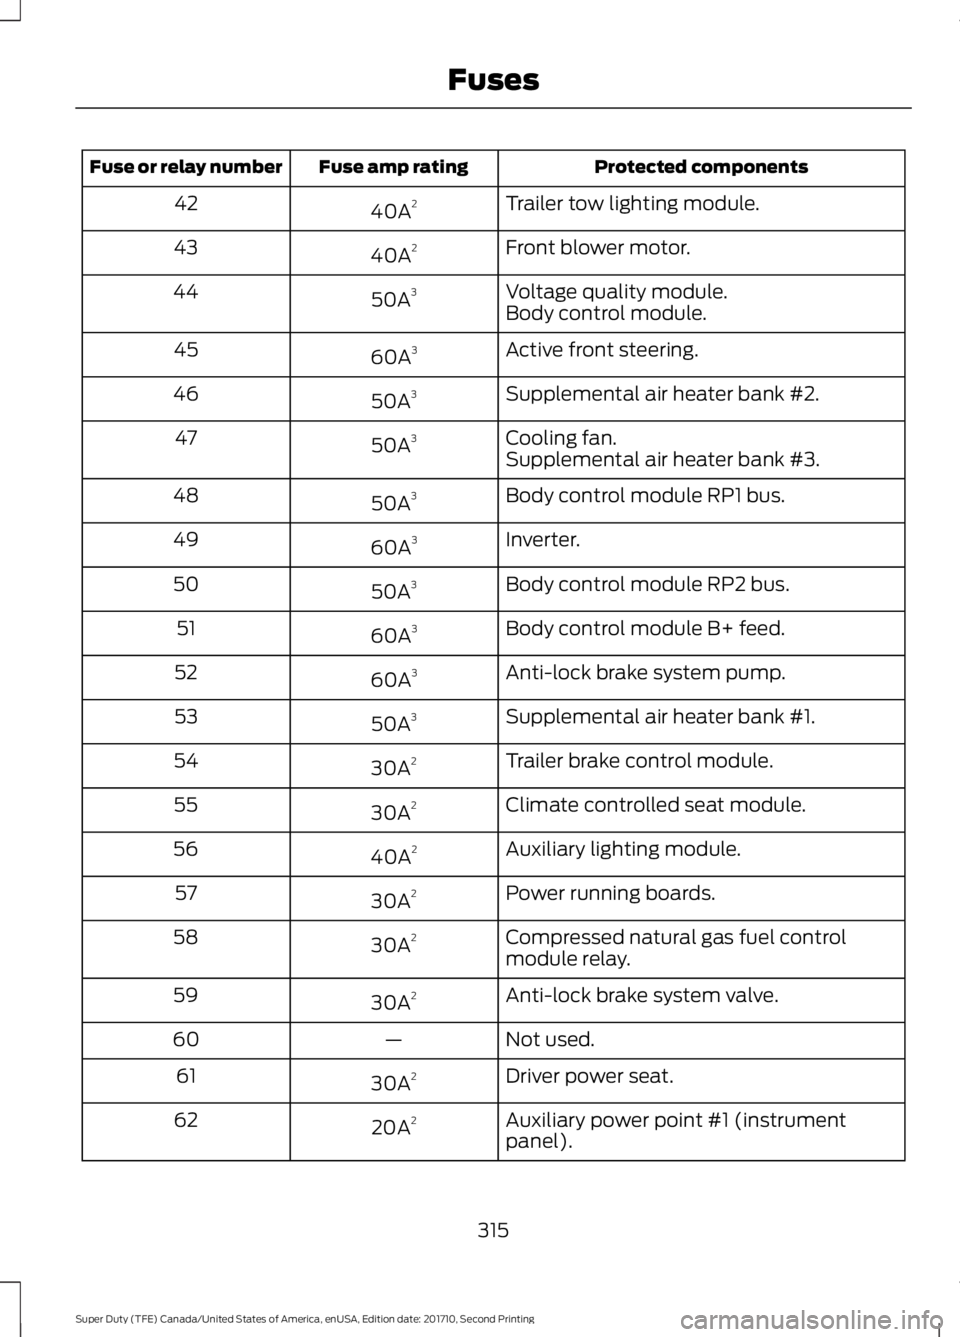
Protected componentsFuse amp ratingFuse or relay number
Trailer tow lighting module.40A242
Front blower motor.40A243
Voltage quality module.50A344Body control module.
Active front steering.60A345
Supplemental air heater bank #2.50A346
Cooling fan.50A347Supplemental air heater bank #3.
Body control module RP1 bus.50A348
Inverter.60A349
Body control module RP2 bus.50A350
Body control module B+ feed.60A351
Anti-lock brake system pump.60A352
Supplemental air heater bank #1.50A353
Trailer brake control module.30A254
Climate controlled seat module.30A255
Auxiliary lighting module.40A256
Power running boards.30A257
Compressed natural gas fuel controlmodule relay.30A258
Anti-lock brake system valve.30A259
Not used.—60
Driver power seat.30A261
Auxiliary power point #1 (instrumentpanel).20A262
315
Super Duty (TFE) Canada/United States of America, enUSA, Edition date: 201710, Second Printing
Fuses
Page 320 of 642

Protected componentsFuse amp ratingFuse or relay number
Not used.—86
Not used.—87
Multi contour seats.10A188
Not used.—89
Spot light module.10A190
Upfitter interface module.10A191
Not used.—92
Not used.—93
Transmission control module.15A194
Powertrain control module keep alivepower.10A195
Rain sensor.5A196
Not used.—97
Alternator sense.10A198
Trailer tow parking lamps.30A199
1Micro fuse.2M-type fuse.3J-type fuse.
Passenger Compartment FusePanel
The fuse panel is located under theinstrument panel to the left of the steeringcolumn.
Note:It may be easier to access the fusepanel if you remove the finish trim piece.
317
Super Duty (TFE) Canada/United States of America, enUSA, Edition date: 201710, Second Printing
Fuses
Page 325 of 642
GENERAL INFORMATION
Have your vehicle serviced regularly to helpmaintain its roadworthiness and resalevalue. There is a large network ofauthorized dealers that are there to helpyou with their professional servicingexpertise. We believe that their speciallytrained technicians are best qualified toservice your vehicle properly and expertly.They are supported by a wide range ofhighly specialized tools developedspecifically for servicing your vehicle.
If your vehicle requires professional service,an authorized dealer can provide thenecessary parts and service. Check yourwarranty information to find out whichparts and services are covered.
Use only recommended fuels, lubricants,fluids and service parts conforming tospecifications. Motorcraft® parts aredesigned and built to provide the bestperformance in your vehicle.
Precautions
•Do not work on a hot engine.
•Make sure that nothing gets caught inmoving parts.
•Do not work on a vehicle with theengine running in an enclosed space,unless you are sure you have enoughventilation.
•Keep all open flames and other burningmaterial (such as cigarettes) awayfrom the battery and all fuel relatedparts.
Working with the Engine Off
1.Set the parking brake and shift to park(P).
2. Switch off the engine.
3. Block the wheels.
Working with the Engine On
WARNING
To reduce the risk of vehicle damageand/or personal burn injuries, do notstart your engine with the air cleanerremoved and do not remove it while theengine is running.
1.Set the parking brake and shift to park(P).
2. Block the wheels.
OPENING AND CLOSING THE
HOOD
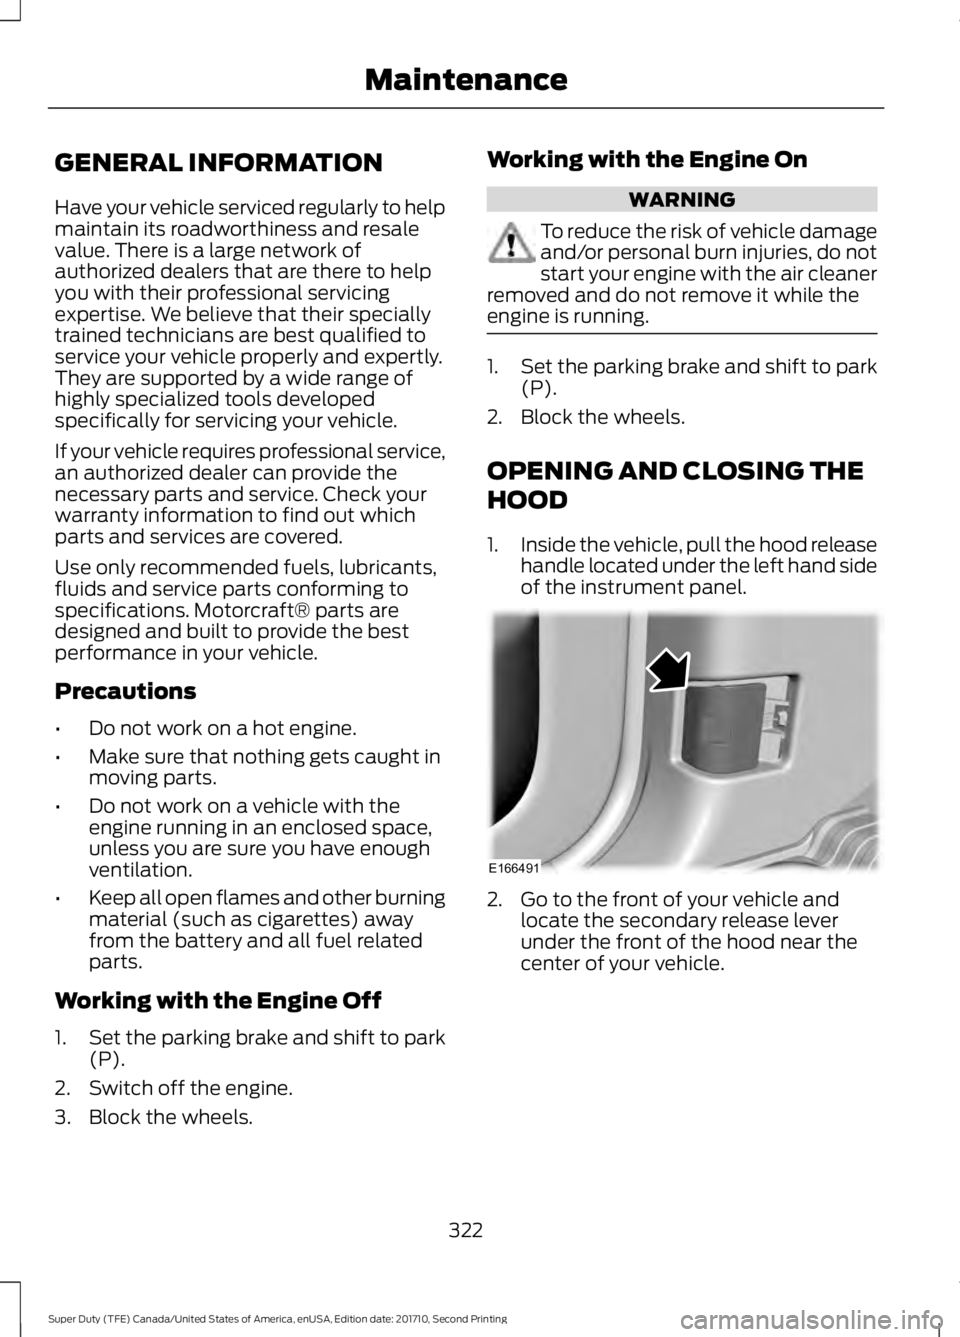
1.Inside the vehicle, pull the hood releasehandle located under the left hand sideof the instrument panel.
2. Go to the front of your vehicle andlocate the secondary release leverunder the front of the hood near thecenter of your vehicle.
322
Super Duty (TFE) Canada/United States of America, enUSA, Edition date: 201710, Second Printing
MaintenanceE166491