Page 97 of 292
95Menu…Press... Sub-menu... Press... Select...c onfirm
and quit Allows you to...
12
Daytime
running lampsON Activate / Deactivate daytime
running lamps.
OFF
13
Automatic
headlamp
dipping ON
Activate / Deactivate automatic
headlamp dipping.
OFF
14
Passenger
airbag
(BAG P) ON
Ye s
Activate the passenger airbag.
No
OFF Ye s
Deactivate the passenger airbag.
No
15
Quit menu Quit the menu.
Press the arrow at the bottom to
go to the first menu.
4
tEcHnOLOGY on BOArd
Vehicle configuration
Page 98 of 292

96
using the touch screen audio
system
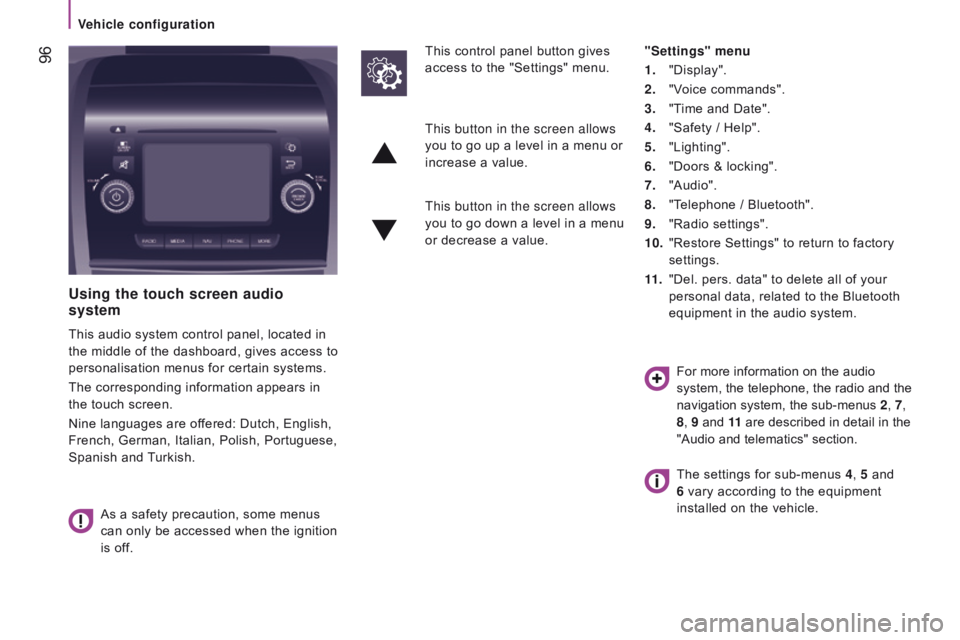
This audio system control panel, located in
the middle of the dashboard, gives access to
personalisation menus for certain systems.
The corresponding information appears in
the touch screen.
Nine languages are offered: Dutch, English,
French, German, Italian, Polish, Portuguese,
Spanish and Turkish.
As a safety precaution, some menus
can only be accessed when the ignition
is off. This control panel button gives
access to the "Settings" menu.
"Settings" menu
1.
"Display".
2.
"V
oice commands".
3.
"T
ime and Date".
4.
"Safety / Help".
5.
"Lighting".
6.
"Doors & locking".
7.
"Audio".
8.
"T
elephone / Bluetooth".
9.
"Radio settings".
10.
"Restore Settings" to return to factory
settings.
11 .
"Del. pers. data" to delete all of your
personal data, related to the Bluetooth
equipment in the audio system.
This button in the screen allows
you to go up a level in a menu or
increase a value.
This button in the screen allows
you to go down a level in a menu
or decrease a value.
For more information on the audio
system, the telephone, the radio and the
navigation system, the sub-menus 2, 7,
8 , 9 and 11 are described in detail in the
"Audio and telematics" section.
The settings for sub-menus 4 , 5 and
6 vary according to the equipment
installed on the vehicle.
Vehicle configuration
Page 99 of 292

97From the "Safety / Help" sub menu, you can:
-
select "Parkview Camera", then
"Reversing camera" to activate or
deactivate its use (On, Off),
-
select "Parkview Camera", then
"Camera delay" to activate or deactivate
the maintaining of the display for
10
seconds or up to 11 mph (18 km/h)
(On, Off),
-
select "T
raffic Sign" to activate or
deactivate its use (On, Off),
-
select "Passenger airbag" to activate or
deactivate its use (On, Off).
From the "Lighting" sub-menu, you can:
-
select "Daytime running lamps" to
activate or deactivate their use (On, Off),
-
select "Auto headlamp dipping" to
activate or deactivate its use (On, Off),
-
select "Headlamp sensor" to adjust its
sensitivity (1, 2, 3). From the "Doors & locking" sub-menu,
you
can:
-
select "Autoclose" to activate or
deactivate its use (On, Off).
From the "Display" sub-menu, you can:
-
select "Languages" and choose one of
the languages listed above,
-
select "Units of measurement" to
choose the units for fuel consumption
(l/100
km, mpg), distance (miles, km)
and temperature (°C, °F),
-
select "Display
Trip B" to switch trip B
On or Off in the trip computer.
From the "Time and Date" sub-menu, you
can:
-
select "Adjust time and format" to set the
hour, minutes and seconds and choose
the format (24 h, 12 h with am or pm),
-
select "Adjust Date" to set the day
,
month and year.
To set the time manually, "Synch Time"
must be Off.
4
TECHNOLOGYon BOARD
V
Page 100 of 292
98
The trIP button, located at the end of the
wiper control stalk, gives access to the
following information:
-
r
ange
This indicates the distance that can still
be travelled with the fuel remaining in
the tank on the basis of the average
consumption over the last few miles
(kilometres) travelled. -
A verage speed A
This is the average speed calculated
since the last trip computer zero reset
(with the ignition on).
-
t
rip
duration A
This indicates the total time since the
last trip recorder zero reset.
-
d istance A
This indicates the distance travelled
since the last trip computer zero reset.
-
A
verage fuel consumption A
This is the average quantity of fuel
consumed since the last trip computer
zero reset.
-
c
urrent fuel consumption A
This is the average quantity of fuel
consumed during the last few seconds.
trIP c OMP ut E r
If TRIP B is activated in the MOdE menu:
-
Distance B
-
A
verage fuel consumption B
-
A
verage speed B
-
T
rip duration B
Vehicle data
Page 101 of 292
99
tAc HOG r APH
If your vehicle is fitted with a tachograph,
this permits storing of all of the data relating
to the vehicle in the unit and on a card
inserted in it.
Example: at the beginning of each journey
or change of team. When the card is inserted, all of the data
can be:
-
displayed on the tachograph screen,
-
printed,
-
transferred to external storage media via
an interface. For further information, refer to the
documents supplied by the manufacturer of
the tachograph.
If your vehicle is fitted with a
tachograph, disconnection of the
negative (-) terminal of the battery (located
under the floor on the left-hand side, in the
cab) is recommended if the vehicle is not to
be used for a period of more than 5
days.
4
tEcHnOLOGY on BOArd
Vehicle data
Page 102 of 292

100
AudIBLE rEAr PArKInG SEnSOrS
If fitted on your vehicle, the system consists
of four proximity sensors, installed in the
rear bumper.
They detect any obstacle: person, vehicle,
tree, fence, behind the vehicle during the
manoeuvre.
However, objects the size or thickness of
which are detected at the beginning of the
manoeuvre will no longer be detected at the
end of the manoeuvre: blind spots between
and below the sensors. Examples: stake,
roadworks cone or pavement post.
The rear parking sensor system may be
coupled with a reversing camera.Operation
Engage reverse gear with the gear lever.
The proximity information is indicated by an
audible signal of increasing frequency as the
vehicle approaches the obstacle.
When the distance between the rear of
the vehicle and the obstacle is less than
approximately thirty centimetres, the audible
signal becomes continuous.
Switching off
Come our of reverse gear into neutral.
Operating fault
If this warning lamp comes
on in the instrument panel
accompanied by a message in
the screen, contact a CITROËN
dealer or a qualified workshop.
Good practice
The system cannot, in any circumstances,
replace the need for vigilance on the part of
the driver.
Take even greater care if you reverse with a
rear door open.
In bad weather or in winter, ensure that the
sensors are not covered with mud, ice or
snow.
Parking sensors
Page 103 of 292

101
rEVErSInG cAMErA
If your vehicle is fitted with this camera, it is
located at the rear, next to the third brake
lamp.
It sends images to the screen installed
in the cab. This rear vision is an aid to
manoeuvring.
The reversing camera may be coupled with
rear parking sensors.Screen
The camera sends the images to a 5 inch
LCD colour screen. This screen is also
the one used by the touch screen audio-
telematic system.
Activation and deactivation of the system
is done in the settings menu of the touch
screen audio-telematic system.
Operation
The camera comes into operation when
reverse gear is engaged and remains active
up to approximately 9 mph (15 km/h). It is
deactivated above 11 mph (18 km/h).
The camera also comes on, with the vehicle
stationary, when the rear doors are opened.
Switching off
When a forward gear is engaged, the last
image remains displayed for approximately
5 seconds then switches off.
In the same way, the last image also
remains displayed, with the vehicle
stationary, when the rear doors are closed.
Good practice
With optimum vehicle conditions (position on
the road, loading level) the maximum area of
visibility covered by the camera has a field
depth approximately 3 m long and 5.5
m wide.
The area of visibility may vary depending on
the external weather conditions (brightness,
rain, snow, fog, ...), the load in the vehicle
and the position of the vehicle on the road.
When cleaning the camera and the screen,
avoid using a detergent or a tool which may
scratch the glass.
Use a non-abrasive cloth or a small brush.
4
tEcHnOLOGY on BOArd
Parking sensors
Page 104 of 292
102
PnEuMAtI c S u SPE n SIO n
If your vehicle is fitted with pneumatic
suspension, you can adjust the height of
the rear of the vehicle to make loading and
unloading easier.
The controls are located alongside the
steering wheel.
There is a nominal level as well as 6 height
adjustment levels, raising (from +1 to +3)
or lowering (from -1 to -3). The levels are
indicated in the instrument panel screen.
Manual adjustment of the loading
height
raise: upwards adjustment of the load
floor Lower: downwards adjustment of the
load floor
Make a quick press on the control
to select the next level up. Each
press (LED on) raises the floor by
one level: +1 to +3.
A long press selects the highest level (+3). Make a quick press on the control
to select the next level down.
Each press (LED on) lowers the
floor by one level: -1 to -3.
A long press selects the lowest level (-3).
Loading assistance