Page 33 of 116

60 || 61
VEHICLE CONTROLSVEHICLE CONTROLS
Interior and Exterior Lights
Operate interior and exterior lights when the vehicle is on or off.
n
Exterior Lights
Rotate the switches on the lev
er to operate the exterior lights. Push the lever forward to
turn on high beams. Return the lever to its original position for low beams.
Turn on all exterior lights including headlights.High Beams
Flashing the high beams
Low Beams
OFF All exterior lights are off.
Turn on exterior lights except headlights.
AUTO Turn on the automatic lighting feature.
Headlights turn on or off depending on ambient
brightness when the vehicle is on. Headlights
automatically come on after the wipers are
engaged for a certain time. n
Interior Lights
Located on the ceiling in the fr
ont.
ON position: Interior lights remain on.
Door activated position: Interior lights come on a door is
opened, the driver’s door is unlocked, or the vehicle is turned
off.
OFF position: Interior lights remain off.
Of f
Door
Activated Position
On
n Brightness Control
Adjust instrument panel brightness when the vehicle is on.
To brighten: Press the (+) button.
To dim: Press the (–) button.
A beep sounds when the brightness reaches minimum or
maximum.
(+) Button
(-) Butto n
Page 34 of 116
62 || 63
VEHICLE CONTROLSVEHICLE CONTROLS
n Map Lights
Press the map lights
in the ceiling to turn them on or off.
n One-Touch Turn Signal
Use this quick and conv enient method to signal a lane
change.
Lightly push the turn signal lever up or down for a three-blink
sequence.
For a continuous signal, push the lever up or down until it
locks into place.
Right
Left
Wiper Operation
The windshield wipers and washers can be used when the vehicle is on.
n
Front Wipers
Mov
e the wiper lever up or down to the desired position.
Pull to use
washer. MIST
OFF
INT (intermittent)
LO: Low speed wipe
HI: High speed wipe
Page 35 of 116

64 || 65
VEHICLE CONTROLSVEHICLE CONTROLS
Intermittent (INT) wipers
When you move the lever to the INT position, the wipers operate based on the wiper delay.
Rotate the adjustment ring to adjust the wiper delay.
Intermittent time adjusting ringLower speed,
fewer sweeps
Higher speed,
more sweeps
Adjusting the Seats
Make seat adjustments before driving to ensure the best comfort and safety.
n
Adjusting the Driver
’s seat
Adjust the driver’s seat as far back as possible while allowing
you to maintain full control of the vehicle. You should be able
to sit upright and well back in the seat, adequately press the
pedals without leaning forward, and grip the steering wheel
comfortably. The passenger’s seat should be adjusted so that
it is as far back from the front airbag in the dashboard as
possible.
Allow suf�cient
space.
Move
back.
The National Highway Traffic Safety Administration and Transport Canada recommend that
drivers allow at least 10 inches (25 cm) between the center of the steering wheel and their
chest.
Page 36 of 116
66 || 67
VEHICLE CONTROLSVEHICLE CONTROLS
Sitting improperly or out of position can result in serious injury or death in a
crash. Always sit upright, well back in the seat, with your feet on the floor.
WARNING
Sitting too close to a front airbag can result in serious injury or death if the front
airbags inflate.
Always sit as far back from the front airbags as possible while maintaining
control of the vehicle.
WARNING
Reclining the seat-back too far can result in serious injury or death in a crash.
Adjust the seat-back to an upright position, and sit well back in the seat.
WARNING
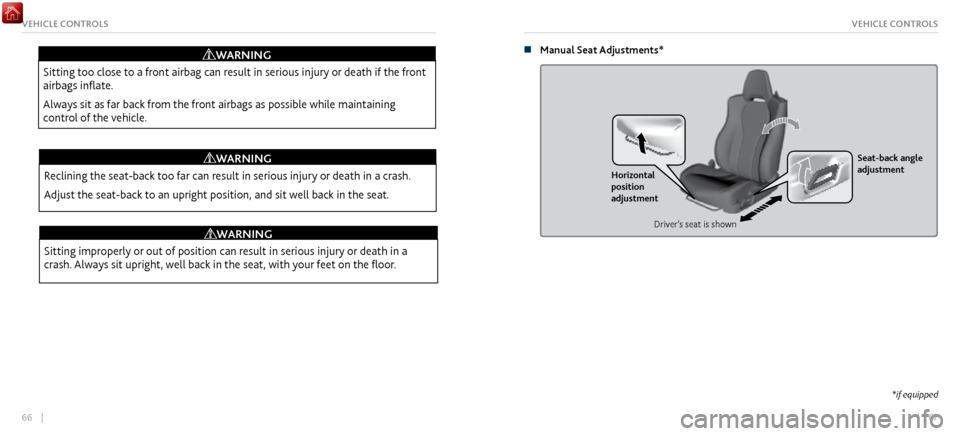
n Manual Seat Adjustments*
Horizontal
position
adjustment Seat-back angle
adjustment
Driver’s seat is shown
*if equipped
Page 37 of 116
68 || 69
VEHICLE CONTROLSVEHICLE CONTROLS
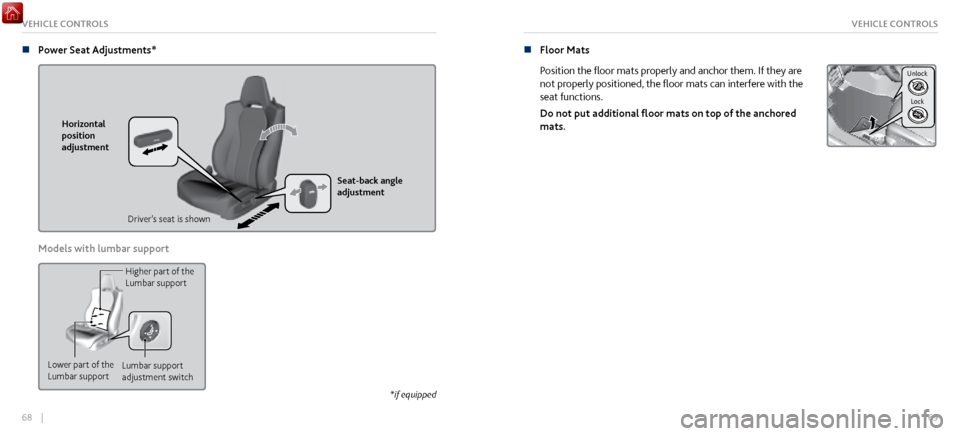
n Power Seat Adjustments*
Horizontal
position
adjustment
Seat-back angle
adjustment
Driver’s seat is shown
Models with lumbar support
Lower part of the
Lumbar support Lumbar support
adjustment switchHigher part of the
Lumbar support
*if equipped
n Floor Mats
Position the floor mats properly and anchor them. If they are
not properly positioned, the floor mats can interfere with the
seat functions.
Do not put additional floor mats on top of the anchored
mats.
Unlock
Lock
Page 38 of 116

70 || 71
VEHICLE CONTROLSVEHICLE CONTROLS
n Adjusting the Steering Wheel
The steering wheel height and distance
from your body can be adjusted so that you can
comfortably grip the steering wheel in an appropriate driving posture.
1.
Pull up the steering wheel adjustment lever
.
2.
Move the steering
wheel up or down, and in or out.
3.
Push down the steering wheel adjustment lev
er to lock
the steering wheel in position.
To adjust
To lock
Lever
Adjusting the steering wheel position while driving may cause you to lose control
of the vehicle and be seriously injured in a crash.
Adjust the steering wheel only when the vehicle is stopped.
WARNING
Driving Position Memory System*
You can store two driver’s seat and door mirror positions into memory when the vehicle is
on. When you unlock and open the driver’s door with a remote transmitter, the seat and door
mirrors adjust automatically to the corresponding preset positions.
Adjust the seat and mirrors to your preferred positions.
1.
Press SET.
2.
Press and hold memory button 1 or 2. Y
ou will
hear two beeps when the memory is set.
Press one of the memory buttons to recall previously stored
positions. Lumbar positions cannot be stored.
SET Button
Memory
Button
1
Memory
Button 2
*if equipped
Page 39 of 116

72 || 73
VEHICLE CONTROLSVEHICLE CONTROLS
Adjusting the Mirrors
Adjust the angle of the mirrors for the best visibility when you are sitting in the correct driving
position.
n Automatic Dimming Rearview Mirror
When driving after dark, the
automatic dimming function
reduces the glare in the rearview mirror (and power door
mirrors) from headlights behind you.
The function cancels when the transmission is in Reverse (R).
n Power Door Mirrors
Adjust the power door
mirrors using the switches on the driver’s door when the vehicle is on.
L/R selector switch: Select the left or right mirror. After
adjusting the mirror, return the switch to the center position.
Mirror position adjustment switch: Press the switch left,
right, up, or down to move the mirror.
SwitchSelector
Switch Adjustment
n Reverse Tilt Door Mirrors
The selected door mirror can tilt downward when you shift to Reverse (R), improving
visibility on the selected side of the vehicle while reversing. The mirror returns to its original
position when you shift out of Reverse.
Models with driving position memory system
Either side mirror can tilt by moving the selector switch to the
appropriate side.
Slide the selector switch to left
or right to tilt down either side
door mirror.
Models without driving position memory system
The passenger-side door mirror can tilt downward by moving
the selector switch to the right.
Selector Switch
Page 40 of 116

74 || 75
VEHICLE CONTROLSVEHICLE CONTROLS
HomeLink® Universal Transceiver
Program your vehicle to operate up to three remote-controlled devices around your home—
such as garage doors, lighting, or home security systems—using the buttons on the ceiling.
Red Indicator
n Training a Button
Park near the system
you want to program, and follow the instructions in the flowchart.
To retrain a button or erase codes, see the Owner’s Manual on the Owner Information CD
or visit owners.acura.com (U.S.) or www.myacura.ca (Canada). If you need help, call (800)
355-3515 or visit www.homelink.com.
Press and hold the button on the r emote
and the HomeLink button at the same
time. Then, while continuing to hold the
HomeLink button, press and r elease the
button on the remote every 2 seconds.
Does the LED blink at a f ast er ra te within 20 seconds ?
Press and hold the
HomeLink button
again. Training
complete
YES
NO
HomeLink indicator
�ashes for 2 seconds,
then r emains on. HomeLink LED
r
emains on.YES
NO
YES
NO
Position the remote transmitter
1–3 inches (3–8 cm) from the
HomeLink button you want to program.1
Press and hold the desired HomeLink
button and the button on the remote
transmitter.
Does the HomeLink indicator (LED) blink at a f aster
rate after about 10 seconds ?
2
a
The remote has a rolling code. Press
the “learn” button on the remote-
controlled device (e.g., garage door
opener).
Press the programmed HomeLink
button again; the remote-controlled
device should operate. Within 30 seconds, press and hold the
programmed HomeLink button for 2
seconds.a
Press and hold the programmed
HomeLink button for about a second.
Does the devic e (garage door opener) work ?
3
b
4
5
HomeLink® is a registered trademark of Gentex Corporation.
 1
1 2
2 3
3 4
4 5
5 6
6 7
7 8
8 9
9 10
10 11
11 12
12 13
13 14
14 15
15 16
16 17
17 18
18 19
19 20
20 21
21 22
22 23
23 24
24 25
25 26
26 27
27 28
28 29
29 30
30 31
31 32
32 33
33 34
34 35
35 36
36 37
37 38
38 39
39 40
40 41
41 42
42 43
43 44
44 45
45 46
46 47
47 48
48 49
49 50
50 51
51 52
52 53
53 54
54 55
55 56
56 57
57 58
58 59
59 60
60 61
61 62
62 63
63 64
64 65
65 66
66 67
67 68
68 69
69 70
70 71
71 72
72 73
73 74
74 75
75 76
76 77
77 78
78 79
79 80
80 81
81 82
82 83
83 84
84 85
85 86
86 87
87 88
88 89
89 90
90 91
91 92
92 93
93 94
94 95
95 96
96 97
97 98
98 99
99 100
100 101
101 102
102 103
103 104
104 105
105 106
106 107
107 108
108 109
109 110
110 111
111 112
112 113
113 114
114 115
115


