Page 41 of 116

76 || 77
VEHICLE CONTROLSVEHICLE CONTROLS
Climate Control System
The automatic climate control system can maintain your preferred interior temperature by
selecting the proper mix of heated or cooled air and fan speed.
There is a system to cool the High Voltage battery. When that system is active, you may notice
reduced cooling capability in the cabin.
Seat Heaters*
Quickly warm the seats when the vehicle is on.
n
Front Seat Heaters
Press the button for the desired setting. An indicator in the
switch appears for the selected setting.
Press once: high setting (three indicators)
Press twice: middle setting (two indicators)
Press three times: low setting (one indicator)
Press four times: off setting (no indicators)
The high setting cycles on and off. For continuous heat,
choose middle or low settings.
Heat-induced burns are possible when using seat heaters.
Persons with a diminished ability to sense temperature (e.g., persons with
diabetes, lower-limb nerve damage, or paralysis) or with sensitive skin should
not use the seat heaters.
WARNING
*if equipped
AUTO button:
Press, then use
the temperature
control dial to set
your preferred
temperature.
ON/OFF
button Windshield
defroster button
SYNC button:
Set the passenger’s temperature to the
same as the driver’s. Rear window
defogger/heated
mirror button
Recirculation button:
Choose recirculation or
fresh air.
Dashboard
vents Dashboard
and floor
vents Floor vent
s Floor and MID vents
defroster
vent s
Page 42 of 116

78 || 79
VEHICLE CONTROLSVEHICLE CONTROLS
Customized Features
You can easily customize many features of your vehicle. The customized settings are recalled
every time you unlock the driver’s door with the remote (Driver 1 or Driver 2). Settings are
unique to each remote.
Audio/Information Screen
n How to Change a Setting
The vehicle must be in P
ark (P) to select Vehicle Settings. Use the touchscreen to make and
enter selections. From the HOME screen:
1.
Press the SETTINGS button.
2.
Select a category (Clock/Info, Audio,
Bluetooth/Wi-Fi, System, etc.).
3.
Select a setting option, and make y
our preferred changes.
4.
Press BACK to
exit out of the menus.
Setting the Clock
Adjust the time in the clock display.
Models without navigation
Select items on the touchscreen to make selections.
1.
From the HOME scr
een, select Settings.
2.
Select Clock/Info.
3.
Select Clock Adjustment.
4.
Adjust the hour and minute values.
5.
Select OK when complete.
Models with navigation
The time is automatically set using GPS signals.
Model with navigation shown
Page 43 of 116

80 || 81
AUDIO AND CONNECTIVITYAUDIO AND CONNECTIVITY
iPod and iPhone are trademarks of Apple, Inc.
Applicable laws may prohibit the operation of handheld electronic devices while operating a vehicle.
AUDIO AND CONNECTIVITY
Learn how to operate the vehicle’s audio system.
Basic Audio Operation
n USB Ports
Connect a USB
flash drive or other audio device, such as an iPod or iPhone. One port is in
the glove box, the other in the console compartment.
1.
Open the glove bo
x and locate the USB port, on the left.
2.
Install the iPod dock connector or the
USB flash drive into
the USB port. This port is for playing audio and device
charging.
In the glove bo x
In the console compartment1. Open the console compartment, then open the USB port
cover.
2.
Install the iPod dock connector or the
USB flash drive
into the USB port. This port is for playing audio, device
charging, and connecting to Apple CarPlay (see page
88) or Android Auto (see page 90).
In the glove bo x
In the console compartment
n Accessory Power Socket
Located on the side of the center
console. Open the socket
cover to use power when the vehicle is on.
Do not insert an automotive type cigarette lighter element. This can overheat the power
socket.
NOTICE
Page 44 of 116

82 || 83
AUDIO AND CONNECTIVITYAUDIO AND CONNECTIVITY
n Steering Wheel Controls
Operate certain
functions of the audio system using the steering wheel controls.
SOURCE button: Cycle through available audio modes.
Selector Wheel: Roll up and down to adjust volume, or press
to mute. The selector wheel has different functions based on
the audio source:
Radio Left or right: Select previous or next radio preset
Left or right (and hold): Select previous or next strong
station
USB flash drive, iPod, Bluetooth Audio
Left or right: Restart current song, or skip to next song.
Left or right (and hold): Select previous or next folder
Pandora* Right: Skip to next song.
Left or right (and hold): Select previous or next station.
.
Left Selector Wheel
SOURCE Butto n
Left Selector Wheel
n Adjusting the Sound
Make selections
using the touchscreen.
1.
From the HOME scr
een, select Settings.
2.
Select Audio.
3.
Select Sound.
4.
Select the tabs to change the sound mode
and adjust the
setting.
5.
Select OK when complete.
*if equipped
Page 45 of 116

84 || 85
AUDIO AND CONNECTIVITYAUDIO AND CONNECTIVITY
Operating Display Audio
Use simple gestures—such as touching, swiping, and scrolling—to operate certain audio
functions.
Some items may be grayed out during driving to reduce the potential for distraction. You can
select them when the vehicle is stopped.
Wearing gloves may limit or prevent touchscreen response.
You can use a microfiber cleaning cloth to remove dust or fingerprints from the touchscreen.
Power: Turn
audio on or off.
HOME MAP
MENU: Display
menu items for
the selected
screen. BACK: Go back to
the previous screen.
button: Change
screen brightness. Settings: Select to
customize options.
Navigation
Volume Apps: Choose an
app or widget.
n Changing Icon Order
You can change the order of the icons on the HOME screen.
1.
From the HOME scr
een, select and hold an icon to enter
the customization screen.
2.
Select and hold the icon you
want to move and slide it to
a different position.
3.
Select OK when complete.
n Adding Apps or Widgets to the HOME Screen
You can add apps or widgets to the HOME screen for easy selection.
1.
From the HOME scr
een, select and hold an empty space.
Select and hold.
Select and hold.
Drag and drop.
2. Select Add App or Add Widget. The Apps/Widgets screen
appears.
Select and hold.
Select and hold .
Drag and drop.
Model with navigation shown
Page 46 of 116

86 || 87
AUDIO AND CONNECTIVITYAUDIO AND CONNECTIVITY
3. Select and hold the app or widget you want to add to the
HOME screen. The customization scr
een appears.
Select and hold.
Select and hold.
Drag and drop.
4. Select and hold the app or widget and mo ve it to where
you want.
Select and hold.
Select and hold .
Drag and drop.
5. Select OK when complete.
Wi-Fi Connection
You can connect the audio system to the internet using Wi-Fi and use online services through
the touchscreen. If your compatible phone has hotspot capabilities, the system can be tethered
to the phone. When the vehicle is stopped, follow the steps below to set up Wi-Fi. Standard
data rates apply with your phone service provider.
1.
From the HOME scr
een, select Settings.
2.
Select Bluetooth/Wi-Fi. Select the Wi-Fi tab.
3.
Select Wi-Fi On/Off Status, and
select On.
4.
Select Wi-Fi Network List. Make sur
e your phone’s
Wi-Fi setting is in access point (tethering) mode.
5.
Select the phone you want to
connect to the system.
If the phone you want to connect does not appear, select
Scan.
6.
Select Connect.
7.
Enter a password for y
our phone. Select OK.
The Wi-Fi symbol is displayed on the list when connection is
successful.
Page 47 of 116

88 || 89
AUDIO AND CONNECTIVITYAUDIO AND CONNECTIVITY
Apple® CarPlay®
Connect an Apple CarPlay-compatible iPhone to the system. You can use the touchscreen
to make a phone call, listen to music, and more. Visit the Apple CarPlay website for more
information.
Park in a safe place before connecting your iPhone and launching any compatible apps.
1.
Connect the iPhone to the USB
port in the console
compartment (see page 80).
2.
Apple CarPlay requir
es you to send vehicle information to
your iPhone. On the consent screen, select Enable Once,
Always Enable, or Cancel. Your phone may prompt you to
allow access for CarPlay to be launched.
Home screen
Apple CarPlay
icon
Depending on use, Apple CarPlay can share certain vehicle information (e.g., vehicle location, speed, and other
operating conditions) with the connected iPhone. See Apple’s privacy policy for details regarding Apple’s use
and handling of data uploaded by CarPlay. Use of CarPlay is at user’s own risk, and is subject to agreement to
the CarPlay terms of use, which are included as part of the Apple iOS terms of use. CarPlay vehicle integration
is provided “as is,” and Acura cannot guarantee CarPlay operability or functionality now or in the future due
to, among other conditions, changes in CarPlay software/Apple iOS, service interruptions, or incompatibility
or obsolescence of vehicle-integrated hardware or software. See dealer for details. Use CarPlay only when
conditions allow you to do so safely. See your Owner’s Manual on the Owner Information CD or at owners.
acura.com (U.S.) or myacura.ca (Canada) for further license and warranty terms.
3. From the HOME screen, select Apple CarPlay.
4.
Select a menu option:
•
Phone: Access
your contacts, make phone calls, or listen
to voicemail. While connected to Apple CarPlay, calls can
only be made through Apple CarPlay, not through Bluetooth
HandsFreeLink.
•
Music: Play music stored on
your iPhone.
•
Maps: View a map and operate navigation
with route
guidance.
•
Messages: View and repl
y to text messages, or have
messages read to you aloud by the system. Apple CarPlay menu screen
Go back to
the Apple CarPlay
menu screen
Go back to the
home screen
Page 48 of 116

90 || 91
AUDIO AND CONNECTIVITYAUDIO AND CONNECTIVITY
Android Auto™
Connect a compatible Android phone to the system. You can use the touchscreen to make a
phone call, listen to music, and more. Visit the Android Auto website for more information.
Park in a safe place before connecting your smartphone and launching any compatible apps.
1.
Download the Android Auto
app to your phone.
2.
Connect the phone to
the USB port (see page 80).
The phone is automatically paired. A tutorial also appears.
3.
From the HOME scr
een, select Android Auto.
4.
Android Auto r
equires you to send vehicle information to
Google or its service providers. On the consent screen, select
Enable Once, Always Enable, or Cancel.
Android Auto icon
5. Select a menu option.
A.
Maps (Navigation): View Google Maps and
operate
navigation with route guidance. You cannot enter
destinations using the keyboard while the vehicle is
moving.
B.
Phone: Make phone calls or listen
to voicemail.
While connected to Android Auto, calls can only be
made through Android Auto, not through Bluetooth
HandsFreeLink.
C. HOME (Google Now): Display useful information organiz ed by Android Auto into
simple cards that appear only when needed.
D.
Music: Play music from compatible apps.
Select this icon to switch between music apps.
E.
Return to HOME screen:
Go back to the vehicle system HOME screen.
F.
Voice: Use
voice commands via Google Voice Search to operate Android Auto. You can
also press and hold the Talk button on the steering wheel (see page 101) to say voice
commands.
Depending on use, Android Auto can share certain vehicle information (e.g., vehicle location, speed, and other
operating conditions) with Google and its service providers. See Google privacy policy for details regarding
Google’s use and handling of data uploaded by Android Auto. Use of Android Auto is at user’s own risk, and
is subject to agreement to the Android Auto terms of use, which are presented to the user when the Android
Auto application is downloaded to the user’s Android phone. Android Auto vehicle integration is provided
“as is,” and Honda cannot guarantee Android Auto operability or functionality now or in the future due to,
among other conditions, changes in Android Auto software/Android operating system, service interruptions,
or incompatibility or obsolescence of vehicle-integrated hardware or software. See dealer for details. Only use
Android Auto when conditions allow you to do so safely. See your Owner’s Manual on the Owner Information
CD or at owners.honda.com (U.S.) or myhonda.ca (Canada) for further license and warranty terms.
A B C D E
F
Model with navigation shown
 1
1 2
2 3
3 4
4 5
5 6
6 7
7 8
8 9
9 10
10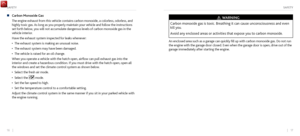 11
11 12
12 13
13 14
14 15
15 16
16 17
17 18
18 19
19 20
20 21
21 22
22 23
23 24
24 25
25 26
26 27
27 28
28 29
29 30
30 31
31 32
32 33
33 34
34 35
35 36
36 37
37 38
38 39
39 40
40 41
41 42
42 43
43 44
44 45
45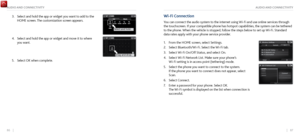 46
46 47
47 48
48 49
49 50
50 51
51 52
52 53
53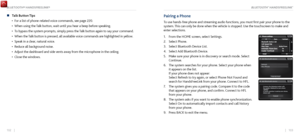 54
54 55
55 56
56 57
57 58
58 59
59 60
60 61
61 62
62 63
63 64
64 65
65 66
66 67
67 68
68 69
69 70
70 71
71 72
72 73
73 74
74 75
75 76
76 77
77 78
78 79
79 80
80 81
81 82
82 83
83 84
84 85
85 86
86 87
87 88
88 89
89 90
90 91
91 92
92 93
93 94
94 95
95 96
96 97
97 98
98 99
99 100
100 101
101 102
102 103
103 104
104 105
105 106
106 107
107 108
108 109
109 110
110 111
111 112
112 113
113 114
114 115
115