Page 65 of 116

124 || 125
DRIVINGNAVIGATION
n Traffic
View traffic flow and incidents in select metr
o areas. Traffic alerts are accompanied by an
audible beep. Pop-up messages and traffic information can be viewed when you are on the
map screen. You can also select traffic to avoid. Traffic coverage is limited in Canada.
Viewing traffic
1.
From the map scr
een, select the traffic icon.
2.
Select Traffic Conditions.
3.
Traffic icons are shown on
the map. Select the magnifying
glass icon to display a full list of traffic delays.
To mute traffic alerts and voice guidance: From the map screen, press MENU. Select Mute.
To lower voice guidance volume, see page 117.
Avoiding traffic on your route
1.
From the map scr
een, select the traffic icon.
2.
Select Traffic on R
oute.
3.
Select an incident to avoid fr
om the list.
4. Select the menu icon.
5.
Select Avoid.
DRIVING
Learn about preparation for driving and other features.
Before Driving
n Break In
Avoid har d braking for the first 200 miles (300 km). You should also follow this
recommendation when the brake pads are replaced.
n
Exterior Checks
Make sure ther
e are no obstructions on the windows, door mirrors, exterior lights, or other
parts of the vehicle.
Remove any frost, snow, or ice.
Make sure the hood and hatch are securely closed.
Heat from the engine and exhaust can ignite flammable materials in the engine
compartment, causing a fire. If you’ve parked your vehicle for an extended period, inspect
and remove any debris that may have collected, such as dried grass and leaves that have
fallen or have been carried in for use as a nest by a small animal. Also check for leftover
flammable materials after you or someone else has performed maintenance on your vehicle.
Make sure the tires are in good condition.
Make sure there are no people or objects behind or around the vehicle.
Page 66 of 116

126 || 127
DRIVINGDRIVING
If the doors are frozen shut, use warm water around the door edges to melt any ice. Do not
try to force them open, as this can damage the rubber trim around the doors. When done,
wipe dry to avoid further freezing.
NOTICE
n
Interior Checks
Store or secure all items
on board properly.
Do not pile items higher than the seat height.
Do not place anything in the footwells. Make sure to secure the floor mats.
If you have any animals on board, do not let them move freely in the vehicle.
Securely close and lock both doors.
Adjust your seating position, mirrors, and steering wheel properly.
Everyone in the vehicle must fasten their seat belt.
Make sure that the indicators in the instrument panel come on when you start the vehicle,
and go off soon after.
Improper accessories or modifications can affect your vehicle’s handling,
stability, and performance, and cause a crash in which you can be seriously hurt
or killed.
Follow all instructions in the vehicle owner’s manual regarding accessories and
modifications.
WARNING
Maximum Load Limit
Carrying too much cargo or improperly storing it can affect your vehicle’s handling, stability,
stopping distance, and tires, and make it unsafe.
The maximum load for your vehicle is 507 lbs (230 kg). See the Tire and Loading Information
label on the driver’s doorjamb. The maximum load in the trunk is 100 lbs (45 kg).
The vehicle maximum load includes the total weight of all occupants, cargo,
accessories, and the tongue load if you are towing a trailer. Below are the steps for
determining the correct load limit:
1. Locate the statement “The combined weight of occupants and cargo should never exceed
XXX kg or XXX lbs.” on your vehicle’s placard.
2.
Determine the combined weight of the driver
and passengers that will be riding in your
vehicle.
3.
Subtract the combined weight of the driver
and passengers from XXX kg or XXX lbs.
4.
The resulting figure equals
the available amount of cargo and luggage load capacity. For
example, if the “XXX” amount equals 1,400 lbs. and there will be five 150 lb. passengers in
your vehicle, the amount of available cargo and luggage load capacity is 650 lbs. (1,400 -
750 (5 x 150) = 650 lbs.)
High Voltage Battery Maintenance
All batteries discharge if not used. For best battery life and capacity, drive your vehicle for at
least 30 minutes, at least once every three months. Try to avoid parking under direct summer
sun. For battery maintenance while storing the vehicle, see page 207.
Page 67 of 116
 100 lbs
Passenger Weight
150 lbs x 1 + 257 lbs = 407 lbs (68 kg x 1 + 117 kg = 185 kg) (45 kg) Max Cargo Weig")
128 || 129
DRIVINGDRIVING
Load Limits Example
Example1 Max Load 507 lbs
(230 kg) 100 lbs
Passenger Weight
150 lbs x 1 + 257 lbs = 407 lbs (68 kg x 1 + 117 kg = 185 kg) (45 kg) Max Cargo Weight
Example2 Max Load (230 kg)507 lbs
100 lbs
(45 kg)
Pass
enger Weight
150 lbs x 2 + 107 lbs = 407 lbs (68 kg x 2 + 49 kg = 185 kg) Max Cargo Weight
Overloading or improper loading can affect handling and stability and cause a crash
in which you can be hurt or killed.
Follow all load limits and other loading guidelines in this guide.
WARNING
The headlight aim on your vehicle was set by the factory and does not need to be adjusted.
However, if you regularly carry heavy items in the cargo area, have the aiming readjusted at
your authorized Acura NSX dealer or by a qualified technician.
5.
Determine the combined weight of luggage and car
go being loaded on the vehicle. That
weight may not safely exceed the available cargo and luggage load capacity calculated in
step 4.
6.
If your vehicle
will be towing a trailer, load from your trailer will be transferred to your
vehicle. Consult the Owner’s Manual to determine how this reduces the available cargo and
luggage load capacity of your vehicle.
In addition, the total weight of the vehicle, all occupants, accessories, cargo, and
trailer tongue load must not exceed the Gross Vehicle Weight Rating (GVWR) or the
Gross Axle Weight Rating (GAWR). Both are on a label on the driver’s doorjamb.
Label Example
Your vehicle is not designed to tow a trailer. Attempting to do so can void your warranties.
Page 68 of 116

130 || 131
DRIVINGDRIVING
Starting to Drive
The keyless access system allows simple push-button start.
n
Before Starting the Engine
Check
that the parking brake is applied (pull up on the switch
and look for the indicator light), then depress the brake pedal.
Keep your foot firmly on the brake pedal when starting the
engine.
The engine will be harder to start in cold weather and in
thinner air found at altitudes above 8,000 feet (2,400
m). When starting the engine in cold weather, turn off all
electrical accessories such as the lights, climate control
system, and rear defogger in order to reduce battery drain.
The vehicle will not start if the High Voltage battery
temperature drops below -4F (-20C). Plan your driving and
storage appropriately if you expect this to happen.
Brake pedal
n Changing the Power Mode
Accessory
or On mode: Press the ENGINE START/STOP
button once without pressing the accelerator pedal for
Accessory mode. Press it again for On mode.
Starting the power system: Make sure the parking brake
is applied. Then, press the brake pedal while you press
the ENGINE START/STOP button once. Do not press the
accelerator.
•
When IDS is in QUIET mode: Whether the engine starts
depends on the
engine temperature and the charge in the
High Voltage batteries.
•
When IDS is in SPORT mode: The engine
will start.
Turning the power system off: Select Park (P), then press
the ENGINE START/STOP button.
Page 69 of 116
:
Used when parking or starting the power system.
Reverse (R): Used for r")
132 || 133
DRIVINGDRIVING
Shifting
Change your vehicle’s gears to begin driving.
n
Electronic Gear Selector
Park (P):
Used when parking or starting the power system.
Reverse (R): Used for reversing.
Neutral (N): Used to disengage the transmission from the
engine and motor.
Drive (D/M): Toggles between Drive and Manual modes.
Drive is for automatic gear selection. Manual is for the driver
to shift gears sequentially.
The vehicle can roll away if left unattended without confirming that Park is
engaged.
Always keep your foot on the brake pedal until you have confirmed that (P) is
shown on the gear position indicator.
WARNING
When you change from D/M to R or vice versa, come to a complete stop and keep the
brake pedal depressed. Do not press the accelerator. Otherwise, you may damage the
transmission.
NOTICE n
Sequential Shift Mode
Use the paddle shifters to change gears
without removing your hands from the steering
wheel.
(-) Paddle shifter:
Pull to shift down to
a lower gear. (+) Paddle shifter:
Pull to shift up to a
higher gear.
Gear position indicator
Page 70 of 116

134 || 135
DRIVINGDRIVING
When the transmission is in D: The vehicle will go into the sequential mode momentarily, and
the gear selection indicator becomes more prominent. The sequential mode is automatically
canceled and the gear selection indicator returns to ordinary display under the following
conditions:
•
Hold the (+) paddle shifter for a few seconds.
•
Once you start trav
eling at a constant speed.
•
The vehicle comes to a complete stop.
•
When you change to another IDS mode.
The sequential mode automaticall
y shifts under following conditions:
•
Accelerator pedal depressed bey
ond the click.
•
Engine speed reaches near the tachometer
’s red zone.
•
Engine speed reaches idle speed while deceleration.
When
the transmission is in M: The vehicle will go into the sequential mode, and the gear
position indicator goes off and only the gear selection indicator is displayed. You can cancel this
mode by pressing the button, pulling the (+) paddle shifter for a few seconds or changing IDS
mode to QUIET. When the sequential mode is canceled, the display is changed from only the
gear selection indicator to both of the gear position indicator and the gear selection indicator.
The transmission automatically shifts up from 1st to 2nd and does not automatically shift up
between 2nd and 9th gear.Car Wash Mode
Follow the procedure below to keep the transmission in (N) when the power system is switched
off.
Begin with the power system on and your foot on the brake pedal.
1.
Press Neutral (N). Within two seconds, pr
ess and hold (N) for two seconds.
2.
Press the ENGINE ST
ART/STOP button. The vehicle goes into Accessory mode.
This mode lasts for 15 minutes before the gear changes to Park and the vehicle turns off.
We do not recommend using conveyor-style car washes.
Page 71 of 116

Choose a driving mode for your preference based on road conditions, vehicle speed, and
handling.
SPORT modeSPORT+ mode
Hold
QUIET mode")
136 || 137
DRIVINGDRIVING
Integrated Dynamics System (IDS)
Choose a driving mode for your preference based on road conditions, vehicle speed, and
handling.
SPORT modeSPORT+ mode
Hold
QUIET mode
IDS Mode Switch
TRACK mode
QUIET: Prioritizes EV operation and quiet sound. Engine speed is limited to 4000 rpm.
SPORT: Balances sport and touring driving performance for enjoyable everyday driving.
SPORT+: Offers heightened dynamic response. EV operation is eliminated.
TRACK: Provides maximum, consistent performance from all dynamic systems. In Sport+ mode,
turn and hold the IDS switch to engage this mode. VSA activity is reduced and the VSA indicator
lamp illuminates. This mode is for closed-course use only. See also page 150. n
Launch Control
The v
ehicle controls the engine and transmission response for maximum acceleration from
a stop. Launch control functions in TRACK mode, with VSA turned on. See also page 150.
This feature should be used only in closed-course settings.
To engage launch control:
1.
In Sport+ mode, turn and hold the IDS Mode
Switch to
engage TRACK mode.
2. Depress the brake pedal and change the gear selector
to D/M. Keep the pedal depressed.
3. Release the parking brake.
Page 72 of 116

138 || 139
DRIVINGDRIVING
4. Press the accelerator to the floor.
5.
When Launch Mode Ready appears in the Driver
Information Interface, r
elease the brake all at once.
To cancel Launch Mode, take your foot off the accelerator.
Using this system on public roads that are used by other vehicles and pedestrians
can result in a collision involving serious injury or death.
WARNING
Braking
Slow down or stop your vehicle, and keep it from moving when parked.
n
Foot Brake
Press the
brake pedal to slow down or stop your vehicle
from moving.
There are times you may hear brake squeal. This is a
characteristic of the high-performance braking system and is
not a malfunction.
Brake pedal
n Brake Assist System
During hard or emer
gency braking, the system increases braking force. The brake pedal may
move slightly or make a noise; this is normal. Continue to hold the brake pedal firmly down.
n
Anti-Lock Brake System (ABS)
During har
d or emergency braking, the system rapidly pumps the brakes to prevent wheel
lockup and help you maintain steering control. Do not pump the brake pedal, and continue
to firmly hold it down.
The ABS may not function correctly if you use an incorrect tire type and size.
NOTICE
 1
1 2
2 3
3 4
4 5
5 6
6 7
7 8
8 9
9 10
10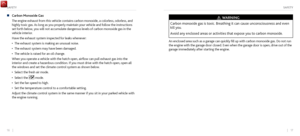 11
11 12
12 13
13 14
14 15
15 16
16 17
17 18
18 19
19 20
20 21
21 22
22 23
23 24
24 25
25 26
26 27
27 28
28 29
29 30
30 31
31 32
32 33
33 34
34 35
35 36
36 37
37 38
38 39
39 40
40 41
41 42
42 43
43 44
44 45
45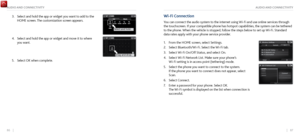 46
46 47
47 48
48 49
49 50
50 51
51 52
52 53
53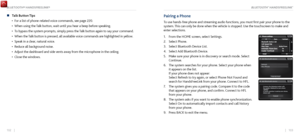 54
54 55
55 56
56 57
57 58
58 59
59 60
60 61
61 62
62 63
63 64
64 65
65 66
66 67
67 68
68 69
69 70
70 71
71 72
72 73
73 74
74 75
75 76
76 77
77 78
78 79
79 80
80 81
81 82
82 83
83 84
84 85
85 86
86 87
87 88
88 89
89 90
90 91
91 92
92 93
93 94
94 95
95 96
96 97
97 98
98 99
99 100
100 101
101 102
102 103
103 104
104 105
105 106
106 107
107 108
108 109
109 110
110 111
111 112
112 113
113 114
114 115
115