Page 57 of 114
For your safety – pre-operation checks
4-3
4
Chassis fasteners• Make sure that all nuts, bolts and screws are properly tightened.
• Tighten if necessary. —
Instruments, li ghts, si gnals
an d switches • Check operation.
• Correct if necessary.
—
Si destan d switch • Check operation of ignition circuit cut-off system.
• If system is not working correctly, have Yamaha dealer check vehicle. 3-36
ITEM CHECKS PAGE
U2PPE2E0.book Page 3 Tuesday, June 9, 2015 1:57 PM
Page 58 of 114

Operation and important rid ing points
5-1
5
EAU15952
Read the Owner’s Manual carefully to
become familiar with all controls. If
there is a control or function you do not
understand, ask your Yamaha dealer.
WARNING
EWA10272
Failure to familiarize yourself with
the controls can lead to loss of con-
trol, which coul d cause an acci dent
or injury.
EAU48712
TIPThis model is equipped with: a lean angle sensor to stop the en-
gine in case of a turnover. In this
case, the display will indicate error
code 30, but this is not a malfunc-
tion. Turn the key to “OFF” and
then to “ON” to clear the error co-
d e . F ai l in g to do s o wi ll pr e v e nt the
engine from starting even though
the engine will crank when push-
ing the start switch.
an engine auto-stop system. The
engine stops automatically if left
idling for 20 minutes. If the engine
stops, simply push the start
switch to restart the engine.
EAU63090
Startin g the en gineIn order for the ignition circuit cut-off
system to enable starting, one of the
following conditions must be met:
The transmission is in the neutral
position.
The transmission is in gear with
the clutch lever pulled and the
sidestand up.
See page 3-37 for more informa-
tion.
1. Turn the key to “ON” and make sure that the start/engine stop
switch is set to “ ”.
The following warning lights and
indicator lights should come on for
a few seconds, then go off. Oil level warning light
Engine trouble warning light
Traction control system indi-
cator/warning light
Immobilizer system indicator
lightNOTICE
ECA11834
If a warnin g or in dicator li ght does
not come on initially when the key is
turne d to “ON”, or if a warning or in-
U2PPE2E0.book Page 1 Tuesday, June 9, 2015 1:57 PM
Page 59 of 114

Operation and important ri din g points
5-2
5
d
icator li ght remains on, see pa ge
3-4 for the correspon din g warnin g
an d in dicator li ght circuit check.
The ABS warning light should
come on when the key is turned to
“ON”, and then go off after travel-
ing at a speed of 10 km/h (6 mi/h)
or higher.
NOTICE
ECA17682
If the ABS warnin g li ght does not
come on an d then go off as ex-
plaine d a bove, see pa ge 3-4 for the
warnin g li ght circuit check.2. Shift the transmission into the
neutral position. The neutral indi-
cator light should come on. If not,
ask a Yamaha dealer to check the
electrical circuit.
3. Start the engine by pushing the “ ” side of the start/engine
stop switch.
If the engine fails to start, release
the start/engine stop switch, wait
a few seconds, and then try again.
Each starting attempt should be
as short as possible to preserve the battery. Do not crank the en-
gine more than 10 seconds on any
one attempt.
NOTICE
ECA11043
For maximum en
gine life, never ac-
celerate har d when the en gine is
col d!
EAU16673
Shiftin gShifting gears lets you control the
amount of engine power available for
starting off, accelerating, climbing hills,
etc.
The gear positions are shown in the il-
lustration.TIPTo shift the transmission into the neu-
tral position, press the shift pedal down
repeatedly until it reaches the end of its
travel, and then slightly raise it.1. Shift pedal
2. Neutral position
1
N
2 3
4
5
6
1
2
U2PPE2E0.book Page 2 Tuesday, June 9, 2015 1:57 PM
Page 60 of 114

Operation and important rid ing points
5-3
5
NOTICE
ECA10261
Even with the transmission in
the neutral position, do not
coast for lon g period s of time
with the en gine off, an d d o not
tow the motorcycle for lon g d is-
tances. The transmission is
properly lu bricated only when
the en gine is runnin g. Ina de-
quate lu brication may damag e
the transmission.
Always use the clutch while
chan gin g g ears to avoi d d am-
a g in g the en gine, transmission,
an d d rive train, which are not
d esi gne d to withstan d the
shock of force d shifting .
EAU16682
To start out an d accelerate
1. Pull the clutch lever to disengage the clutch.
2. Shift the transmission into first gear. The neutral indicator light
should go out.
3. Open the throttle gradually, and at the same time, release the clutch
lever slowly. 4. At the recommended shift points
shown in the following table, close
the throttle, and at the same time,
quickly pull the clutch lever in.
5. Shift the transmission into second gear. (Make sure not to shift the
transmission into the neutral posi-
tion.)
6. Open the throttle part way and gradually release the clutch lever.
7. Follow the same procedure when shifting to the next higher gear.
TIPWhen shifting gears in normal operat-
ing conditions, use the recommended
shift points.
EAU58270
To decelerate
1. Release the throttle and apply both the front and the rear brakes
smoothly to slow the motorcycle.
2. At the recommended shift points shown in the following table, shift
to a lower gear.
3. When the motorcycle reaches 25 km/h (16 mi/h), the engine is about
to stall or runs roughly, pull the clutch lever in, use the brakes to
slow the motorcycle, and continue
to downshift as necessary.
4. Once the motorcycle has stopped, the transmission can be
shifted into the neutral position.
The neutral indicator light should
come on and then the clutch lever
can be released.
WARNING
EWA17380
Improper brakin g can cause
loss of control or traction. Al-
ways use b oth brakes an d apply
them smoothly.
Make sure that the motorcycle
and the en gine have sufficiently
slowe d b efore shiftin g to a low-
er gear. En gag in g a lower gear
when the vehicle or en gine
speed is too hi gh coul d make
the rear wheel lose traction or
the en gine to over-rev. This
coul d cause loss of control, an
acci dent an d injury. It coul d also
cause en gine or drive train dam-
a g e.
U2PPE2E0.book Page 3 Tuesday, June 9, 2015 1:57 PM
Page 61 of 114

Operation and important ri din g points
5-4
5
EAU64150
Recommen ded shift points
The recommended shift points during
acceleration and deceleration are
shown in the table below.
EAU16811
Tips for re ducin g fuel con-
sumptionFuel consumption depends largely on
your riding style. Consider the follow-
ing tips to reduce fuel consumption:
Shift up swiftly, and avoid high en-
gine speeds during acceleration.
Do not rev the engine while shift-
ing down, and avoid high engine
speeds with no load on the en-
gine.
Turn the engine off instead of let-
ting it idle for an extended length
of time (e.g., in traffic jams, at traf-
fic lights or at railroad crossings).
EAU16842
Engine break-inThere is never a more important period
in the life of your engine than the period
between 0 and 1600 km (1000 mi). For
this reason, you should read the fol-
lowing material carefully.
Since the engine is brand new, do not
put an excessive load on it for the first
1600 km (1000 mi). The various parts in
the engine wear and polish themselves
to the correct operating clearances.
During this period, prolonged full-throt-
tle operation or any condition that
might result in engine overheating
must be avoided.
EAU63170
0–1000 km (0–600 mi)
Avoid prolonged operation above 5600
r/min. NOTICE: After 1000 km (600
mi) of operation, the en gine oil must
b e chan ged an d the oil filter car-
tri dge or element replace d.
[ECA10303]
1000–1600 km (600–1000 mi)
Avoid prolonged operation above 6800
r/min.
Shift up points:
1st → 2nd: 20 km/h (12 mph)
2nd → 3rd: 30 km/h (19 mph)
3rd → 4th: 40 km/h (25 mph)
4th → 5th: 50 km/h (31 mph)
5th → 6th: 60 km/h (37 mph)
Shift down points:
6th → 5th: 45 km/h (28 mph)
5th → 4th: 35 km/h (22 mph)
4th → 3rd: 25 km/h (16 mph)
U2PPE2E0.book Page 4 Tuesday, June 9, 2015 1:57 PM
Page 62 of 114
Operation and important rid ing points
5-5
5 1600 km (1000 mi) an
d b eyon d
The vehicle can now be operated nor-
mally.
NOTICE
ECA20190
Keep the en gine spee d out of
the tachometer hi gh-rpm zone.
If any en gine trou ble shoul d oc-
cur durin g the eng ine break-in
period , imme diately have a
Yamaha dealer check the vehi-
cle.
EAU17214
Parkin gWhen parking, stop the engine, and
then remove the key from the main
switch.
WARNING
EWA10312
Since the en gine an d exhaust
system can become very hot,
park in a place where pe destri-
ans or chil dren are not likely to
touch them and b e burne d.
Do not park on a slope or on soft
groun d, otherwise the vehicle
may overturn, increasin g the
risk of a fuel leak an d fire.
Do not park near grass or other
flammab le materials which
mi ght catch fire.
U2PPE2E0.book Page 5 Tuesday, June 9, 2015 1:57 PM
Page 63 of 114

Periodic maintenance an d a djustment
6-1
6
EAU17246
Periodic inspection, adjustment, and
lubrication will keep your vehicle in the
safest and most efficient condition
possible. Safety is an obligation of the
vehicle owner/operator. The most im-
portant points of vehicle inspection,
adjustment, and lubrication are ex-
plained on the following pages.
The intervals given in the periodic
maintenance charts should be simply
considered as a general guide under
normal riding conditions. However, de-
pending on the weather, terrain, geo-
graphical location, and individual use,
the maintenance intervals may need to
be shortened.
WARNING
EWA10322
Failure to properly maintain the vehi-
cle or performin g maintenance ac-
tivities incorrectly may increase
your risk of injury or death during
service or while usin g the vehicle. If
you are not familiar with vehicle ser-
vice, have a Yamaha d ealer perform
service.
WARNING
EWA15123
Turn off the en gine when performin g
maintenance unless otherwise
specified .
A runnin g en gine has movin g
parts that can catch on b ody
parts or clothin g an d electrical
parts that can cause shocks or
fires.
Runnin g the eng ine while ser-
vicin g can lead to eye injury,
b urns, fire, or car bon monoxi de
poisonin g – possi bly lea din g to
d eath. See pag e 1-3 for more in-
formation a bout car bon monox-
i d e.
WARNING
EWA15461
Brake discs, calipers, drums, an d
linin gs can b ecome very hot during
use. To avoi d possi ble burns, let
b rake components cool before
touching them.
EAU17303
Emission controls not only function to
ensure cleaner air, but are also vital to
proper engine operation and maximum
performance. In the following periodic
maintenance charts, the services relat-
ed to emissions control are grouped
separately. These services require
specialized data, knowledge, and
equipment. Maintenance, replace-
ment, or repair of the emission control
devices and systems may be per-
formed by any repair establishment or
individual that is certified (if applicable).
Yamaha dealers are trained and
equipped to perform these particular
services.
U2PPE2E0.book Page 1 Tuesday, June 9, 2015 1:57 PM
Page 64 of 114
Periodic maintenance an d a djustment
6-2
6
EAU59910
Owner’s tool kitThe owner’s tool kit is located under
the passenger seat. Some tools are
also located on the bottom of the pas-
senger seat. (See page 3-28.)
The service information included in this
manual and the tools provided in the
owner’s tool kit are intended to assist
you in the performance of preventive
maintenance and minor repairs. How-
ever, additional tools such as a torque
wrench may be necessary to perform
certain maintenance work correctly.
TIPIf you do not have the tools or experi-
ence required for a particular job, have
a Yamaha dealer perform it for you.
1. Owner’s tool kit
1
1
1
U2PPE2E0.book Page 2 Tuesday, June 9, 2015 1:57 PM
 1
1 2
2 3
3 4
4 5
5 6
6 7
7 8
8 9
9 10
10 11
11 12
12 13
13 14
14 15
15 16
16 17
17 18
18 19
19 20
20 21
21 22
22 23
23 24
24 25
25 26
26 27
27 28
28 29
29 30
30 31
31 32
32 33
33 34
34 35
35 36
36 37
37 38
38 39
39 40
40 41
41 42
42 43
43 44
44 45
45 46
46 47
47 48
48 49
49 50
50 51
51 52
52 53
53 54
54 55
55 56
56 57
57 58
58 59
59 60
60 61
61 62
62 63
63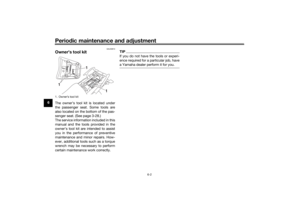 64
64 65
65 66
66 67
67 68
68 69
69 70
70 71
71 72
72 73
73 74
74 75
75 76
76 77
77 78
78 79
79 80
80 81
81 82
82 83
83 84
84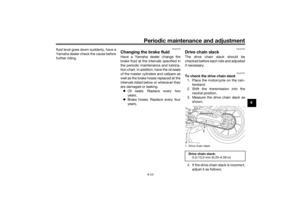 85
85 86
86 87
87 88
88 89
89 90
90 91
91 92
92 93
93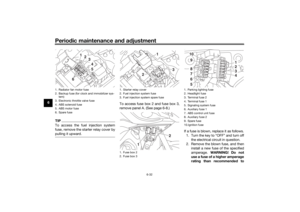 94
94 95
95 96
96 97
97 98
98 99
99 100
100 101
101 102
102 103
103 104
104 105
105 106
106 107
107 108
108 109
109 110
110 111
111 112
112 113
113
 an
d b eyon d
The vehicle can now be operated nor-
mally.
NOTICE
ECA20190
Keep the en gine spee d out of
the tachometer hi gh-rpm zon")
