2016 VOLVO XC90 T8 change time
[x] Cancel search: change timePage 5 of 546

3
Starting or moving a vehicle in safety mode88
Airbag system 89
Driver/passenger side airbags 89
Inflatable curtains 92
Side impact airbags 93
INSTRUMENTS AND CONTROLS
Trip computer96
Displaying trip computer information 97
Displaying trip statistics 98
HomeLink ®
Wireless Control System *99
Programming the HomeLink ®
Wire-
less Control System * 100
Instruments and controls 103
Adjusting the power door mirrors 105
Laminated panoramic roof *
106
Operating the laminated panoramic roof *
107
Power windows 109
Operating the power windows 109
Rearview mirror 110
Using sun shades 111
Settings view 111
Categories in Settings view 112
Changing system settings in Set- tings view 114
Changing settings in apps 115
Resetting the settings view 115
Resetting user data when the vehiclechanges owners 116
Ambient temperature sensor 116
Clock 117
Head-up display (HUD) *
117
Voice control
120
Using voice commands 121
Voice control for cell phones 122
Voice control for radio and media 122
Climate system voice commands 123
Navigation system voice commands 124
Voice control settings 125
Indicator symbols in the instrument panel 125
Instrument panel 127
Instrument panel App menu 129
Hybrid-related information in the instrument panel 130
Instrument panel licenses 132
Warning symbols in the instrument panel 137
Compass 139
Calibrating the compass 139
Lighting panel and controls 140
Low beam headlights 142
Daytime Running Lights (DRL) 142
High and low beam headlights 143
Active Bending Lights *
145
Brake lights 146
Rear fog lights 146
Hazard warning flashers 147
Parking lights 147
Page 20 of 546

||
INTRODUCTION
18
Electrical current for charging the hybrid bat- tery
Electric motor for powering the rear wheels
Hybrid battery
Drive modes (change in the center display or by using the drive mode control in the tunnelconsole)
Instrument panel showing unique hybrid-rela- ted information
WARNING
Please be aware that there is no sound from the engine when the vehicle is being poweredby the electric motor and it may be difficult todetect by children, pedestrians, cyclists andanimals. This is especially true at low speeds.
High-voltage electrical current
WARNING
A number of electrical components in the XC90 T8 Twin Engine Plug-in Hybrid usehigh-voltage current and can be extremelydangerous if handled incorrectly. These com-ponents and any orange wiring in the vehiclemay only be handled by trained and qualifiedVolvo service technicians.
Hybrid-unique functions
Drive modes
Different drive modes can be selected while driv- ing, e.g., electric power only or a combination ofelectric and gasoline power. The vehicle calcu-lates the optimal combination of drivability, drivingexperience, environmental impact and fuel econ-omy for the selected drive mode. See also thearticle "Drive modes" for additional information.
Instrument panel
In certain driving situations, hybrid-unique infor- mation may be displayed in the instrument panel,such as: a hybrid battery gauge (current chargelevel), the current drive mode, a symbol that illu-minates when the gasoline engine is being used,a Hybrid Guide and the level of energy regenera-tion.
Preconditioning
In order to function optimally, the hybrid battery (and its related electrical systems) and the gaso-line engine (and its drive systems) should be atthe correct operating temperature. The hybridbattery's capacity is reduced considerably if it istoo cold or hot. Preconditioning prepares thevehicle's drive systems and passenger compart-ment before the vehicle is driven to help reducewear and energy consumption.
Charging the hybrid battery
CAUTION
Never connect the charging cable if there is a risk of thunderstorms/lightning.
The XC90 T8 Twin Engine Plug-in Hybrid uses a lithium-ion battery that can be charged in severalways:
• A charging cable can be connected from the vehicle to a 110-volt AC socket. Chargingtime depends on the strength of the current.
• When the brakes are applied lightly, the elec-tric motor is used for engine braking, duringwhich the vehicle's kinetic energy is conver-ted into electric current that is used to helprecharge the hybrid battery.
• The hybrid battery is also recharged to a cer-tain extent when the gasoline engine is inoperation.
Related information
•Drive modes (p. 390)
• Hybrid-related information in the instrumentpanel (p. 130)
• Charging the hybrid battery (p. 383)
Page 28 of 546

INTRODUCTION
26
Options, accessories and the On- board Diagnostic (OBDII) socket We strongly recommend that Volvo owners install only genuine, Volvo-approved accesso-ries, and that accessory installations be per-formed only by a trained and qualified Volvoservice technician.
Optional or accessory equipment described in this manual is indicated by an asterisk. Optional or accessory equipment may not be available in all countries or markets. Please notethat some vehicles may be equipped differently,depending on special legal requirements. Contact your Volvo retailer for additional informa- tion.
NOTE
• Do not export your Volvo to another country before investigating that coun-try's applicable safety and exhaust emis-sion requirements. In some cases it maybe difficult or impossible to comply withthese requirements. Modifications to theemission control system(s) may renderyour Volvo not certifiable for legal opera-tion in the U.S., Canada and other coun-tries.
• All information, illustrations and specifica-tions contained in this manual are basedon the latest product information availa-ble at the time of publication. Please notethat some vehicles may be equipped dif-ferently, depending on market-specificadaptations or special legal requirements.Optional equipment described in thismanual may not be available in all mar-kets.
• Some of the illustrations shown aregeneric and are intended as examplesonly, and may not depict the exact modelfor which this owner's information isintended.
• Volvo reserves the right to make modeland product changes at any time, or tochange specifications or design withoutnotice and without incurring obligation.
WARNING
If your vehicle is involved in an accident, unseen damage may affect its drivability andsafety.
WARNING
CALIFORNIA proposition 65 Engine exhaust, some of its constituents, and certain vehicle components contain or emitchemicals known to the state of California tocause cancer, and birth defects or otherreproductive harm. In addition, certain fluidscontained in vehicles and certain products ofcomponent wear contain or emit chemicalsknown to the State of California to cause can-cer, and birth defects or other reproductiveharm.
WARNING
Certain components of this vehicle such as air bag modules, seat belt pretensioners, adap-tive steering columns, and button cell batter-ies may contain Perchlorate material. Specialhandling may apply for service or vehicle endof life disposal. See www.dtsc.ca.gov/hazardouswaste/ perchlorate.
• Genuine Volvo accessories are tested to ensure compatibility with the performance,safety, and emission systems in your vehicle.Additionally, a trained and qualified Volvo
Page 39 of 546

INTRODUCTION
}}
37
Several buttons (depending on the context for which the keyboard is being used) will bedisplayed here. In certain cases, it can be used to enter @, .com or to start a new line.
Press to hide the keyboard. In cases where this is not possible, the button will not be dis-played.
Tap once to enter one uppercase letter.
Double-tap for Caps lock (tap again to
return to lowercase letters). Letters entered after the !, . and ? characters will automati-cally be uppercase. The first letter in the textfield or in text fields intended for names,addresses or company names will also auto-matically be uppercase. The first letter in textfields intended for passwords, webaddresses or email addresses will automati-cally be lowercase unless upper case ischosen.
Press to display the numbers that can be entered. When numbers are displayed, tap
to resume entering text or to
enter special characters.
Tap to change the keyboard language (in this example, UK English is the selected lan-guage). The characters available will changeaccording to the selected language (2). Thisbutton will only be displayed if several key-board languages have been selected (seethe section "Changing keyboard languages" below). Tap to display a list of possible lan-guages and tap a language to use it.
Tap to enter blank spaces.
Tap to erase one character at a time.
Tap to enable handwriting. See the section "Handwritten text" below.
Entering text and performing searches using thekeyboard are done somewhat differently in thenavigation system. See the section "Filtering des-tination search results" below. Tap the button above the keyboard to confirm the text that has been entered (not shown in theillustration). This button's appearance differsdepending on the context.
Changing keyboard languagesIn order to change keyboard languages, they must first be selected under Settings.
The keyboard language can be changed without changing the language used for the other sys-tems/menus in the vehicle.
1. Pull down the center display's Top view and tap
Settings.
2. Tap
SystemKeyboard Layouts. 3. Select and one or more of the languages in
the list.
> The makes it possible to change the key-board layout and characters available depending on the language(s) selected.
When more than one languagehas been selected, this button (7)3
will appear on the key-
board.
To shift between keyboard languages:
1. Press and hold the button (7).
> A list will be displayed.
2. Tap the desired language. If more than four languages have been selected in
Settings,
scroll in the list.
> The keyboard layout and characters avail- able will change to the selected language.
3In the example illustration, the button shows "UK".
Page 40 of 546

||
INTRODUCTION
38
Special characters
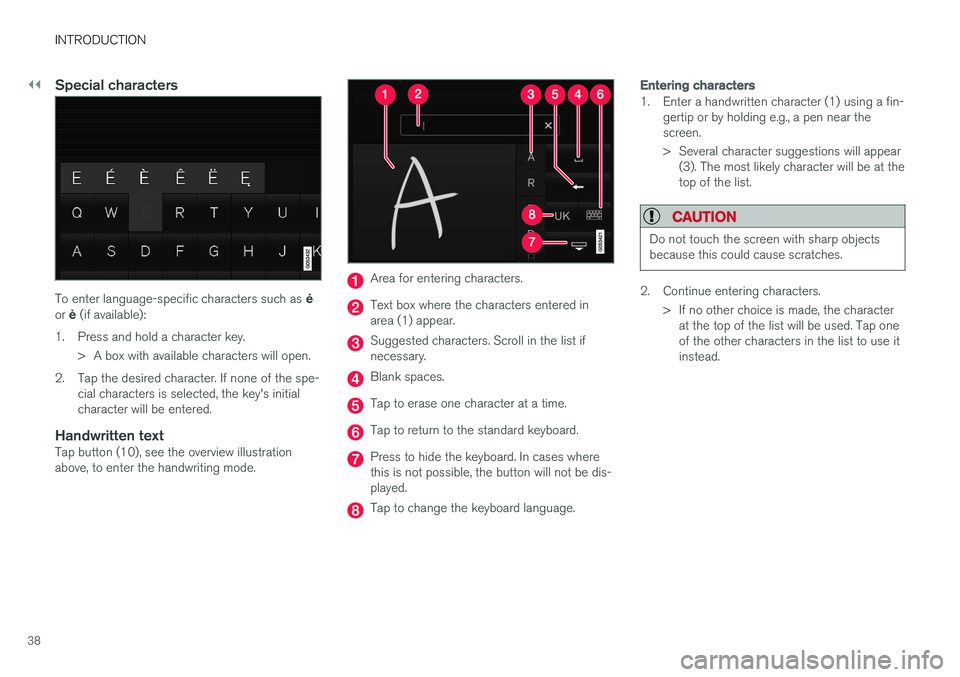
To enter language-specific characters such as é
or è (if available):
1. Press and hold a character key. > A box with available characters will open.
2. Tap the desired character. If none of the spe- cial characters is selected, the key's initial character will be entered.
Handwritten textTap button (10), see the overview illustrationabove, to enter the handwriting mode.
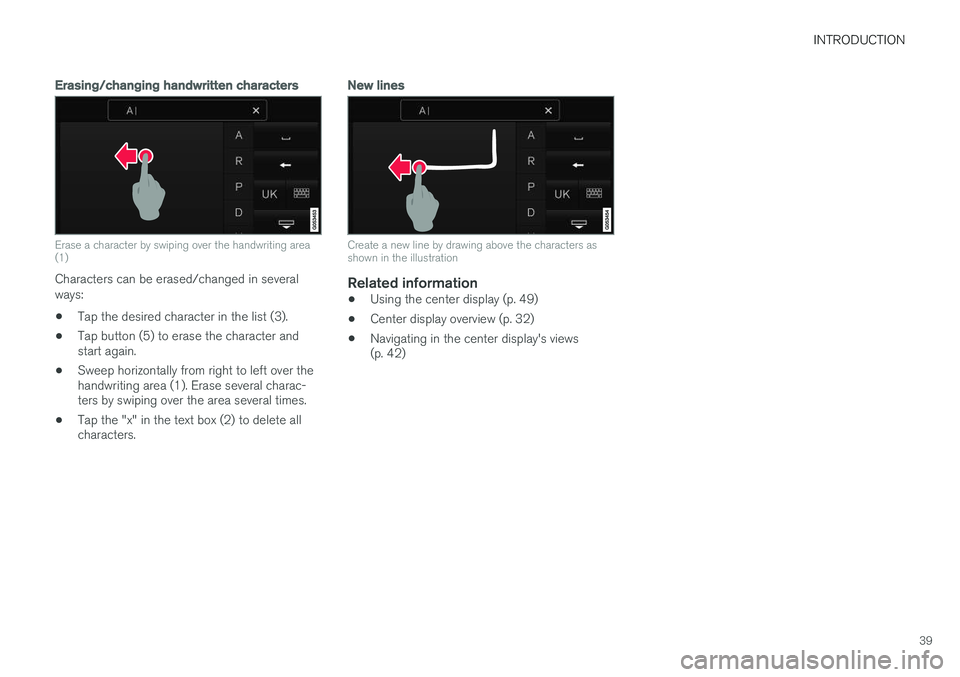
Area for entering characters.
Text box where the characters entered in area (1) appear.
Suggested characters. Scroll in the list if necessary.
Blank spaces.
Tap to erase one character at a time.
Tap to return to the standard keyboard.
Press to hide the keyboard. In cases where this is not possible, the button will not be dis-played.
Tap to change the keyboard language.
Entering characters
1. Enter a handwritten character (1) using a fin-gertip or by holding e.g., a pen near the screen.
> Several character suggestions will appear(3). The most likely character will be at the top of the list.
CAUTION
Do not touch the screen with sharp objects because this could cause scratches.
2. Continue entering characters.
> If no other choice is made, the characterat the top of the list will be used. Tap one of the other characters in the list to use itinstead.
Page 41 of 546

INTRODUCTION
39
Erasing/changing handwritten characters
Erase a character by swiping over the handwriting area (1)
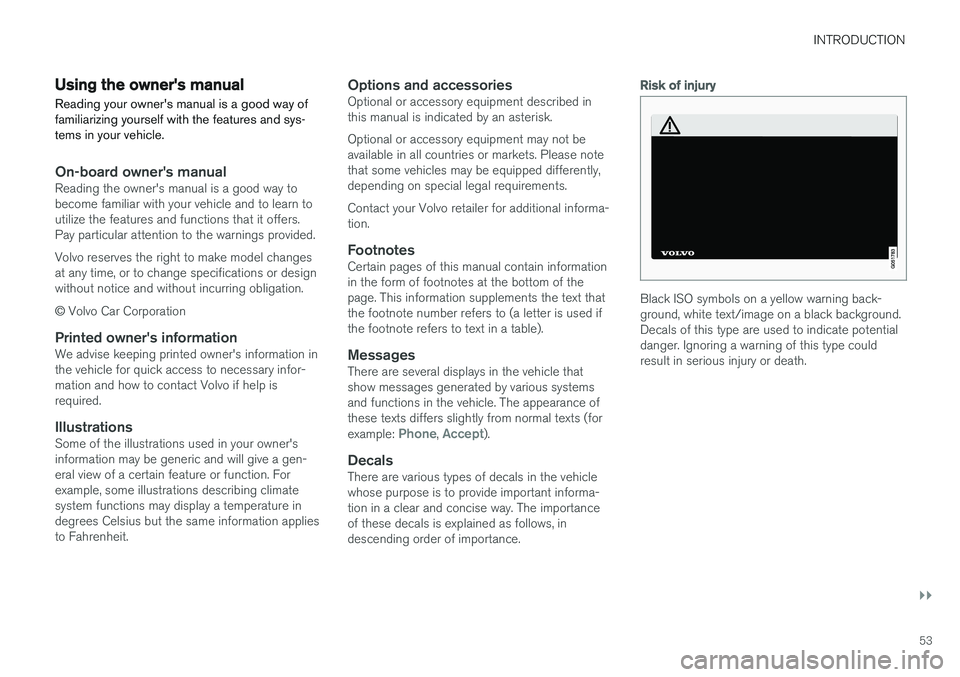
Characters can be erased/changed in several ways:
• Tap the desired character in the list (3).
• Tap button (5) to erase the character and start again.
• Sweep horizontally from right to left over thehandwriting area (1). Erase several charac-ters by swiping over the area several times.
• Tap the "x" in the text box (2) to delete allcharacters.
New lines
Create a new line by drawing above the characters as shown in the illustration
Related information
•
Using the center display (p. 49)
• Center display overview (p. 32)
• Navigating in the center display's views (p. 42)
Page 55 of 546

INTRODUCTION
}}
53
Using the owner's manualReading your owner's manual is a good way of familiarizing yourself with the features and sys-tems in your vehicle.
On-board owner's manualReading the owner's manual is a good way to become familiar with your vehicle and to learn toutilize the features and functions that it offers.Pay particular attention to the warnings provided. Volvo reserves the right to make model changes at any time, or to change specifications or designwithout notice and without incurring obligation. © Volvo Car Corporation
Printed owner's informationWe advise keeping printed owner's information in the vehicle for quick access to necessary infor-mation and how to contact Volvo if help isrequired.
IllustrationsSome of the illustrations used in your owner'sinformation may be generic and will give a gen-eral view of a certain feature or function. Forexample, some illustrations describing climatesystem functions may display a temperature indegrees Celsius but the same information appliesto Fahrenheit.
Options and accessoriesOptional or accessory equipment described inthis manual is indicated by an asterisk. Optional or accessory equipment may not be available in all countries or markets. Please notethat some vehicles may be equipped differently,depending on special legal requirements. Contact your Volvo retailer for additional informa- tion.
FootnotesCertain pages of this manual contain informationin the form of footnotes at the bottom of thepage. This information supplements the text thatthe footnote number refers to (a letter is used ifthe footnote refers to text in a table).
MessagesThere are several displays in the vehicle thatshow messages generated by various systemsand functions in the vehicle. The appearance ofthese texts differs slightly from normal texts (for example:
Phone, Accept).
DecalsThere are various types of decals in the vehicle whose purpose is to provide important informa-tion in a clear and concise way. The importanceof these decals is explained as follows, indescending order of importance.
Risk of injury
Black ISO symbols on a yellow warning back- ground, white text/image on a black background.Decals of this type are used to indicate potentialdanger. Ignoring a warning of this type couldresult in serious injury or death.
Page 98 of 546

INSTRUMENTS AND CONTROLS
96
Trip computer The trip computer registers and calculates infor- mation such as distance driven, fuel consump-tion and average speed. This information is dis-played in the instrument panel.
To help promote fuel efficient driving, the trip computer provides readings for current and aver-age fuel consumption. The trip computer includes the following gauges:
• Trip odometers
• Odometer
• Current fuel consumption
• Distance to empty
• Tourist (alternative speedometer)
Trip odometerThere are two trip odometers: TM and TA. During a drive, the trip odometer registers:
• Mileage
• Driving time
• Average speed
• Average fuel consumption
The values displayed are those since the lasttime the trip odometer was reset.
OdometerThe odometer registers the vehicle's total mile-age and cannot be reset.
Current fuel consumptionThis gauge shows the current fuel consumption.This reading is updated once a second.
Distance to emptyThis function shows the approximate distancethat can be driven on the fuel remaining in thetank. The calculation is based on average fuel con- sumption during the last 20 miles (30 km) ofdriving and the amount of fuel remaining in thetank. When the gauge displays "----", there is very little useable fuel remaining in the tank; refuel as soonas possible. The accuracy of this figure may vary if your driv-ing style changes. An economical driving style willgenerally increase this distance.
Distance to discharged batteryThis gauge shows the approximate distance thatcan be driven on the charge remaining in thehybrid battery. When the gauge displays "----"there is no guaranteed driving charge remainingin the battery. This calculation is based on the average electrical current consumption in a normally loaded vehicleduring normal driving, and whether the A/C is onor off. An economical driving style will generally increase this distance.
Distance using the electric motor
To get the optimal driving distance using the electric motor, it is essential to conserve current.Functions that use a great deal of current (e.g.,audio system, electrical heating in the steeringwheel/door mirrors/rear window/seats, very coldair from the climate system, etc.) reduce the pos-sible driving distance.
NOTE
In addition to high electrical consumption in the passenger compartment, fast accelera-tion, sudden braking, heavy loads, low ambienttemperatures and driving up hills can reducethe possible driving distance.