2016 VOLVO XC90 T8 change time
[x] Cancel search: change timePage 163 of 546

INSTRUMENTS AND CONTROLS
}}
* Option/accessory, for more information, see Introduction.161
Adjusting the steering wheel
The steering wheel can be adjusted to various positions.
Adjusting the steering wheel
Lever for releasing/locking the steering wheel
Possible positions
The steering wheel's height and reach can be adjusted. To do so:
1. Push the lever down to release the steering wheel.
2. Adjust the steering wheel to a suitable posi- tion.
3. Pull back the lever to lock the steering wheel in place. If the lever is difficult to pull into place, press the steering wheel lightly at thesame time as you pull the lever.
WARNING
Never adjust the steering wheel while driving.
If the vehicle is equipped with the optional speed-dependent power steering, the level ofsteering force can be adjusted. The force level isadjusted according to the vehicle's speed.
Related information
• Steering wheel (p. 160)
• Adjustable steering force
* (p. 323)
Seats
The vehicle is equipped with 7 seats. The front seats can be adjusted electroncially or manually.The second and third row seats are adjusted pri-marily manually.
The adjustment settings for the power front seats *, door mirrors and the head-up display can
be stored in memory buttons. Using the multi-function control *, comfort in the
front seats can be further enhance by e.g., adjust- ing the lumbar support or extending the length ofthe front seat cushion. The rear seats can be folded down and their head restraints can be adjusted. The second rowseats can be moved forward/rearward and theirbackrest tilt can also be changed.
Related information
• Adjusting power front seats
* (p. 163)
• Adjusting function settings in the multifunc- tional front seats
* (p. 166)
• Manually operated front seats (p. 162)
• Using the power seat memory function
*
(p. 164)
• Folding the second row backrests (p. 172)
• Getting into and out of the third row of seats (p. 174)
Page 165 of 546

INSTRUMENTS AND CONTROLS
* Option/accessory, for more information, see Introduction.163
Power front seats*
The power front seats offer a number of adjust- ment possibilities to help maximize comfort andergonomics.
The power seats have an overload protector that
activates if a seat is blocked by any object. If this occurs, put the ignition in mode I or 0 and wait
for a short period before operating the seat again. The power seat(s) can be adjusted for a short period after unlocking the door with the remotekey without switching the ignition on. Seat adjust-ment can always be made when the engine isrunning.
Related information
• Multifunctional front seats
* (p. 165)
• Adjusting power front seats
* (p. 163)
• Using the power seat memory function
*
(p. 164)
• Manually operated front seats (p. 162)
• Turning seat heating
* on and off (p. 199)
• Turning front seat ventilation
* on and off
(p. 200)
• Easy access to and from the driver seat (p. 169)
Adjusting power front seats
*
The power front seat(s) can be adjusted to many positions to help improve comfort and ergonom-ics.
Adjust lumbar support by pressing the con- trol up/down/forward/rearward
Raise/lower the front edge of the seat cush- ion by moving the control up/down
Raise/lower the seat by moving the control up/down
Move the seat forward/rearward by moving the control forward/rearward
Change backrest tilt by moving the control forward/rearward
Only one of the power seat's controls can beused at the same time. The front seat backrests can be folded down completely.
Related information
• Power front seats
* (p. 163)
• Using the power seat memory function
*
(p. 164)
• Multifunctional front seats
* (p. 165)
• Seat belts (p. 64)
Page 166 of 546
INSTRUMENTS AND CONTROLS
* Option/accessory, for more information, see Introduction.
164
Adjusting the passenger's seat from the driver's seat *
Using the controls on the side of the driver's seat, the driver can adjust the position of thefront passenger's seat.
Activating the function in the center
display
From the center display, the function can be acti- vated in two ways. After activating the function, adjust the passeng- er's seat within 10 seconds . If no adjustments
are made in that time span, the function deacti- vates automatically.
Activating from Function view
1. Go to the center display's Function view. 2. Activate the function by tapping
Adjust
passenger seat.
Activating from Settings
–In the center display, select SettingsMy
Car
SeatsAdjust Passenger Seat
From Driver Position.
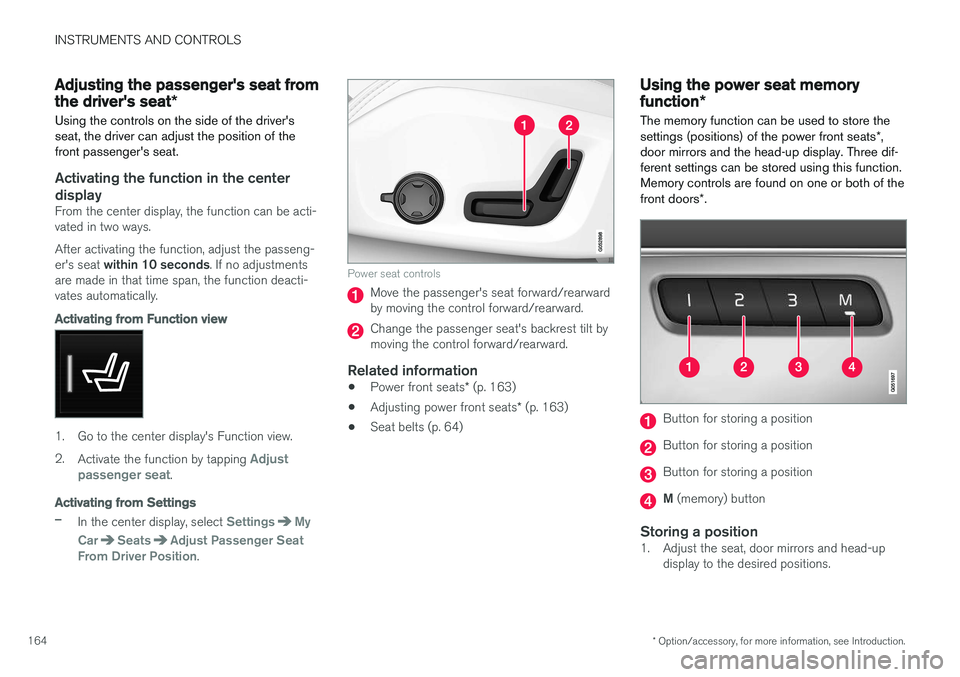
Power seat controls
Move the passenger's seat forward/rearward by moving the control forward/rearward.
Change the passenger seat's backrest tilt by moving the control forward/rearward.
Related information
• Power front seats
* (p. 163)
• Adjusting power front seats
* (p. 163)
• Seat belts (p. 64)
Using the power seat memory function
*
The memory function can be used to store the settings (positions) of the power front seats *,
door mirrors and the head-up display. Three dif- ferent settings can be stored using this function.Memory controls are found on one or both of the front doors *.
Button for storing a position
Button for storing a position
Button for storing a position
M (memory) button
Storing a position1. Adjust the seat, door mirrors and head-up
display to the desired positions.
Page 185 of 546

CLIMATE
183
3.
Tap
Add timer.
> A pop-up window will open.
NOTE
A new timer setting cannot be made if there are already 8 timers set. Delete one of theexisting timer settings in order to add a newone.
4. Tap Date to set a specific date for the timer
setting. Tap
Days to set a timer for one or more days
of the week. For
Days: activate/deactivate the repeat
function by selecting/deselecting the
Repeat weekly box.
5. For
Date: Select a date for preconditioning
by scrolling in the date list using the arrow keys. For
Days: Select days of the week for pre-
conditioning by tapping the days' buttons.
6. Set the time at which preconditioning should be completed by scrolling with the arrows in the clock.
7. Tap
Confirm to add the timer setting.
> The timer settings will be added to the list and activated.
Editing a timer setting1. Open Climate view in the center display. 2. Tap the
Parking climate tab.
3. Tap the timer setting to be changed. > A pop-up window will open.
4. Change the setting as described in the sec- tion "Adding a timer setting" above.
Deleting a timer setting
The button for editing a list/deleting a timer setting in the Climate setting's Parking climate tab
1. Open Climate view in the center display. 2.
Tap the
Parking climate tab.
3. Tap
Edit list.
4. Tap the delete icon at the right in the list. >The icon will change to the text
Delete. 5.
Tap
Delete to confirm.
> The timer setting will be deleted from the list.
Page 188 of 546

CLIMATE
* Option/accessory, for more information, see Introduction.
186
Air quality
The materials used in the passenger compart- ment have been selected and designed to bepleasant and comfortable, even for people withasthma or other types of allergies.
Materials in the passenger compartment
The materials used have been developed to help minimize the amount of dust and make the cabineasier to keep clean. All floor mats can be easily removed for cleaning. Use car cleaning products recommended byVolvo. Only use cleaning agents and car care products recommended by Volvo. Clean regularly and fol-low the instructions included with the car careproduct.
Air filtering systemsIn addition to the passenger compartment filter, the Clean Zone Interior Package * and the Interior
Air Quality System * contribute to a cleaner pas-
senger compartment environment.
Related information
• Passenger compartment air filter (p. 187)
• Interior Air Quality System (IAQS)
* (p. 186)
• Clean Zone Interior Package (CZIP)
*
(p. 186)
• Cleaning the interior (p. 513)
Clean Zone Interior Package (CZIP)
*
The Clean Zone Interior Package includes a number of features that help further reduce aller-genic substances in the passenger compart-ment.
CZIP includes the following:
• An enhanced blower function that starts the blower when the vehicle is unlocked with theremote key to fill the passenger compart-ment with fresh air. This function starts auto-matically when required and shuts off auto-matically after a short period or if one thedoors is opened. The time for which theblower operates decreases gradually due toreduced need until the vehicle is four yearsold.
• The Interior Air Quality System (IAQS).
NOTE
In order to retain the CZIP standard, the IAQS filter must be replaced at the specified inter-vals. Consult your Volvo retailer.
Interior Air Quality System (IAQS)
*
The Interior Air Quality System uses a multifilter and an air quality sensor to remove gases, parti-cles and other contaminants from the air enter-ing the passenger compartment.
The IAQS air quality sensor monitors increased levels of contaminants in the outside air and ifcontaminants are detected, the air intake closesand the air inside the passenger compartment isrecirculated, i.e., no outside air enters the vehicle.The filter also cleans recirculated passengercompartment air.
NOTE
• The air quality sensor should always be engaged in order to obtain the best air inthe passenger compartment.
• Recirculation is limited in cold weather toavoid fogging.
• If the insides of the windows start fog-ging, disengage the air quality sensor.Use the defroster function to increaseairflow to the front, side, and rear win-dows.
Activating/deactivating IAQSTo change the setting for IAQS activation/deacti- vation:
1. In the center display's Settings view, go to
Climate.
Page 245 of 546

• Child safety locks (p. 228)
Locking/unl")
LOCKS AND ALARM
}}
* Option/accessory, for more information, see Introduction.243
Related information
•Locking/unlocking from outside the vehicle (p. 243)
• Child safety locks (p. 228)
Locking/unlocking from outside the vehicle The buttons on the remote key can be used to lock or unlock all doors and the tailgate at thesame time. This can also be done without press-ing the remote key buttons on models equippedwith the optional keyless Passive Entry system. The power tailgate
* can also be opened/closed
by moving your foot under a sensor beneath therear bumper *.
The lock/unlock settings can be changed in the center display's Top view. Go to:
SettingsMy CarRemote Unlockand select Unlock All Doors or Driver Door
Only.
In order to lock the vehicle, the driver's door must be closed. If the tailgate or any of the other doorsare open, they will be locked and the alarm will bearmed when they are closed.
NOTE
Be sure the remote key is outside of the vehi- cle before the other doors/tailgate are closedto help avoid locking the remote inside thevehicle.
If the locks repeatedly do not react when the unlock button is pressed, it may be necessary toreplace the battery in the remote. In this case, the driver's door can be unlocked with the detacha-ble key blade.
Keyless Passive Entry
*If the vehicle is equipped with this system, it isonly necessary to have a remote key in your pos-session to operate the central locking system. Models with Passive Entry have an indentation on the outside of the handle for locking the vehicleand a pressure-sensitive area on the inside of thehandle for unlocking. The tailgate has a rubber-ized button used only for locking/unlocking.
Outer indentation for locking, the pressure sensitive area on the inside of the handle is for unlocking
Page 267 of 546
 and Adaptive Cruise Control (ACC)*
In models equipped with the optional ACC, the dri")
DRIVER SUPPORT
* Option/accessory, for more information, see Introduction.265
Switching between Cruise Control (CC) and Adaptive Cruise Control (ACC)*
In models equipped with the optional ACC, the driver can toggle between CC and ACC.
Switching from ACC till CCA symbol in the instrument panel will indicate which system is currently being used:
CC
Cruise ControlACC
Adaptive Cruise Control
AA
A If the symbol is WHITE, the function is active. If the symbol is GRAY, the function is in standby mode.
To switch from ACC to CC
1. From the center display's Function view, tap
the
Activate cruise control button.
> The symbol in the instrument panel will
change from
(ACC) to (CC). This means that ACC has been com- pletely deactivated (turned off) and CC is instandby mode (ready for use but not cur-rently maintaining a set speed).
2. Press the
button on the left-side steer-
ing wheel keypad: CC goes into active mode and sets the vehicle's current speed.
WARNING
Switching from ACC to CC means that:
• Your vehicle will
no longer automatically
maintain a set distance to a vehicle ahead.
• Only the set speed will be maintained andthe driver will have to apply the brakeswhen needed.
If CC was activated when the engine was turned off, ACC will be selected and go into standbymode when the engine is restarted.
Switching from CC back to ACC1. In the center display's Function view, tap theActivate cruise control button.
> The symbol in the instrument panel will
change from
(CC) to (ACC). This means that CC has been com- pletely deactivated (turned off) and ACC is instandby mode (ready for use but not cur-rently maintaining a set speed/time interval).
2. Press the
button on the left-side steer-
ing wheel keypad: ACC goes into active mode and sets the vehicle's current speedand the selected distance to the vehicleahead.
Related information
• Adaptive Cruise Control (ACC)
* (p. 266)
• Cruise Control (CC) (p. 261)
• Center display overview (p. 32)
Page 272 of 546

||
DRIVER SUPPORT
* Option/accessory, for more information, see Introduction.
270 To temporarily deactivate and put Adaptive Cruise Control in standby mode:
Function buttons and symbols
–Press the button (2).
> The
symbol in the instrument panel
will change colors from WHITE to GRAY and the set speed in the center of thespeedometer will change from BEIGE toGRAY.
Standby mode due to action by the driver
ACC is temporarily deactivated and put in standby mode if:
• the brakes are applied
• The gear selector is moved to
N
• the vehicle is driven faster than the set speed for more than 1 minute. In these cases, the driver will have to regulate the vehicle's speed. A temporary increase in speed, such as when passing another vehicle, does not affect the ACCset speed. The vehicle will return to the set speedwhen the accelerator pedal is released.
Automatic standby mode
ACC interacts with other systems, such as Electronic Stability Control. If any of these othersystems are not functioning properly, ACC willturn off automatically.
WARNING
If this happens, the driver will be alerted by an audible signal and a message in the instru-ment panel. The driver will have to adapt thevehicle's speed, apply the brakes when nec-essary and keep a safe distance to the vehicleahead.
ACC switches automatically to standby mode if: • the vehicle's speed goes below approx. 3 mph (5 km/h) and ACC cannot determineif the vehicle ahead is stationary or is anobject such as a speed bump, etc
• the vehicle's speed goes below approx.3 mph (5 km/h) and the vehicle aheadchanges lanes or turns so that ACC nolonger has a target vehicle to follow
• the driver opens the door
• the driver unbuckles the seat belt •
engine speed (rpm) is too high/low
• the wheels lose traction
• the parking brake is applied
• the stability system's
ESC Sport Mode is
activated
• the
Off Road drive mode is selected
• The radar sensor is covered by e.g., wet snow or if heavy rain interferes with radar waves
Reactivating ACC from standby modeTo reactivate ACC after it has temporarily been put in standby mode:
–Press the button (1).
> The vehicle will then return to the most
recently set speed .
WARNING
There may be a significant increase in speed after the
button has been pressed.
Related information
•Adaptive Cruise Control (ACC)
* (p. 266)
• Starting and activating Adaptive Cruise Control (ACC) (p. 268)
• Setting an Adaptive Cruise Control timeinterval (p. 272)