2016 VOLVO XC90 T8 change time
[x] Cancel search: change timePage 273 of 546

DRIVER SUPPORT
}}
271
•
Adaptive cruise control passing assistance (p. 284)
• Adaptive Cruise Control (ACC) symbols andmessages (p. 286)
Changing Adaptive Cruise Control (ACC) speed
ACC makes it possible to set various speeds.
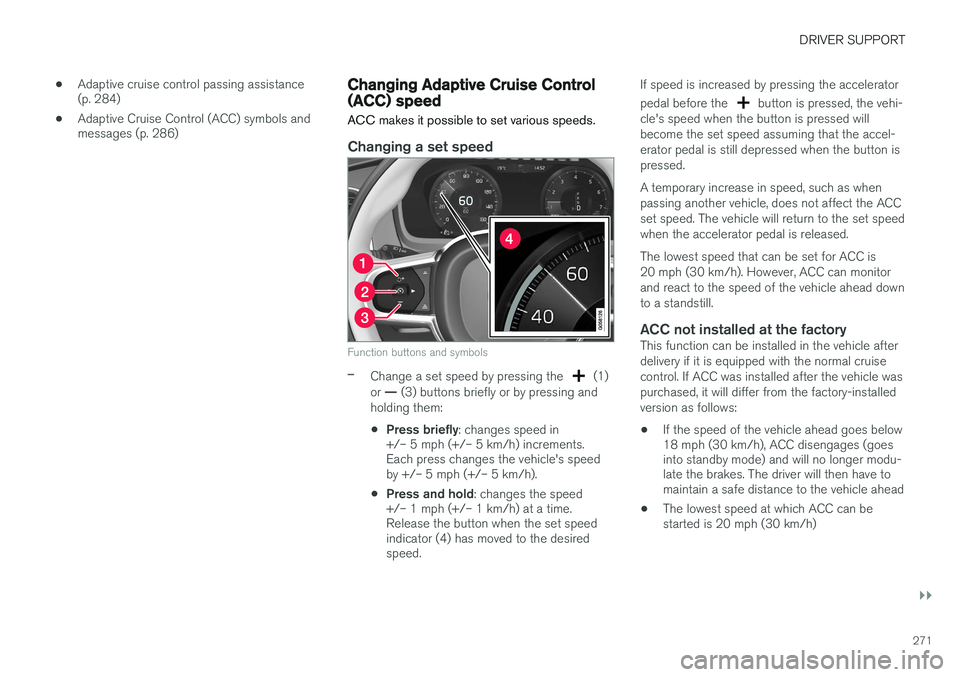
Changing a set speed
Function buttons and symbols
–Change a set speed by pressing the (1)
or — (3) buttons briefly or by pressing and
holding them:
• Press briefly
: changes speed in
+/– 5 mph (+/– 5 km/h) increments. Each press changes the vehicle's speedby +/– 5 mph (+/– 5 km/h).
• Press and hold
: changes the speed
+/– 1 mph (+/– 1 km/h) at a time.Release the button when the set speedindicator (4) has moved to the desiredspeed. If speed is increased by pressing the accelerator pedal before the
button is pressed, the vehi-
cle's speed when the button is pressed will become the set speed assuming that the accel-erator pedal is still depressed when the button ispressed. A temporary increase in speed, such as when passing another vehicle, does not affect the ACCset speed. The vehicle will return to the set speedwhen the accelerator pedal is released. The lowest speed that can be set for ACC is 20 mph (30 km/h). However, ACC can monitorand react to the speed of the vehicle ahead downto a standstill.
ACC not installed at the factoryThis function can be installed in the vehicle afterdelivery if it is equipped with the normal cruisecontrol. If ACC was installed after the vehicle waspurchased, it will differ from the factory-installedversion as follows:
• If the speed of the vehicle ahead goes below 18 mph (30 km/h), ACC disengages (goesinto standby mode) and will no longer modu-late the brakes. The driver will then have tomaintain a safe distance to the vehicle ahead
• The lowest speed at which ACC can bestarted is 20 mph (30 km/h)
Page 275 of 546

DRIVER SUPPORT
}}
* Option/accessory, for more information, see Introduction.273
time interval to the vehicle ahead does not allow an increase in speed.
• The higher the speed, the greater the dis-tance to the vehicle ahead for a given timeinterval.
• Only use time intervals permitted by localtraffic regulations.
WARNING
•
Only use a time interval that is suitable in current traffic conditions.
• A short time interval gives the driver lim-ited reaction time if an unexpected situa-tion occurs in traffic.
Related information
•
Adaptive Cruise Control (ACC)
* (p. 266)
• Starting and activating Adaptive CruiseControl (ACC) (p. 268)
• Deactivating/resuming Adaptive CruiseControl (ACC) (p. 269)
• Adaptive cruise control passing assistance(p. 284)
• Adaptive Cruise Control (ACC) symbols andmessages (p. 286)
Pilot Assist
*
The Pilot Assist feature helps keep the vehicle in its current traffic lane, at a set speed and a settime interval to the vehicle ahead.
FunctionThe vehicle's camera monitors the traffic lane's side marker lines and a distance monitor helpsmaintain the set time interval to the vehicleahead. Pilot Assist helps provide more relaxed driving in heavy, slow-moving traffic at speeds up to30 mph (50 km/h) on highways and major roads.
Function overview
Windshield module containing the camera/ radar sensor
Monitoring distance
Monitoring side marker lines The driver sets the desired time interval to the vehicle ahead. Pilot Assist monitors that vehicleand the traffic lane's side market lines using thecamera and radar sensor mounted in the upper,center section of the windshield. It helps maintainthe set time interval by automatically adjustingspeed and by providing steering assistance tohelp keep your vehicle in the lane. Pilot Assist's steering assistance is based on monitoring the direction of the vehicle ahead andthe traffic lane's side marker lines. The driver canalways override Pilot Assist and steer the vehicleto e.g., change lanes, etc. If the camera and radar sensor cannot detect the lane's side marker lines or a vehicle ahead, PilotAssist goes into standby mode. When Pilot Assist is in standby mode and your vehicle comes too close to the vehicle ahead, thedriver will be alerted by the Distance Alert func-tion.
Page 276 of 546

||
DRIVER SUPPORT
274
WARNING
•Pilot Assist is designed to be a supple- mentary driving aid and cannot cover alldriving situations, traffic, weather and/orroad conditions.
• The driver should be familiar with all ofthe information in this article regardingPilot Assist, including its limitations.
• Pilot Assist is not intended to replace thedriver's attention and judgement.
• Pilot Assist must only be used wherethere are clearly visible traffic lane sidemarker lines on both sides of the currenttraffic lane. In other circumstances thereis an increased risk of collision with sur-rounding obstacles that are not detectedby the system.
• The driver is always responsible for steer-ing the vehicle and maintaining a suitablespeed and distance to the vehicle aheadand must intervene if necessary, even ifPilot Assist is being used.
Pilot Assist is designed to regulate speed smoothly but in situations calling for fast braking,the driver must apply the brakes. This applies tosituations where there are considerable differen-ces in speed or if the vehicle ahead brakes sud-denly. Due to the limitations of the camera andradar sensor, the system may apply the brakes inyour vehicle suddenly or not at all. The default speed for Pilot Assist is preset toapprox. 30 mph (50 km/h) and cannot bechanged. If the vehicle ahead increases speed toover 30 mph (50 km/h) and pulls away from yourvehicle, Pilot Assist will go into standby mode.
NOTE
•
Pilot Assist maintenance should only be carried out by a trained and qualifiedVolvo service technician.
• Pilot Assist regulates your vehicle'sspeed using the accelerator pedal andthe brakes. Please be aware that theremay be a faint sound from the brakeswhen the system is using them.
WARNING
•Pilot Assist does not react to people or animals, or small vehicles such as bicy-cles and motorcycles. It also does notreact to low trailers, slow moving, parkedor approaching vehicles, or stationaryobjects.
• Do not use Pilot Assist in demandingdriving conditions such as city driving orother heavy traffic situations, in slipperyconditions, when there is a great deal ofwater or slush on the road, during heavyrain or snow, in poor visibility, on windingroads or on highway on- or off-ramps.
Pilot Assist overview
Controls
Function buttons and symbols
[]: Press to activate Pilot Assist or put it
in standby mode
Arrow key [ < ]: change from Pilot Assist to
Adaptive Cruise Control (symbol (6) will also change)
Reduce the distance (time interval) to the vehicle ahead
Arrow key [ > ]: change from Adaptive Cruise
Control to Pilot Assist (symbol (6) will also change)
Increase the distance (time interval) to the vehicle ahead
Function symbols
Page 291 of 546

DRIVER SUPPORT
}}}}
289
When City Safety applies the brakes, the brake lights will illuminate. When City Safety is triggered and applies the brakes, a text message will be displayed in theinstrument panel.
Related information
•
City Safety
™ troubleshooting (p. 295)
• City Safety in crossing traffic (p. 291)
• City Safety limitations (p. 293)
• City Safety symbols and messages (p. 297)
• Detecting cyclists and pedestrians with City Safety (p. 290)
• Rear Collision Warning (RCW) (p. 292)
• City Safety warning level settings (p. 289)
• City Safety in crossing traffic (p. 291)
• Seat belts (p. 64)
City Safety warning level settings
City Safety is always activated but the function's warning distance can be adjusted.
NOTE
City Safety cannot be turned off and activates automatically each time the engine/electricmotor is started.
Setting a warning level (distance)
The distance set for warnings determines the system's responsiveness and sets the distance atwhich visual, audible and tangible (haptic) warn-ings will be triggered. To do so:1. Tap
Settings in the center display's Top
view.
2. Tap
My CarIntelliSafeCity Safety.
3. Choose among
Earlier, Normal or Later.
Begin by choosing
Earlier. If too many warnings
are given, change to Normal.
If the driver feels that warnings are given too often, the warning level can be lowered. Thismeans that warnings will be provided later, result-ing in fewer warnings being given. The setting
Later should only used in exceptional
circumstances, e.g., for a more dynamic driving style.
WARNING
• No automatic system can be guaranteed to function 100% correctly in all situa-tions. For that reason, never test CitySafety by driving toward a person orobject. This could result in serious injuryor death.
• Even if the setting
Earlier has been
selected, warnings may be perceived as being given late, e.g., if the difference inspeed is great or if the vehicle aheadbrakes suddenly.
• City Safety can provide a warning for apotential collision but it can never shortenthe driver's reaction time.
• To help make City Safety as effective as possible, always using the setting
Earlieris recommended.
NOTE
•Due to local traffic regulations in certain markets, RCW will
not activate the rear
turn signals. That part of the function will be deactivated.
• The use of the rear turn signals will alsobe deactivated if the City Safety warning level is set at
Later. See also the section
"Setting a warning level (distance)" in the article "City Safety settings."
• If RCW detects a vehicle approachingfrom behind, the seat belt pretensioners
Page 294 of 546

||
DRIVER SUPPORT
292
WARNING
•City Safety is a supplementary driving aid and does not function in all driving situa-tions or in all traffic, weather or road con-ditions.
• Warnings and braking for an approachingvehicle will usually come at a very latestage.
• The driver is responsible for maintaining asafe distance and speed. Never wait for awarning or for City Safety to take action.
LimitationsIn certain situations, it may be very difficult for City Safety to help the driver avoid a collision withan approaching vehicle in crossing traffic, forexample:
• on slippery roads when Electronic Stability Control is active
• if the approaching vehicle is detected at alate stage
• If the approaching vehicle is partiallyobscured by another vehicle
• if the approaching vehicle moves erratically(e.g., sudden lane changes at a late stage)
Related information
•
City Safety
™ (p. 287)
• City Safety limitations (p. 293)
Rear Collision Warning (RCW)
The
Rear Collision Warning with braking at
standstill (RCW) function can help the driver
avoid rear-end collisions.
RCW is activated automatically each time the engine is started and cannot be turned off. RCW can warn the driver of a vehicle approach- ing yours from behind by rapidly flashing yourrear turn signals. RCW is only activated when a vehicle is rapidly approaching your vehicle from behind. At speeds below 20 mph (30 km/h), if RCW determines that your vehicle is at risk of a rear-end collision, the front seat belt pretensionersand the Whiplash Protection System are acti-vated. Just prior to the collision, the brakes are also applied to help reduce your vehicle's forwardmovement if and when the collision occurs. How-ever, this can only happen if your vehicle is sta-tionary. The brakes will be released immediately if the accelerator pedal is pressed.
NOTE
• Due to local traffic regulations in certain markets, RCW will
not activate the rear
turn signals. That part of the function will be deactivated.
• The use of the rear turn signals will alsobe deactivated if the City Safety warning level is set at
Later. See also the section
"Setting a warning level (distance)" in the article "City Safety settings."
• If RCW detects a vehicle approachingfrom behind, the seat belt pretensionersand Whiplash Protection System will beactivated.
LimitationsIn some circumstances, it may be difficult for RCW to help the driver if there is a risk of a colli-sion, such as: •
In slippery conditions when Electronic Stability Control is active
• If the vehicle approaching from the rear isdetected at a late stage
• If the vehicle approaching from the rearchanges lanes at a late stage
• If the vehicle approaching from the rear ismoving at a speed above approx. 50 mph(80 km/h)
Page 301 of 546

DRIVER SUPPORT
}}
* Option/accessory, for more information, see Introduction.299
Starting and activating the Speed Limiter (SL)*
The Speed Limiter (SL) is a feature that has to be selected and activated in order to set a maxi-mum speed.
Selecting SL (putting it in standby mode)
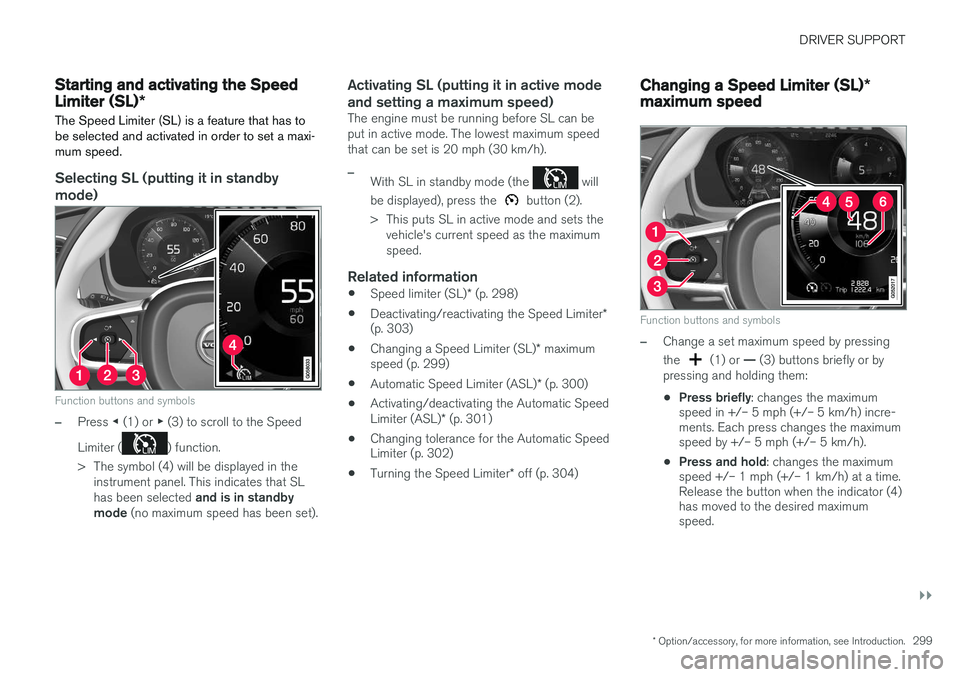
Function buttons and symbols
–Press ◀ (1) or ▶ (3) to scroll to the Speed
Limiter (
) function.
> The symbol (4) will be displayed in the instrument panel. This indicates that SL has been selected and is in standby
mode (no maximum speed has been set).
Activating SL (putting it in active mode and setting a maximum speed)
The engine must be running before SL can be put in active mode. The lowest maximum speedthat can be set is 20 mph (30 km/h).
–With SL in standby mode (the will
be displayed), press the
button (2).
> This puts SL in active mode and sets the vehicle's current speed as the maximum speed.
Related information
• Speed limiter (SL)
* (p. 298)
• Deactivating/reactivating the Speed Limiter
*
(p. 303)
• Changing a Speed Limiter (SL)
* maximum
speed (p. 299)
• Automatic Speed Limiter (ASL)
* (p. 300)
• Activating/deactivating the Automatic Speed Limiter (ASL)
* (p. 301)
• Changing tolerance for the Automatic Speed Limiter (p. 302)
• Turning the Speed Limiter
* off (p. 304)
Changing a Speed Limiter (SL) *
maximum speed
Function buttons and symbols
–Change a set maximum speed by pressing the
(1) or — (3) buttons briefly or by
pressing and holding them: • Press briefly
: changes the maximum
speed in +/– 5 mph (+/– 5 km/h) incre- ments. Each press changes the maximumspeed by +/– 5 mph (+/– 5 km/h).
• Press and hold
: changes the maximum
speed +/– 1 mph (+/– 1 km/h) at a time.Release the button when the indicator (4)has moved to the desired maximumspeed.
Page 316 of 546

||
DRIVER SUPPORT
* Option/accessory, for more information, see Introduction.
314
Trajectory lines for a trailer hitch (towbar)
Towbar: activate trajectory lines for a trailer
hitch
Zoom: zoom in/out
The camera can help make hitching a trailer eas- ier by showing the "line" that the trailer hitch willtake toward the trailer. 1. Tap
Towbar (1).
> The trajectory lines will be displayed and the trajectory lines for the vehicle will dis- appear.
2. Tap
Zoom (2) for a close-up view.
> The camera will zoom in.
trajectory lines for the trailer hitch and the vehicle cannot be shown at the same time.
Front and rear sensor fields
Front and rear sensors
The screen can display colored sensor fields on the car symbol at the right
The front and rear fields change colors (yellow- orange-red) as the vehicle moves closer to anobject.
Front/rear field colorsDistance to the object
Yellow2–4.9 ft (06.–1.5 m )
Orange1.3–2 ft (0.4–0.6 m)
Red0–1.3 ft (0–0.4 m)
Side sensors
The side fields will only be shown in orange.
Side field colorDistance to the object
Orange0–1 ft (0–0.3 m)
Related information
• Park Assist Camera (PAC)
* (p. 311)
• Starting the Park Assist Camera (PAC)
*
(p. 315)
Page 332 of 546

||
DRIVER SUPPORT
* Option/accessory, for more information, see Introduction.
330 Different time intervals to the vehicle ahead can be selectedand are shown in the instru-ment panel as 1–5 horizontalbars. The greater the number ofbars, the longer the time inter-val.
One bar between the vehicles represents a timeinterval of approximately 1 second; 5 bars isapproximately 3 seconds. The same symbol appears if Adaptive Cruise Control is activated.
NOTE
• The greater the vehicles' speed, the greater the
distance between them for a
set time interval.
• The set time interval is also used by Adaptive Cruise Control
*.
• Only use time intervals permitted by local traffic regulations.
Related information
•
Distance Alert
* (p. 329)
Distance Alert * limitations
Distance Alert uses the same radar sensor as Adaptive Cruise Control * and has several limita-
tions.
WARNING
• The radar sensor has a limited field of vision. In some situations it may detect avehicle later than expected or not detectother vehicles at all.
• The radar sensor cannot cover all drivingsituations and traffic, weather and roadconditions.
• The driver is responsible for maintaining asafe distance and speed and must inter-vene if the various driver support systemsdo not maintain a suitable speed or suita-ble distance to the vehicle ahead.
• Maintenance of radar sensor componentsmay only be performed by a trained andqualified Volvo technician.
• Strong sunlight, reflections from the roadsurface, strong lighting contrasts or usingsunglasses may make the warning light inthe windshield difficult to see.
For additional information, see also the article "Radar sensor limitations."
Related information
• Radar sensor limitations (p. 258)
• Distance Alert
* (p. 329)
Blind Spot Information (BLIS) *
Blind Spot Information is a system designed to alert the driver to the presence of other vehiclesmoving in the same direction as your vehicle onroads with several lanes.
Blind Spot Information is a driving aid intended to:
• detect other vehicles in your door mirrors' "blind area"
• detect vehicles that are about to pass yourvehicle or are approaching your vehiclequickly from behind in the left and/or rightlanes
WARNING
•
Blind Spot Information is an information system, NOT a warning or safety systemand does not function in all situations.
• Blind Spot Information does not eliminatethe need for you to visually confirm theconditions around you, and the need foryou to turn your head and shoulders tomake sure that you can safely changelanes or back up.
• As the driver, you have full responsibilityfor changing lanes/backing up in a safemanner.