2016 VOLVO XC90 T8 seat memory
[x] Cancel search: seat memoryPage 6 of 546

4
Approach lighting148
Home safe lighting 148
Passenger compartment lighting 148
Using turn signals 151
Messages in the instrument panel and center display 151
Handling messages in the instru-ment panel and center display 153
Handling messages stored from theinstrument panel and center display 154
Using the instrument panel App menu 156
Using the windshield wipers 156
Activating/deactivating the rain sensor 157
Windshield and headlight washers 158
Tailgate window wiper and washer 159
Steering wheel 160
Adjusting the steering wheel 161
Seats 161
Manually operated front seats 162
Power front seats *
163
Adjusting power front seats *
163
Adjusting the passenger's seat from the driver's seat * 164
Using the power seat memory function *
164
Multifunctional front seats *
165
Adjusting function settings in the multifunctional front seats *166
Rear seats 169
Easy access to and from the driver seat 169
Adjusting the second row head restraints 170
Adjusting the second row backrest tilt 171
Folding the second row backrests 172
Moving the second row seats for- ward/rearward 174
Getting into and out of the third rowof seats 174
Folding the third row backrests 175
CLIMATE
Climate control system178
Perceived temperature 178
Climate system sensors 179
Parking climate (preconditioning) 179
Activating/deactivating the parking climate timer 181
Activating/deactivating the climate comfort retaining function *181
Preconditioning timer 182
Setting the parking climate (precon- ditioning) timer 182
Starting and stopping preconditioning 184
Preconditioning symbols and messages 185
Air quality 186
Clean Zone Interior Package (CZIP) *
186
Interior Air Quality System (IAQS) *
186
Passenger compartment air filter 187
Automatic climate control 187
Climate system controls 188
Climate system controls in the centerdisplay 189
Rear climate system controls on thetunnel console 190
Setting the blower speed 191
Setting the temperature 192
Turning recirculation on and off 194
Page 106 of 546

||
INSTRUMENTS AND CONTROLS
* Option/accessory, for more information, see Introduction.
104
Display/function/control
Front reading lights and courtesy lighting
Laminated panoramic roof *
Ceiling console display
Manual rearview mirror auto-dim (certain markets only)
Display/function/control
Center display
Hazard warning flashers, max. defroster/ heated windshield*, media player, glove
compartment open
Gear selector
Display/function/control
Start knob
Drive modes
Parking brake
Auto-hold brakes
Display/function/control
Memory control for:
• power seats
*
• door mirrors
• head-up display
*
Door open, door/tailgate lock/unlock
Display/function/control
Power windows, power door mirrors
Controls for power front seat *
Page 107 of 546

INSTRUMENTS AND CONTROLS
}}
* Option/accessory, for more information, see Introduction.105
Adjusting the power door mirrors
The control on the driver's door is used to adjust the position of the door mirrors.
Door mirror controls
Adjusting1. Press the L button for the left door mirror or
the R button for the right door mirror. The
light in the button comes on.
2. Adjust the position with the joystick in the center.
3. Press the L or R button again. The light
should no longer be on.
WARNING
Objects seen in the mirrors may appear fur- ther away than they actually are.
Storing the position *The mirror positions are stored in the key mem- ory* when the vehicle has been locked with the
remote key. When the vehicle is unlocked with the same remote key, the mirrors and the driver'sseat adopt the stored positions when the driver'sdoor is opened. The mirrors' position can also be stored in the power seat's * memory.
Tilting the door mirrors when parking 5The door mirrors can be tilted down to help give the driver a better view along the sides of thevehicle, for example when parallel parking.
–To activate this function, select reverse gear and press the
L or R mirror control button to
tilt the mirror down.
The door mirror will reset to its normal position:
• after 10 seconds when reverse is disen- gaged
• immediately if you press the corresponding
L
or R button again.
NOTE
Only one mirror can be tilted down at a time.
Automatically tilting the door mirrors when parking 5
This function can be activated/deactivated in the center display. 1.
Tap
Settings in Top view.
2. Tap
My CarMirrors.
3. Under
Tilt Mirror In Reverse, select Off,Driver, Passenger or Both to activate/
deactivate and select which mirror to tilt.
Folding mirrors *When parking in a limited space, the mirrors can be folded in: 1.
Press the L and R buttons at the same time
(the ignition must be in at least mode I).
2. Release the buttons after approx. 1 second. The mirrors will stop automatically when they are completely folded in.
Fold out the mirrors by pressing the L and R at
the same time. The mirrors will stop automaticallywhen they return to their original positions.
Automatic folding when the vehicle is
locked 5
The mirrors can be folded in/out automaticallywhen the vehicle is locked/unlocked. This function can be activated/deactivated in the center display.
5
Only on models equipped with a power driver's seat.
Page 108 of 546

||
INSTRUMENTS AND CONTROLS
* Option/accessory, for more information, see Introduction.
106 1.
Tap
Settings in Top view.
2. Tap
My CarMirrors.
3. Select
Fold Mirrors When Locking to acti-
vate/deactivate.
Resetting the mirrors' positionA mirror that has been moved manually (e.g., bumped into in a parking lot, etc.) has to bereturned to its normal position electrically beforeautomatic folding will function correctly. 1. Fold in the mirrors with the L and R buttons.
2. Fold out the mirrors with the L and R buttons.
The mirrors have now been reset to their original positions.
Auto-dim *Settings can be made for the auto-dim functionin the rearview and door mirrors. The auto-dim function is always active while the vehicle is being driven except when the reversegear has been selected. The level of sensitivityfor this function can be set to three levels, whichaffect the rearview mirror and door mirrors.
NOTE
When the level of sensitivity is changed, this change will not be noticeable immediately butwill take effect after a short period of time.
The level of sensitivity is set from the center dis- play: 1.
Tap
Settings in Top view.
2. Tap
My CarMirrors.
3. Under
Auto Dim Mirrors, select Normal,Dark or Light.
Related information
• Using the power seat memory function
*
(p. 164)
• Rearview mirror (p. 110)
Laminated panoramic roof
*
The laminated panoramic roof is divided into two sections and only the front section can beopened; it can be slid horizontally to the open orclosed positions or its rear edge can be raisedand lowered to allow ventilation.
The laminated panoramic roof also has a sun shade made of perforated fabric that is locatedbelow the sections of glass. This shade can beopened or closed, for example when driving inbright sunlight.
The laminated panoramic roof and the sun shade are operated using the controls in the ceilingconsole, near the rear-view mirror. The controlsare activated when the vehicle's ignition is in mode I or II.
Page 121 of 546

INSTRUMENTS AND CONTROLS
}}
* Option/accessory, for more information, see Introduction.119
Via settings
1.
Tap Settings in Top view.
2. Tap
My CarDisplays.
3. Select/deselect
Head-Up Display.
Selecting display alternatives1.Tap Settings in Top view.
2. Tap
My CarDisplaysHead-Up
Display Options.
Tap Go to the center display's Settings view and select
Driver Display & Head-up
Display.
3. Select :
Show Navigation In Head-Up
Display, Road Sign Information In Head-
Up Display, Show Driver Support In
Head-Up Display or Show Phone In
Head-Up Display.
Adjusting HUD brightness and height position
1. Tap Head-up display adjustments in the
center display's Function view. 2. Use the right-side steering wheel keypad to
adjust the HUD's brightness and height posi- tion on the windshield in the driver's field ofvision.
Reduce brightness
Increase brightness
Higher position
Lower position
Confirm
Adapting brightness
The brightness of the graphics displayed in the HUD are also automatically adjusted according toambient lighting conditions. HUD brightness isalso affected by adjustments to the brightness ofthe other displays in the vehicle.
Power front seat * memory function
The position of the HUD can be stored in the power seat's memory function.
Replacing the windshieldVehicles with a head-up display have a specialtype of windshield meeting the requirements fordisplaying projected information. If the windshield has to be replaced, contact a trained and qualified Volvo service technician orauthorized workshop. The correct type of replace-ment windshield must be used for a head-up dis-play.
Calibrating the horizontal positionIf the windshield has been replaced, it may benecessary to calibrate the HUD's horizontal posi-tion. This means that the projected image willhave to be rotated clockwise or counterclockwise.To do so:
1. Pull down the center display's Top view and
tap
Settings.
2. Select
My CarDisplaysHead-Up
Display Calibration.
3. Use the buttons on the right-side steering wheel keypad to calibrate the horizontal posi- tion.
Page 163 of 546

INSTRUMENTS AND CONTROLS
}}
* Option/accessory, for more information, see Introduction.161
Adjusting the steering wheel
The steering wheel can be adjusted to various positions.
Adjusting the steering wheel
Lever for releasing/locking the steering wheel
Possible positions
The steering wheel's height and reach can be adjusted. To do so:
1. Push the lever down to release the steering wheel.
2. Adjust the steering wheel to a suitable posi- tion.
3. Pull back the lever to lock the steering wheel in place. If the lever is difficult to pull into place, press the steering wheel lightly at thesame time as you pull the lever.
WARNING
Never adjust the steering wheel while driving.
If the vehicle is equipped with the optional speed-dependent power steering, the level ofsteering force can be adjusted. The force level isadjusted according to the vehicle's speed.
Related information
• Steering wheel (p. 160)
• Adjustable steering force
* (p. 323)
Seats
The vehicle is equipped with 7 seats. The front seats can be adjusted electroncially or manually.The second and third row seats are adjusted pri-marily manually.
The adjustment settings for the power front seats *, door mirrors and the head-up display can
be stored in memory buttons. Using the multi-function control *, comfort in the
front seats can be further enhance by e.g., adjust- ing the lumbar support or extending the length ofthe front seat cushion. The rear seats can be folded down and their head restraints can be adjusted. The second rowseats can be moved forward/rearward and theirbackrest tilt can also be changed.
Related information
• Adjusting power front seats
* (p. 163)
• Adjusting function settings in the multifunc- tional front seats
* (p. 166)
• Manually operated front seats (p. 162)
• Using the power seat memory function
*
(p. 164)
• Folding the second row backrests (p. 172)
• Getting into and out of the third row of seats (p. 174)
Page 165 of 546

INSTRUMENTS AND CONTROLS
* Option/accessory, for more information, see Introduction.163
Power front seats*
The power front seats offer a number of adjust- ment possibilities to help maximize comfort andergonomics.
The power seats have an overload protector that
activates if a seat is blocked by any object. If this occurs, put the ignition in mode I or 0 and wait
for a short period before operating the seat again. The power seat(s) can be adjusted for a short period after unlocking the door with the remotekey without switching the ignition on. Seat adjust-ment can always be made when the engine isrunning.
Related information
• Multifunctional front seats
* (p. 165)
• Adjusting power front seats
* (p. 163)
• Using the power seat memory function
*
(p. 164)
• Manually operated front seats (p. 162)
• Turning seat heating
* on and off (p. 199)
• Turning front seat ventilation
* on and off
(p. 200)
• Easy access to and from the driver seat (p. 169)
Adjusting power front seats
*
The power front seat(s) can be adjusted to many positions to help improve comfort and ergonom-ics.
Adjust lumbar support by pressing the con- trol up/down/forward/rearward
Raise/lower the front edge of the seat cush- ion by moving the control up/down
Raise/lower the seat by moving the control up/down
Move the seat forward/rearward by moving the control forward/rearward
Change backrest tilt by moving the control forward/rearward
Only one of the power seat's controls can beused at the same time. The front seat backrests can be folded down completely.
Related information
• Power front seats
* (p. 163)
• Using the power seat memory function
*
(p. 164)
• Multifunctional front seats
* (p. 165)
• Seat belts (p. 64)
Page 166 of 546
INSTRUMENTS AND CONTROLS
* Option/accessory, for more information, see Introduction.
164
Adjusting the passenger's seat from the driver's seat *
Using the controls on the side of the driver's seat, the driver can adjust the position of thefront passenger's seat.
Activating the function in the center
display
From the center display, the function can be acti- vated in two ways. After activating the function, adjust the passeng- er's seat within 10 seconds . If no adjustments
are made in that time span, the function deacti- vates automatically.
Activating from Function view
1. Go to the center display's Function view. 2. Activate the function by tapping
Adjust
passenger seat.
Activating from Settings
–In the center display, select SettingsMy
Car
SeatsAdjust Passenger Seat
From Driver Position.
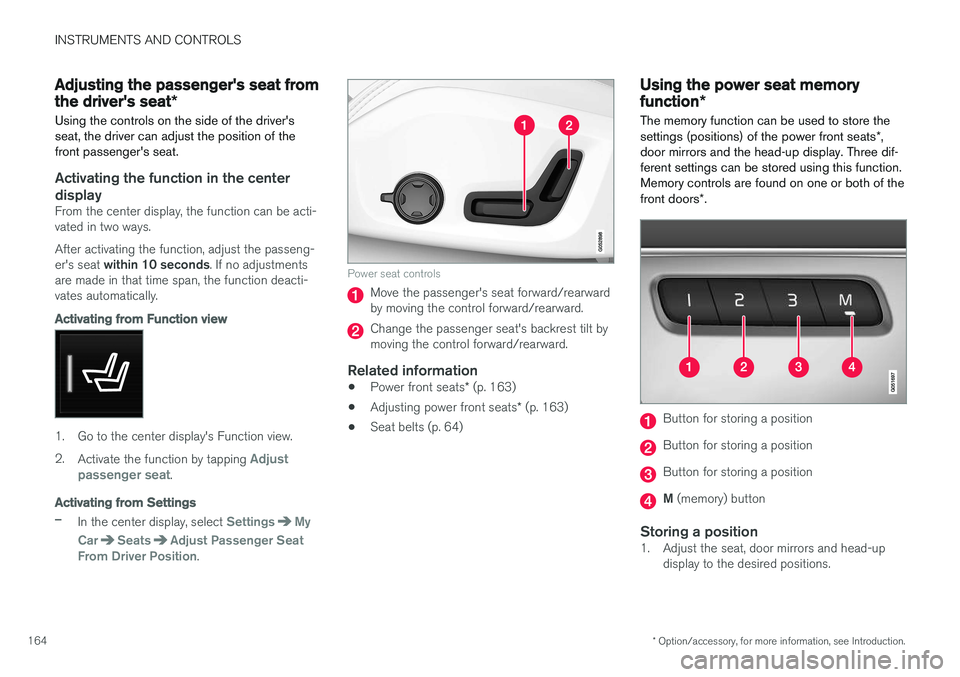
Power seat controls
Move the passenger's seat forward/rearward by moving the control forward/rearward.
Change the passenger seat's backrest tilt by moving the control forward/rearward.
Related information
• Power front seats
* (p. 163)
• Adjusting power front seats
* (p. 163)
• Seat belts (p. 64)
Using the power seat memory function
*
The memory function can be used to store the settings (positions) of the power front seats *,
door mirrors and the head-up display. Three dif- ferent settings can be stored using this function.Memory controls are found on one or both of the front doors *.
Button for storing a position
Button for storing a position
Button for storing a position
M (memory) button
Storing a position1. Adjust the seat, door mirrors and head-up
display to the desired positions.