2016 VOLVO XC90 T8 turn signal bulb
[x] Cancel search: turn signal bulbPage 12 of 546

10
Using the tire sealing system463
Inflating a tire with the tire sealing system compressor 467
Refilling coolant 468
MAINTENANCE AND SERVICING
Volvo's service program472
System updates 474
Remote updates 475
Vehicle status 475
Booking service and repairs 475
Wi-Fi connection to a workshop 478
Climate system service 479
Start battery 479
Hybrid battery 481
Battery symbols 482
Fuses 483
Replacing fuses 483
Fuses in the engine compartment 484
Fuses in the passenger compartment 489
Fuses in the cargo compartment 493
Replacing bulbs 496
Removing the rectangular headlight cover 498
Replacing low beam headlight bulbs 498
Replacing High Beam headlight bulbs 499
Replacing parking light bulbs 500
Replacing front turn signal bulbs 500
Bulb specifications 501
Hoisting the vehicle 502
Opening and closing the hood 504
Engine compartment overview505
Engine oil 506
Checking and refilling engine oil 507
Windshield wipers in the service position 508
Replacing wiper blades 509
Refilling the windshield washer fluid reservoir 511
Cleaning the exterior 511
Cleaning the interior 513
Cleaning the center display 515
Corrosion protection 516
Paint damage 516
Touching up paint damage 517
Polishing and waxing 518
Page 153 of 546
INSTRUMENTS AND CONTROLS
}}
151
Using turn signals
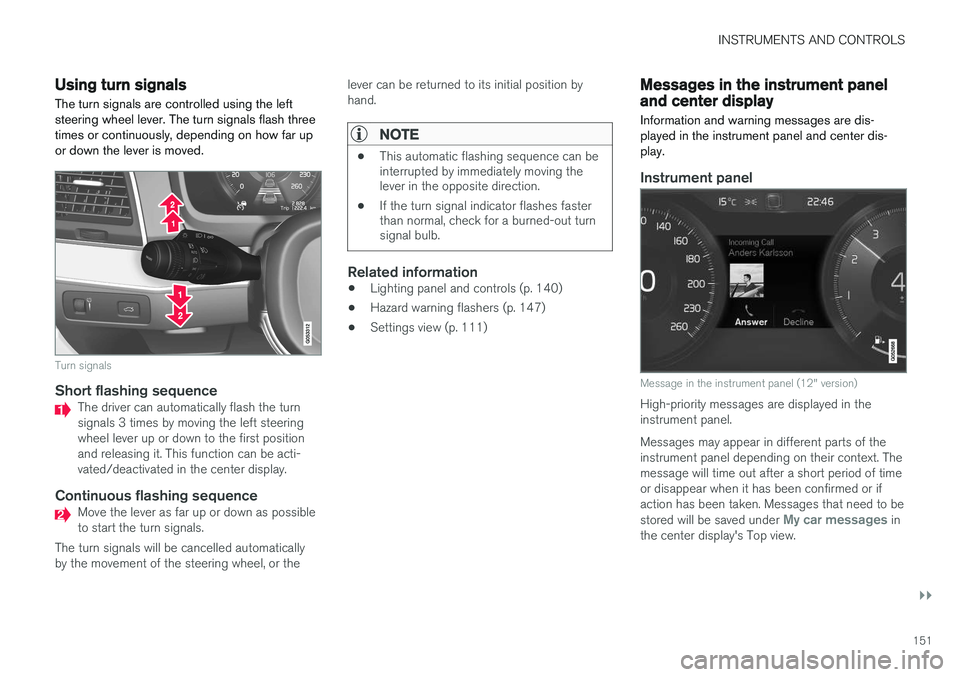
The turn signals are controlled using the left steering wheel lever. The turn signals flash threetimes or continuously, depending on how far upor down the lever is moved.
Turn signals
Short flashing sequenceThe driver can automatically flash the turn signals 3 times by moving the left steeringwheel lever up or down to the first positionand releasing it. This function can be acti-vated/deactivated in the center display.
Continuous flashing sequenceMove the lever as far up or down as possible to start the turn signals.
The turn signals will be cancelled automaticallyby the movement of the steering wheel, or the lever can be returned to its initial position byhand.
NOTE
•
This automatic flashing sequence can be interrupted by immediately moving thelever in the opposite direction.
• If the turn signal indicator flashes fasterthan normal, check for a burned-out turnsignal bulb.
Related information
•Lighting panel and controls (p. 140)
• Hazard warning flashers (p. 147)
• Settings view (p. 111)
Messages in the instrument panel and center display Information and warning messages are dis- played in the instrument panel and center dis-play.
Instrument panel
Message in the instrument panel (12" version)
High-priority messages are displayed in the instrument panel. Messages may appear in different parts of the instrument panel depending on their context. Themessage will time out after a short period of timeor disappear when it has been confirmed or ifaction has been taken. Messages that need to be stored will be saved under
My car messages in
the center display's Top view.
Page 498 of 546
MAINTENANCE AND SERVICING
496
Replacing bulbs
The halogen headlight bulbs can be replaced by the owner.
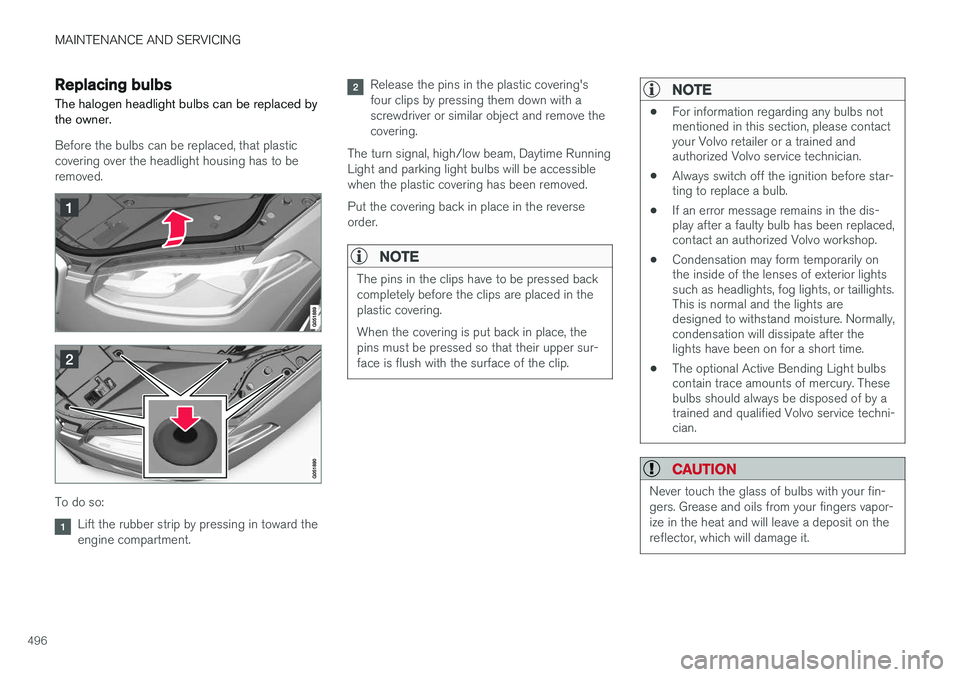
Before the bulbs can be replaced, that plastic covering over the headlight housing has to beremoved.
To do so:
Lift the rubber strip by pressing in toward the engine compartment.
Release the pins in the plastic covering's four clips by pressing them down with ascrewdriver or similar object and remove thecovering.
The turn signal, high/low beam, Daytime RunningLight and parking light bulbs will be accessiblewhen the plastic covering has been removed. Put the covering back in place in the reverse order.
NOTE
The pins in the clips have to be pressed back completely before the clips are placed in theplastic covering. When the covering is put back in place, the pins must be pressed so that their upper sur-face is flush with the surface of the clip.
NOTE
• For information regarding any bulbs not mentioned in this section, please contactyour Volvo retailer or a trained andauthorized Volvo service technician.
• Always switch off the ignition before star-ting to replace a bulb.
• If an error message remains in the dis-play after a faulty bulb has been replaced,contact an authorized Volvo workshop.
• Condensation may form temporarily onthe inside of the lenses of exterior lightssuch as headlights, fog lights, or taillights.This is normal and the lights aredesigned to withstand moisture. Normally,condensation will dissipate after thelights have been on for a short time.
• The optional Active Bending Light bulbscontain trace amounts of mercury. Thesebulbs should always be disposed of by atrained and qualified Volvo service techni-cian.
CAUTION
Never touch the glass of bulbs with your fin- gers. Grease and oils from your fingers vapor-ize in the heat and will leave a deposit on thereflector, which will damage it.
Page 499 of 546
MAINTENANCE AND SERVICING
497
WARNING
•The ignition should be switched off com- pletely (be in ignition mode
0) when
replacing bulbs.
• If the engine has been running just prior to replacing bulbs in the headlight hous-ing, please keep in mind that componentsin the engine compartment will be hot.
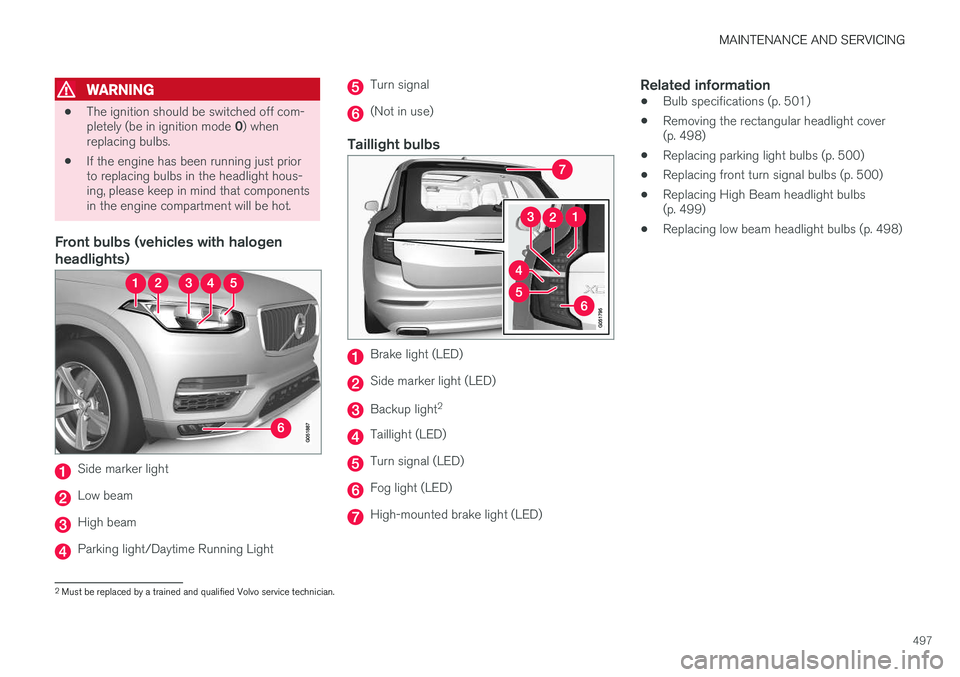
Front bulbs (vehicles with halogen headlights)
Side marker light
Low beam
High beam
Parking light/Daytime Running Light
Turn signal
(Not in use)
Taillight bulbs
Brake light (LED)
Side marker light (LED)
Backup light 2
Taillight (LED)
Turn signal (LED)
Fog light (LED)
High-mounted brake light (LED)
Related information
•
Bulb specifications (p. 501)
• Removing the rectangular headlight cover (p. 498)
• Replacing parking light bulbs (p. 500)
• Replacing front turn signal bulbs (p. 500)
• Replacing High Beam headlight bulbs(p. 499)
• Replacing low beam headlight bulbs (p. 498)
2
Must be replaced by a trained and qualified Volvo service technician.
Page 502 of 546
MAINTENANCE AND SERVICING
500
Replacing parking light bulbsOn models with halogen headlights, the front parking light bulb can be replaced by the owner.
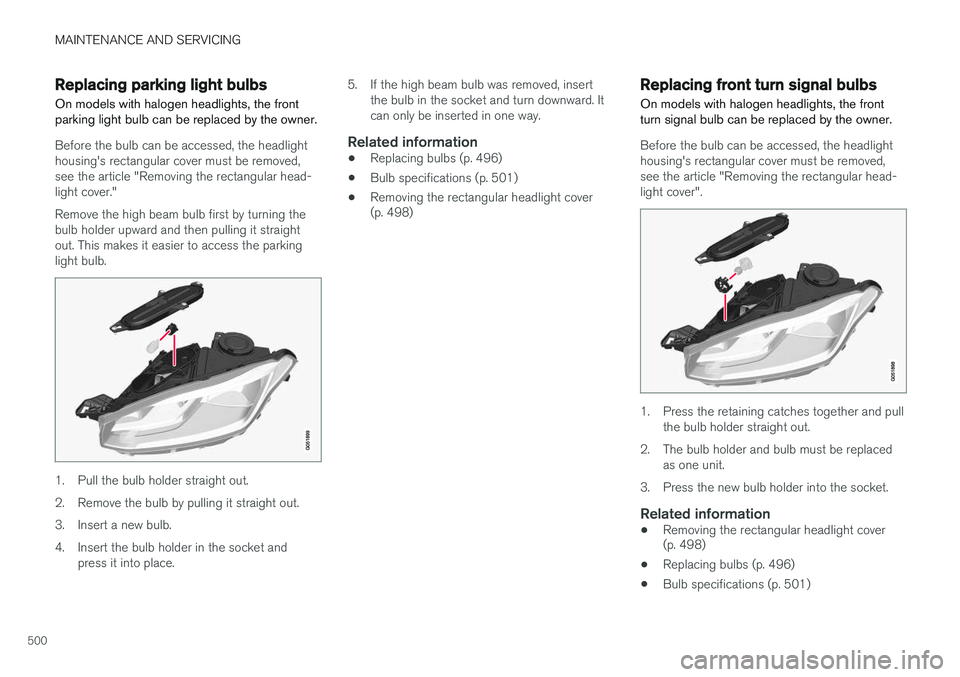
Before the bulb can be accessed, the headlight housing's rectangular cover must be removed,see the article "Removing the rectangular head-light cover." Remove the high beam bulb first by turning the bulb holder upward and then pulling it straightout. This makes it easier to access the parkinglight bulb.
1. Pull the bulb holder straight out.
2. Remove the bulb by pulling it straight out.
3. Insert a new bulb.
4. Insert the bulb holder in the socket and press it into place. 5. If the high beam bulb was removed, insert
the bulb in the socket and turn downward. It can only be inserted in one way.
Related information
• Replacing bulbs (p. 496)
• Bulb specifications (p. 501)
• Removing the rectangular headlight cover (p. 498)
Replacing front turn signal bulbs On models with halogen headlights, the front turn signal bulb can be replaced by the owner.
Before the bulb can be accessed, the headlight housing's rectangular cover must be removed,see the article "Removing the rectangular head-light cover".
1. Press the retaining catches together and pull
the bulb holder straight out.
2. The bulb holder and bulb must be replaced as one unit.
3. Press the new bulb holder into the socket.
Related information
• Removing the rectangular headlight cover (p. 498)
• Replacing bulbs (p. 496)
• Bulb specifications (p. 501)
Page 503 of 546
MAINTENANCE AND SERVICING
501
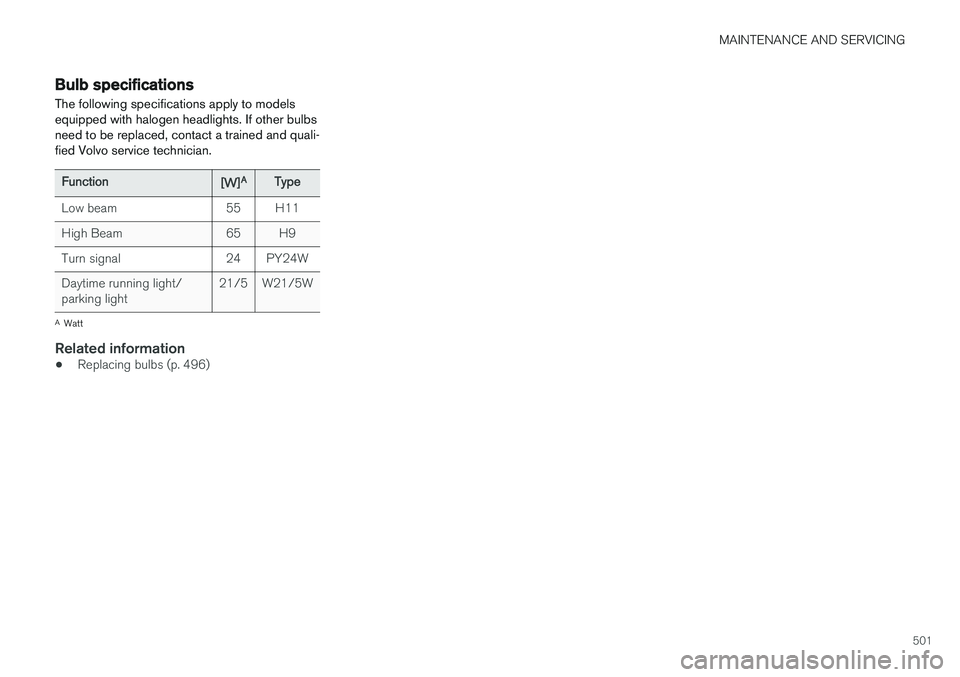
Bulb specifications The following specifications apply to models equipped with halogen headlights. If other bulbsneed to be replaced, contact a trained and quali-fied Volvo service technician.
Function[W]AType
Low beam55H11
High Beam65H9
Turn signal24PY24W
Daytime running light/ parking light21/5W21/5W
A
Watt
Related information
• Replacing bulbs (p. 496)
Page 544 of 546

INDEX
542Turn signals 151
changing bulbs 500
U
Uniform Tire Quality Grading 450
Unlocking the tailgate 244
Unlocking the vehicle 242, 243
USB/AUX connection 420, 427
V
Vehicle Event Data 30
Vehicle information 14
Vehicle loading 215, 449
Vehicle maintenance 472performed by the owner 472
Vehicle status 475
Vehicle weights 525Voice control cell phones 122
giving commands 121
introduction 120
multimedia devices 122
radio 122
settings 125
Volvo and the environment 20
Volvo ID 31
Volvo maintenance 472
Volvo On Call Roadside Assistance 14
Volvo programs 14
W
Warning flashers, hazard 147
Warning lights 137
Warning system, collision 288
Warranties 472
Washer fluid 511Washers headlight 158
windshield 156
Water, driving through 357
Waxing 518Weights trailer 367
Wheels changing 453, 454
storing 445
Whiplash Protection System 63
Wi-Fi 435, 436
Windows laminated glass 57
power 109
sun shade 109
Windshield rain sensor 157
washers 158
wipers/washers 156
Windshield washer fluid reservoir 511
Windshield wiper blades 509Windshield wipers service position 508
Wiper blades replacing 508, 509
replacing tailgate wiper 509
WMA files 429 Workshop Wi-Fi connection 478