2016 VOLVO XC90 T8 door lock
[x] Cancel search: door lockPage 5 of 546

3
Starting or moving a vehicle in safety mode88
Airbag system 89
Driver/passenger side airbags 89
Inflatable curtains 92
Side impact airbags 93
INSTRUMENTS AND CONTROLS
Trip computer96
Displaying trip computer information 97
Displaying trip statistics 98
HomeLink ®
Wireless Control System *99
Programming the HomeLink ®
Wire-
less Control System * 100
Instruments and controls 103
Adjusting the power door mirrors 105
Laminated panoramic roof *
106
Operating the laminated panoramic roof *
107
Power windows 109
Operating the power windows 109
Rearview mirror 110
Using sun shades 111
Settings view 111
Categories in Settings view 112
Changing system settings in Set- tings view 114
Changing settings in apps 115
Resetting the settings view 115
Resetting user data when the vehiclechanges owners 116
Ambient temperature sensor 116
Clock 117
Head-up display (HUD) *
117
Voice control
120
Using voice commands 121
Voice control for cell phones 122
Voice control for radio and media 122
Climate system voice commands 123
Navigation system voice commands 124
Voice control settings 125
Indicator symbols in the instrument panel 125
Instrument panel 127
Instrument panel App menu 129
Hybrid-related information in the instrument panel 130
Instrument panel licenses 132
Warning symbols in the instrument panel 137
Compass 139
Calibrating the compass 139
Lighting panel and controls 140
Low beam headlights 142
Daytime Running Lights (DRL) 142
High and low beam headlights 143
Active Bending Lights *
145
Brake lights 146
Rear fog lights 146
Hazard warning flashers 147
Parking lights 147
Page 67 of 546
SAFETY
}}
65
Seat belt pretensioners The vehicle's seat belts are equipped with stand- ard and electric pretensioners that can help pullthe seat belts taut in a critical situation or a colli-sion. Some or all of the pretensioners will betriggered in certain types of collisions, depend-ing on the direction and severity of the impact.
Reversible seat belt pretensionersReversible seat belt pretensioners is a system in the front seats that pulls the seat belts slightlytaut prior to a collision. This function helps posi-tion the front seat occupants to help improve theeffects of other safety systems, e.g., the airbagsystem.
Seat belt pretensioners in collisionsThe seat belts are equipped with standard pre-tensioners that are triggered according to theseverity of a collision.
Seat belt pretensioners in critical
situations
In addition to the standard pretensioners, theseat belts in the front seats are also equippedwith electric pretensioners. The pretensioners interact and can be triggered along with the City Safety and Rear CollisionWarning systems. In critical situations such assudden braking, evasive maneuvers, etc., the seatbelt can be pulled taut by the pretensioner'selectric motor. The electric pretensioner positions the occupantin the seat to help reduce the risk of striking theinterior of the passenger compartment andimproves the effect of other safety systems suchas the airbags.
Resetting the electric pretensioners
When a critical situation has passed, the seat belt and the electric pretensioner are reset automati-cally. If the seat belt should remain taut:
1. Stop the vehicle safely.
2. Unbuckle the seat belt and rebuckle it.
> The seat belt and the electric preten-sioner will be reset.
Related information
• Seat belts (p. 64)
• Door and seat belt reminders (p. 67)
• Buckling and unbuckling seat belts (p. 65)
Buckling and unbuckling seat belts
Seat belts should be used by all occupants in the vehicle when it is in motion.
Buckling a seat belt1. Pull the belt out slowly. It should not be twis- ted or turned.
NOTE
Each seat belt is equipped with a seat belt retractor that will lock up in the following sit-uations:
• if the belt is pulled out rapidly
• during braking and acceleration
• if the vehicle is leaning excessively
• when driving in turns
• if the Automatic Locking Retractor/Emer- gency Locking Retractor (ALR/ELR) isactivated (each seat belt (except for thedriver's belt) is equipped with theALR/ELR function, which is designed tohelp keep the seat belt taut. ALR/ELRactivates if the seat belt is pulled out as faras possible. If this is done, a sound fromthe seat belt retractor will be audible,which is normal, and the seat belt will bepulled taut and locked in place. This func-tion is automatically disabled when theseat belt is unbuckled and fully retracted).
Page 72 of 546
||
SAFETY
* Option/accessory, for more information, see Introduction.
70
WARNING
• Do not use child safety seats or child booster cushions/backrests in the frontpassenger's seat. We also recommendthat children under 4 feet 7 inches(140 cm) in height who have outgrownthese devices sit in the rear seat with theseat belt fastened.
• Sedan models: Keep vehicle doors andtrunk locked and keep remote controlsout of a child
Page 88 of 546

||
SAFETY
86
ModificationsIf you are considering modifying your vehicle in any way to accommodate a disability, for exampleby altering or adapting the driver's or front pas-senger's seat(s) and/or airbag systems, pleasecontact Volvo at: In the USA Volvo Cars of North America, LLC Customer Care Center1 Volvo DriveP.O. Box 914Rockleigh, New Jersey 076471-800-458-1552 In Canada Volvo Cars of Canada Corp. National Customer Service9130 Leslie Street, Suite 101Richmond Hill, Ontario L4B 0B91-800-663-8255WARNING
•No objects that add to the total weight on the seat should be placed on the frontpassenger's seat. If a child is seated inthe front passenger's seat with any addi-tional weight, this extra weight couldcause the OWS system to enable the air-bag, which might cause it to deploy in theevent of a collision, thereby injuring thechild.
• The seat belt should never be wrappedaround an object on the front passeng-er's seat. This could interfere with theOWS system's function.
• The front passenger's seat belt shouldnever be used in a way that exerts morepressure on the passenger than normal.This could increase the pressure exertedon the weight sensor by a child, andcould result in the airbag being enabled,which might cause it to deploy in theevent of a collision, thereby injuring thechild.
WARNING
• Keep the following points in mind with respect to the OWS system. Failure tofollow these instructions could adverselyaffect the system's function and result inserious injury to the occupant of the frontpassenger's seat:
• The full weight of the front seat passen-ger should always be on the seat cushion.The passenger should never lift him/herself off the seat cushion using thearmrest in the door or the center console,by pressing the feet on the floor, by sit-ting on the edge of the seat cushion, orby pressing against the backrest in a waythat reduces pressure on the seat cush-ion. This could cause OWS to disable thefront, passenger's side airbag.
WARNING
•Do not place any type of object on the front passenger's seat in such a way thatjamming, pressing, or squeezing occursbetween the object and the front seat,other than as a direct result of the correctuse of the Automatic Locking Retractor/Emergency Locking Retractor (ALR/ELR)seat belt.
• No objects should be placed under thefront passenger's seat. This could inter-fere with the OWS system's function.
Page 101 of 546

INSTRUMENTS AND CONTROLS
}}
* Option/accessory, for more information, see Introduction.99
Open the
Driver performanceapp in the app menu to display trip statistics. Each bar in the graph repre- sents a driving distance of 1 mile, 10 miles or 100 miles
1
depending on the current scale; bars are added from the right and the bar at the far right showsthe value for the current trip. Average fuel consumption is calculated from the most recent time at which the current trip odom-eter was reset. Fuel and electrical current consumption are shown in separate graphs. The electrical currentgraph shows "net" consumption, i.e., consumedcurrent minus regenerated current generated bybraking.
Trip statistic settings
Select Preferences to:
• change the graph's scale
• Reset data after each trip (this occurs if the vehicle remains parked for more than 4hours)
• Reset data for the current trip
The illustration is generic; the layout may vary depending on the model or due to software updates
Changing the unit of measureChange the units of measure for driven distance and fuel consumption in the center display's Topview. 1.
Tap
Settings in Top view.
2. Tap
SystemUnits.
3. Under
Units, select: Metric, Imperial or US.
Related information
• Trip computer (p. 96)
• Displaying trip computer information (p. 97)
HomeLink ®
Wireless Control
System *
HomeLink ®
can be used to open garage doors,
gates, etc.
Button 1
Button 2
Button 3
Indicator light
The HomeLink ®
2
Wireless Control System pro-
vides a convenient way to replace up to three hand-held radio-frequency (RF) transmitters usedto activate devices such as gate operators,garage door openers, entry door locks, security
1 This can also be displayed in kilometers.
2 HomeLink and the HomeLink house are registered trademarks of Gentex Corporation.
Page 104 of 546
||
INSTRUMENTS AND CONTROLS
102
Gate Operator/Canadian Programming
Canadian radio-frequency laws require transmit- ter signals to “time-out” (or quit) after severalseconds of transmission – which may not be longenough for HomeLink to pick up the signal dur-ing programming. Similar to this Canadian law,some U.S. gate operators are designed to “time-out” in the same manner. If you live in Canada or you are having difficulties programming a gate operator or garage dooropener by using the “Programming” procedures, replace “Programming HomeLink” step 3 with the following:
• Continue to press and hold the HomeLink button while you
press and release - every
two seconds (“cycle”) your hand-held trans-
mitter until the HomeLink indicator light changes from a slow to a rapidly blinkinglight. Now you may release both the Home-Link and hand-held transmitter buttons.
Proceed with “Programming” step 4 to complete.
Using HomeLink ®When programming has been completed, HomeLink
®
can be used instead of the original
remote controls. To operate, press and hold the programmed HomeLink ®
button until the trained device begins
to operate 3
(this may take several seconds). The indicator light will glow steadily or flash when the button has been pressed. Activation will nowoccur for the trained device (i.e., garage dooropener, gate operator, security system, entry doorlock, home/office lighting, etc.).
NOTE
If the ignition is switched off, HomeLink will function for 30 minutes after the driver's doorhas been opened.
For convenience, the hand-held transmitter of the device may also be used at any time. In the event that there are still programming diffi- culties or questions, contact HomeLink at:www.HomeLink.com, www.youtube.com/HomeLinkGentex or by phoning the hotline at 1–800–355–3515.
Resetting HomeLink
®
buttonsUse the following procedure to reset (erase pro- gramming) from the three HomeLink ®
buttons
(individual buttons cannot be reset but can be “reprogrammed” as outlined in the following sec-tion): 1. Press and hold HomeLink ®
buttons 1 and 3
for approx. 10 seconds until the indicator light begins to flash green. 2. Release both buttons.
>HomeLink ®
is now in the training (or
learning) mode and can be programmedat any time beginning with “To program HomeLink ®
" above.
Reprogramming a single HomeLink ®
button
To reprogram an individual HomeLink ®
button:
1. Press and hold the desired HomeLink ®
but-
ton. DO NOT release the button.
2. The yellow indicator light will begin to flash after 20 seconds. Without releasing the HomeLink button, proceed with “To program HomeLink ®
" step 1 above.
For questions or comments, contact HomeLink at: www.HomeLink.com, www.youtube.com/HomeLinkGentex or by phoning the hotline at 1–800–355–3515.
FCC (USA) and IC (Canada)This device complies with FCC rules part 15 andIndustry Canada RSS-210. Operation is subjectto the following two conditions: (1) This devicemay not cause harmful interference, and (2) Thisdevice must accept any interference that may bereceived including interference that may causeundesired operation. WARNING: The transmitterhas been tested and complies with FCC and IC
3 Do not hold the button for more than 20 seconds as this will clear the programming of the button.
Page 106 of 546
||
INSTRUMENTS AND CONTROLS
* Option/accessory, for more information, see Introduction.
104
Display/function/control
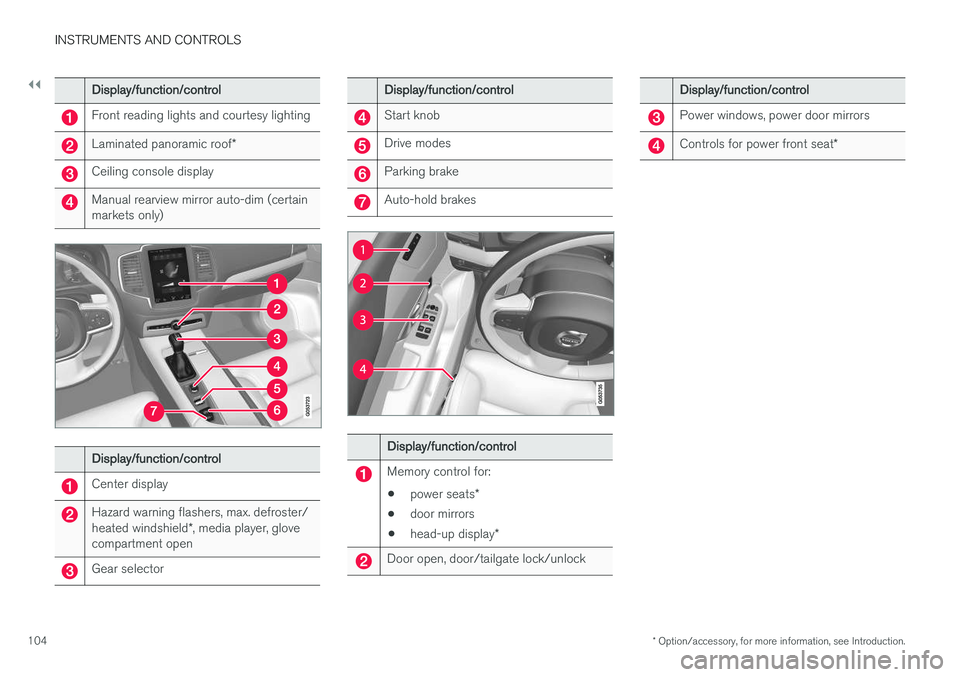
Front reading lights and courtesy lighting
Laminated panoramic roof *
Ceiling console display
Manual rearview mirror auto-dim (certain markets only)
Display/function/control
Center display
Hazard warning flashers, max. defroster/ heated windshield*, media player, glove
compartment open
Gear selector
Display/function/control
Start knob
Drive modes
Parking brake
Auto-hold brakes
Display/function/control
Memory control for:
• power seats
*
• door mirrors
• head-up display
*
Door open, door/tailgate lock/unlock
Display/function/control
Power windows, power door mirrors
Controls for power front seat *
Page 107 of 546
INSTRUMENTS AND CONTROLS
}}
* Option/accessory, for more information, see Introduction.105
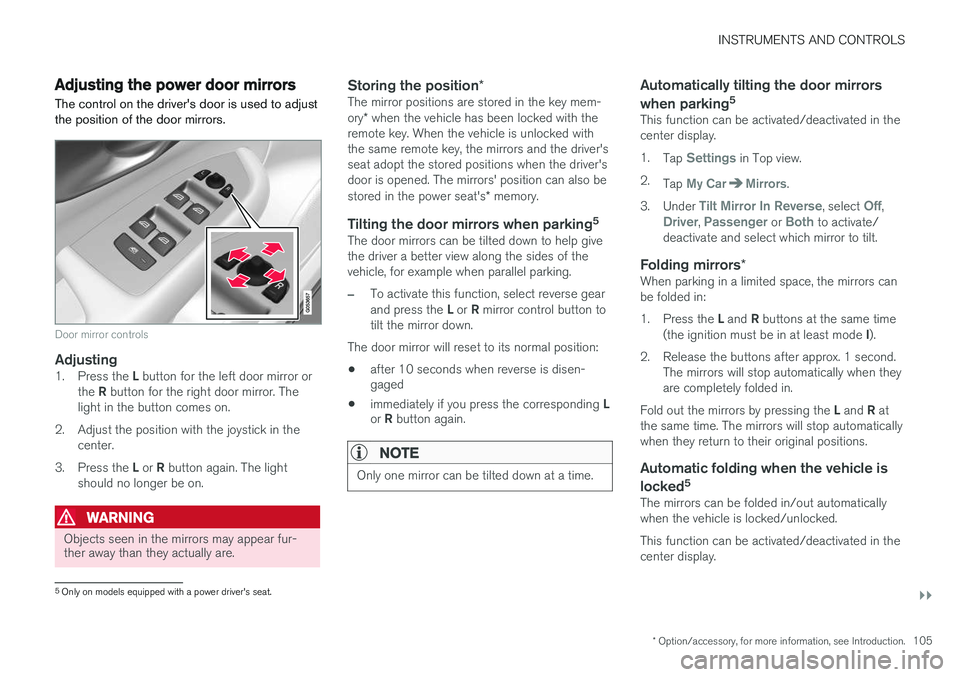
Adjusting the power door mirrors
The control on the driver's door is used to adjust the position of the door mirrors.
Door mirror controls
Adjusting1. Press the L button for the left door mirror or
the R button for the right door mirror. The
light in the button comes on.
2. Adjust the position with the joystick in the center.
3. Press the L or R button again. The light
should no longer be on.
WARNING
Objects seen in the mirrors may appear fur- ther away than they actually are.
Storing the position *The mirror positions are stored in the key mem- ory* when the vehicle has been locked with the
remote key. When the vehicle is unlocked with the same remote key, the mirrors and the driver'sseat adopt the stored positions when the driver'sdoor is opened. The mirrors' position can also be stored in the power seat's * memory.
Tilting the door mirrors when parking 5The door mirrors can be tilted down to help give the driver a better view along the sides of thevehicle, for example when parallel parking.
–To activate this function, select reverse gear and press the
L or R mirror control button to
tilt the mirror down.
The door mirror will reset to its normal position:
• after 10 seconds when reverse is disen- gaged
• immediately if you press the corresponding
L
or R button again.
NOTE
Only one mirror can be tilted down at a time.
Automatically tilting the door mirrors when parking 5
This function can be activated/deactivated in the center display. 1.
Tap
Settings in Top view.
2. Tap
My CarMirrors.
3. Under
Tilt Mirror In Reverse, select Off,Driver, Passenger or Both to activate/
deactivate and select which mirror to tilt.
Folding mirrors *When parking in a limited space, the mirrors can be folded in: 1.
Press the L and R buttons at the same time
(the ignition must be in at least mode I).
2. Release the buttons after approx. 1 second. The mirrors will stop automatically when they are completely folded in.
Fold out the mirrors by pressing the L and R at
the same time. The mirrors will stop automaticallywhen they return to their original positions.
Automatic folding when the vehicle is
locked 5
The mirrors can be folded in/out automaticallywhen the vehicle is locked/unlocked. This function can be activated/deactivated in the center display.
5
Only on models equipped with a power driver's seat.