Page 65 of 184

Folding in the exterior mirrors
The mirror can be manually folded in towards the side window. To put it back
into its original position, it should be folded back from the side window until it
audibly clicks into place.WARNINGDo not touch the exterior mirror surfaces, if the exterior mirror heating is
switched on - hazard of burning.Seats and head restraints
Front seats
Introduction
This chapter contains information on the following subjects:
Adjusting the front seats
63
Setting the armrest height
64WARNING■ Only adjust the driver's seat when the vehicle is stationary – otherwise
risk of accident!■
Caution when adjusting the seat! You may suffer injuries or bruises as a
result of adjusting the seat without paying proper attention.
Adjusting the front seats
Fig. 54
Control elements on the seat
Read and observe on page 63 first.
The seats can be adjusted by the pulling or pressing the operating element in
the direction of the arrows » Fig. 54.
Adjusting the seat in the longitudinal direction (after releasing the control
lever must lock audibly)
Adjusting height of seat
Adjust the tilt of the backrest (during adjustment, release the backrest and
select the required tilt using your back)
Note
After a certain time, play can develop within the adjustment mechanism of the
backrest angle.ABC63Seats and head restraints
Page 66 of 184

Setting the armrest heightFig. 55
Raise armrest
Read and observe on page 63 first.
›
To adjust the height , lift the armrest in the direction of the arrow into one of
the six locking positions » Fig. 55.
›
To fold down , lift the armrest in the direction of the arrow up to the stop and
then fold back down again.
Rear seats
Introduction
This chapter contains information on the following subjects:
Seat backrests
64
Fold down armrest
65
Seat backrests
Fig. 56
Folding the seat backrest forwards/standby position of the seat
belt
Before folding the seat backrests forwards, adapt the position of the front
seats in such a way that they are not damaged by the folded seat backrests.
Folding forward›
Push the headrest into the seat backrest until it clicks into position.
›
Insert the belt buckle latching element
C
of the seat belt into the opening in
the side panel - ready position » Fig. 56.
›
Push the release lever
A
in the direction of arrow
1
and fold down the seat
backrest in the direction of arrow
2
.
In the undivided seat back, insert the buckle tongues
C
into the two outer
belts and the press the release handles
A
on both sides of the seat back si-
multaneously.
Folding backwards
›
Pull the outer seat belt to the side panel in the direction of arrow
3
» Fig. 56 .
›
Raise the seat backrest against the direction of arrow
2
until the release
handle
A
audibly locks. Check this by pulling on the seat backrest.
›
Make sure that the red pin
B
is hidden.
In the undivided seat back, pull the two outer belts to the side panel. After
folding back the seat back, the release handles
A
should audibly click into
place on both sides of the seat back and the red mark
B
should not be visible
on either side of the seat back.
WARNING■ The seat backs in occupied rear seats must be properly engaged.■When transporting objects in the luggage compartment that has been en-
larged by folding the backrest forward, ensure the safety of the passengers
transported on the other rear seats.■
The seat backrests must be securely locked in position so that no objects
in the luggage compartment can slide into the passenger compartment on
sudden braking – risk of injury.
CAUTION
When moving the seat backrest, the seat belts should not be trapped - there is
a risk of damage to the seat belts.64Using the system
Page 67 of 184

Fold down armrestFig. 57
Fold down armrest
The armrest can be folded down by pulling on the loop
A
in the direction of
arrow » Fig. 57 .
Headrests
Introduction
This chapter contains information on the following subjects:
Setting the height
65
Removing/inserting the front headrests
65
Removing/inserting the rear headrests
65
Note
In sports seats, the headrests are integrated into the seat backrests and can-
not be adjusted in height.
Setting the height
Fig. 58
Setting the height of the headrest
Adjustment of the head rest heights is the same in the front and rear.›
Grasp the headrest and move upwards in the direction of arrow
1
» Fig. 58 .
›
To move the headrest down, press the securing button
A
in the direction of
arrow
2
and hold it down while pressing the headrest in the direction of ar-
row
3
.
Removing/inserting the front headrests
Fig. 59
Removing/inserting the front headrest
›
To remove , hold the locking button
A
in direction of arrow
1
and remove
the support in the direction of arrow
2
» Fig. 59 .
›
To insert the headrest, push the headrest into the seat backrest in the direc-
tion of arrow
3
until the locking button clicks into place.
Removing/inserting the rear headrests
Fig. 60
Removing/inserting the rear headrest
65Seats and head restraints
Page 68 of 184
, press the
locking button in the opening B
in the directi")
›To
remove , hold the locking button A in the direction of arrow 1, at the
same time, using a flat screwdriver (with a max. width of 5 mm), press the
locking button in the opening B
in the direction of arrow
2
and remove the
rest in the direction of arrow
3
» Fig. 60 .
›
To insert the headrest, push the headrest into the seat backrest in the direc-
tion of arrow
4
until the locking button clicks into place.
Seat heaters
Fig. 61
Buttons for heating the front /rear seats
The seat backrests and surfaces of the front seats and the outer rear seats
can be heated electronically.
Seat heating buttons » Fig. 61
Left seat heating
Right seat heating
›
To turn on the heater at maximum heat (level 2), press button
or
.
By repeatedly pressing the button, the heat is turned down until it is com-
pletely switched off . The level of the seat heating is indicated by the number
of illuminated warning lights in the switch.
The seat heating only operates when the engine is running.
WARNINGIf you are sensitive to pain and/or temperature, e.g. through medication,
paralysis or because of chronic illness (e.g. diabetes), we recommend not to
use the seat heating. If the seat heating is used, we recommend to make
regular breaks in your journey when driving long distances, so that the
body can recuperate from the stress of the journey. Please consult your
doctor, who can evaluate your specific condition.CAUTIONThe following instructions must be observed to avoid damage to the seats.■Do not kneel on the seats or apply concentrated pressure to them.■
Do not switch on the heating for unoccupied seats.
■
Do not switch on the heating for seats which have objects on them (e.g. a
child seat, bag or similar).
■
Do not switch on the heating for seats which have seat covers or protective
covers on them.
Note
■ If the heaters are set to their highest intensity (level 2), they are automatical-
ly switched down to level 1 after 10 minutes.■
If the on-board voltage decreases, the seat heating switches off automati-
cally » page 133 , Automatic shutdown of consumers - vehicle battery dis-
charge protection .
66Using the system
Page 69 of 184

Useful features
Interior fittings
Introduction
This chapter contains information on the following subjects:
Ticket holder
67
stowage compartments in the doors
68
Storage compartment in the centre console
68
USB and AUX input
68
Storage compartment on the dashboard
68
Cup holders
69
Waste container
69
Cigarette lighter
70
Ashtray
70
12-volt socket
71
Multimedia holder
71
Storage compartment in the front arm rest
72
Glasses compartment
72
Storage compartment on the front passenger side
72
Storage compartment for umbrella
73
Clothes hook
73
Storage pockets on the backs of the front seats
73
Storage pockets on the inner sides of the front seats
73WARNING■ Do not place anything on the dashboard. These objects might slide or fall
down when driving and may distract you from concentrating on the traffic –
risk of accident!■
Make sure that while driving no objects can enter the driver's footwell -
they could cause an accident!
■
Do not carry any objects on the front passenger seat, except objects de-
signed for this purpose (e.g. child seats) – risk of accident!
■
No objects should be placed in the storage compartments nor in the
drinks holders; the vehicle occupants could be endangered if there is sud-
den braking or the vehicle collides with something.
WARNING (Continued)■ For safety reasons, lockable storage compartments should be closed
while driving - there is a risk of injury from the opened lid or through the
loose objects in the compartment.■
Make sure no objects protrude from the storage compartments - danger
of injury!
■
Do not exceed the permissible loads for the storage compartments and
pockets - risk of injury and risk of damage to the compartments and pock-
ets!
■
Ash, cigarettes, cigars and the like should only be stored in the ashtray -
danger of fire/burns!
■
The storage compartments, multimedia holder and waste container are
not a substitute for the ashtray and must not be used for such purposes –
risk of fire!
CAUTION
Do not place any large or sharp objects in the storage compartments and pock-
ets - there is a risk of damage to the compartments and pockets.
Ticket holder
Fig. 62
Ticket holder
Read and observe and on page 67 first.
The ticket holder » Fig. 62 is provided for the holding and displaying e.g. car
park tickets.
67Useful features
Page 70 of 184

stowage compartments in the doorsFig. 63
Storage compartment: in the front door/in the rear door
Read and observe
and on page 67 first.
Storage compartments » Fig. 63
Storage compartment
Bottle holder with a capacity of max. 1.5 l
Bottle holder with a capacity of max. 0.5 l
WARNINGThe storage compartment A » Fig. 63 is to be used exclusively for storing
objects which do not stick out - danger of restricting the effectiveness of
the side airbags.
Storage compartment in the centre console
Fig. 64
Non-lockable compartment, front / rear
ABCRead and observe and on page 67 first.
The non-lockable storage compartment is located in the front centre console
A
and in the rear centre console
B
» Fig. 64 .
USB and AUX input
Fig. 65
USB and AUX inputs
Read and observe and on page 67 first.
The USB input (marked with
) and AUX input (marked with
) are located
above the storage compartment in the front centre console » Fig. 65.
Information on use » Owner´s Manual - Infotainment .
Storage compartment on the dashboard
Fig. 66
Storage compartment
Read and observe and on page 67 first.
The storage compartment is located in the middle part of the dashboard
» Fig. 66 .
68Using the system
Page 71 of 184

Cup holdersFig. 67
Cup holder at the front/rear
Fig. 68
Cup holder in rear armrest
Read and observe and on page 67 first.
Two beverage containers can be placed into the cup holder.
The cup holders are located in the front centre console
A
, rear
B
» Fig. 67
and in the rear armrest
C
» Fig. 68 .
WARNING■
Do not use any cups or beakers which are made of brittle material (e.g.
glass, porcelain). This could lead to injuries in the event of an accident.■
Never put hot beverage containers in the cup holder. If the vehicle moves,
they may spill – risk of scalding!
CAUTION
Do not leave open beverage containers in the cup holder during the journey.
There is a risk of spilling e.g. when braking which may cause damage to the
electrical components or seat upholstery.Waste containerFig. 69
Waster containers: inserting and moving/opening
Fig. 70
Replacing bags
Read and observe
and on page 67 first.
The waste container can be inserted into the storage compartment in the
door.
Insert waste container
›
Position the waste container at the front edge of the slot.
›
Push the waste container to the back in the direction of the arrow
A
» Fig. 69 .
›
Push the waste container as required in the direction of arrow
B
.
Remove the waste container
›
Remove the waste container in the opposite direction to the arrow
A
» Fig. 69 .
69Useful features
Page 72 of 184

Open/close waste container›Lift the lid in the direction of arrow C » Fig. 69 .
Closing takes place in reverse order.
Replace bags›
Remove the waste container from the slot.
›
Press the two locking lugs on the frame in the direction of arrow
1
» Fig. 70 .
›
Pull the bag together with the frame down in the direction of arrow
2
.
›
Remove the bag from the frame.
›
Pull the new bag through the frame and pull it over the frame in the direction
of arrow
3
.
›
Place the bag with the frame in the direction of arrow
4
into the container
body, so that the two lugs engage audibly on the frame.
Note
We recommend that you use 20x30 cm bags.
Cigarette lighter
Fig. 71
Cigarette lighter
Read and observe and on page 67 first.
›
To use the lighter, push it in as far as the stop and wait until the glowing
lighter clicks out again » Fig. 71.
›
Take out the glowing lighter instantly, use it and insert it back into the sock-
et.
WARNING■ The cigarette lighter also works if the ignition is switched off. When leav-
ing the vehicle, never leave people who are not completely independent,
such as children, unattended in the vehicle - there is a risk of burning, fire
or damage to the vehicle interior.■
Be careful when using the cigarette lighter - can cause burns.
NoteThe cigarette lighter socket can also be used as a 12 volt socket.
Ashtray
Fig. 72
Remove front/rear ashtray and open
Read and observe
and on page 67 first.
The ashtray can be used for disposing of ash, cigarettes, cigars and the like.
›
Remove the ashtray in the direction of the arrow
A
» Fig. 72 .
›
To the Openturn the ashtray cover in the direction of arrow
B
.
Closing takes place in reverse order.
WARNINGNever place hot or flammable objects in the ashtray – risk of fire!70Using the system
 1
1 2
2 3
3 4
4 5
5 6
6 7
7 8
8 9
9 10
10 11
11 12
12 13
13 14
14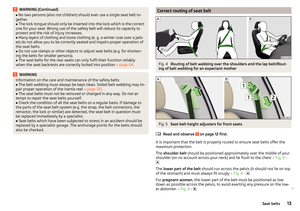 15
15 16
16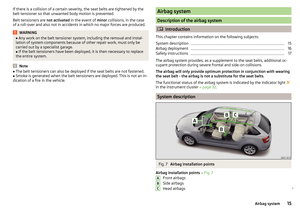 17
17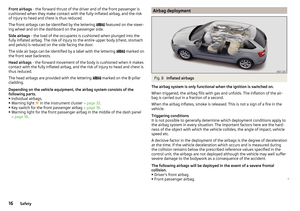 18
18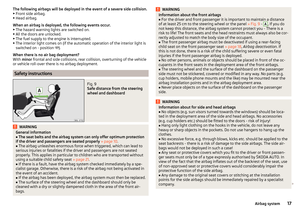 19
19 20
20 21
21 22
22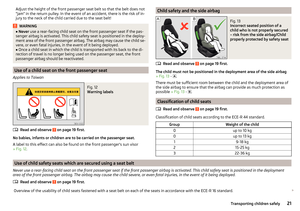 23
23 24
24 25
25 26
26 27
27 28
28 29
29 30
30 31
31 32
32 33
33 34
34 35
35 36
36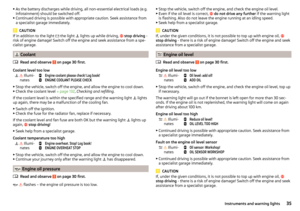 37
37 38
38 39
39 40
40 41
41 42
42 43
43 44
44 45
45 46
46 47
47 48
48 49
49 50
50 51
51 52
52 53
53 54
54 55
55 56
56 57
57 58
58 59
59 60
60 61
61 62
62 63
63 64
64 65
65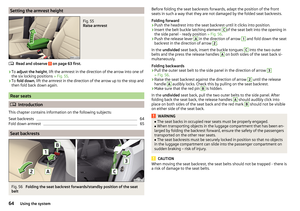 66
66 67
67 68
68 69
69 70
70 71
71 72
72 73
73 74
74 75
75 76
76 77
77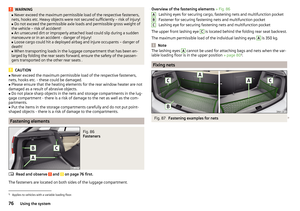 78
78 79
79 80
80 81
81 82
82 83
83 84
84 85
85 86
86 87
87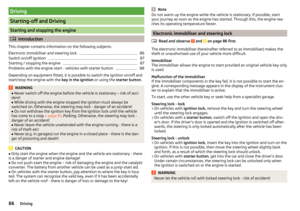 88
88 89
89 90
90 91
91 92
92 93
93 94
94 95
95 96
96 97
97 98
98 99
99 100
100 101
101 102
102 103
103 104
104 105
105 106
106 107
107 108
108 109
109 110
110 111
111 112
112 113
113 114
114 115
115 116
116 117
117 118
118 119
119 120
120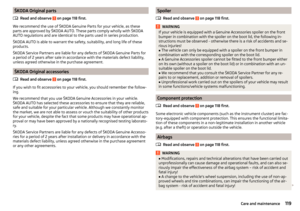 121
121 122
122 123
123 124
124 125
125 126
126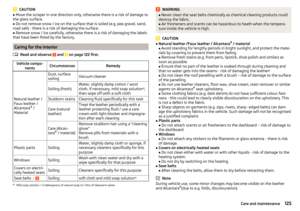 127
127 128
128 129
129 130
130 131
131 132
132 133
133 134
134 135
135 136
136 137
137 138
138 139
139 140
140 141
141 142
142 143
143 144
144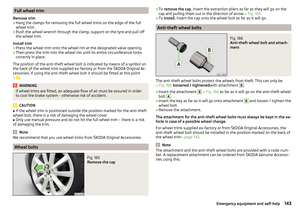 145
145 146
146 147
147 148
148 149
149 150
150 151
151 152
152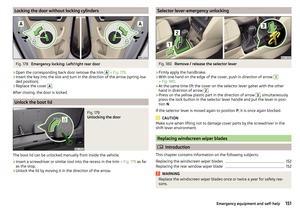 153
153 154
154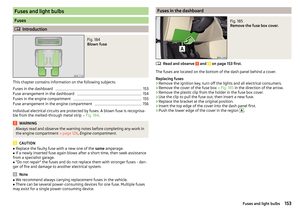 155
155 156
156 157
157 158
158 159
159 160
160 161
161 162
162 163
163 164
164 165
165 166
166 167
167 168
168 169
169 170
170 171
171 172
172 173
173 174
174 175
175 176
176 177
177 178
178 179
179 180
180 181
181 182
182 183
183