Page 65 of 172
 and
remove » Fig. 65 it in the direction of
the arrow.
Insertion takes place in reverse order.WARNINGNever place hot or flammable objects in the ashtray – ri")
›Grasp the ashtray (not by the lid) and
remove » Fig. 65 it in the direction of
the arrow.
Insertion takes place in reverse order.WARNINGNever place hot or flammable objects in the ashtray – risk of fire!
12-volt socket
Fig. 66
12-volt socket
Read and observe and on page 59 first.
›
To use , open the cover of the socket and insert the lead of the electrical ap-
pliance in the socket » Fig. 66.
The 12-volt socket will only work when the ignition is switched on.
WARNING■ Do not place anything on the dash panel. These objects might slide or fall
down when driving and may distract you from concentrating on the traffic –
risk of accident!■
Make sure that while driving no objects can enter the driver's footwell -
they could cause an accident!
■
Stow all devices safely during the journey to prevent them from being
thrown around the interior in the event of a sudden braking manoeuvre or
an accident – risk of death!
■
The devices may warm up during operation – risk of injury or fire!
■
Improper use of the power sockets and the electrical accessories can
cause fires, burns and other serious injuries.
CAUTION■ The sockets can only be used for the connection of approved electrical ac-
cessories with a total power consumption of up to 120 watts - otherwise the
electrical system of the vehicle may be damaged.■
Connecting appliances when the engine is not running will drain the vehicle's
battery!
■
Switch off the device connected to the power socket before you switch the
ignition on or off and before starting the engine - danger of damage caused by
voltage fluctuations.
Multimedia holder
Fig. 67
Multimedia holder
Read and observe and on page 59 first.
The multimedia holder » Fig. 67 is provided for storing mobile phones, MP3
players and the like.
63Useful features
Page 66 of 172

Storage compartment on the front passenger side - version 1Fig. 68
Storage compartment on the
front passenger side
Read and observe and on page 59 first.
The open stowage compartment
A
can be found underneath the dash panel
on the front passenger's side » Fig. 68.
There is a bag hook
B
in the stowage compartment which is used to hang
smaller items of luggage (e.g. bags, or similar).
The maximum permissible load on the hook is 1.5 kg.
Storage compartment on the passenger side - version 2
Fig. 69
Open storage compartment / interior of the storage compartment
Read and observe
and on page 59 first.
Storage compartment » Fig. 69
Opening lever
Glasses storage box
Notepad holder
ABCPen holder
Card holder
Coin holder
Open/close›
If there is a folding hook » Fig. 71 on page 65 on the handle
A
» Fig. 69 ,
remove any items hanging from it.
›
To open , pull the opening lever
A
in the direction of arrow
1
. The cover
folds in the arrow direction
2
.
›
To close , screw in the lid in the opposite direction of arrow
2
until it audibly
clicks into place.
Storage compartment for umbrella
Fig. 70
Storage compartment for the
umbrella
Read and observe and on page 59 first.
The storage compartment under the passenger seat » Fig. 70is used for stor-
ing an umbrella.
CAUTION
Never store a wet umbrella in the storage compartment - there is a risk of
damage to the umbrella.
Note
We recommend that you use the umbrella from the ŠKODA Original Accesso-
ries.DEF64Using the system
Page 67 of 172
.
›
To use it, pull d")
Foldable hookFig. 71
Fold down hook
Read and observe and on page 59 first.
The folding hook is intended to be used for holding small items of luggage (e.g.
bags or similar).
›
To use it, pull down the hook in the direction of the arrow » Fig. 71.
The maximum permissible load on the hook is 1.5 kg.
Note
When the hook is folded forward, it folds back automatically when the storage
compartment is opened.
Clothes hook
Fig. 72
Clothes hooks
Read and observe and on page 59 first.
The clothes hooks are located on the centre door bars of the vehicle » Fig. 72.
The maximum permissible load of each of the hooks is 2 kg.
WARNING■ Never leave any heavy or sharp-edged objects in the pockets of the items
of clothing hung up - danger of injury.■
Do not use hangers to hang up the clothes - there is a risk of restricting
the effectiveness of head airbags and a danger of injury from the hanger.
■
Make sure that any clothes hanging from the hooks do not impede your
vision.
Storage pockets on the inner sides of the front seats
Fig. 73
Storage pocket
Read and observe and on page 59 first.
The storage pockets are located on the inside of the front seats » Fig. 73 and
are used to store small and light objects (e.g. mobile phones).
The maximum permissible load for each of the pockets is 150 g.
65Useful features
Page 68 of 172

Stowage compartments in front of the rear seatsFig. 74
Storage compartment
Read and observe and on page 59 first.
The open storage compartments
A
are located on the backs of the front
seats » Fig. 74 .
Phone bracket
Introduction
This chapter contains information on the following subjects:
Fasten bracket to the adapter
66
Attach adapter to the panel
66
Inserting / removing phone
67
In the telephone bracket, a telephone (or similar device) which is 122x56 mm to
164x83 mm can be transversely mounted.
The maximum permissible load of the compartment is 200 g.
WARNINGNever work with the device when driving –There is a risk of accident!
CAUTION
■ Never exceed the maximum permissible load of the bracket- there is a risk of
damage or functional impairment.■
Make sure that no liquid or moisture gets into the opening for the fixture -
There is a risk of damage to the vehicle’s electrical system.
■
Use a dry cloth to clean the adapter and the bracket.
Fasten bracket to the adapterFig. 75
Insert bracket into the adapter / remove bracket from the adapter
Read and observe
and on page 66 first.
›
to Fixing the bracket to the adapter insert the bracket
A
into the supports
B
in direction of arrow
1
until it clicks » Fig. 75.
›
To remove the holder from the adapter press the lever
C
in direction of ar-
row
2
press and remove the bracket
A
in direction of arrow
3
.
Attach adapter to the panel
Fig. 76
Remove cover/ attach adapter / remove adapter
Read and observe
and on page 66 first.
Attach adapter
›
For example, insert a coin into the opening
A
and lift up cover in direction of
arrow
1
» Fig. 76 .
›
Insert the adapter into the opening in the panel and push in the direction of
arrow
2
until it clicks.
66Using the system
Page 69 of 172

Remove adapter›Push the release buttonB in the direction of arrow 3 and remove the
adapter in the direction of arrow 4
» Fig. 76 .
›
Seal the opening in the dashboard with the cover.
WARNINGAn incorrectly mounted adapter can break loose from the dashboard in sud-
den manoeuvre or an accident - there is risk of injury!
Inserting / removing phone
Fig. 77
Inserting phone / Removing phone
Read and observe
and on page 66 first.
Inserting phone
›
Insert the phone between the arms
A
move them in the direction of arrows
1
and secure the phone by doing so » Fig. 77.
›
Secure the phone by moving the arm
B
in direction of arrow
2
.
Removing phone
›
Press The key
C
in direction of arrow
3
the arm
B
moves into the starting
position in the direction of arrow
4
» Fig. 77 .
›
Remove the phone from the bracket.
›
To adjust the lower arms to the starting position, lift the holder with the
adapter of the panel and press the button
D
.
Transport of cargo
Luggage compartment and transporting objects
Introduction
This chapter contains information on the following subjects:
Fasteners
68
Fixing nets
68
Luggage compartment cover
69
Variable loading floor
69
Class N1 vehicles
70
When transporting heavy objects, the driving characteristics change due to the
shift in centre-of-gravity. The speed and style of driving must be adjusted ac-
cordingly.
When transporting cargo the following instructions must be adhered to
▶ Distribute the load evenly in the luggage compartment and secure it with
suitable lashing straps to the lashing eyes or fixing nets so that they cannot
slip.
▶ Place heavy objects as far forward as possible.
▶ Tyre pressure should be adjusted for the load.
In the event of an accident, even small and light objects gain so much kinetic
energy that they can cause severe injuries.
The magnitude of the kinetic energy is dependent on the speed at which the
vehicle is travelling and the weight of the object.
Luggage compartment light
The light switches on/off when the luggage compartment lid is opened or
closed.
If the boot lid is open and the ignition switched off, the light will go out auto-
matically after 10 minutes.
67Transport of cargo
Page 70 of 172

WARNING■Never exceed the maximum permissible load of the respective fasteners,
nets, hooks etc. If heavy objects have not been suitably secured, there is a
risk of injury!■
Do not exceed the permissible axle loads and permissible gross weight of
the vehicle – risk of accident!
■
An unsecured dirt or improperly attached load could slip during a sudden
manoeuvre or in an accident - danger of injury!
■
Loose cargo could hit a deployed airbag and injure occupants – danger of
death!
■
When transporting loads in the luggage compartment that has been en-
larged by folding one of the rear seats forward, care should be taken to en-
sure the safety of passengers transported on the other rear seat.
CAUTION
■ Never exceed the maximum permissible load for the respective fasteners,
nets, hooks etc. - these could be damaged.■
Please ensure that the heating elements for the rear window heater are not
damaged as a result of abrasive objects.
■
Do not place any sharp objects in the nets in the luggage compartment -
there is a risk of damage to the nets.
Fasteners
Fig. 78
Fasteners
Read and observe and on page 68 first.
The fasteners are located on both sides of the luggage compartment.
Overview of the fastening elements » Fig. 78
Fasteners only for fastening fixing nets
Hooks for hanging small items of luggage (e.g. bags)
Lashing eye for fastening the load
The maximum static load for each hook B
is 1.5 kg and the individual lashing
eyes
C
is 350 kg.
WARNINGDo not use hook B » Fig. 78 to lash down any objects - there is a risk of
damage to the hook during sudden braking or a vehicle collision.
Fixing nets
Fig. 79
Example of how to fix nets/fastening details for the rear area of
the luggage compartment
ABC68Using the system
Page 71 of 172

Fig. 80
Details of the fastening behind the rear seats
Read and observe
and on page 68 first.
Fastening examples for nets » Fig. 79 and » Fig. 80
cross bags
Fastening details in the rear area of the luggage compartment
Details of the fastening to the upper lashing eyes behind the foldable rear
seat rest
Details of the fastening to the lashing eyes on the luggage compartment
floor behind the rear seats
The maximum permissible load for each of the nets is 1.5 kg.
Luggage compartment cover
Fig. 81
Remove the luggage compartment cover
Read and observe
and on page 68 first.
If the support straps
A
» Fig. 81 are attached to the boot lid, then opening the
lid will raise the boot lid cover (hereafter referred to as cover).
Fold up and lock›Raise the cover and bolt it down » Fig. 81on both sides of the boot lid in the
studs B
.
Unlocking
›
Fold the raised cover down. The cover is released from the studs
B
» Fig. 81 .
Removal
›
On both sides of the boot lid unhook the straps
A
in the direction of arrow
1
» Fig. 81 .
›
Press down on both sides on the underside of the cover to free them from
the studs
C
.
›
Take out the cover in the direction of arrow
2
.
Inserting
›
Position the fixtures
D
on the cover over the studs
C
» Fig. 81 .
›
Press down on both sides on the top of the cover in the area of the studs
C
.
The fixtures
D
must lock into place in the studs
C
on both sides of the lug-
gage compartment.
›
On both sides of the boot lid unhook the straps
A
.
WARNING■ Do not place any objects on the cover during the trip - risk of injury if
braking suddenly or colliding!■
Never ride with the cover up - risk of damage to the cover.
Variable loading floor
Fig. 82
Variable loading floor in the raised position: raise / raised
69Transport of cargo
Page 72 of 172

Fig. 83
Variable loading floor: lower / lowered
Read and observe
and on page 68 first.
›
To raise the loading floor, grasp handle
A
and raise as far as the stop in the
direction of arrow
1
» Fig. 82 .
›
To lower it, lift the loading floor, push it into the grooves in the direction of
arrow
2
insert and lay it on the luggage compartment floor in direction of
arrow
3
.
Class N1 vehicles
Read and observe
and on page 68 first.
In class N1 vehicles that are not fitted with a protective grille, a lashing set that
complies with the EN 12195 standard (1-4) must be used for fastening the load.
For safe vehicle operation, the proper functioning of the electrical installation
is essential. It is important to ensure that it is not damaged in adaptation as
well as the loading and unloading of the cargo space.
Transportation on the roof rackFig. 84
Attachment points - 3-door
Fig. 85
Attachment points - 5-door
The attachment points
A
and
B
are located on both sides of the vehicle
» Fig. 84 and » Fig. 85 .
The basic carrier should be mounted and dismounted in accordance with the
instructions provided.
Roof load
The maximum permitted weight of the load incl. carriers is 50 kg.
WARNINGThe following instructions must be observed to aid road safety when trans- porting cargo on the roof rack.■
Always distribute the load on the roof rack evenly and secure properly
with suitable lashing straps or tensioning straps.
70Using the system
 1
1 2
2 3
3 4
4 5
5 6
6 7
7 8
8 9
9 10
10 11
11 12
12 13
13 14
14 15
15 16
16 17
17 18
18 19
19 20
20 21
21 22
22 23
23 24
24 25
25 26
26 27
27 28
28 29
29 30
30 31
31 32
32 33
33 34
34 35
35 36
36 37
37 38
38 39
39 40
40 41
41 42
42 43
43 44
44 45
45 46
46 47
47 48
48 49
49 50
50 51
51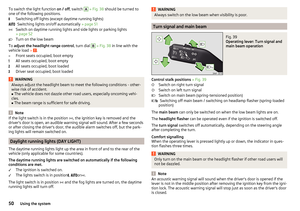 52
52 53
53 54
54 55
55 56
56 57
57 58
58 59
59 60
60 61
61 62
62 63
63 64
64 65
65 66
66 67
67 68
68 69
69 70
70 71
71 72
72 73
73 74
74 75
75 76
76 77
77 78
78 79
79 80
80 81
81 82
82 83
83 84
84 85
85 86
86 87
87 88
88 89
89 90
90 91
91 92
92 93
93 94
94 95
95 96
96 97
97 98
98 99
99 100
100 101
101 102
102 103
103 104
104 105
105 106
106 107
107 108
108 109
109 110
110 111
111 112
112 113
113 114
114 115
115 116
116 117
117 118
118 119
119 120
120 121
121 122
122 123
123 124
124 125
125 126
126 127
127 128
128 129
129 130
130 131
131 132
132 133
133 134
134 135
135 136
136 137
137 138
138 139
139 140
140 141
141 142
142 143
143 144
144 145
145 146
146 147
147 148
148 149
149 150
150 151
151 152
152 153
153 154
154 155
155 156
156 157
157 158
158 159
159 160
160 161
161 162
162 163
163 164
164 165
165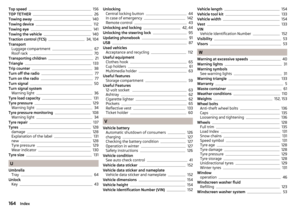 166
166 167
167 168
168 169
169 170
170 171
171