Page 9 of 248
The essentials
Interior view (left-hand drive)1 ››› page 13
2 ››› page 21
3 ››› page 22
4 ››› page 34 5
››› page 35
6 ››› page 23
7 ››› page 25
8 ››› page 24 9
››› page 39
10 ››› page 22
11 ››› page 14
12 ››› page 21 13
››› page 37
14 ››› page 11
15 ››› page 10
16 ››› page 44 17
››› page 12
18 ››› page 12
19 ››› page 13 7
Page 10 of 248
The essentials
Interior view (right-hand drive)1 ››› page 22
2 ››› page 34
3 ››› page 22
4 ››› page 39 5
››› page 24
6 ››› page 23
7 ››› page 25
8 ››› page 35 9
››› page 21
10 ››› page 13
11 ››› page 10
12 ››› page 14 13
››› page 13
14 ››› page 37
15 ››› page 12
16 ››› page 12 17
››› page 21
18 ››› page 44
19 ››› page 11 8
Page 11 of 248

The essentials
How it works
Openin g and c
lo
sing
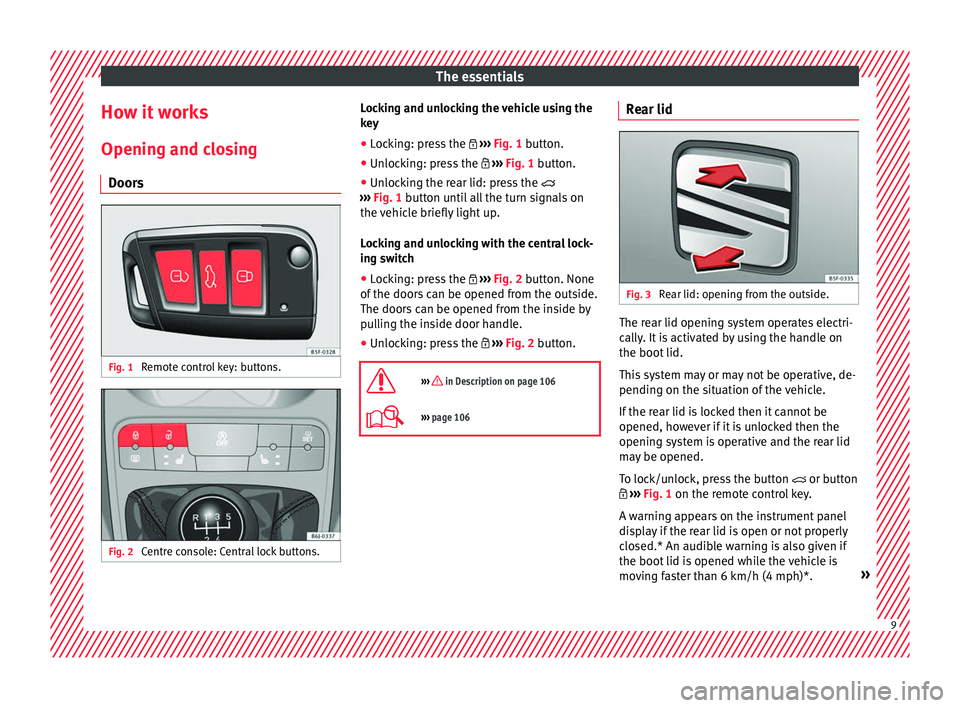
Doors Fig. 1
Remote control key: buttons. Fig. 2
Centre console: Central lock buttons. Locking and unlocking the vehicle using the
k
ey
● Loc
king: press the ›››
Fig. 1 button.
● Unlocking: press the ›››
Fig. 1 button.
● Unlocking the rear lid: press the
›››
Fig. 1 button until all the turn signals on
the vehicle briefly light up.
Locking and unlocking with the central lock-
ing switch
● Locking: press the ›››
Fig. 2 button. None
of the doors can be opened from the outside.
The doors can be opened from the inside by
pulling the inside door handle.
● Unlocking: press the ›››
Fig. 2 button.
››› in Description on page 106
››› page 106 Rear lid
Fig. 3
Rear lid: opening from the outside. The rear lid opening system operates electri-
c
al
ly
. It is activated by using the handle on
the boot lid.
This system may or may not be operative, de-
pending on the situation of the vehicle.
If the rear lid is locked then it cannot be
opened, however if it is unlocked then the
opening system is operative and the rear lid
may be opened.
To lock/unlock, press the button or button
››› Fig. 1 on the remote control key.
A warning appears on the instrument panel
display if the rear lid is open or not properly
closed.* An audible warning is also given if
the boot lid is opened while the vehicle is
moving faster than 6 km/h (4 mph)*. » 9
Page 12 of 248

The essentials
● Openin g the r
e
ar lid: Pull on the release
lever and lift it up ››› Fig. 3. The rear lid opens
automatically.
● Closing the rear lid: Hold it by one of the
handle
s on the interior lining and close it by
pushing gently.
››› in Opening and closing on
page 114
››› page 10 Unlocking the rear lid manually
Fig. 4
Unlocking the rear lid manually. This allows the vehicle to be opened if the
c
entr
al
locking does not work (for example, if
the battery is flat) There is a groove in the luggage compart-
ment allo
wing access to the emergency
opening mechanism.
Opening the rear lid from inside the luggage
compartment
● Insert the key in the groove and unlock the
lockin
g system, turning the key from right to
left, as shown by the arrow ››› Fig. 4.
Bonnet Fig. 5
Release lever in the driver's footwell
ar e
a. Fig. 6
Cam under the bonnet ●
Opening the bonnet: Pull the lever under
the d a
shbo
ard ››› Fig. 5 1 .
● Lifting up the bonnet: press the release
c at
c
h under the bonnet upwards ››› Fig. 6 2 .
The arr e
s
ter hook under the bonnet is re-
leased.
● Release the bonnet stay and secure it in
the fixtur
e designed for this in the bonnet.
››› in safety notes for work in the en-
gine compartment on page 198
››› page 198 10
Page 13 of 248

The essentials
Electric windows* Fig. 7
Detail of the driver door: controls for
the w indo
w
s. ●
Opening the window: Press the butt
on.
● C
losing the window: Pull the button.
B
uttons on the driver door Window on the front left door
Window on the front right door
Safety switch for deactivating the electric
window buttons on the rear doors (only 5-
door vehicles)
Window on the rear left door (only 5-door
vehicles)
Window on the right rear door (only 5-
door vehicles)
1 2
3
4
5
››› in Opening and closing of the elec-
tric windows* on page 114
››› page 114 Panoramic roof*
Fig. 8
On the interior roof lining: Panoramic
s u
nr
oof controls ●
Opening: Press the ››
›
Fig. 8 A button once
on ly
. If
you keep it pressed down, it will open
to the desired position.
● Closing: Press the ›››
Fig. 8 B button once
on ly
. If
you keep it pressed down, it will close
to the desired position.
Restoring one-touch opening and closing
● Close the sunroof manually until it is com-
pl et
ely closed. Release the button. ●
Pre s
s the closing button again, keeping it
pressed down, until a complete opening and
closing cycle has taken place.
››› in Opening or closing of the tilting
panoramic roof on page 116
››› page 116
››› page 11 Operation of the panoramic sunroof
Fig. 9
Emergency operation of the panoram-
ic/ti lting s
unroof. In case of a breakdown, the sunroof may be
c
lo
sed m
anually.
● Remove the plastic cover by inserting a
scr
ewdriver into the rear section. » 11
Page 14 of 248
The essentials
● Inser
t
an Allen key (4 mm) into the opening
as far as possible and close the sunroof.
Before driving Manual
ly adjusting the front seats Fig. 10
Front seats: manual seat adjustment. Forward/back: pull the lever and move
the se
at
f
orwards or backwards.
Raising/lowering: pull/push the lever.
Tilting the backrest: turn the hand wheel.
1 2
3 Folding down the backrest (only 3-door
v
ehic
l
es): pull the lever and push the
backrest forward.
››› in Adjusting the front seats on
page 127 Adjusting the head restraints
Fig. 11
Front seat: adjustment of the head re-
s tr aint
. ●
Grab the sides of the head restraints with
both h and
s
and push upwards to the desired
position. To lower it, repeat the same action,
pressing the 1 button on the side.
››› in Adjusting or disassembling the
head restraints on page 128
››› page 60, ››› page 128 4
Adjustment of the seat belt
Fig. 12
Positioning and removing the seat
belt b
uc
kle. 12
Page 15 of 248

The essentials
Fig. 13
Correct seat belt and head restraint
pos ition
s, viewed from front and the side. To adjust the seat belt around your should-
er
s, a
dju
st the height of the seats.
The shoulder part of the seat belt should be
well centred over it, never over the neck. The
seat belt lies flat and fits comfortably on the
upper part of the body.
The lap part of the seat belt lies across the
pelvis, never across the stomach. The seat
belt lies flat and fits comfortably on the pel-
vis.
››› page 63
››› page 64 Seat belt tensioners
During a collision, the seat belts on the front
seats
ar
e retracted automatically.
The tensioner can be triggered only once.
››› in Service and disposal of belt ten-
sioners on page 66
››› page 65 Adjusting the exterior mirrors
Fig. 14
Detail of the driver door: control for
the e xt
erior mirr
or. Adjusting the exterior mirrors: Turn the knob
t
o the c
orr
esponding position:
Turning the knob to the desired posi-
tion, adjust the mirrors on the driver
L/R side (L, left) and the passenger side (R,
right) to the direction de
sired.
Folding in mirrors.
››› in Electric exterior mirrors* on
page 126
››› page 126 Adjusting the steering wheel
Fig. 15
Lever in the lower left side of the
s t
eerin
g column. ●
Adjusting the position of the steering
wheel: P ul
l the ››› Fig. 15 1 lever down,
mo v
e the s
teering wheel to the desired posi-
tion and lift the lever back up until it locks.
››› in Adjusting the steering wheel po-
sition on page 58
13
Page 16 of 248

The essentials
Airbags fr ont
airb
agsFig. 16
Driver airbag located in steering
wheel . Fig. 17
Front passenger airbag located in
d ash p
anel. The front airbag for the driver is located in
the s
t
eerin
g wheel ››› Fig. 16 and the airbag
for the front passenger is located in the dash
panel ››› Fig. 17. Airbags are identified by the
word “AIRBAG”.
When the driver and front passenger airbags
are deployed, the covers remain attached to
the steering wheel and dashboard, respec-
tively ››› Fig. 16 ››› Fig. 17.
In conjunction with the seat belts, the front
airbag system gives the driver and the front
passenger additional protection for the head and chest in the event of a severe frontal col-
lision.
The s
pecial design of the airbag allows the
controlled escape of the propellant gas when
an occupant puts pressure on the bag. Thus,
the head and chest are surrounded and pro-
tected by the airbag. After the collision, the
airbag deflates sufficiently to allow visibility.
››› page 69 Deactivating the front passenger front
airb
ag Fig. 18
Front passenger front airbag switch. To deactivate the front passenger front air-
b
ag:
● Open the glo v
e compartment on the front
pas
senger side. 14