Page 209 of 248

Checking and refilling levels
WARNING
Brake fluid is poisonous. Old brake fluid im-
pair s
the braking effect.
● Before opening the bonnet to check the
brake fluid l
evel, read and observe the warn-
ings ››› page 198.
● Brake fluid should be stored in the closed
original
container in a safe place out of reach
of children. There is a toxic risk.
● Perform the brake fluid change according to
the Mainten
ance Programme. Heavy use of
the brakes may cause a vapour lock if the
brake fluid is left in the brake system for too
long. This would seriously affect the effec-
tiveness of the brakes and the safety of the
vehicle. This may cause an accident. CAUTION
Brake fluid damages the vehicle paintwork.
Wipe off an
y brake fluid from the paintwork
immediately. For the sake of the environment
The brake pads and brake fluid must be col-
lect ed and di
sposed of according the applica-
ble regulations. The SEAT Technical Service
network has the necessary equipment and
qualified personnel for collecting and dispos-
ing of this waste material. Windscreen washer reservoir
Top
pin
g up the windscreen washer
reservoir water Read the additional information carefully
›› ›
page 43
The windscreen washer and the headlight
washers are supplied with fluid from the
windscreen washer fluid container in the en-
gine compartment. The container holds ap-
prox. 3 litres; in vehicles with headlight
washers* it holds approx. 4.5 litres.
The tank is in the engine compartment.
Plain water is not enough to clean the wind-
screen and headlights. We recommend that
you always add a product to the windscreen
washer fluid. Approved windscreen cleaning
products exist on the market with high deter-
gent and anti-freeze properties, these may be
added all-year-round. Please follow the dilu-
tion instructions on the packaging. WARNING
Any work carried out in the engine compart-
ment or on the en gine mu
st be carried out
cautiously.
● When working in the engine compartment,
alwa
ys observe the safety warnings
››› page 198. CAUTION
● Never p ut
radiator anti-freeze or other addi-
tives into the windscreen washer fluid.
● Always use approved windscreen cleansing
products
diluted as per instructions. If you
use other washer fluids or soap solutions,
the tiny holes in the fan-shaped nozzles
could become blocked. Vehicle battery
Symbo l
s and warnings on handling
the battery Read the additional information carefully
› ›
›
page 43
Wear eye protection
Battery acid is extremely corrosive. Wear protec-
tive gloves and eye protection!
Fires, sparks, open flames and smoking are pro-
hibited!
A highly explosive mixture of gases is released
when the battery is under charge.
Keep children away from acid and batteries!»
207
Technical data
Advice
Operation
Emergencies
Safety
Page 210 of 248

Advice
WARNING
Always be aware of the danger of injury and
chemic a
l burns as well as the risk of accident
or fire when working on the battery and the
electrical system:
● Wear eye protection. Protect your eyes,
skin and clothin
g from acid and particles con-
taining lead.
● Battery acid is extremely corrosive. Wear
protectiv
e gloves and eye protection. Do not
tilt the batteries. This could spill acid through
the vents.
● Rinse battery acid from eyes immediately
for sever
al minutes with clear water. Then
seek medical care immediately. Neutralise
any acid splashes on the skin or clothing
with a soapy solution, and rinse off with plen-
ty of water. If acid is swallowed by mistake,
consult a doctor immediately.
● Fires, sparks, open flames and smoking are
prohibit
ed. When handling cables and electri-
cal equipment, avoid causing sparks and
electrostatic charge. Never short the battery
terminals. High-energy sparks can cause in-
jury.
● A highly explosive mixture of gases is re-
lea
sed when the battery is under charge. The
batteries should be charged in a well-ventila-
ted room only.
● Keep children away from acid and batteries.
● Before working on the electrical system,
you mus
t switch off the engine, the ignition
and all electrical devices. The negative cable on the battery must be disconnected. When a
light b
u
lb is changed, you need only switch
off the light.
● Deactivate the anti-theft alarm by unlock-
ing the v
ehicle before you disconnect the bat-
tery! The alarm will otherwise be triggered.
● When disconnecting the battery from the
vehicl
e on-board network, disconnect first
the negative cable and then the positive ca-
ble.
● Switch off all electrical devices before re-
connecting the b
attery. Reconnect first the
positive cable and then the negative cable.
Never reverse the polarity of the connections.
This could cause an electrical fire.
● Never charge a frozen battery, or one which
has
thawed. This could result in explosions
and chemical burns. Always replace a battery
which has frozen. A flat battery can also
freeze at temperatures close to 0°C (+32°F).
● Ensure that the vent hose is always connec-
ted to the b
attery.
● Never use a defective battery. This could
cause an e
xplosion. Replace a damaged bat-
tery immediately.
● For vehicles with the battery in the luggage
compar
tment: Check that the battery gas
ventilation hose is securely attached. CAUTION
● Never di s
connect the battery if the ignition
is switched on or if the engine is running. This could damage the electrical system or
electr
onic
components.
● Do not expose the battery to direct sunlight
over a lon
g period of time, as the intense ul-
traviolet radiation can damage the battery
housing.
● If the vehicle is left standing in cold condi-
tions f
or a long period, protect the battery
from “freezing”. If it freezes it will be dam-
aged. Warning lamp
It lights up
Alternator fault.
The control lamp
lights up when the igni-
tion i s
switched on. It should go out when the
engine has started running.
If the control lamp lights up while driving,
the alternator is no longer charging the bat-
tery. You should immediately drive to the
nearest specialised workshop.
You should avoid using electrical equipment
that is not absolutely necessary because this
will drain the battery.
208
Page 211 of 248

Checking and refilling levels
Checking the battery electrolyte level The electrolyte level should be checked regu-
larly
in high-mi
leage vehicles, in hot coun-
tries and in older batteries.
– Open the bonnet and open the battery cov-
er at the front
››› in safety notes for work
in the engine c omp
artment on page 198
››› in Symbols and warnings on handling
the batt er
y on page 208. For vehicles with
the battery under the spare wheel, open
the rear lid and lift the floor covering. The
battery is located next to the spare wheel.
– Check the colour display in the "magic eye"
on the top of the b
attery.
– If there are air bubbles in the window, tap
the window g
ently until they disperse.
The position of the battery is shown in the
corresponding engine compartment diagram
››› page 201. The location of the battery in
the luggage compartment can be seen in
››› Fig. 174.
The “magic eye” indicator, located on the top
of the battery changes colour, depending on
the charge state and electrolyte level of the
battery.
There are two different colours:
● Black: correct charge status.
● Transparent/clear yellow: the battery must
be repl
aced. Contact a specialised workshop. Charging or changing the battery The battery is maintenance-free and is
chec
k
ed during the inspection service. All
work on the vehicle battery requires special-
ist knowledge.
If you often drive short distances or if the ve-
hicle is not driven for long periods, the bat-
tery should be checked by a specialised
workshop between the scheduled services.
If the battery has discharged and you have
problems starting the vehicle, the battery
might be damaged. If this happens, we rec-
ommend you have the vehicle battery
checked by a Technical Service where it will
be re-charged or replaced.
Charging the battery
The vehicle battery should be charged by a
specialised workshop only, as batteries us-
ing special technology have been installed
and they must be charged in a controlled en-
vironment.
Replacing a vehicle battery
The battery has been developed to suit the
conditions of its location and has special
safety features.
Genuine SEAT batteries meet the mainte-
nance, performance and safety specifications
of your vehicle. WARNING
● We r ec
ommend you use only maintenance-
free or cycle free leak-proof batteries which
comply with standards T 825 06 and
VW 7 50 73. This standard applies as of
2001.
● Before starting any work on the batteries,
you mus
t read and observe the warnings
››› in Symbols and warnings on handling
the batt er
y on page 208. For the sake of the environment
Batteries contain toxic substances such as
su lphuric
acid and lead. They must be dis-
posed of appropriately and must not be dis-
posed of with ordinary household waste. 209
Technical data
Advice
Operation
Emergencies
Safety
Page 212 of 248

Advice
Wheels
Wheel s
and ty
res
General notes Avoiding damage
– If you have to drive over a kerb or similar
ob s
tacle, drive very slowly and at a right
angle.
– Keep grease, oil and fuel off the tyres.
– Inspect the tyres regularly for damage
(cuts, c r
acks or blisters, etc.). Remove any
foreign objects embedded in the treads.
Storing tyres
– When you remove the tyres, mark them in
order to m
aintain the same direction of ro-
tation when they are installed again.
– When removed, the wheels and/or tyres
should be s
tored in a cool, dry and prefera-
bly dark location.
– Store tyres in a vertical position, if they are
not fitted on wheel
rims.
New tyres
New tyres must be run in ›››
page 164.
The tread depth of new tyres may vary, ac-
cording to the type and make of tyre and the
tread pattern. Concealed damage
Damage t
o tyres and rims is often not readily
visible. If you notice unusual vibrations or the
vehicle pulling to one side, this may indicate
that one of the tyres is damaged. They
should be checked immediately by a Techni-
cal Service.
Tyres with directional tread pattern
An arrow on the tyre sidewall indicates the di-
rection of rotation on tyres with directional
tread. Always observe the direction of rota-
tion indicated when fitting the wheel. This
guarantees optimum grip and helps to avoid
aquaplaning, excessive noise and wear. WARNING
● New tyr e
s do not have maximum grip dur-
ing the first 500 km. Drive particularly care-
fully to avoid possible accidents.
● Never drive with damaged tyres. This may
cause an ac
cident.
● If you notice unusual vibrations or if the ve-
hicle p
ulls to one side when driving, stop the
vehicle immediately and check the tyres for
damage. Tyre pressure monitoring system
Fig. 176
Location of the tyre pressure sticker. The correct tyre pressure can be seen on the
s
tic
k
er on the inside of the fuel tank flap
››› Fig. 176.
1. Read the required tyre inflation pressure from the stic
ker. The values refer to Sum-
mer tyres.
2. The tyre pressures should only be checked when the tyre
s are cold. The slightly raised
pressures of warm tyres must not be re-
duced.
3. Adjust the tyre pressure to the load you are carr
ying.
210
Page 213 of 248

Wheels
Tyre pressure
The c orr
ect
tyre pressure is especially impor-
tant at high speeds. The pressure should
therefore be checked at least once a month
and before starting a journey.
Depending on the vehicle, tyre pressure can
be adjusted to medium load to improve driv-
ing comfort (“comfort” tyre pressure). When
driving with comfort tyre pressure fuel con-
sumption may increase slightly. WARNING
A tyre can easily burst if the pressure is too
low , c
ausing an accident!
● At continuously high speeds, a tyre with in-
sufficient
pressure flexes more. In this way it
becomes too hot, and this can cause tread
separation and tyre blow-out. Always observe
the recommended tyre pressures.
● If the tyre pressure is too low or too high,
the tyre
s will wear prematurely and the vehi-
cle will not handle well. Risk of accident! For the sake of the environment
Under-inflated tyres will increase fuel con-
sumption. Tyre useful life
Fig. 177
Tyre tread wear indicators. Fig. 178
Diagram for changing wheels The useful life of tyres is dependent on tyre
pr
e
s
sure, driving style and fitting.
Wear indicators
The original tyres on your vehicle have
1.6 mm high “tread wear indicators”
››› Fig. 177, running across the tread. De- pending on the make, there will be 6 to 8 of
them evenly
spaced around the tyre. Mark-
ings on the tyre sidewall (for instance the let-
ters “TWI” or other symbols) indicate the po-
sitions of the tread wear indicators. The mini-
mum tread depth required by law is 1.6 mm
(measured in the tread grooves next to the
tread wear indicators). Worn tyres must be re-
placed. Different figures may apply in export
countries ››› .
T y
r
e pressure
Incorrect tyre pressure causes premature
wear and could cause tyre blow-out. For this
reason, the tyre pressure should be checked
at least once per month ››› page 210.
Driving style
Fast cornering, heavy acceleration and hard
braking all increase tyre wear.
Changing wheels around
If the front tyres are worn considerably more
than the rear ones it is advisable to change
them around as shown ››› Fig. 178. The use-
ful life of all the tyres will then be about the
same time.
Wheel balance
The wheels on new vehicles are balanced.
However, various factors encountered in nor-
mal driving can cause them to become unbal-
anced, which results in steering vibration. »
211
Technical data
Advice
Operation
Emergencies
Safety
Page 214 of 248

Advice
Unbalanced wheels should be rebalanced, as
they other
w
ise cause excessive wear on
steering, suspension and tyres. A wheel must
also be rebalanced when a new tyre is fitted.
Incorrect wheel alignment
Incorrect running gear alignment causes ex-
cessive tyre wear, impairing the safety of the
vehicle. If tyres show excessive wear, you
should have the wheel alignment checked by
a Technical Service. WARNING
There is a serious danger of accidents if a tyre
bur s
ts during driving!
● The tyres must be replaced at the latest
when the trea
d wear indicators are worn
››› page 211. Failure to follow this instruction
could result in an accident. Worn tyres do not
grip well at high speeds on wet roads. There
is also a greater risk of “aquaplaning”.
● At continuously high speeds, a tyre with in-
sufficient
pressure flexes more. This causes it
to overheat. This can cause tread separation
and tyre blow-out. Risk of accident. Always
observe the recommended tyre pressures.
● If tyres show excessive wear, you should
have the ru
nning gear checked by a Technical
Service.
● Keep chemicals such as oil, fuel and brake
fluid awa
y from tyres.
● Damaged wheels and tyres must be re-
plac
ed immediately! For the sake of the environment
Under-inflated tyres will increase fuel con-
sumption. New tyres and wheels
New tyres and wheels have to be run in.
The tyr
e
s and wheel rims are an essential
part of the vehicle's design. Those approved
by SEAT are specially matched to the charac-
teristics of the vehicle and make a major con-
tribution to good road-holding and safe han-
dling ››› .
T y
r
es should be replaced at least in pairs and
not individually (i.e. both front tyres or both
rear tyres together). A knowledge of tyre des-
ignations makes it easier to choose the cor-
rect tyres. Radial tyres have the tyre designa-
tions marked on the sidewall, for example:
195/65 R15 91T
This contains the following information:
Tyre width in mm
Height/width ratio in %
Tyre construction: Radial
Rim diameter in inches
Load rating code
Speed rating
195
65
R
15
91
T The tyres could also have the following infor-
mation:
● A direction of
rotation symbol
● “Reinforced” denotes heavy-duty tyres.
The manufact
uring date is also indicated on
the tyre sidewall (possibly only on the inner
side of the wheel).
“DOT ... 1103 ...” means, for example, that
the tyre was produced in the 11th week of
2003.
We recommend that work on tyres and
wheels be carried out by a Technical Service.
They are familiar with the procedure and
have the necessary special tools and spare
parts as well as the proper facilities for dis-
posing of the old tyres.
Any technical service has full information on
the technical requirements when installing or
changing tyres, wheels or wheel trims. WARNING
● We r ec
ommend that you use only wheels
and tyres which have been approved by SEAT
for your model. Failure to do so could impair
vehicle handling. Risk of accident.
● Avoid running the vehicle on tyres that are
more than 6
years old. If you have no alterna-
tive, you should drive slowly and with extra
care at all times. 212
Page 215 of 248

Wheels
●
Never u se o
ld tyres or those with an un-
known “history of use”.
● If wheel trims are retrofitted, you must en-
sure th
at the flow of air to the brakes is not
restricted. This could cause the brake system
to overheat.
● All four wheels must be fitted with radial
tyre
s of the same type, size (rolling circumfer-
ence) and the same tread pattern. For the sake of the environment
Old tyres must be disposed of according to
the l aw
s in the country concerned. Note
● A S EA
T Service Centre should be consulted
to find out whether wheels or tyres of differ-
ent sizes to those originally fitted by SEAT
can be fitted, and to find out about the com-
binations allowed between the front axle
(axle 1) and the rear axle (axle 2).
● For technical reasons, it is not generally
poss
ible to use the wheels from other vehi-
cles. This can also apply to wheels of the
same model. The use of wheels or tyres
which have not been approved by SEAT for
use with your model may invalidate the vehi-
cle's type approval for use on public roads.
● If the spare tyre is not the same as the
tyre
s that are mounted on the vehicle (e.g.
winter tyres) you should only use the spare
tyre for a short period of time and drive with extra care. Refit the normal road wheel as
soon as
po
ssible. Wheel bolts
The design of wheel bolts is matched to the
rims. If diff
er
ent wheel rims are fitted, the
correct wheel bolts with the right length and
correctly shaped bolt heads must be used.
This ensures that wheels are fitted securely
and that the brake system functions correctly.
In certain circumstances, you should not use
wheel bolts from a different vehicle, even if it
is the same model ››› page 187. WARNING
If the wheel bolts are not tightened correctly,
the wheel c ou
ld become loose while driving.
Risk of accident.
● The wheel bolts must be clean and turn
eas
ily. Never apply grease or oil to them.
● Use only wheel bolts which belong to the
wheel.
● If the pr
escribed torque of the wheel bolts
is t
oo low, they could loosen whilst the vehi-
cle is in motion. Risk of accident! If the tight-
ening torque is too high, the wheel bolts and
threads can be damaged. CAUTION
The prescribed tightening torque for wheel
bolt s
for steel and alloy wheels is 120 Nm. Tyre pressure
Fig. 179
Centre console: tyre monitoring sys-
t em b
utt
on. The tyre monitoring lamp * c
omp
ar
es
wheel revolutions and with it, using the ESC,
the wheel diameter of each wheel. If the di-
ameter of a wheel changes, the tyre control
lamp lights up. The wheel diameter
changes when:
● Tyre pressure is insufficient.
● The tyre structure is damaged.
● The vehicle is unbalanced because of a
load. »
213
Technical data
Advice
Operation
Emergencies
Safety
Page 216 of 248
.
● The vehicle is fitted with snow chains.
● The temporary spare wheel is fitt")
Advice
● The wheel s
of
one axle are under more
pressure (for example, driving with a trailer or
on steep slopes).
● The vehicle is fitted with snow chains.
● The temporary spare wheel is fitted.
● The wheel on one axle is changed.
Tyr
e pressure adjustment
On adjusting tyre pressure or changing one
or more wheels, the ››› Fig. 179 button must
be kept pressed down, with the ignition on,
until an acoustic signal is heard.
Store the new tyre pressure in the Easy Con-
nect system with the button and the func-
tion b utt
on Set
up
› ›
›
page 24.
If the wheels are under excessive load (for ex-
ample, driving with a trailer or heavy load),
the tyre pressure must be increased to the
recommended value for a full load (see the
sticker on the inside of the fuel flap). If the
tyre monitor system button is pressed down,
the new tyre pressures are confirmed.
The tyre pressure control lamp lights up
If the tyre pressure of a wheel is much lower
than the value set by the driver, then the tyre
pressure control lamp ››› will light up.
WARNING
● When the tyr e pr
essure control lamp lights
up, reduce speed immediately and avoid any sudden turning or braking manoeuvre. Stop
when pos
s
ible, and check the tyre pressure
and status.
● The driver is responsible for maintaining
correct
tyre pressures. For this reason, tyre
pressure must be regularly checked.
● Under certain circumstances (e.g. when
driving in a s
porty manner, in winter condi-
tions or on a dirt track) the tyre control lamp
may light up belatedly or may function incor-
rectly. Note
If the battery is disconnected, the yellow
warnin g l
amp lights up after turning the
ignition on. This should turn off after a brief
journey. Winter service
W int
er ty
res In winter conditions winter tyres will consid-
er
ab
ly
improve the vehicle's handling. The
design of summer tyres (width, rubber com-
pound, tread pattern) gives less grip on ice
and snow.
Winter tyres must be inflated to a pressure of
0.2 bar (2.9 psi/20 kPa) higher than the pres-
sures specified for summer tyres (see sticker
on fuel tank flap). Winter tyres must be fitted on all four wheels.
Information on permitt
ed winter tyre sizes
can be found in the vehicle's registration
documentation. Use only radial winter tyres.
All tyre sizes listed in the vehicle documenta-
tion also apply to winter tyres.
Winter tyres lose their effectiveness when the
tread is worn down to a depth of 4 mm.
The speed rating code ››› page 212, New
tyres and wheels determines the following
speed limits for winter tyres: ››› max. 160 km/h (99 mph)
m
ax. 180 km/h (112 mph)
m ax. 190 km/h (118 mph)
m
ax. 210 km/h (130 mph)
In some countries, vehicles which can exceed
the speed rating of the fitted tyre must have
an appropriate sticker in the driver's field of
view. These stickers are available from your
technical service. The legal requirements of
each country must be followed.
Do not have winter tyres fitted for unnecessa-
rily long periods. Vehicles with summer tyres
handle better when the roads are free of
snow and ice.
If you have a flat tyre, please refer to the
notes on the spare wheel ››› page 212, New
tyres and wheels .
Q
S
T
H
214
 1
1 2
2 3
3 4
4 5
5 6
6 7
7 8
8 9
9 10
10 11
11 12
12 13
13 14
14 15
15 16
16 17
17 18
18 19
19 20
20 21
21 22
22 23
23 24
24 25
25 26
26 27
27 28
28 29
29 30
30 31
31 32
32 33
33 34
34 35
35 36
36 37
37 38
38 39
39 40
40 41
41 42
42 43
43 44
44 45
45 46
46 47
47 48
48 49
49 50
50 51
51 52
52 53
53 54
54 55
55 56
56 57
57 58
58 59
59 60
60 61
61 62
62 63
63 64
64 65
65 66
66 67
67 68
68 69
69 70
70 71
71 72
72 73
73 74
74 75
75 76
76 77
77 78
78 79
79 80
80 81
81 82
82 83
83 84
84 85
85 86
86 87
87 88
88 89
89 90
90 91
91 92
92 93
93 94
94 95
95 96
96 97
97 98
98 99
99 100
100 101
101 102
102 103
103 104
104 105
105 106
106 107
107 108
108 109
109 110
110 111
111 112
112 113
113 114
114 115
115 116
116 117
117 118
118 119
119 120
120 121
121 122
122 123
123 124
124 125
125 126
126 127
127 128
128 129
129 130
130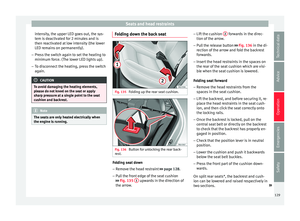 131
131 132
132 133
133 134
134 135
135 136
136 137
137 138
138 139
139 140
140 141
141 142
142 143
143 144
144 145
145 146
146 147
147 148
148 149
149 150
150 151
151 152
152 153
153 154
154 155
155 156
156 157
157 158
158 159
159 160
160 161
161 162
162 163
163 164
164 165
165 166
166 167
167 168
168 169
169 170
170 171
171 172
172 173
173 174
174 175
175 176
176 177
177 178
178 179
179 180
180 181
181 182
182 183
183 184
184 185
185 186
186 187
187 188
188 189
189 190
190 191
191 192
192 193
193 194
194 195
195 196
196 197
197 198
198 199
199 200
200 201
201 202
202 203
203 204
204 205
205 206
206 207
207 208
208 209
209 210
210 211
211 212
212 213
213 214
214 215
215 216
216 217
217 218
218 219
219 220
220 221
221 222
222 223
223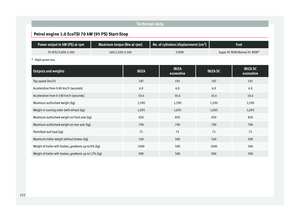 224
224 225
225 226
226 227
227 228
228 229
229 230
230 231
231 232
232 233
233 234
234 235
235 236
236 237
237 238
238 239
239 240
240 241
241 242
242 243
243 244
244 245
245 246
246 247
247