Page 25 of 248

The essentials
Interior lights Fig. 32
Detail of headliner: front interior light-
in g.KnobFunction
Switches interior lights off.
Switches interior lights on.
Switches door contact control on (central po-
sition).
The interior lights come on automatically
when the vehicle is unlocked, a door is
opened or the key is removed from the igni-
tion.
The lights go off a few seconds after all the
doors are closed, the vehicle is locked or the
ignition is switched on.
KnobFunction
Turning the reading light on and off
›››
page 122 Windscreen wipers and window wiper
bl
a
de Fig. 33
Operating the windscreen wiper and
r e
ar w
iper
More the lever to the required position:
0 Windscreen wiper off.
More the lever to the required position:
1
Windscreen wipers interval wipe.
Using the control
››› Fig. 33 A adjust the
interval (vehicles without rain sensor), or
the sensitivity of the rain sensor.
2 Slow wipe.
3
Continuous wipe.
4
Short wipe. Brief press, short clean. Hold
the lever down for more time to increase
the wipe frequency.
5
Automatic wipe. The windscreen washer
function is activated by pushing the lever
forwards, and simultaneously the wind-
screen wipers start.
6
Interval wipe for rear window. The wiper
will wipe the window approximately every
six seconds.
7
The rear window wash function is activa-
ted by pressing the lever, and the rear wip-
er starts simultaneously.
››› in Windscreen wipers on page 123
›››
page 123
››› page 54 23
Page 26 of 248
Fig. 34
Easy Connect: Main menu Fig. 35
Easy Connect: CAR menu To select the settings menus, press the Easy
C
onnect
button and")
The essentials
Easy Connect CAR menu settin g
s
(Setup)Fig. 34
Easy Connect: Main menu Fig. 35
Easy Connect: CAR menu To select the settings menus, press the Easy
C
onnect
button and the
Set
up function
b utt
on.
The act
ual number of menus available and
the name of the various options will depend
on the vehicle’s electronics and equipment.
● Switch the ignition on.
● If the Infotainment System is off, switch it
on. ●
Pres s the system's MENU button and then
the sy s
t
em's
› ››
Fig. 34
button or but-
t on t
o g
o to the CAR menu ››› Fig. 35.
● Press the function button Setup to open the
menu Vehicle settings › ›
›
Fig. 35.
● To select a function in the menu, press the
desir
ed button.
When you press the menu button, the last se-
lected menu will always be displayed. When the function button check box is activa-
ted
, the function is active.
Any changes made using the settings menus
are automatically saved on closing the BACK menus.
MenuSubmenuPossible settingDescription
ESC system–Activation of the Electronic Stability Programme (ESC)›››
page 152
TyresTyre pressure monitoringTyre pressure storing (Calibration)››› page 213
Winter tyresActivation and deactivation of the speed warning. Setting the speed warning value››› page 214 24
Page 27 of 248

The essentialsMenuSubmenuPossible settingDescription
Driver assistanceFatigue detectionActivation/deactivation›››
page 171
Parking and manoeu-
vringParkPilotAutomatically activate, front volume, front sound settings, rear volume, rear sound set-
tings, adjust volume››› page 173
Vehicle lights
Vehicle interior lightingInstrument and switch lighting, footrest lighting››› page 122
Coming home/Leaving home func‐
tionStart time for “Coming home” function, start time for “Leaving home” function››› page 119
Windscreen wipersWindscreen wipersAutomatic windscreen wipers, wipe when reversing››› page 23
Opening and closingRadio-operated remote controlConvenience open function››› page 116
Central locking systemUnlocking doors, automatic locking/unlocking, audible confirmation››› page 106
Multifunction display–
Current consumption, average consumption, volume to fill up, convenience consum-
ers, ECOAdvice, travelling time, distance travelled, digital speed display, average
speed, speeding warning, oil temperature, coolant temperature, restore data “from
start”, restore data “total calculation”
››› page 25
Date and time–Time source, set the time, automatic summer time (DST) setting, select time zone,
time format, set the date, date format–
Measurement units–Distance, speed, temperature, volume, consumption–
Service–Chassis number, date of next SEAT service inspection, date of next oil change service››› page 33
Factory settings–All settings can be reset: driver assistance, parking and manoeuvring, lights, rear view
mirrors, opening and closing, multi-function display–
››› in CAR menu (Setup) on page 100
›››
page 99 Driver information system
Intr oduction With the ignition switched on, it is possible
to r
e
ad the different functions of the display
by scrolling through the menus. In vehicles with multifunction steering wheel,
the multif
u
nction display can only be operat-
ed with the steering wheel buttons.
The number of menus displayed on the in-
strument panel will vary according to the ve-
hicle electronics and equipment. » 25
Page 28 of 248

The essentials
A specialised workshop will be able to pro-
gr amme or modif
y
additional functions, ac-
cording to the vehicle equipment. SEAT rec-
ommends visiting a SEAT Official Service.
Some menu options can only be read when
the vehicle is at a standstill.
As long as a priority 1 warning is displayed, it
will not be possible to read the menus. Some
warning messages can be confirmed and
made to disappear with the windscreen wiper
lever button or the multifunction steering
wheel button.
The information system also provides the fol-
lowing information and displays (depending
on the vehicle's equipment):
Driving data ››› page 29
■ Vehicle status
■ MFD from departure
■ MFD from refuelling
■ MFD total calculation
Assist systems ››› table on page 27
■ Reverse (optional)
Navigation ››› Booklet Navigation system
Audio ››› Booklet Radio or ››› Booklet Naviga-
tion system
Telephone ››› Booklet Radio or ››› Book-
let Navigation system
Vehicle ››› table on page 27 WARNING
Any distraction may lead to an accident, with
the risk of
injury.
● Do not operate the instrument panel con-
trol
s when driving. Operating the instrument panel me-
nus
Fig. 36
Windscreen wiper lever: control but-
t on
s. Fig. 37
Right side of multifunction steering
wheel: contr o
l buttons. The driver information system is controlled
w
ith the mu
ltif
unction steering wheel buttons
››› Fig. 37 or with the windscreen wiper lever
››› Fig. 36 (if the vehicle is not equipped with
multifunction steering wheel).
Enabling the main menu
● Switch the ignition on.
● If a message or vehicle pictogram appears,
pres
s button ››› Fig. 36 1 on the windscreen
w iper l
ev
er or button on the multifunction
s t
eerin
g wheel ››› Fig. 37.
● If managed from the windscreen wiper lev-
er: to dis
play the main screen ››› page 27 or
to return to the main menu from another
menu hold down the rocker button ››› Fig. 36
2 .
● If managed from the multifunction steering
whee l:
the main menu list is not displayed.
To go from point to point in the main menu, 26
Page 29 of 248

The essentials
press button
or
several times
› ›
›
Fig. 37.
Select a submenu ● Press the rocker switch ›››
Fig. 36 2 on the
w ind
s
creen wiper lever up or down or turn
the thumbwheel of the multifunction steering
wheel ››› Fig. 37 until the desired option ap-
pears marked on the menu.
● The selected option is displayed between
two horizont
al lines. In addition, a triangle is
displayed on the right:
● To consult the submenu option, press but-
ton ››
› Fig. 36 1 on the windscreen wiper
l ev
er or b
utton on the multifunction steer-
in g wheel
›
›› Fig. 37.
Making changes according to the menu ● Make the desired changes with the rocker
switc
h on the windscreen wiper lever or the
thumbwheel of the multifunction steering
wheel. To increase or decrease the values
more quickly, turn the thumbwheel faster.
● Mark or confirm the selection with button
›››
Fig. 36 1 on the windscreen wiper lever
or b utt
on on the multifunction steering
wheel
›
›
› Fig. 37. Menu
MenuFunction
Driving
dataInformation and possible configura-
tions of the multifunction display (MFD)
››› page 29, ››› page 99.
Assist
systemsInformation and possible configura-
tions of the driver assistance systems
››› page 99.
Navigation
Information instructions from the acti-
vated navigation system: when a route
guidance is activated, the turning ar-
rows and proximity bars are displayed.
The appearance is similar to the Easy
Connect system.
If route guidance is not activated, the
direction of travel (compass) and the
name of the street along which you are
driving are shown ››› Booklet Naviga-
tion system.
Audio
Station display on the radio.
Track name on the CD.
Track name in Media mode ››› Book-
let Radio or ››› Booklet Navigation sys-
tem.
Telephone
Information and possible configura-
tions of the mobile phone preinstalla-
tion ››› Booklet Radio or ››› Booklet Nav-
igation system.
Lap timer *
In a racing circuit, measurement and
memorisation of lap times by the vehi-
cle and comparison with previously
measured best times ››› page 31.
MenuFunction
Vehicle
statusDisplay of the current warning or infor-
mation texts and other system compo-
nents, depending on the equipment
››› page 99. Outside temperature display
When the outside temperature is below +4°C
(+39°F), the “ice c
r
ystal” symbol (warning of
risk of freezing) is also displayed. At first, this
symbol flashes and then it remains lit until
the outside temperature rises above +6°C
(+43°F) ››› in Indications on the display on
p ag
e 96
.
When the vehicle is at a standstill or when
travelling at very low speeds, the tempera-
ture displayed may be higher than the true
outside temperature as a result of the heat
produced by the engine.
The temperatures measured range from
-40°C to +50°C (-40°F to +122°F). 27
Page 30 of 248
. A gear change will be recommended if the
g
e
ar
you are in is not the most economical
cho")
The essentials
Gear-change indicator Fig. 38
Instrument panel: gear-change indica-
t or (m
anual
gearbox). A gear change will be recommended if the
g
e
ar
you are in is not the most economical
choice. If no gear-change is recommended, it
means that you are already in the most eco-
nomical gear.
Vehicles with a manual gearbox
The following display symbols ››› Fig. 38
mean:
● Chan ge to a higher gear: the suggested
g
ear appears to the right of the current gear
when a higher gear is recommended .
● Change to a lower gear: the suggested
g
ear appears to the left of the current gear
when a lower gear is recommended .
The gear recommendation may occasionally
skip a gear (2nd 4th). Vehicles with an automatic gearbox*
The dis
p
lay is only visible in tiptronic mode
››› page 161.
The following display symbols mean:
● Shiftin g up a gear
●
Shifting down a gear CAUTION
The gear-change indicator is intended to help
sav e f
uel, but it is not intended to recom-
mend the right gear for all driving situations.
In certain situations, only the driver can
choose the correct gear (for instance when
overtaking, driving up a steep gradient or
towing a trailer). Note
The display disappears from the instrument
panel when
you press the clutch pedal. Bonnet, rear lid and doors open
Fig. 39
A: bonnet open; B: rear lid open; C:
fr ont
l
eft door open; D: rear right door open
(5-door vehicles only). When the ignition is switched on or when
driv
in
g, the bonnet, r
ear lid or doors that are
open will be indicated on the instrument pan-
el display, and, as applicable, this will be in-
dicated audibly. The display may vary accord-
ing to the type of instrument panel fitted. 28
Page 31 of 248

The essentialsIllustra-
tionKey to ››› Fig. 39
A Do not continue driving!
The bonnet is open or is not properly
closed ››› page 198.
B Do not continue driving!
The rear lid is open or is not properly
closed ››› page 9.
C, D Do not continue driving!
A vehicle door is open or is not properly
closed ››› page 106. Warning and information messages
The system runs a check on certain compo-
nents
and f
u
nctions when the ignition is
switched on and while the vehicle is moving.
Faults in the operation are displayed on the
screen using red and yellow symbols and
messages on the instrument panel display
( ›››
page 98,
››› page 35) and, in
some cases, with audible warnings. The dis-
play may vary according to the type of instru-
ment panel fitted.
Priority 1 warning (red symbols)
Symbol flashing or lit; partly combined with audible
warnings.
Stop the vehicle! It is dangerous ››› in Warning
symbols on page 99!
Check the function that is faulty and repair it. If necessa-
ry, request assistance from specialised personnel.
Priority 2 warning (yellow symbols)
Symbol flashing or lit; partly combined with audible
warnings.
A faulty function, or fluids which are below the correct
levels may cause damage to the vehicle! ›››
in Warn-
ing symbols on page 99
Check the faulty function as soon as possible. If neces-
sary, request assistance from specialised personnel.
Informative text
Information relating to different vehicle processes. Assist systems submenu
Assist
systems
menuFunction
Fatigue de-
tection *Switching the fatigue detection on
or off (pause recommendation)
››› page 171. Journey data
M emor y The MFD (multifunction display) shows differ-
ent
v
alues for the journey and the consump-
tion. Changing between display modes on the
MFD
● In vehicles without multifunction steering
wheel:
Press the rocker switch on the
w ind
s
creen wiper lever ››› Fig. 36.
● Vehicles with a multifunction steering
wheel:
turn the thumbwheel ››› Fig. 37.
Multifunction display memory
The multifunction display is equipped with
three memories that work automatically: MFD
from departure, MFD from refuelling and MFD
total calculation. On the screen display, you
can read which memory is currently dis-
played.
Toggle between memories with the ignition
on and the memory displayed
Press the button on the windscreen
w iper l
ev
er or the button of the multifunc-
tion s t
eerin
g wheel. » 29
Page 32 of 248

The essentialsMenuFunction
MFD from de-
parture
Display and storage of the values for
the journey and the consumption
from when the ignition is switched
on to when it is switched off.
If the journey is continued in less
than 2 hours after the ignition is
switched off, the new data is added
to the data already stored in the
memory. The memory will automati-
cally be deleted if the journey is in-
terrupted for more than 2 hours.
MFD from re- fuellingDisplay and storage of the values for
the journey and the consumption.
By refuelling, the memory will be
erased automatically.
MFD total
calculation
The memory records the values for a
specific number of partial trips, up
to a total of 19 hours and 59 mi-
nutes or 99 hours and 59 minutes,
or 1999.9 km or 9999 km, depend-
ing on the model of instrument pan-
el. On reaching either of these lim-
its a)
, the memory is automatically
erased and starts to count from 0
again.
a) It varies according to the instrument panel version.
Erasing a memory manually
● Select the memory that you wish to erase.
● Hold the button of the multifunction
s t
eerin
g wheel or the button of the multi-
f u
nction wheel
pressed down for about 2 sec-
onds. Personalising the displays
In the Easy
Connect system you can adjust
which of the possible displays of the MFD can
be shown on the instrument panel display
with the button and the function button
Set up
› ››
p
age 99.
Dat
a summary
MenuFunction
Current fuel
consumption
The current fuel consumption dis-
play operates throughout the
journey, in litres/100 km; and
with the engine running and the
vehicle stopped, in litres/hour.
Average fuel consumption
After turning on the ignition, aver-
age fuel consumption in li-
tres/100 km will be displayed af-
ter travelling about 100 metres.
Otherwise horizontal lines are
displayed. The value shown is up-
dated approximately every 5 sec-
onds.
ACT ®
*: Depending on the equip-
ment, number of active cylinders.
Operating range
Approximate distance in km that
can still be travelled with the fuel
remaining in the tank, assuming
the same style of driving is main-
tained. This is calculated using
the current fuel consumption.
MenuFunction
Travelling
timeThis indicates the hours (h) and
minutes (min) since the ignition
was switched on.
Distance cov- eredDistance covered in km (m) after
switching on the ignition.
Average speed
The average speed will be shown
after a distance of about 100 me-
tres has been travelled. Otherwise
horizontal lines are displayed.
The value shown is updated ap-
proximately every 5 seconds.
Digital dis- play of speedCurrent speed displayed in digital
format.
Speed warning
at --- km/h or
Speed warning
at --- mphIf the stored speed is exceeded
(between 30 - 250 km/h, or 19 -
155 mph), an audible warning is
given together with a visual warn-
ing.
Oil tempera-
tureUpdated engine oil temperature
digital display
Coolant tem-
perature gaugeDigital display of the current tem-
perature of the liquid coolant. Storing a speed with the speed warning
● Select the display Speed warning at
--- km/h (---
mph)
● Press the button
on the windscreen
w iper l
ev
er or the button on the multifunc-
tion s t
eerin
g wheel to store the current speed
and activate the warning. 30
 1
1 2
2 3
3 4
4 5
5 6
6 7
7 8
8 9
9 10
10 11
11 12
12 13
13 14
14 15
15 16
16 17
17 18
18 19
19 20
20 21
21 22
22 23
23 24
24 25
25 26
26 27
27 28
28 29
29 30
30 31
31 32
32 33
33 34
34 35
35 36
36 37
37 38
38 39
39 40
40 41
41 42
42 43
43 44
44 45
45 46
46 47
47 48
48 49
49 50
50 51
51 52
52 53
53 54
54 55
55 56
56 57
57 58
58 59
59 60
60 61
61 62
62 63
63 64
64 65
65 66
66 67
67 68
68 69
69 70
70 71
71 72
72 73
73 74
74 75
75 76
76 77
77 78
78 79
79 80
80 81
81 82
82 83
83 84
84 85
85 86
86 87
87 88
88 89
89 90
90 91
91 92
92 93
93 94
94 95
95 96
96 97
97 98
98 99
99 100
100 101
101 102
102 103
103 104
104 105
105 106
106 107
107 108
108 109
109 110
110 111
111 112
112 113
113 114
114 115
115 116
116 117
117 118
118 119
119 120
120 121
121 122
122 123
123 124
124 125
125 126
126 127
127 128
128 129
129 130
130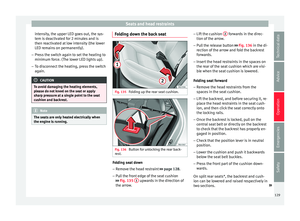 131
131 132
132 133
133 134
134 135
135 136
136 137
137 138
138 139
139 140
140 141
141 142
142 143
143 144
144 145
145 146
146 147
147 148
148 149
149 150
150 151
151 152
152 153
153 154
154 155
155 156
156 157
157 158
158 159
159 160
160 161
161 162
162 163
163 164
164 165
165 166
166 167
167 168
168 169
169 170
170 171
171 172
172 173
173 174
174 175
175 176
176 177
177 178
178 179
179 180
180 181
181 182
182 183
183 184
184 185
185 186
186 187
187 188
188 189
189 190
190 191
191 192
192 193
193 194
194 195
195 196
196 197
197 198
198 199
199 200
200 201
201 202
202 203
203 204
204 205
205 206
206 207
207 208
208 209
209 210
210 211
211 212
212 213
213 214
214 215
215 216
216 217
217 218
218 219
219 220
220 221
221 222
222 223
223 224
224 225
225 226
226 227
227 228
228 229
229 230
230 231
231 232
232 233
233 234
234 235
235 236
236 237
237 238
238 239
239 240
240 241
241 242
242 243
243 244
244 245
245 246
246 247
247